Blog
All Blog Posts | Next Post | Previous Post

 TMS WEB Core TWebDataGrid and XData, a powerful combination
Thursday, November 13, 2025
When you create business applications for the web you need powerful & intuitive tools to show, filter, sort and work on data typically managed by a relational database. You'll be surprised how easily this can be done using TMS WEB Core (available for Delphi as well as the free cross-platform Visual Studio Code IDE) and TMS XData resulting in an application that looks like this:

The classic example of a sort of small business application benchmark for years is the Microsoft Northwind example and you wanted a simple web based application to keep track of everything from customers, orders, products to suppliers. You might have a legacy database that has a schema similar to the following:
The diagram above (by the way) was generated using TMS Data Modeler. It can be licensed stand-alone or comes bundle with TMS BIZ Premium or TMS ALL-ACCESS. You can do everything from reverse engineering existing databases, generating Aurelius code to creating entity relationship diagrams like the one above.
Let's first examine how a proposed system can potentially work. There will be two main parts: the server, and the client. The server application will be responsible for reading and writing to a database backend while accepting requests from the client. The client application runs on the web browser and requests information from the server to be displayed to the end-user.
In this blog, we will examine how a simple TMS XData server for the back-end along with a TMS WEB Core client for the front-end can be build to serve this purpose.
The Server Application
For those of you who are already familiar with XData servers, feel free to skip ahead to the client part. In this example, we have created a server application called the XDataNorthwindServer using XData, Aurelius, Sparkle, and FireDac. Assuming you're not that familiar with what they are, here is a summary:
- XData – is a data access protocol similar to OData that allows you to perform a series of data requests to retrieve and/or manipulate data on the server.
- Aurelius – is an ORM (Object-Relational Mapping) framework that allow you to quickly describe the schema of a database using Delphi / Object Pascal.
- Sparkle – is a simple web server that runs on Windows to allow web browsers to make requests to it through HTTP (Hypertext Transfer Protocol).
- FireDac – is a set of Data Access Components that can used to simplify data access to various databases such as Oracle, Microsoft SQL Server, MySQL / Maria DB, PostgreSQL, SQLite, and others.
XData, Aurelius, and Sparkle are provided by us and they are all bundled with the BIZ Premium subscription along with TMS ALL-ACCESS. FireDac is provided by Embarcadero and comes with most versions of Delphi, CBuilder, and/or RAD Studio. The Microsoft Public Licensed Northwind database we are using that has been provided with Embarcadero's development tools shall be used in this example. Your server application may vary depending on your business needs.
If you are familiar with the components mentioned above, you may be curious why we are using FireDac. We are using FireDac because Embarcadero provides the SQL schema along with CSV data for Northwind to populate the SQLite database. SQLite was chosen to simplify the set up process as the drivers for it has been included with both FireDac as well as Aurelius. Normally, if you are using either SQLite and/or Microsoft SQL Server, you may not even need to use FireDac as Aurelius already comes bundled with both SQLite and Microsoft SQL Server drivers natively. However since developing a CSV data loader for the Northwind database would take longer and Embarcadero already provides working examples of how to create and populate the SQLite database using FireDac, we are using the components along with the scripts and data provided by Embarcadero in the XDataNorthwindServer example.
The Northwind sample database is a well-known sample database that was made available since the 1990's by Microsoft. Because of it popularity, the TMS Data Modeler also comes with the Northwind data model (northwind.dgp) that describes the same Northwind sample database. When you are creating your own XData server, you will likely need to either import from an existing database or design a new one from scratch. To save time, we are using the Northwind data model provided instead of creating a custom model from scratch. This model was made for Microsoft SQL Server, and since we're using SQLite, some of the TBlob fields that are generated by default were changed to Nullable<string> because they should be displayed as strings and should not be treated as BLOBs. When exporting to TMS Aurelius classes, don't forget to check off Register Entities otherwise, the entities won't show up in the XData Server. The TMS Data Modeler generated Pascal Unit is all that you need to tell Aurelius how to create the database, then read from and write to it.

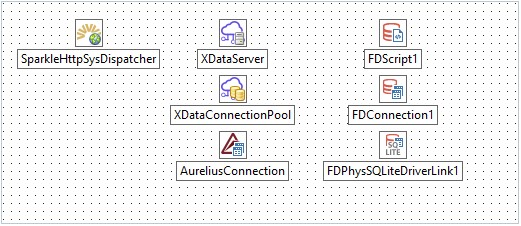
Once generated, the NorthWindEntities.pas file can be added to our server project directly. Because we selected the Register Entities option above, no other code is required to make code available to the server. To follow best practices from TMS, a Data Module is used to separate the server code from the Delphi Form. This Data Module Unit called uServerContainer.pas has a number of non-visual components added to it. Please see the following screenshot:
The main form appears like the following:
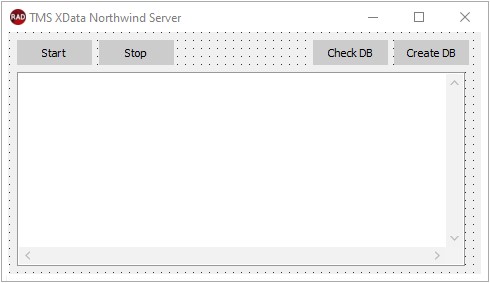
Beside the obvious "Start" and "Stop" buttons to start and stop the web server, the "Create DB" button is used to create the SQLite database file from scratch along with populating it with the CSV data provided by Embarcadero. The "Check DB" button calls the Aurelius database manager to ValidateDatabase.
The server container's initialization code looks like the following:
constructor TServerContainer.Create(AOwner: TComponent);
begin
  inherited;

  // Configure the database connection
  with FDConnection1 do
  begin
    DriverName := 'SQLITE';
    Params.Values['DriverID'] := 'SQLite';
    Params.Values['Database'] := 'northwind.db';
  end;

  // Configure the XData server's EntitySetPermissions
  with XDataServer do
  begin
    EnableEntityKeyAsSegment := True;

    DefaultEntitySetPermissions := [
      TEntitySetPermission.List,
      TEntitySetPermission.Get,
      TEntitySetPermission.Insert,
      TEntitySetPermission.Modify,
      TEntitySetPermission.Delete
      ];

    BaseUrl := 'http://+:2001/tms/northwind';
    Dispatcher := SparkleHttpSysDispatcher;
    Pool := XDataConnectionPool;
    SwaggerOptions.Enabled := True;
    SwaggerUIOptions.Enabled := True;
    SwaggerUIOptions.ShowFilter := True;
    SwaggerUIOptions.DisplayOperationId := True;
    SwaggerUIOptions.TryItOutEnabled := True;
    OnModuleCreate := XDataServerModuleCreate;

  end;

  // Configure the XData connection pool
  XDataConnectionPool.Connection := AureliusConnection;

  // Configure the Aurelius connection
  with AureliusConnection do
  begin
    AdapterName := 'FireDac';
    AdaptedConnection := FDConnection1;
    SQLDialect := 'SqliteEx';
  end;


  // Set up the SparkleHttpSysDispatcher
  with SparkleHttpSysDispatcher do
  begin
    Active := True;
  end;

end;
There isn't much to it given that TMS XData has handled almost all of the heavy lifting and the code required for CRUD (Create, Read, Update, and Delete) operations to interact with the database. It does so via the AureliusConnection, which means you can create additional custom API functions also using Aurelius.
Say the NorthWind company have a customer who always orders the same products every time, you can easily create a function that uses Aurelius to query the TProducts for the order then populate a new TOrders object to create the new order (using the classes in the NorthWindEntities.pas created earlier). Since all the database tables and fields have been predefined and generated as Aurelius classes and properties respectively, the use of code completion means you don't even have to look up the proper spelling or capitalization of your field names. Although not shown in this example, you can also leverage the TMS Data Modeler's ability to generate Dictionaries which are used for making Aurelius queries. By using dictionaries, you can even make your database queries type strict meaning that if your data model changes, the Delphi / Object Pascal compiler will tell you that there is a name mismatch before it becomes a bug in your software. When you're done coding this new function, it can then be exported through the XData server and called as a REST API by the client application running in the browser. This way, you can create, build, and debug web enabled business applications quite rapidly – in some instances even more rapidly than competing products because of the speed of the Delphi / Object Pascal compiler along with its debugger capabilities.
One customization that we needed to do at the time of writing is that we need the ability for the XData server to handle row insertion with DEFAULT VALUES. At present, the Aurelius SQL generation process does not allow POST operations with an empty JSON object {} and raises an assertion error if you tried. So we must override this by creating our own SQL generator. Luckily, because Aurelius was designed with flexibility in mind, it can easily be customized with the following class:
TSQLiteSQLGeneratorEx = class(TSQLiteSQLGenerator)
protected
  function GetGeneratorName: string; override;
  function GetSqlDialect: string; override;
public
  constructor Create; reintroduce;
  function GenerateInsert(Command: TInsertCommand): string; override;
end;
To use this class, we must register the TSQLiteSQLGeneratorEx class with the following under the initialization section of your code:
initialization
  // Register our SQLite generator extenion
  TSQLGeneratorRegister.GetInstance.RegisterGenerator(TSQLiteSQLGeneratorEx.Create);
  TSchemaImporterRegister.GetInstance.RegisterImporter('SQLiteEx', TSQLiteSchemaImporter.Create);
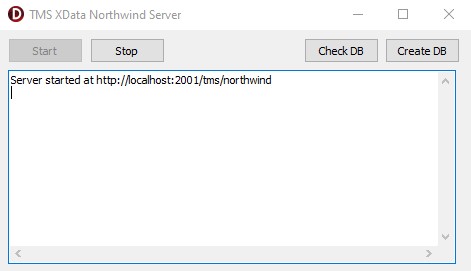
Please feel free to examine the example code to get a better understanding of how this works. The example server code for XDataNorthwindServer can be found in the latest version of the TMS WEB Core or a separate download link is at the end of this blog. You should be able to just open the example project, compile it, then run it. It should appear as follow:
The first time you run this server application, you will need to create the database. Just click on the "Create DB" button and look for any errors. The example server should run through the SQL scripts along with importing the CSV data files assuming that all paths in the provided example project stays the same. Otherwise, you may have to modify your code slightly to change the referenced paths for the SQL files along with the CSV files.
The server is now ready for use. You should be able to start a browser, then copy and paste the URL (http://localhost:2001/tms/northwind) from this XData server application then paste it into your favorite browser's URL to load the list of entities (a.k.a. database tables) available through your XData server. It should be returned as a JSON string.
For production use you will (at minimum) need to add the ability to authenticate users along with using HTTPS. Sparkle is your underlying web server for your XData server application. It can be configured to operate as a Http.Sys, Apache module, Indy component, or in-process based server. They can all be either configured to support HTTPS or you can use an HTTPS reverse proxy such as NGINX or the IIS server with additional modules to simplify to achieve the same, depending on your needs. How this can be achieved is beyond the scope of this blog. But if you are interested in doing so, just make a quick request to TMS Software and we would be happy to show you how. In the meantime, feel free to read about how Sparkle handles requests (here https://doc.tmssoftware.com/biz/sparkle/guide/server.html).
The Client Application
Creating a TMS WEB Core client application to connect to your XData is relatively easy If you are like me, you would probably be spending a lot more time tweaking your CSS to make every look right than actually coding. The main form of the application is a pretty simple and appears as follows:
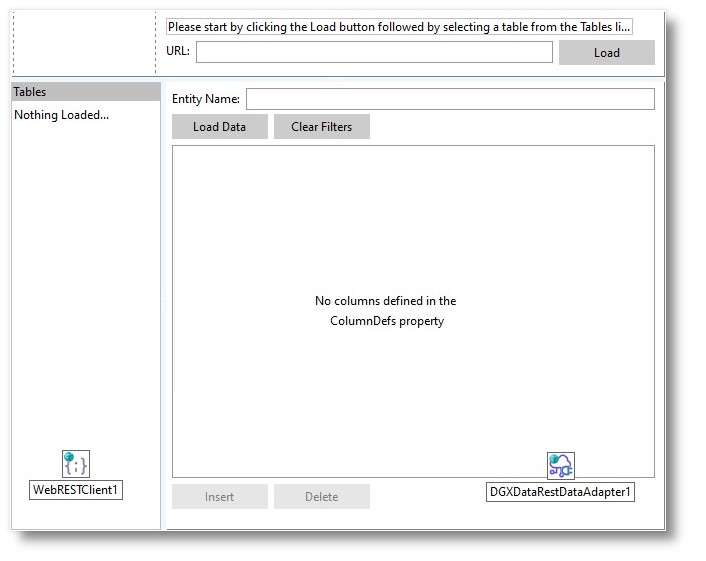
In this client application, we want it to load a list of available tables from the XData example application server from above. It should then populate the TWebListControl that currently say "Nothing Loaded…". The user can then select one of the available tables, and its data will be displayed in the TWebDataGrid on the right. Depending on the column type, the user has the ability to modify the data which immediately updates the server to modify the data in the SQLite database. The "Insert" button calls the DGXDataRestDataAdapter1 which in turn creates a POST request to the XData server to create a blank record – this is where the TSQLiteSQLGeneratorEx is needed. The "Delete” button calls the DGXDataRestDataAdapter1 which in turn creates a DELETE request to the XData server to delete the currently selected record.
The "star of the show" here, being the TWebDataGrid, is capable of displaying your data quickly by loading your data a page at a time using a ServerDataAdapter. The ServerDataAdapter in this case is the TDGXDataRestDataAdapter which allows the grid to make XData REST API calls directly to your XData server mentioned earlier in this blog. (Note that we have a specific adapter TDGStellarRestDataAdapter tailored to our StellarDS.io cloud database as well and it is covered in this article) Since the form above doesn't look very appealing when compared to modern day web applications, we are going to use the Bootstrap CSS to make it look more professional. Although you can technically configure everything for each component within the Object Inspector, we are providing some coding to make our customization more obvious. In order to configure all the visual components to work with Bootstrap, the following code is needed:
procedure TForm1.WebFormCreate(Sender: TObject);
begin
  edtURL.Text := 'http://localhost:2001/tms/northwind';
  DGXDataRestDataAdapter1.UseSwaggerForSchema := False;

  // Set form up for Bootstrap
  WebListControl1.ElementClassName := 'list-group';
  btnLoadData.ElementClassName := 'btn btn-outline-primary btn-sm';
  btnInsert.ElementClassName := btnLoadData.ElementClassName;
  btnDelete.ElementClassName := btnLoadData.ElementClassName;
  btnClearFilters.ElementClassName := btnLoadData.ElementClassName;
  btnLoad.ElementClassName := btnLoadData.ElementClassName;
  edtURL.ElementClassName := 'form-control';
  edtEntityName.ElementClassName := edtURL.ElementClassName;

  WebAccordion1.ElementClassName := 'custom-scroller';
end;

procedure TForm1.WebListControl1GetItemClass(Sender: TObject; AItem: TListItem;
  var AClassName: string);
begin
  // Set the class name to Bootstrap list group item
  AClassName := 'list-group-item d-flex justify-content-between align-items-center list-group-item-action';
end;
Notice that we are prepopulating the edtURL with the URL of the XData server above. Your URL may be different, so please change it accordingly. The property UseSwaggerForSchema can be set to either True or False depending of whether you would like to use Swagger for the database schema retrieval. Please keep in mind the Swagger needs to be enabled on your XData server in order for you to use Swagger. For more information about Swagger, please visit (https://swagger.io/). The rest of the code helps assign the class name of the web components to use Bootstrap.
Beyond that, when the user clicks the btnLoad button, we need to call the XData server and load the list of available entities / table names. This can be done using a TWebRESTClient component. The code is as follow:
procedure TForm1.btnLoadClick(Sender: TObject);
begin
  WebRESTClient1.HttpsGet(edtURL.Text);
end;

procedure TForm1.WebRESTClient1RequestResponse(Sender: TObject;
  ARequest: TJSXMLHttpRequestRecord; AResponse: string);
var
  Response: TCustomXDataResponse;
  Entry: TCustomXDataResponseEntry;
  I: Integer;
begin
  Response := TCustomXDataResponse(Pointer(TJSJSON.parse(AResponse)));

  if _typeof(Response) = 'object' then
  begin
    // Sort the response value array
    TArrayHelper<TCustomXDataResponseEntry>.Sort(Response.value,
        TComparer<TCustomXDataResponseEntry>.Construct(
        function(const Left, Right: TCustomXDataResponseEntry): Integer
        begin
          Result := 0;
          if (Left <> nil) and
             (_typeof(Left) = 'object') and
             (_typeof(Left.name) = 'string') and
             (Right <> nil) and
             (_typeof(Right) = 'object') and
             (_typeof(Right.name) = 'string') then
          begin
            if Left.name > Right.name then
              Result := 1
            else if Left.name < Right.name then
              Result := -1;
          end;
        end
      )
    );

    // Loop through the XData list of entities and add
    // them to the list
    WebListControl1.Items.Clear;
    for I := 0 to Length(Response.value) - 1 do
    begin
      Entry := Response.value[I];
      with WebListControl1.Items.Add do
      begin
        Text := Entry.name;
        Link := '';   // The Link must be empty, otherwise TWebListControl would fail
      end;
    end;

    ExpandAccordion;
  end
  else
    raise Exception.Create('Error: Invalid response - [' + AResponse + ']');
end;
After the TWebListControl list is populated with the entity / table names, and when the user clicks on an entry, it calls an event handler:
procedure TForm1.WebListControl1ItemClick(Sender: TObject;
  AListItem: TListItem);
begin
  if AListItem.Text <> '' then
  begin
    edtEntityName.Text := AListItem.Text;
    btnLoadDataClick(Sender);
  end;
end;
The item click event handler checks to make sure the item selected has a Text value, assigns it to the edtEntityName then calls btnLoadDataClick as if the "Load Data" button is pressed to load the data.
procedure TForm1.btnLoadDataClick(Sender: TObject);
begin
  SetConfiguration;
  WebDataGrid1.ColumnDefs.Clear;
  WebDataGrid1.RefreshGrid;
end;

procedure TForm1.SetConfiguration;
begin
  DGXDataRestDataAdapter1.URL := edtURL.Text;
  DGXDataRestDataAdapter1.EntityName := edtEntityName.Text;
  btnInsert.Enabled := True;
end;
The btnLoadDataClick handler sets the configuration for the DGXDataRestDataAdapter1 and enables the "Insert" button. It then clears any existing column definitions and refreshes the grid. Since the TWebDataGrid is connected to a ServerDataAdapter, calling the .RefreshGrid will cause the WebDataGrid1 to automatically fetch the necessary data using the DGXDataRestDataAdapter1. Any end-user interaction with the data grid will automatically call the XData server via the TDGXDataRestDataAdapter data adapter.
And just like that, you now have a working TMS WEB Core driven web application that is easy to use and potentially scalable. At this point, it won't look like much as we haven't added the reference to Bootstrap and we have not finished styling it yet:
To make Bootstrap work, you can simply make a reference to it. We have incorporated the minimized Bootstrap file into the example client application project so it has less dependencies. Since we have already initialized the component element classes earlier, all that's left for us to do is to add one line to Project1.html to make Bootstrap work:
<link href="css/bootstrap.min.css" rel="stylesheet"/>
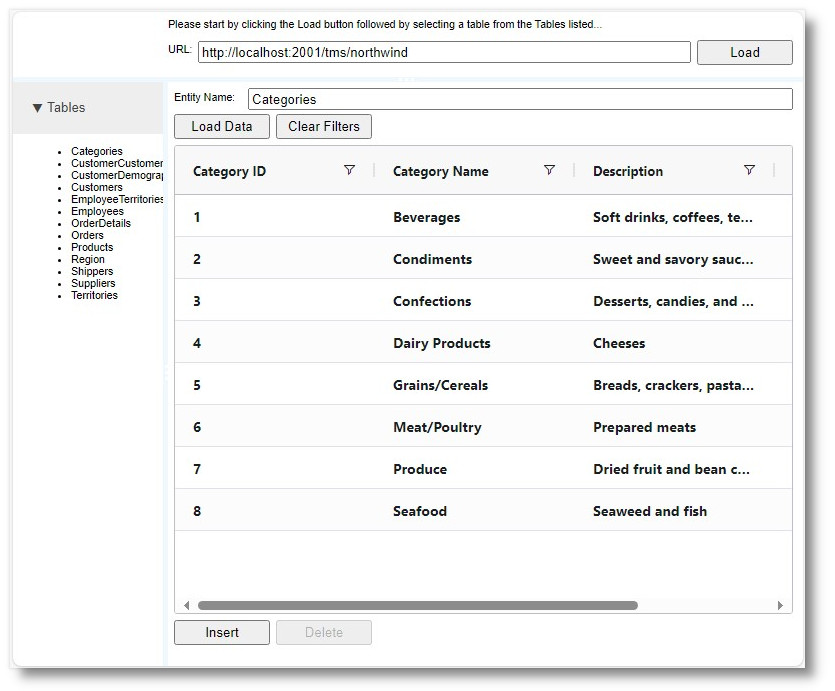
From this point on you can spend more time modifying the CSS and tweaking the classes for a better result. But once you spend a bit of time correcting minor layout and color issues like we have in Unit1.html, the result application becomes a lot more presentable:
The functionality of the TWebDataGrid offers you a host of features to manage your data. Within a single line of extra coding, you can already customize the grid by resizing and reordering the columns:

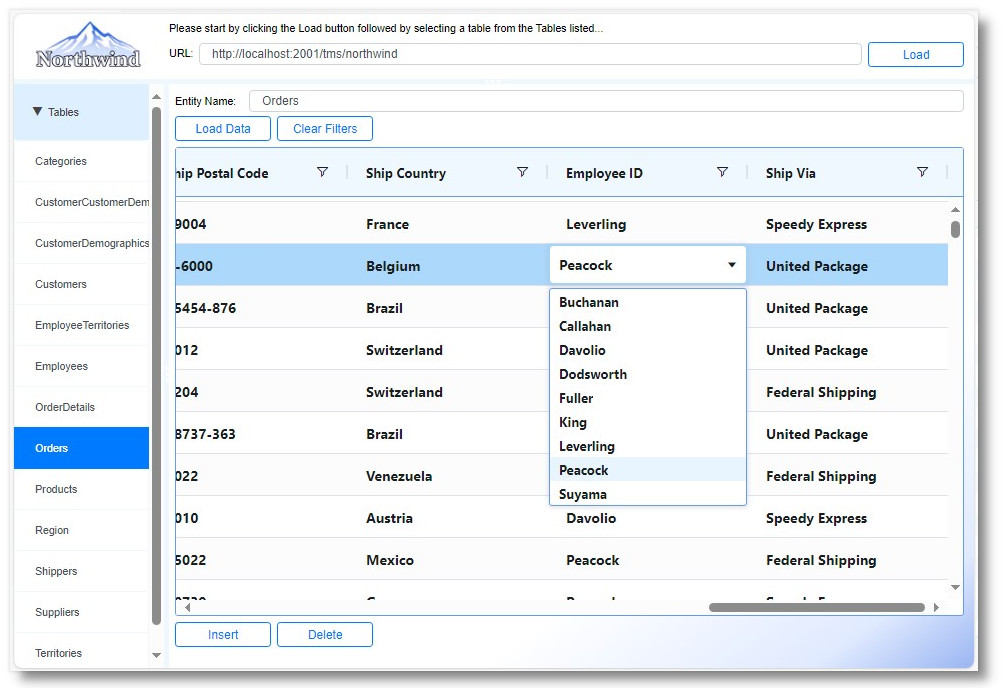
Although the TWebDataGrid is fully capable of performing client-side sorting and filtering, when connected to a ServerDataAdapter as in this example, the TWebDataGrid automatically leverages the use of the XData REST API data adapter to call the server for such operations. Client-side sorting and filtering is where the grid loads all the data at the same time then performs sorting and filtering on it all within the browser. In this example however, server-side sorting and filtering is used instead where the browser calls the XData server to perform such operations.
Sorting can be done by clicking on the column header name. Subsequent clicks on the column header name will cycle between the three modes: ascending, descending, and no sorting:

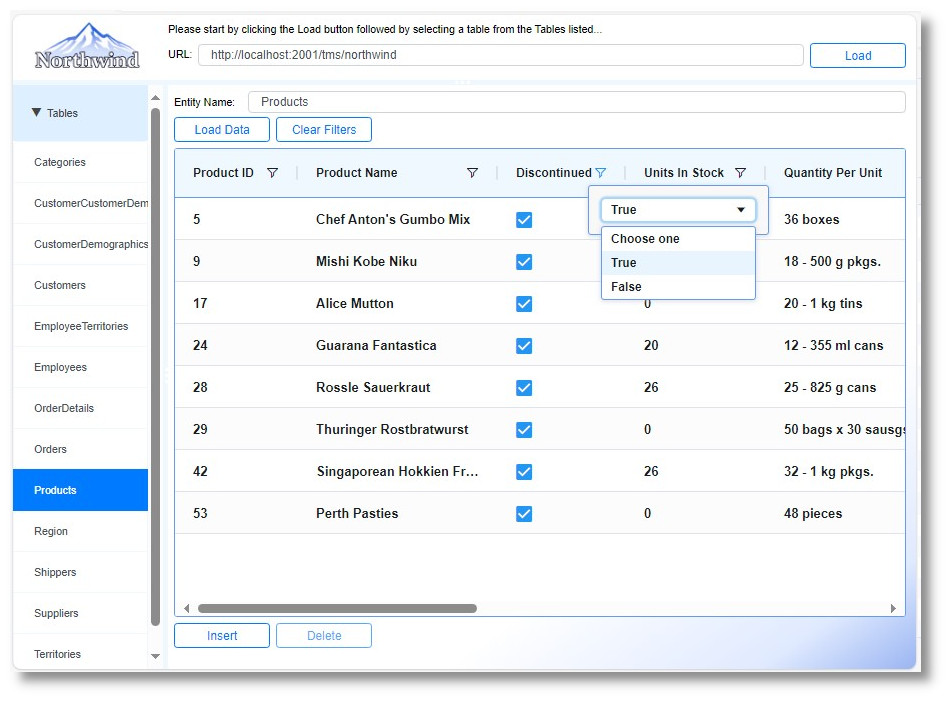
Filtering can be done by clicking on the filter icon (small funnel) to the right of every column name. Depending on the column type, different types of filtering popup options should appear like the following:
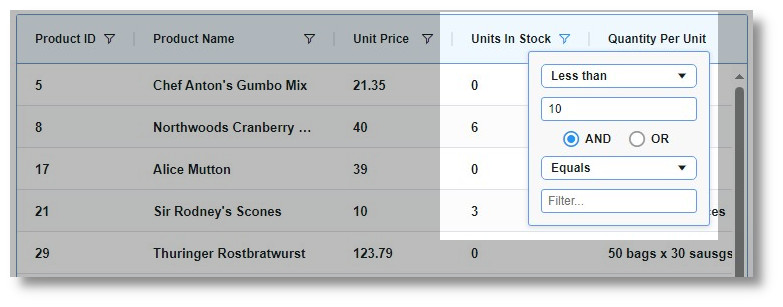
Looking at this Northwind example from a business standpoint, you can now query all of the discontinued products within the Northwind database to see how many you have left in stock – all without extra coding. Simply resize and reorder the columns based on relevance, and click the filter icon to set the filtering parameter as follow:
Although it is outside the scope of this blog and the XDataNorthwind example, it is possible to save the customized column states so when you return to the same view, the same column widths, column order, etc. persists.
As you can see, you can create web based database applications quickly and easily using TMS WEB Core along with XData and Aurelius.
You can download the full source code of this example TMS XData back-end server and the TMS WEB Core or TMS WEB Core for Visual Studio Code front-end app here:
You can download the full source code of this example TMS XData back-end server and the TMS WEB Core or TMS WEB Core for Visual Studio Code front-end app here:

Please feel free to modify them to suit your business needs and create a head-start for leveraging the power of Delphi, XData and TMS WEB Core to deliver your customers no-deploy web application that run on any operating system or device!
Albert Chau / Bruno Fierens
Bruno Fierens

This blog post has received 3 comments.
 2. Thursday, November 20, 2025 at 8:55:57 AM
Do you have more details about what exactly you experience?
2. Thursday, November 20, 2025 at 8:55:57 AM
Do you have more details about what exactly you experience?The default behavior is that the date format adapts automatically to the browser regional settings.
So, for users with a US settings, the date format would be MM-DD-YYYY and we tested it here with Italian regional settings where the date format is dd/mm/yyyy and this also works.
So, it is unclear what exact kind of problem you experience. Please contact us via email with sufficiently detailed description of the problem with which we can reproduce a problem and investigate.
Bruno Fierens
3. Wednesday, January 7, 2026 at 2:25:01 PM
How add Button in coluna?
Alberto
All Blog Posts | Next Post | Previous Post
GIORGIO BARTOLOMEO