Blog
All Blog Posts | Next Post | Previous Post

 TMS WEB Core and More with Andrew:
Working with Home Assistant - Part 9: Scenes
Tuesday, May 30, 2023

In this latest installment of our ongoing series on Home Assistant and our TMS WEB Core and Miletus framework project, Catheedral, we're going to have a look at how to manage scenes within our
app. While we can use this to control groups of devices in Home Assistant, we can also use that support to reach
even further, all the way into HomeKit, Apple's home automation environment. This makes controlling our home
environment a much simpler affair. It also helps to provide a level of consistency between our app and the kinds
of commands we might give our phone-based voice assistants, like Siri
Home Assistant Scenes.
Like many other home automation ecosystems, the concept of a scene in Home Assistant revolves around the idea of setting a collection of devices to a certain state. A "good morning" scene might turn on the kitchen lights to a particular brightness, open the blinds, and turn on the coffee maker. A "good night" scene might turn off all the lights, lock the doors, and turn down the thermostat. By having multiple scenes, each configured for a specific room, time of day, or even a specific activity (It's Showtime!), a lot of the drudgery of using smart devices evaporates.
It is often easy to control scenes using voice assistants, like Siri. And there's an entire device category of "scene controllers" - wireless buttons or even in-wall switches that can instantly trigger a scene just as easily as a light switch. And often easier - you don't need to even get off the couch!
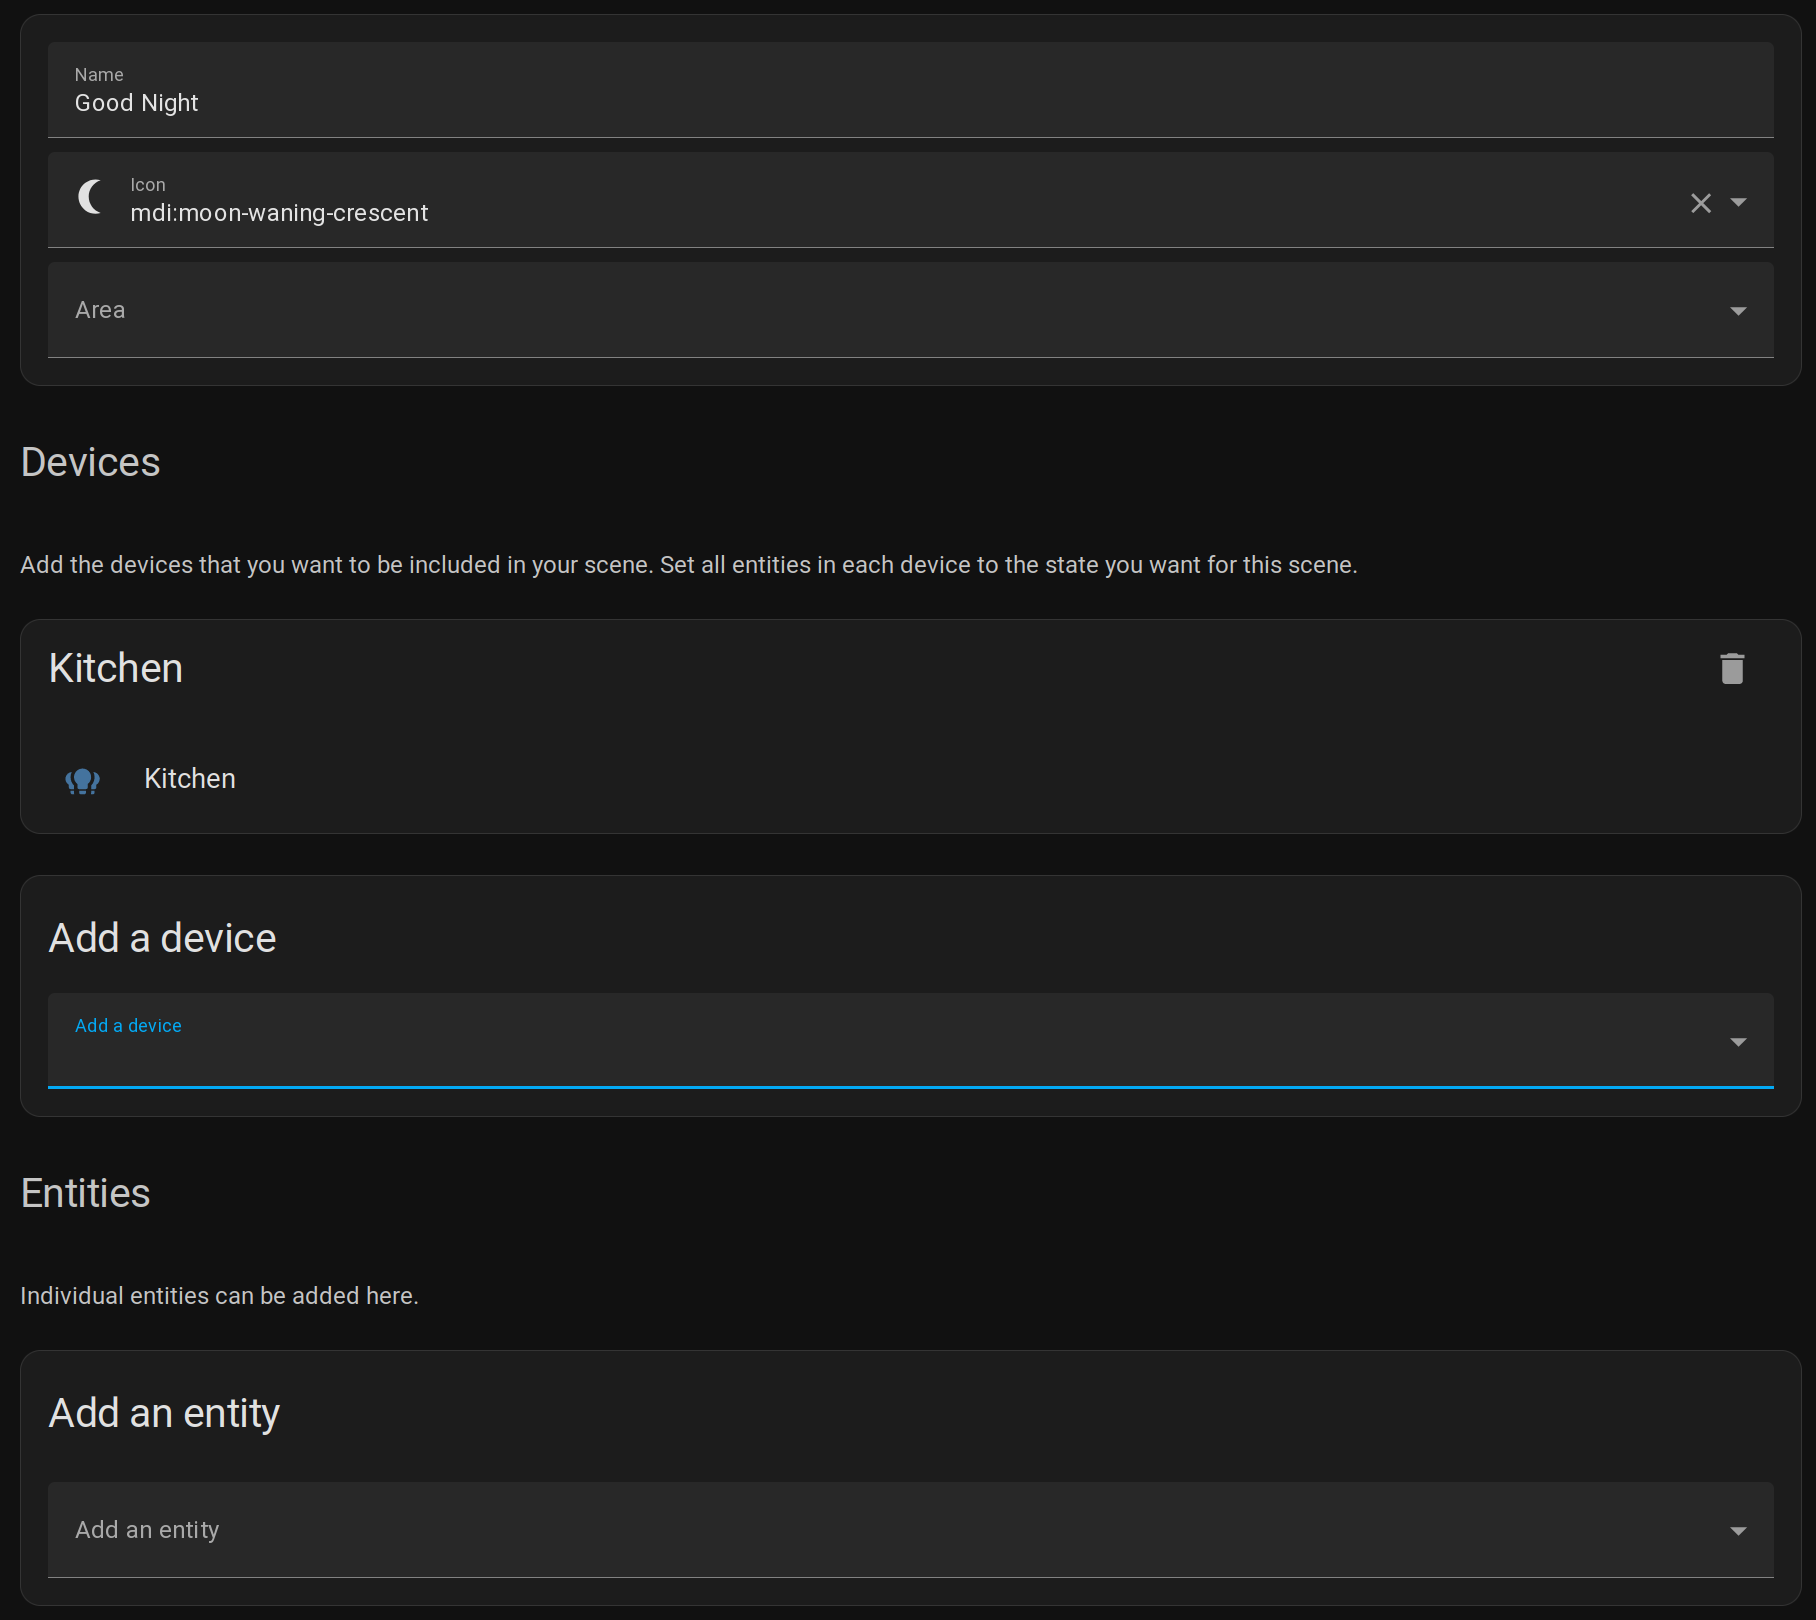
Setting up scenes in Home Assistant is not at all difficult. The list of scenes can be found under Settings
> Automations and Scenes. A scene consists primarily of a name, an icon, and lists of devices and entities
that you want to adjust when the scene is triggered. They can be assigned to an area (Home Assistant's
equivalent of a "room"). And you can add as many scenes as you like.
Home Assistant Scenes.
Once a scene has been created, it can be added to the Home Assistant dashboard, typically using a button.
Scenes are managed in Home Assistant as entities starting with the "scene." prefix. Entities are a core part of
Home Assistant, and there are many ways to incorporate them into a Home Assistant Dashboard, or even to use them
in other automations. For example, triggering a scene at a certain time of day, or even at sunrise or sunset.
Another use for scenes is potentially as a stand-in for other devices or automations. In Catheedral, for example, we don't have a place for "open garage door" or "start coffee maker" anywhere just yet, but we can configure a scene to do these things, and also to trigger any other automations we want. Put another way, if you're looking for a macro button of some kind, putting it inside of a scene is one way to make it a little easier to access later.
HomeKit Scenes.
Like Home Assistant, Apple's HomeKit ecosystem uses scenes to control multiple devices at once. While there are a number of apps for iPhone, iPad, and macOS that can be used with HomeKit, often it is the default Home app that works best. In it, scenes can be managed similarly, with a name, an icon, and a list of devices that can be changed to a specific state (lights on or off for example). A scene can be triggered by a tap on an icon, by using Siri, by using a hardware scene controller, or by using the Automation features of the Home app. Perhaps not quite as powerful as what can be done in Home Assistant, but close. And it's a little friendlier to use.
If you're not using HomeKit (you Android user, you!) this same kind of thing works in other home automation
ecosystems. We're focused on Apple's HomeKit ecosystem here primarily because that's what I'm most familiar
with, but also because it is usually the most complicated to interact with programmatically, with more hoops to jump through than anywhere else. The thinking is that if it works here, it should be no problem at all getting it to work in another environment.
Generally speaking, the integration between Home Assistant and Apple's HomeKit is a curious business. In
practice, it works very well - once it has been set up. However, it does sometimes take a little while to
figure out all the ins and outs to get things to work. Handling scenes is especially tricky. Very workable
though, at least in one direction. The mechanism that is used to handle this communication is referred to as a
bridge, and it is managed on the Home Assistant side. In the configuration for this bridge, you can select the
devices and entities that are to pass through and appear within HomeKit.
This bridge is also what makes it possible for Home Assistant to control HomeKit devices. Definitely some shenanigans going on here. The process takes several steps. First, a HomeKit device needs to be registered with HomeKit. This involves scanning a QR code, entering a device ID of some kind, or pairing it with a phone, that sort of thing. Pretty easy, all things considered. Part of the appeal of HomeKit. This ultimately ends up assigning an IP address to the device.
The next step is to remove the device from HomeKit. This leaves
it with its IP address but in an otherwise unattached state. When a supported HomeKit device is found in this state,
Home Assistant can grab it and take over. It then is able to expose this device back to HomeKit through this
same bridge mechanism, and HomeKit will happily accept it, just as it had done originally. Just that now Home
Assistant is in the middle, and can also control the device all on its own. Sneaky!
When it comes to scenes, we can use this bridge to communicate with HomeKit in a similar way. The idea in this
case is to create a virtual "switch" in Home Assistant that, when turned on, is also turned on in HomeKit. Then, we can set up a HomeKit Automation that is launched when this happens. The only action defined for this
HomeKit Automation is to trigger a particular scene. Sounds like a lot of steps, but it all works pretty
seamlessly.
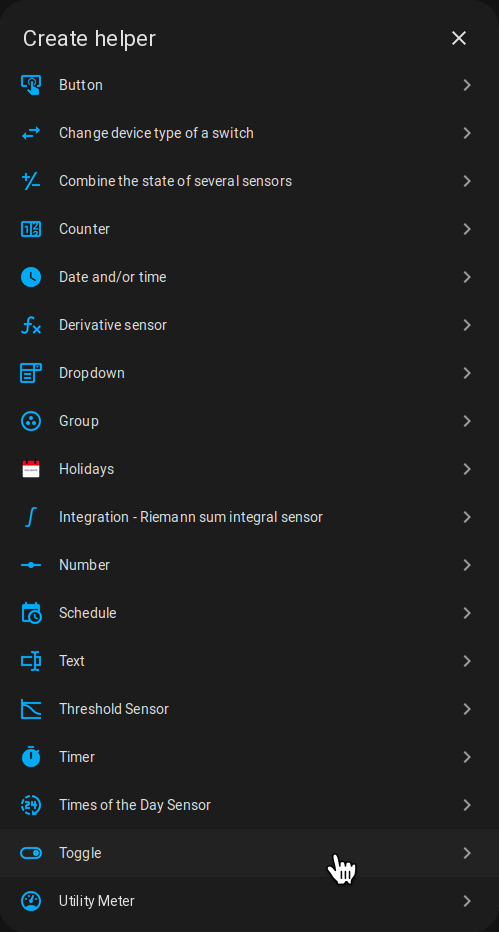
The virtual switch, in Home Assistant, is known as an "input boolean" or, more recently, a "toggle" helper, and
can be created in the "Helpers" section, found under Settings > Devices and Services. One of these virtual
switches would be needed for each scene in HomeKit that we want to control.
Creating a Virtual Switch in Home Assistant.
With the virtual switch created, we can add it to the HomeKit bridge by updating the bridge configuration, which can be
found on the Integration tab, also found under Settings > Devices and Services. We can also update our Home
Assistant scene to flip this switch, completing the circuit, in effect. Here's the process that is at work.
- Home Assistant Scene is triggered (by button click or timer or whatever).
- This scene is configured to include the virtual switch entity, and is set to turn it "on".
- The new switch state is passed through the Home Assistant bridge into HomeKit.
- HomeKit notices that the switch has changed states, and invokes an Automation.
- This Automation then triggers a specific Scene in HomeKit.
And, with that, we can click a button on the Home Assistant dashboard and have the HomeKit scene triggered.
This all happens instantly, of course. But it is a bit of a manual process to get it set up, and then it has to
be set up again separately for each scene that is to be controlled in this fashion. It helps to be clear
when giving names to scenes, toggles, automations, and so on. Would be confusing to click on a "good night"
scene in Home Assistant, and then have all the lights turn on. So it is a bit of work, but once it is in place,
you don't really even think about it anymore.
Catheedral Scenes.
With all that taken care of, the Catheedral side of things becomes considerably simpler. We know we can get entities from Home Assistant. And we know we can call various functions using their WebSockets interface, as we've been doing this with lights and thermostats already. And we already know that we're looking for Home Assistant entities that have a "scene." prefix. So we're in good shape right out of the gate. And, like any good scene controller, we'll want to get access to the scenes with just a tap, so we'll need a new page just for them.
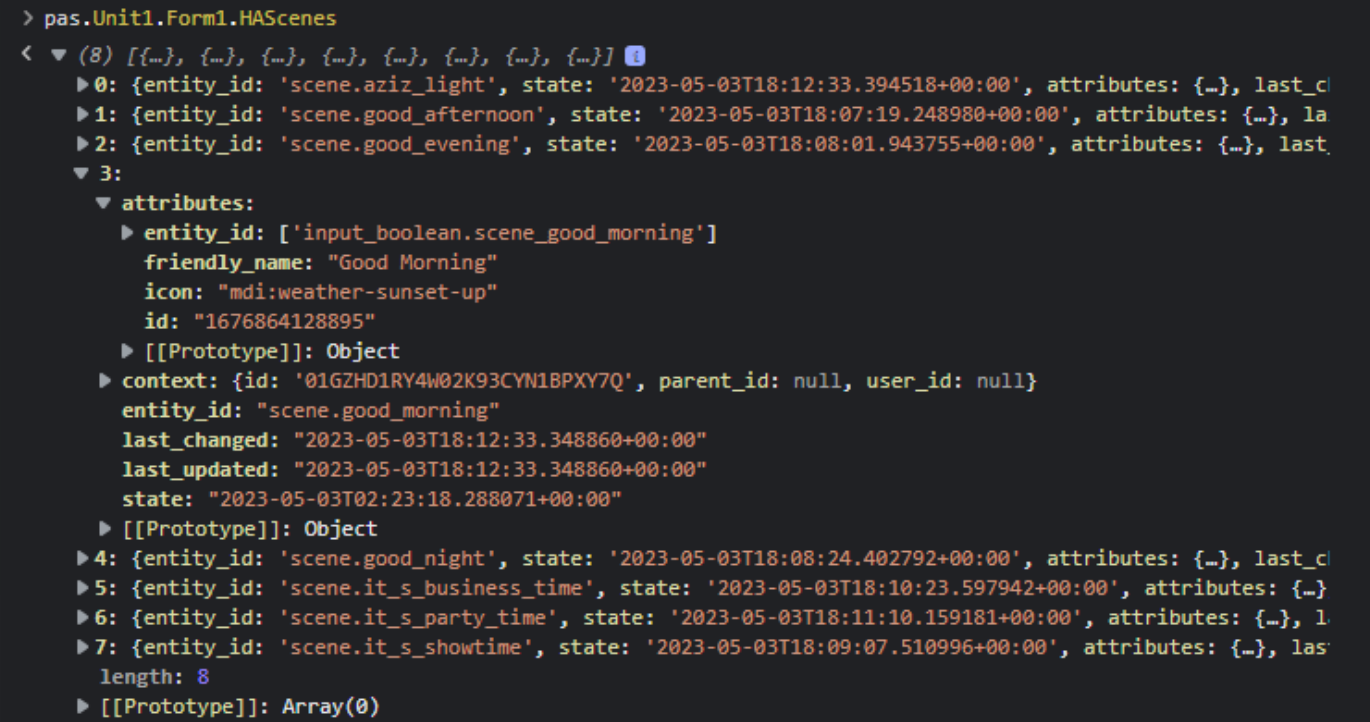
To get the list of scenes from Home Assistant, we can use the following, adding it to the same event
method, HAWebSocketDataReceived, and in the same fashion as we used to retrieve other similar elements, like the
Zone information. A new HAScenes Form variable is used here.
        // Lookup Scenes
        this.HAScenes = hadata.result.filter(
          function(o) {
           return (o.entity_id.indexOf("scene.") == 0);
          });
This leaves us with a JSON array of all the scenes, a total of eight in this case, including the all-important name, icon, and entity_id, as well as other metadata that we don't really need.
Home Assistant Scene Information.
Next, we'll need to display a set of buttons for each scene. We've done this before when we created buttons for
the lights. A little simpler in this case, as they don't really need to change. But we still have to generate
them. How many scenes will we have? How big do the buttons need to be? What dimensions? All good questions.
Scene names are not likely to be more than a few words, but they can sometimes be long words, so we'll have to give a bit of extra room just in case. And as with the lights, we'll want to display buttons that are easily accessible with large fingers on a small display, along with a large icon.
In my (small) home, I've got eight
scenes defined, but only three or four get used regularly. It is not inconceivable that someone might have 20
scenes defined for their home, so let's try a 4x5 grid out of the available 1280x400 display space we have. We
also have to accommodate the buttons in the corner and the navigation controls, and maybe a bit of margin so
that the buttons aren't on the edges. In this arrangement, we'll end up with buttons that are twice the width
of the light buttons, giving us a bit more room for larger text.
To create the scene buttons, we can use a trimmed-down version of the code we used for the lights. Here, we're
first checking that the available scenes haven't changed since we last displayed them. Then, it is just a
matter of creating the buttons with the associated icon and text elements.
  if (pages.TabIndex = 3) or (tmrSeconds.Tag = 3) then
  begin

    asm
      if (this.HAScenesLoaded !== JSON.stringify(this.HAScenes)) {

        this.HAScenesLoaded = JSON.stringify(this.HAScenes);
        divScenes.replaceChildren();

        if (this.HAScenes.length > 0) {
          for (var i = 0; i < this.HAScenes.length; i++) {

            // Create a new button
            var scenebtn = document.createElement("div");
            scenebtn.id = 'scene-'+this.HAScenes[i].entity_id;
            scenebtn.setAttribute('sceneid',this.HAScenes[i].entity_id);
            scenebtn.classList.add('SceneButton');

            var scenetxt = document.createElement("div");
            scenetxt.textContent = this.HAScenes[i].attributes["friendly_name"];
            scenetxt.classList.add('SceneText');

            // Add margin to buttons on first and last rows
            if (i < 4) {
              scenebtn.style.setProperty("margin-top","18px");
            }
            else if (i >= (Math.trunc(this.HAScenes.length / 4) * 4)) {
              scenebtn.style.setProperty("margin-bottom","18px")
            }

            // Find the Home Assistant Icon to use
            var sceneicon = document.createElement("iconify-icon");
            var icon = "mdi:scenebulb";
            if (this.HAScenes[i].attributes["icon"] !== undefined) {
              icon = this.HAScenes[i].attributes["icon"];
            }

            // Add button to the page
            divScenes.appendChild(scenebtn);

            // Add Icon to the button
            scenebtn.appendChild(sceneicon);
            sceneicon.setAttribute("icon",icon);
            sceneicon.classList.add("SceneIcon");

            // Add Text to the button
            scenebtn.appendChild(scenetxt);

            // Call Delphi function when someone clicks on a button
            scenebtn.addEventListener('click',function(e){pas.Unit1.Form1.SceneButtonClicked(e.target.getAttribute('sceneid')); e.stopPropagation;});
          }
        }
      }
    end;
  end;
The addEventListener() method is used to implement the WebSockets call to Home Assistant. In this case, we don't
really need to do much - the scene is triggered, and we don't really care about the response.
procedure TForm1.SceneButtonClicked(SceneID: String);
begin
  // Nothing to do really but send the request
  HAID := HAID + 1;
  HAGetScene := HAID;
  HAWebSocket.Send('{"id":'+IntToStr(HAID)+', "type":"call_service", "domain": "scene", "service": "turn_on", "target": {"entity_id":"'+SceneID+'"}}');
end;
We're not quite out of the woods yet though. We need one more item to get this working perfectly. When we
trigger the scene in Home Assistant, it sets the value of an "input_boolean" value as part of the scene. If
we're just using Home Assistant without passing this value to HomeKit, this is likely just fine - the Home
Assistant scene will configure all the entities and devices that it is intended to.
However, if we're passing
this input_boolean over to HomeKit, we'd also like it to reset shortly afterward. Otherwise, the next time we
try and trigger the scene, this input_boolean will already be set, and without the state transition (from off to on), no scene will be
triggered. This is easy to do in Home Assistant. Under Settings > Automation and Scenes, we can create a
new automation for each of the scenes we're using, from the Automation page.
- Click the +Create Automation button at the bottom right.
- Select the Create New Automation option.
- Click the +Add Trigger button, and select State.
- Find the input_boolean value for the scene (we gave an example of this earlier).
- Under From and To, enter Off and On
- Under For, enter something short, like 5 seconds. Plenty of time for the scene to activate.
- Further down, under +Add Action, select "Call Service" and find input_boolean.turn_off.
- Add the same entity_id here as in step 4.
- Click the Save button at the bottom right.
- Enter a name for this automation, like "Switch Off Good Morning" or whatever your scene is.
Looks more complicated than it actually is. But with that in place, we can click the buttons in Catheedral, and have the scenes triggered, either in Home
Assistant or all the way through to HomeKit. Here's what it looks like.

Catheedral Scenes Page.
With the extra space, we've bumped up the font size a little, and we can now center the text in the space to the
right of the icon. And, as we did with lights, we have the icons that were set for the scene in Home Assistant
coming over nicely. There's no camel icon in the Material Design Icons set, so I've gone with a cow here, a
reference to The Fifth Element (Aziz! Light!) - that's the scene that turns on all the lights everywhere. Just in case you
were wondering.
But alas, this has a few little issues that we'd like to address. The scenes are displayed in alphabetic order, but we'd rather manually order them, particularly for the morning-night set, but
also just generally. And we've got a ton of wasted space that we could use to better lay out the buttons. As
this is likely to be a frequently accessed page, a little extra effort here is warranted. Having the buttons a little further apart reduces the chance we'll tap the wrong scene.
InteractJS to the Rescue.
In a recent blog post, we revisited the InteractJS library, which you can read about here. This specific problem was one of the motivations for that post. What we're after, then, is the ability to simply move these buttons around, arranging them into something that better reflects how they might get used. And we couldn't possibly know what that arrangement is in advance, so we'll leave it to the user to arrange them however they like. We've got our Change button in the top-right corner that we can use to toggle our "jiggle mode", indicating that the buttons can be moved. Let's start with that.
First, we need to add the animation CSS properties to our Scene buttons as we create them.
            // Set Jiggle Animation Properties
            scenebtn.style.setProperty('transform-origin',parseInt(10+Math.random()*80)+'% '+parseInt(10+Math.random()*80)+'%');
            scenebtn.style.setProperty('animation-duration',(0.40+Math.random()*0.40)+'s');
            scenebtn.style.setProperty('animation-iteration-count','infinite');
            scenebtn.style.setProperty('animation-timing-function','ease-in-out');
Next, we'll have to add our CSS @keyframe rule. These are relatively big buttons, so not too crazy with the jiggling here.
@keyframes jigglysmall {
  0% { transform: rotate(0deg); }
  25% { transform: rotate(1deg); }
  50% { transform: rotate(0deg); }
  75% { transform: rotate(-1deg); }
  100% { transform: rotate(0deg); }
}
Then, in our Change button click event, we have to add the 'animation-name', set to 'jigglysmall', in order for the jiggling to start. And reverse the changes when we want to stop. While we're at it, we'll also swap the 'not-draggable' and 'dragdrop' classes that are used to enable or disable the dragging functionality.
  // Scenes Change Mode
  else if (pages.Tabindex = 3) and (ChangeMode = False) then
  begin
    ChangeMode := True;
    asm
      btnChange.firstElementChild.classList.add('text-warning','fa-beat');
      btnChange.style.setProperty('opacity','1');

      var btns = document.querySelectorAll('.SceneButton');
      for (var i = 0; i < btns.length; i++) {
        btns[i].style.setProperty('animation-name','jigglysmall');
        btns[i].style.classList.replace('not-draggable','dragdrop');
      }
    end;
  end
  else if (pages.Tabindex = 3) and (ChangeMode = True) then
  begin
    ChangeMode := False;
    asm
      btnChange.firstElementChild.classList.remove('text-warning','fa-beat');
      btnChange.style.setProperty('opacity','0.25');

      var btns = document.querySelectorAll('.SceneButton');
      for (var i = 0; i < btns.length; i++) {
        btns[i].style.removeProperty('animation-name','jigglysmall');
        btns[i].style.classList.replace('dragdrop','not-draggable');
      }
    end;
  end
That takes care of jiggle mode. What kind of drag-and-drop functionality fits here? We could configure it so
that buttons don't overlap, or so that they move out of the way of other buttons. But we're going with a
simpler approach here, more for flexibility of layout. We also don't need to display a patterned background. But what might be a little different is that we'd like to have more positions than just a stock 4x5 grid. Instead, let's make half-positions possible - an 8x10 grid. This would allow us to have a bit more room to
arrange icons in a pattern of some kind, or just not be as restricted in placement. Still some control, though.
To set this up, we'll need to define the PositionScenes array. Fortunately, this is a fixed display so we can
just set the array directly. Here we're using an array of TPoint, so we'll need System.Types added to our
'uses' clause. We know the width, height, offset, and number of rows and columns, so we can just populate the
array like this. As this isn't changing, we can do this in MiletusFormCreate. The seemingly random numbers are
the offsets from the edge, along with the half-width and half-height values for the button dimensions. And rows
of 8 positions. If that helps. Why 71 and not 79? The last row isn't really usable as it would drop below the
bottom of the interface.
  for i := 0 to 71 do
  begin
    PositionScenes[i].X := 7 + (i mod 8)*147;
    PositionScenes[i].Y := 20 + (i div 8)*36;
  end;
We'll need to add InteractJS to our Project.html file, and then we'll need to add the particular type of drag and drop that we're after. This is one of the simpler variants from the Moving Elements post.
  // InteractJS Code for moving elements
  asm

    // Drag Anywhere
    var This = this;
    interact('.dragdrop')
      .draggable({
        inertia: true,
        modifiers: [
          interact.modifiers.restrictRect({
            restriction: 'parent',
            endOnly: true
          })
        ],
        onstart: function(event) {
          This.ZCounter += 1;
          event.target.style.setProperty('z-index',This.ZCounter);
          event.target.style.removeProperty('animation-name');
        },
        onend: async function(event) {
          var PosX = (parseFloat(event.target.style.left.replace('px','')) + parseFloat(event.target.getAttribute('data-x')));
          var PosY = (parseFloat(event.target.style.top.replace('px','')) + parseFloat(event.target.getAttribute('data-y')));
          event.target.style.top = PosY+'px';
          event.target.style.left = PosX+'px';
          event.target.style.removeProperty('transform');
          event.target.removeAttribute('data-x');
          event.target.removeAttribute('data-y');

          // Find nearest Position
          var minDistance = 999999;
          var NewX = 0
          var NewY = 0;
          var dist = 0;
          for (var i = 0; i < This.PositionScenes.length; i++) {
            dist = Math.sqrt(Math.pow(This.PositionScenes[i].x - PosX,2) + Math.pow(This.PositionScenes[i].y - PosY,2));
            if (dist < minDistance) {
              minDistance = dist;
              NewX = This.PositionScenes[i].x;
              NewY = This.PositionScenes[i].y;
            }
          }

          await sleep(50);
          event.target.style.setProperty('transition','top 0.2s linear, left 0.2s linear');
          event.target.style.top = NewY + 'px';
          event.target.style.left = NewX + 'px';
          setTimeout(function(){
            event.target.style.setProperty('animation-name','jigglysmall');
            event.target.style.removeProperty('transition');
          },200);
        },
        listeners: {
          move: dragMoveListener
        }
      });

      function dragMoveListener (event) {
      var target = event.target
      var x = (parseFloat(target.getAttribute('data-x')) || 0) + event.dx
      var y = (parseFloat(target.getAttribute('data-y')) || 0) + event.dy
      target.style.transform = 'translate(' + x + 'px, ' + y + 'px)'
      target.setAttribute('data-x', x)
      target.setAttribute('data-y', y)
    };
    window.dragMoveListener = dragMoveListener
  end;
Finally, we'll need to add the code that initializes the 'not-draggable' class as well as the original positions of the buttons. Just an extra bit of math so that we pick up non-overlapping positions as we place the buttons.
            // Not draggable by default
            scenebtn.classList.add('SceneButton','not-draggable');

            // Want to layout the buttons in a sensible way
            scenebtn.style.setProperty('position','absolute');
            scenebtn.style.setProperty('top',this.PositionScenes[i*2+8*parseInt(i/4)].y+'px');
            scenebtn.style.setProperty('left',this.PositionScenes[i*2+8*parseInt(i/4)].x+'px');
And with that all done, we've got a configurable user interface.
Changing the Layout of Scene Buttons.
This essentially works as a simple "snap" function. Buttons are semi-transparent, so if they've mistakenly
been overlapped, they will still be visible.
Saving State.
All that's left is to save the new positions. We've already got a few examples where we save state in other
parts of the Catheedral app. Here it is a bit tricky because of the number of buttons involved. So first, let's get the
state whenever a button is moved. We can track these values just by adding them to a SceneState variable
declared as JSValue - ultimately it ends up as a JavaScript array, with each element containing our TPoint
value.
This.SceneState[event.target.getAttribute("sceneid")] = [NewX, NewY];After rearranging the buttons, our SceneState contains the X/Y coordinates for all of our buttons.

SceneState Data.
When we're done editing (after clicking the Change button again), we can include this in the list of
configuration data, and save it along with the rest of that data. And here we encounter one last problem, just
as we're heading out the door.
The SceneData that we have is in a bit of an anomalous format. It is like a normal indexed
array, but with a string index. Which means it's not an indexed array. And it's not really JSON either. It is
something called an associative array. And it has the equally suspicious and annoying quality that if you pass it to
JSON.stringify() you get [] as a result. Makes no sense, really, but it's what we have to work with. We could
format our SceneData values to be more like JSON, but we could also just convert this associative array into proper JSON when storing and
retrieving it. So let's do that. To get it into a regular JSON formatted string, we can do this.
  SceneStateString := '[]';
  asm
    var SSS = [];
    for (var el in this.SceneState) {
      SSS.push({sceneid: el, x: this.SceneState[el][0], y: this.SceneState[el][1]});
    }
    SceneStateString = JSON.stringify(SSS);
  end;
To retrieve it from a string and recreate our associative array, we can try this.
    asm
      var SSS = JSON.parse(ScwneStateString);
      this.SceneState = [];
      SSS.forEach((el) => {
        this.SceneState[el.sceneid] = [el.x,el.y];
      });
    end;
These mechanisms can then be used to store and retrieve the SceneState values using either the Catheedral INI file or the Home Assistant configuration variables, alongside the others, like the background and the date formats. Whenever the scene icons are rearranged, the INI file is updated so that the new arrangement is loaded automatically.
Next Time.
That about covers it for handling scenes in our Catheedral app. Did I miss anything? Is there another aspect of handling scenes that we could improve upon? As always, comments, questions, and feedback are very much appreciated. Next time, we'll swing back and finish off the "energy" portion of that last ring on the Catheedral home page. It is a little more involved - we'll have a look at charting, how to get significantly more data out of Home Assistant, and also look at how we can take steps to reduce our home energy use in some potentially new and interesting ways.
The GitHub repository for the Catheedral app can be accessed using the following link. It has been updated to contain all the code we've covered here, and probably a few more improvements since this blog was first drafted.
Catheedral Repository on GitHub
Follow Andrew on 𝕏 at @WebCoreAndMore or join our 𝕏 Web Core and More Community.
Andrew Simard

This blog post has not received any comments yet.
All Blog Posts | Next Post | Previous Post