Blog
All Blog Posts | Next Post | Previous Post

 TMS Web Core and More with Andrew:
Templates: Bonus Content
Tuesday, March 14, 2023

Contents
Backgrounds.
Let's start with an easy one. When we set up our application with the AdminLTE template, we're ultimately
loading pages within a TWebHTMLDiv component that we've called divHost. We added a bit of CSS to set the background for this element. As the AdminLTE template has no background of
its own, this essentially means we're setting its background as well. And as the template is normally all that is
visible, this is then essentially the background for the app as a whole. We're using "Carbon" from CSS3
Patterns Gallery.
#divHost {
  background: linear-gradient(27deg, #151515 5px, transparent 5px) 0 5px,
              linear-gradient(207deg, #151515 5px, transparent 5px) 10px 0px,
              linear-gradient(27deg, #222 5px, transparent 5px) 0px 10px,
              linear-gradient(207deg, #222 5px, transparent 5px) 10px 5px,
              linear-gradient(90deg, #1b1b1b 10px, transparent 10px),
              linear-gradient(#1d1d1d 25%, #1a1a1a 25%, #1a1a1a 50%, transparent 50%, transparent 75%, #242424 75%, #242424);
  background-color: #131313 !important;
  background-size: 20px 20px;
}
This looks pretty good when using the AdminLTE dark theme, but not so good when using the light theme. When the AdminLTE theme switcher is used to switch themes, the data-bs-theme attribute in the root <html> element of the page is updated to either "light" or "dark". We can then use this to supply a background specific to the theme.
html[data-bs-theme="dark"] #divHost {
  background: linear-gradient(27deg, #151515 5px, transparent 5px) 0 5px,
              linear-gradient(207deg, #151515 5px, transparent 5px) 10px 0px,
              linear-gradient(27deg, #222 5px, transparent 5px) 0px 10px,
              linear-gradient(207deg, #222 5px, transparent 5px) 10px 5px,
              linear-gradient(90deg, #1b1b1b 10px, transparent 10px),
              linear-gradient(#1d1d1d 25%, #1a1a1a 25%, #1a1a1a 50%, transparent 50%, transparent 75%, #242424 75%, #242424);
  background-color: #131313 !important;
  background-size: 20px 20px;
}
Then, we can add a separate background for the "light" theme, perhaps one generated from Hero Patterns.
 html[data-bs-theme="light"] #divHost {
  background-color: #ffffff;
  background-image: url("data:image/svg+xml,%3Csvg width='84' height='48' viewBox='0 0 84 48' xmlns='http://www.w3.org/2000/svg'%3E%3Cpath d='M0 0h12v6H0V0zm28 8h12v6H28V8zm14-8h12v6H42V0zm14 0h12v6H56V0zm0 8h12v6H56V8zM42 8h12v6H42V8zm0 16h12v6H42v-6zm14-8h12v6H56v-6zm14 0h12v6H70v-6zm0-16h12v6H70V0zM28 32h12v6H28v-6zM14 16h12v6H14v-6zM0 24h12v6H0v-6zm0 8h12v6H0v-6zm14 0h12v6H14v-6zm14 8h12v6H28v-6zm-14 0h12v6H14v-6zm28 0h12v6H42v-6zm14-8h12v6H56v-6zm0-8h12v6H56v-6zm14 8h12v6H70v-6zm0 8h12v6H70v-6zM14 24h12v6H14v-6zm14-8h12v6H28v-6zM14 8h12v6H14V8zM0 8h12v6H0V8z' fill='%23dbc8fb' fill-opacity='0.4' fill-rule='evenodd'/%3E%3C/svg%3E");
}
If we want to have a custom background for a particular form, we can add a bit of CSS to do that as well. Each form will ideally have a specific class associated with it, so this is very simple. For example, our login form already does this, using a rotated linear gradient generated using CSS Gradient.
.Login-Form {
  background: rgb(131,58,180) !important;
  background: linear-gradient(66deg, rgba(131,58,180,1) 0%, rgba(253,29,29,1) 50%, rgba(252,176,69,1) 100%) !important;
}
We could go one step further and use the <html> attribute selector again here to create alternate
light/dark backgrounds for individual forms if desired. Not much need for this with the login form, though. Note that we initially set the default theme to "dark" directly in our Project.html file, so it is what is used on
the login page. The theme selected in the AdminLTE template is applied whenever we initialize that JavaScript
library, which is triggered by the DOMContentLoaded event, as we covered last
time. This in turn checks for the "theme" in localStorage, which then updates the data-bs-theme
attribute.
Icons.
This is a bit of a tricky one. The AdminLTE theme includes a number of icons, and this might be considered one of the main benefits of using a template in the first place - to not have to fiddle with icons. However, customizing icons is often something that we, as developers, might like to do. And some of us are rather particular about the icons that we'd like to use.
Adding to the complexity, unfortunately, is that not all icons are
made freely available, so including them in a freely available repository is problematic. Also, icons can
manifest themselves in numerous ways. Sometimes they can be added as a class attribute added to a <div>
or <span> element. Sometimes they are SVG images. Sometimes they are something else. And we don't
really want to limit ourselves. If someone wanted to include a PNG as an icon? Sure, why not?
The first thing we'll need is a new unit to manage these different "icon sets". Let's take the login
form, for example. There are two icons there - one for the username (an envelope - indicating that perhaps the
username might be an e-mail address) and one for the password (a lock). Now, it may be that we're not using
e-mail addresses for usernames. Or that we'd like a Font Awesome 6 "duotone" icon instead of the Font Awesome
6 Free "solid" icon that AdminLTE uses. Or maybe we're using a different icon set entirely. Let's define
icons as strings that we can populate with whatever we like. To start us off, here's what our unit
looks like with just these two icons configured.
unit UnitIcons;

interface

uses
  System.SysUtils, System.Classes, JS, Web, WEBLib.Modules, jsdelphisystem;

type
  TDMIcons = class(TWebDataModule)
    procedure InitializeIcons(IconSet: String);
    function Icon(LookupIcon: String):String;
  private
    { Private declarations }
  public
    { Public declarations }
    Lookup: JSValue;
  end;

var
  DMIcons: TDMIcons;

implementation

{%CLASSGROUP 'Vcl.Controls.TControl'}

{$R *.dfm}

function TDMIcons.Icon(LookupIcon: String):String;
begin
  asm
    Result = this.Lookup[LookupIcon];
  end;
end;

procedure TDMIcons.InitializeIcons(IconSet: String);
begin
  asm
    var Icon = [];

    // Set default as FontAwesome 6 Free Icons
    Icon[ "Password"            ] = '<span class="fa-solid fa-lock"></span>';
    Icon[ "Username"            ] = '<span class="fa-solid fa-envelope"></span>';

    // Override these icons if we're using FontAwesome 6 Pro Duo
    if (IconSet.toUpperCase() == 'DUOTONE') {
      Icon[ "Password"            ] = '<span class="fa-duotone fa-lock fa-swap-opacity"></span>';
      Icon[ "Username"            ] = '<span class="fa-duotone fa-key fa-swap-opacity"></span>';
    }

    this.Lookup = Icon;
  end;
end;

end.
Not at all complicated. We can initialize those form values by a call to InitializeIcons, which we'll do in the WebFormCreate method of MainForm. Whenever we want to use an icon, we can reference something like DMIcons.Icon("Username") when populating an HTML element. Note that we'll have to include UnitIcons in any form where we'll be replacing icons in this fashion (likely all of them). For example, in LoginForm, we'll replace the two icons by assigning an id to the <div> element that contains the current icons and then replacing the contents of that <div> with the updated icons.
procedure TLoginForm.WebFormCreate(Sender: TObject);
begin
  // Update Icons
  document.getElementById('icon-username').innerHTML := DMIcons.Icon('Username');
  document.getElementById('icon-password').innerHTML := DMIcons.Icon('Password');
end;
Eventually, this setup will be upgraded to allow for icons to be updated and extended based on the database we're connecting to. For example, there may be certain elements within our application that would benefit from having icons as part of the UI, but that are not part of the underlying application. Say, contact information. Maybe it would be nice to have an icon beside a reference to a telephone number or a Facebook account. But perhaps the organization might also use other services that we don't know about. We'll want to be able to update and augment this list outside of the confines of what we've put in place at design time.
We have two more issues to cover before we're done with icons, though, and both are related to the same problem. What problem? Well, it would be best if our entire project could be shared on GitHub in a workable state with a default set of icons, like the Font Awesome 6 Free library that we're using right now. This is what is used in the AdminLTE template that we're using. We'd also like to be able to add a custom icon collection to our project and use it during our normal development work, without altering the source code. Sounds good.
But... we don't want to have to flip anything back and forth in our project when posting updates to GitHub, as we're almost certainly going to forget. Part of the appeal of the "publish to GitHub" mechanism of GitHub Desktop is that it is so simple, after all. We'd also like to keep anything referring to any custom icon collection private. In the case of Font Awesome Pro, for example, a "kit" is used, with its own URL. It isn't much of a security risk to share that URL, as it can't be used on another website normally anyway, and it could be discovered by looking at any website that uses it. But still, to avoid the confusion and frustration that might arise if it did find its way into someone else's project, it might be best not to include it in anything destined for GitHub in the first place.
The first issue then is what to do about the reference in Project.html that refers to the icon library that we're using. There are likely many ways to address this problem, but the approach we're going to take here is to use a Delphi "post-build" command to replace the icon library in Project.html with a different one. The script that does this can be included in GitHub as an example but without any reference to the custom library being used. Then, in our own environment, we can use a different post-build script with the commands to replace the default library with the custom library.
The trick, then, is that our own post-build script isn't going to be in
the repository, and the example post-build script is. For whatever reason, it doesn't seem possible within
GitHub Desktop or the GitHub website to have different versions of the same file. Supposedly possible with
the git command-line, but kind of beyond what we want to deal with here. We'll just add a note that a
post-build script is available if anyone wants to use it to do this or anything similar.
Ok, but what kind of script? Let's go with a PowerShell script. The Linux folks have a much easier time with
scripting, given the ubiquity and longevity of bash, but we can suffer through this a little as it is pretty
handy once it is working. What we want is to perform a search and replace in the Project.html file for the
project that we've just built. Let's call the script "PostBuildTemplate.ps1" and place it in a BuildScripts
folder within our project folder, alongside the rest of our code. To enable it, navigate to Project |
Options | Build Events | Post-build events | Command and
enter the following.
powershell -ExecutionPolicy Unrestricted -file .\BuildScripts\PostBuildTemplate.ps1 "$(OUTPUTDIR)"
Then we can add our script.
# PostBuild.PS1
#
# This is run after Delphi has finished its build of the application.
#
echo "PostBuild Script is Running"

# Files that we might be updating
$ProjectFile=$args[0].Substring(0,$args[0].Length-1)+'\Project1.html'
$TemplateFile=$args[0].Substring(0,$args[0].Length-1)+'\css\template.css'

# This replaces the default Font Awesome 6 Free library with a Font Awesome 6 Pro (Kit) library
echo " - Updating Font Awesome Library in Project HTML"
$ProjectFile=$args[0].Substring(0,$args[0].Length-1)+'\Project1.html'
$SearchFor='<link rel="stylesheet" href="https://cdn.jsdelivr.net/npm/@fortawesome/fontawesome-free@6.2.1/css/all.min.css" integrity="sha256-Z1K5uhUaJXA7Ll0XrZ/0JhX4lAtZFpT6jkKrEDT0drU=" crossorigin="anonymous">'
$ReplaceWith='<script crossorigin="anonymous" src="https://kit.fontawesome.com/1234567890.js"></script>'
(Get-Content $ProjectFile) -replace [regex]::Escape($SearchFor), $ReplaceWith | Out-File -encoding ASCII $ProjectFile
Be sure to check that the $ProjectFile referenced is actually Project1.html
as we have here. It might well be something different in another project, or it might be in a different
location. Also, if the original link gets updated to a newer version of Font Awesome 6 Free, then this script
will also have to be updated in order for $SearchFor to find it. But if all
goes according to plan, we should get something like this appearing at the end of our project build.
Target PostBuildEvent:
    powershell -ExecutionPolicy Unrestricted -file .\BuildScripts\PostBuild.ps1 "C:\Users\Andrew Simard\Documents\Embarcadero\Studio\Projects\TMS-WEB-Core-TemplateDemo\TMSWeb\Debug\"
PostBuild Script is Running
 - Updating Font Awesome Reference
PostBuild Script is Complete
Success
Elapsed time: 00:00:03.9
And, with a little luck, we'll end up with an updated Project1.html file to
show for it. Be warned, however, that there was quite a bit of fiddling required to get this to work. It mostly had to do with getting PowerShell scripts to run properly in the first place. This was tested on Windows 10
running Delphi 10.3. Not sure how much different it would be on Delphi 11/Windows 11 or any other supported
combination. If you're not having much luck with PowerShell scripts, a quick Google search is likely to yield
some useful results, such as this
one.
The second issue we have is how to tell the application which font library we're using. Detecting which
version of Font Awesome is installed is notoriously difficult, and all the more difficult if you're not even
using Font Awesome to begin with. To get around this, we're going to replace another value, taking a page
from the AdminLTE theme mechanism. Let's add another attribute, iconset, to the
<html> tag in Project.html. We'll set it to 'default' initially, and then to something else if we want a different set of icons. The something else should correspond to whatever we're using as a
comparison in the DMIcons.InitializeIcons() method. We can get the value of iconset
in the WebFormCreate method of MainForm and then
pass it to DMIcons.InitializeIcons directly to complete our setup. In our
script, we can then use the following to replace 'default' with 'Duotone'.
echo " - Updating Icon Set in Project HTML"
$SearchFor='iconset="default"'
$ReplaceWith='iconset="Duotone"'
(Get-Content $ProjectFile) -replace [regex]::Escape($SearchFor), $ReplaceWith | Out-File -encoding ASCII $ProjectFile
Quite a bit of work to be sure, but so worth it just to get our fancy icons. Once this is in place, our project can be built using the default icon library, or with our own custom icon library, just by enabling or disabling the PostBuild script in Delphi. Most of the time, we'll just leave our PostBuildTemplate.ps1 script in place. Not likely we'll need to change it unless we're changing either the default or custom icon libraries that it references. We will have to update DMIcons as we encounter more icons that we'd like to replace. The default icons should really just be whatever icons we encounter in the AdminLTE template so that, all else being equal, the template will look the same in our TMS WEB Core project as it does in the original AdminLTE source project.
To finish up with this issue, In the local copy of our project, let's create a second BuildScripts folder that is in the same folder as our project folder - one directory level above the other BuildScripts folder - so technically not in our project at all, from the perspective of GitHub. We can then add our own custom version of the PostBuildTemplate.ps1 script to this second PostBuild folder.
We'll leave the original
copy commented out so that it is available for anyone to use, (without changing anything unexpectedly),
but our own local copy will have whatever customizations that we want to make. We can flip between the two by
adjusting the Delphi Post-build event command as we have it above, referencing either .\BuildScripts for the
version in the project folder or ..\BuildScripts (two dots!) for the version that is adjacent to our project
folder. The GitHub repository README file has been updated with this bit of information as well. Hopefully,
this is clear enough that it doesn't cause problems for anyone.
Fonts.
Like icons, fonts are another area where we benefit from the AdminLTE theme having a pretty solid font that looks good and is sized appropriately. But, as with icons, this is also something that we, as developers, might want to customize. Fortunately, most of the fonts that we'd like to use are generally available with fewer restrictions than icons. But not always. Unlike icons, though, CSS does a pretty great job of handling fonts already, all by itself. And AdminLTE seems to do a suspiciously good job of applying the same font everywhere, so with a little luck we'll not need to do much to override it. It uses a Google font by default, Source Sans Pro, which is loaded in our Project.html file just as it was included in the original AdminLTE template.<link rel="stylesheet" href="https://fonts.googleapis.com/css?family=Source+Sans+Pro:300,400,400i,700&display=fallback">
If we want to use a different font, the first step is to load it via Project.html as well. Here, we're just swapping it out for Cairo. Maybe I'll get tired of Cairo one day. But that day is not this day!
<link rel="stylesheet" href="https://fonts.googleapis.com/css?family=Cairo:300,400,400i,700&display=fallback">
Naturally, any other font could be substituted here. Not all fonts will look particularly great, though, so be sure to test it out before subjecting anyone to anything too crazy. In our template.css file, we can then just change the <body> font.
body {
  font-family: Cairo;
}
Surprisingly, that's all we have to do?! Well, for now. In fact, this is so simple that we can add this to our PostBuildTemplate.ps1 script that we just created for swapping the icon library. We might especially want to do this, for example, if we're using a proprietary font that we don't want to share via a GitHub repository, as was the situation with the icons. Let's add this to our script.
# This replaces the default Source Sans Pro font with Cairo
echo " - Replacing Source Sans Pro with Cairo"

$SearchFor='<link rel="stylesheet" href="https://fonts.googleapis.com/css?family=Source+Sans+Pro:300,400,400i,700&display=fallback">'
$ReplaceWith='<link rel="stylesheet" href="https://fonts.googleapis.com/css?family=Cairo:300,400,400i,700&display=fallback">'
(Get-Content $ProjectFile) -replace [regex]::Escape($SearchFor), $ReplaceWith | Out-File -encoding ASCII $ProjectFile

$SearchFor='font-family: "Source Sans Pro";'
$ReplaceWith='font-family: "Cairo";'
(Get-Content $TemplateFile) -replace [regex]::Escape($SearchFor), $ReplaceWith | Out-File -encoding ASCII $TemplateFile
We'll have to keep an eye out for any additional web components we end up using, ensuring that they either pick up the same font, or that we add the appropriate configuration, theme, or CSS override specific to that
component, to ensure consistency.
Login.
With the potential of new icons and a new font now available, we can do a little bit of cleanup when it comes to the login form. We'll skip over the details of some of these things as they're not super important - mostly adjusting either the HTML in LoginForm or adding a few CSS rules to get in those little touches.
Also,
for now, we're kind of anticipating that this is going to be used by organizations with their own people, so we don't need a generic registration system or alternative sign-in partners. The very latest version of TMS WEB Core (2.1) has a new TWebAuth component that looks like it will make that kind of thing really easy, but we'll have to save that for another day. Likewise, a registration form is provided as part of the AdminLTE template, but this would require some kind of notification system which we've not yet gotten to here, so another topic for another day.
We'll also need that notification system to implement a "forgot password" feature, but we'll leave the button in as we know we'll need to get to it at some point soon. For now, let's just focus on making the login form a little more presentable. Which is very subjective, of course.
- Tested using Font Awesome Duotone icons (key and lock, no more envelope).
- Tested using Cairo font.
- Move the application title onto the card.
- Remove Facebook and Google+ buttons.
- Move the Login button to the bottom right.
- Convert "forgot password" to a button.
- Remove the registration option.
- Disable/Enable buttons if inputs are empty/not empty.
- A teensy bit more corner rounding.
- Changed the input rectangles' border-right situation.
- Change the input rectangles' background to match the dark theme.
- Plenty of transitions everywhere.
- Added editPassword highlight for CAPS-LOCK (see post here).
The "Remember me" checkbox is something we can work with. To integrate it into our project, we'll need to add a
TWebCheckbox component to our form and then set its ElementID
property to match that of the checkbox as defined in the AdminLTE template - flexCheckDefault. We could change to something else if we wanted, just be sure that the component ElementID
property matches whatever is set for the id attribute in the HTML page. While
we're at it, we can set the default value to "checked" just by changing our component.
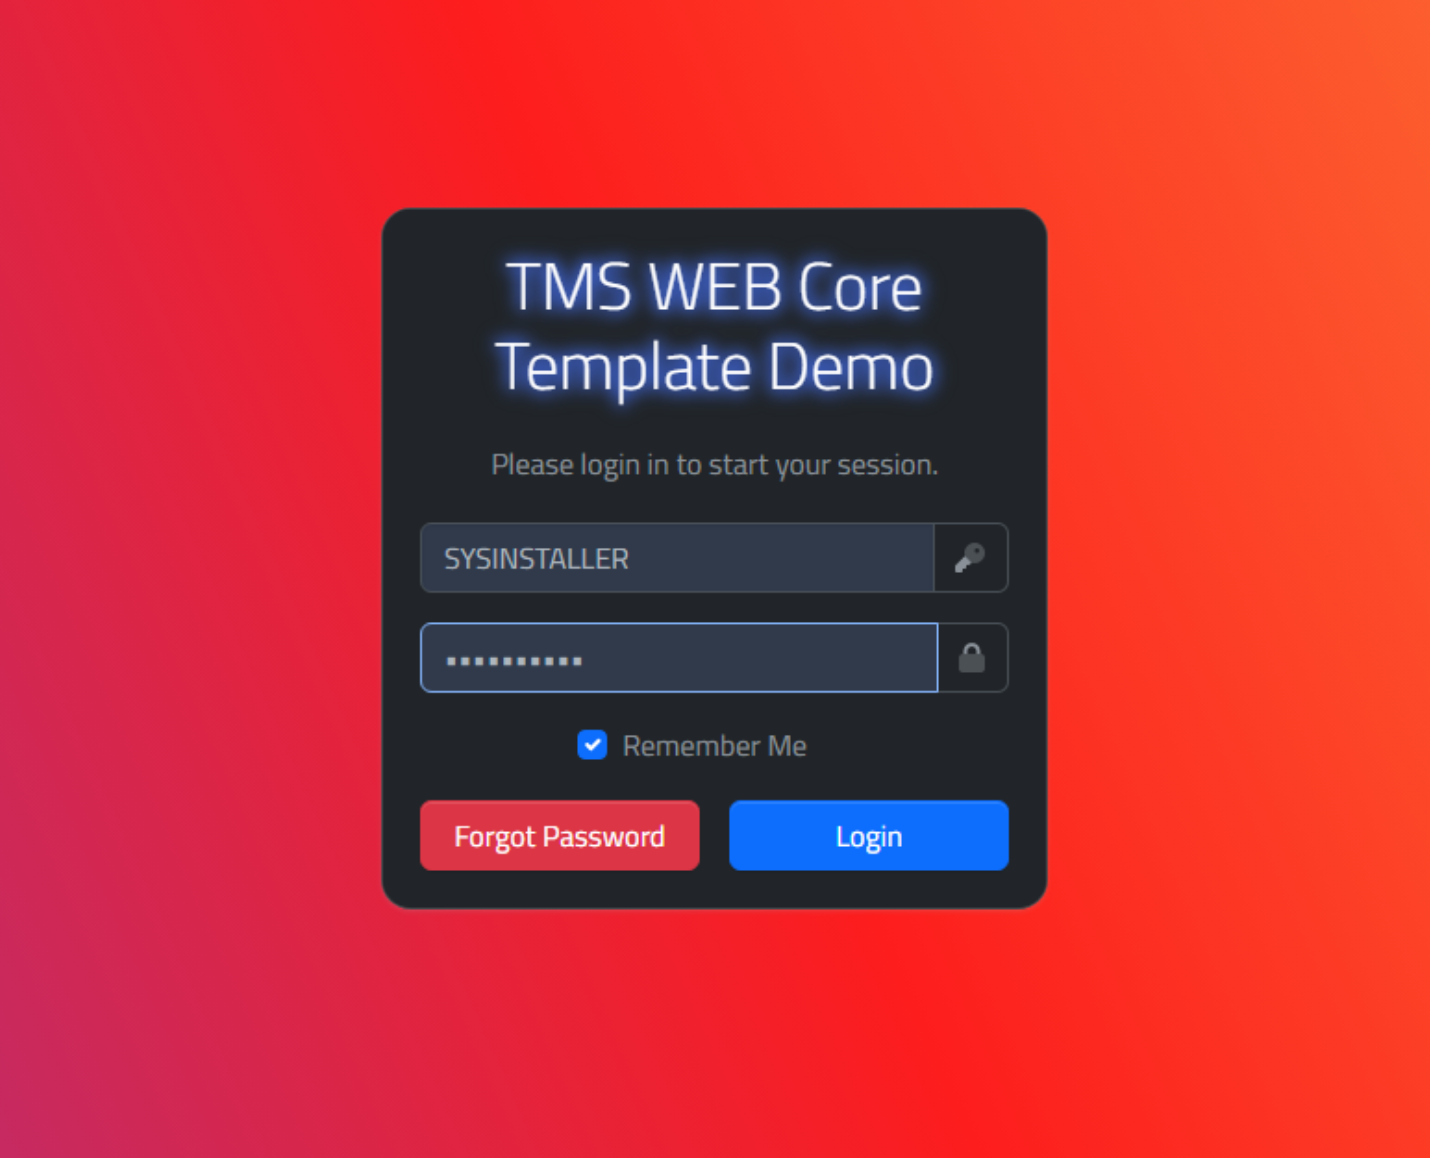
Updated Login Form.
But what do we want this checkbox to actually do? Well, if the login is successful, we'll write out the
username to "local storage" - a place the browser keeps track of, kind of like the modern equivalent of
"cookies". This is a persistent storage mechanism - it survives browser restarts and generally doesn't get
deleted until the application itself (or the user) deliberately deletes the data. We can write a key:value
pair corresponding to the username supplied. When LoginForm is first loaded, we can then check and see if
this key:value pair is available. If it is, we can populate the username TWebEdit component with the value,
and then move the focus to the password TWebEdit component. If the checkbox is not checked, we'll delete the
key:value entry from local storage.
The WEBLib.Storage unit will need to be added to our uses clause. Then, after
a successful login, we can do the following.
    if checkRemember.Checked
    then TWebLocalStorage.SetValue('Login.Username', editUsername.Text)
    else TWebLocalStorage.RemoveKey('Login.Username');
When the application first starts, we can check for this key using the following.
procedure TLoginForm.WebFormCreate(Sender: TObject);
var
  Remembered: String;
begin
  // Check if we have remembered a Username
  Remembered :=  TWebLocalStorage.GetValue('Login.Username');
  if Remembered <> '' then
  begin
    editUsername.Text := Remembered;
    editPassword.SetFocus;
  end
  else
  begin
    editUSername.SetFocus;
  end;
end;
But we can do better! When we log in, we get a JWT. Possessing a valid JWT can be thought of as exactly
equivalent to being logged in. We can save the JWT that we get when logging in, along with its expiration
date (stored separately for convenience, even though it is embedded as a claim in our JWT - twice!). If the application is restarted while the JWT is still valid, we can use it to effectively login
without needing to ask for credentials. Another item to factor in is whether users will be using multiple browser tabs with the application, as this can impact how we want to handle JWTs. If we invalidate a JWT while logging out, for example, applications in other tabs using the same JWT will be unable to continue using it.
There also needs to be some consideration given to whether this is a useful feature for our users or an unnecessary security risk. Certain website vulnerabilities, particularly XSS, can expose this kind of thing to bad actors, with the worst-case scenario being that they can impersonate our users. But an XSS vulnerability is also one of these sorts of problems that may cause one to rethink whether having a public-facing website is really a good idea in the first place. Adjust expectations accordingly. For our purposes, this might very well be an acceptable tradeoff. We'll also need to upgrade our JWT validation check that is performed. We'll want to confirm that the IP address the JWT was issued to is the same as the one making the current request, to at least try and block the most obvious vectors.
Storing and retrieving the JWT in this manner is a bit like (exactly like) storing the application state. And while there is a bigger conversation looming with respect to the use of the browser's back button as it relates to our application state, the easier approach, for now, is to simply store the current form the user is working with, and load that form after logging in automatically. This may not be a perfect solution, depending on how our forms are arranged, but it gets us in the ballpark for the moment.
Here, we
also have to be careful that LoginForm has finished loading before we attempt to load another form in its
place. So we'll move this check to a timer event, and then also add a nicer fade-in for the login box if we
need to login, or not show it at all if we don't need to login. Here's what we've got.
procedure TLoginForm.tmrLoginStartTimer(Sender: TObject);
var
  LoggedIn: Boolean;

begin
  tmrLoginStart.Enabled := False;
  LoggedIn := False;

  // Check if we have remembered a JWT
  if TWebLocalStorage.GetValue('Login.CurrentForm') <> 'Login' then
  begin
    if TWebLocalStorage.GetValue('Login.Expiry') <> '' then
    begin
      MainForm.JWT_Expiry := StrToFloat(TWebLocalStorage.GetValue('Login.Expiry'));
      if SecondsBetween(MainForm.JWT_Expiry, TTimeZone.Local.ToUniversalTime(Now)) > 60 then
      begin
        LoggedIn := True;
//        console.log('JWT Time Remaining: '+IntToStr(SecondsBetween(MainForm.JWT_Expiry, TTimeZone.Local.ToUniversalTime(Now)))+'s');
        MainForm.ProcessJWT(TWebLocalStorage.GetValue('Login.JWT'));
        MainForm.LoadForm(TWebLocalStorage.GetValue('Login.CurrentForm'));
      end;
    end;
  end;

  if not(LoggedIn) then
  begin
    divLoginBox.ElementHandle.style.setProperty('opacity','1');
  end;

end;
This means that, once we've logged in, reloading the page via F5 or Ctrl+F5 or the browser reloading
mechanism of your choice, we won't have to log in again until the JWT expires, even after restarting the
browser. Note that this also means that logging in using two separate accounts might be a bit challenging. When opening a second browser tab and trying to log in a second time, it will automatically login in with the
credentials from the first tab. There's only one set of credentials stored in local storage. On the plus
side, however, you can easily have multiple browser tabs open in the application without having to log in
separately for each. Tradeoffs!
Logout.
The first and most critical part of "logging out" is just a matter of removing any references to the JWT, and then reloading the page - dropping us back at the login page again - assuming that we're not at the login page to start with. We can add a function to do just this in MainForm. We'll get to the Logout endpoint here in just a moment.
procedure TMainForm.Logout(Reason: String);
var
  ResponseString: String;
begin
  if CurrentFormName <> 'Login' then
  begin
    LogAction('Logout: '+Reason);

    ResponseString := await(JSONRequest('ISystemService.Logout',[ActionLogCurrent.Text]));

    JWT := '';
    TWebLocalStorage.setValue('Login.CurrentForm','Login');
    TWebLocalStorage.RemoveKey('Login.JWT');
    TWebLocalStorage.RemoveKey('Login.Expiry');

    window.location.reload(true);
  end;
end;
This can be called when the user clicks a logout button. There's a button in AdministratorForm that we can use for this. To see it in the UI, click on the user image or name in the top-right corner. The same steps we've followed for other template elements work here as well - add a TWebButton component to our form, and then set its ElementID property to have the same value as the id attribute in the HTML page - setting one if one is not already present. We can also add another icon here, with our custom icon mechanism. Then, the button just calls MainForm.Logout. Easy. While we're at it, we'll also add a button for Profile and Actions. More on those in a little bit.
In AdministratorForm.WebFormCreate, we can change the button caption to include a custom icon.
  // User Menu Buttons Buttons
  btnProfile.Caption := DMIcons.Icon('Profile')+'Profile';
  btnActions.Caption := DMIcons.Icon('Actions')+'Actions';
  btnLogout.Caption  := DMIcons.Icon('Logout')+'Logout';
When someone clicks the button, we'll just call MainForm.Logout.
procedure TAdministratorForm.btnLogoutClick(Sender: TObject);
begin
  MainForm.Logout('Button');
end;
And, as we're playing around with the user menu, let's make some tweaks to the presentation. Using CSS, we can add a bit more rounding, also with rounding at the top, and we can make it bigger to fit more stuff, so let's move it over as well so that the small photo and large photo are more closely aligned.
/* DASHBOARDS */
:root {
 --custom-rounding: 1rem;
}
li.nav-item.dropdown.user-menu > ul {
  right: -30px;
  border-radius: var(--custom-rounding);
}
li.nav-item.dropdown.user-menu > ul > li.user-header.text-bg-primary {
  border-top-left-radius: var(--custom-rounding);
  border-top-right-radius: var(--custom-rounding);
}
CSS has variables of its own, so we can set one for custom-rounding and then use it wherever we need it. We could also change one of the existing CSS variables supplied by Bootstrap, but by doing it this way we can be a little more sure that we're only changing what we want to change. To make adjustments to the layout of the buttons, we'll also need to fiddle a bit with the template HTML directly to get the layout just so.
          <!-- Menu Footer-->
          <li class="d-flex m-2 gap-2">
            <button id="btnProfile">Profile</button>
            <button id="btnActions">Actions</button>
            <button id="btnLogout">Sign out</button>
          </li>
Ultimately, we can get exactly what we're after, properly rounded and fit into the space available, with the desired icons and gap spacing. Here's what we've got so far.
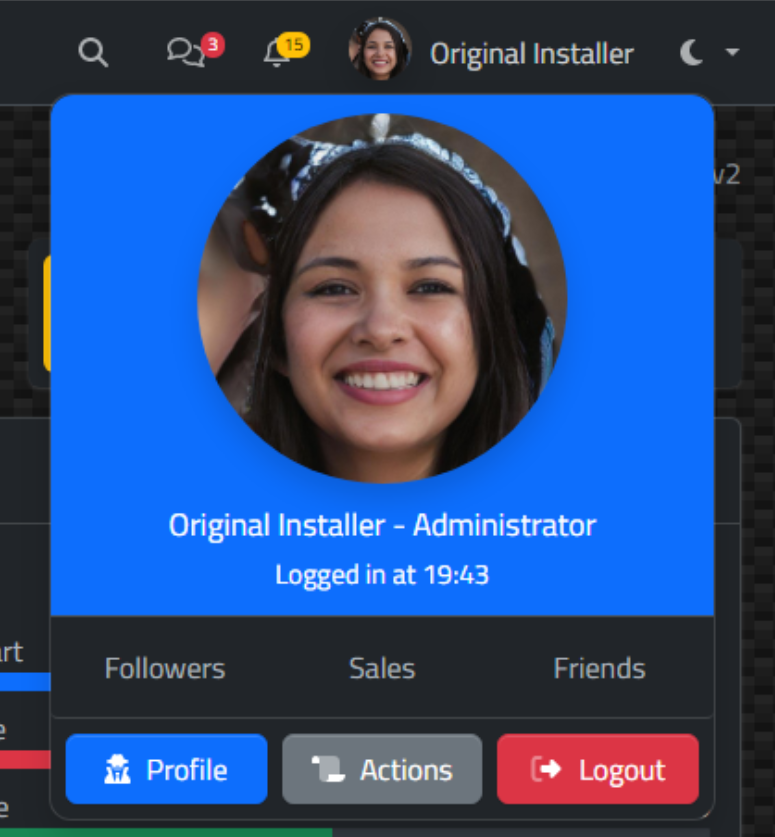
Updated User Menu..
We can even set up a keyboard shortcut to log out more quickly. Let's use the F4 key for the moment. Keyboard handling in TMS WEB Core is surprisingly similar to a regular Delphi app. And even though our LoginForm
is a sub-form of MainForm, the keyboard event handling passes back well enough
(bubbling in JavaScript terminology), so all we need is something very simple. Something to be mindful of,
though, is that there are many shortcut keys already in use by browsers - it can be difficult to find a
keyboard shortcut that is convenient but also not tied to something else.
procedure TMainForm.WebFormKeyDown(Sender: TObject; var Key: Word;
  Shift: TShiftState);
begin
  if Key= VK_F4 then Logout('F4');
end;
Now, you might be asking yourself what this "Reason" is all about - particularly as it doesn't really go anywhere. Well, let's address that. Technically, once the client has lost access to a current JWT, it can't make any authorized requests to the server. Job done. However, the server might like to know when someone has logged out. We can then explicitly remove the JWT from the server, for example, helping lower our potential exposure to XSS attacks just a tiny bit more. Or perhaps we can perform other updates related to the status of the person linked to the account - marking them as "away" or "inactive" for example. Perhaps those two items could be linked.
We'd also like to know what is going on with the client generally. This "action log" that we've been generating while using the application could also be stored on the server for later use - troubleshooting, performance monitoring, or auditing, perhaps. We'll also eventually add other information to this log, such as client and browser information, information about the application, and so on. So let's set up a Logout endpoint and, while we're at it, a Renew endpoint to renew a currently valid JWT for another period of time.
For Logout, there are a bunch of steps that we've been using for all of our endpoints that we'll need here as well. Logging information, that sort of thing. But really all we're after here is to store the "action log" that is passed as a parameter and to potentially remove the existing JWT from the system. We do check that the logout request is authorized. This is deliberate. Wouldn't want one user revoking the JWT of another user, after all. We'll have another endpoint eventually where this can be done, but this is more of a security function, not something that would be happening normally, and certainly restricted more than we're doing here.function TSystemService.Logout(ActionLog: String): TStream;
var
DBConn: TFDConnection;
Query1: TFDQuery;
DatabaseEngine: String;
DatabaseName: String;
ElapsedTime: TDateTime;
OldJWT: String;
User: IUserIdentity;
begin
// Returning JWT, so flag it as such
TXDataOperationContext.Current.Response.Headers.SetValue('content-type', 'application/jwt');
// Time this event
ElapsedTime := Now;
// Get data from the JWT
User := TXDataOperationContext.Current.Request.User;
OldJWT := TXDataOperationContext.Current.Request.Headers.Get('Authorization');
if (User = nil) then raise EXDataHttpUnauthorized.Create('Missing authentication');
// Setup DB connection and query
DatabaseName := MainForm.DatabaseName;
DatabaseEngine := MainForm.DatabaseEngine;
try
DBSupport.ConnectQuery(DBConn, Query1, DatabaseName, DatabaseEngine);
except on E: Exception do
begin
DBSupport.DisconnectQuery(DBConn, Query1);
MainForm.mmInfo.Lines.Add('['+E.Classname+'] '+E.Message);
raise EXDataHttpUnauthorized.Create('Internal Error: CQ');
end;
end;
// Check if we've got a valid JWT (one that has not been revoked)
try
{$Include sql\system\token_check\token_check.inc}
Query1.ParamByName('TOKENHASH').AsString := DBSupport.HashThis(OldJWT);
Query1.Open;
except on E: Exception do
begin
MainForm.mmInfo.Lines.Add('['+E.Classname+'] '+E.Message);
raise EXDataHttpUnauthorized.Create('Internal Error: JC');
end;
end;
if Query1.RecordCount <> 1 then
begin
DBSupport.DisconnectQuery(DBConn, Query1);
raise EXDataHttpUnauthorized.Create('JWT was not validated');
end;
// Revoke JWT
try
{$Include sql\system\token_revoke\token_revoke.inc}
Query1.ParamByName('TOKENHASH').AsString := DBSupport.HashThis(OldJWT);
Query1.ExecSQL;
except on E: Exception do
begin
MainForm.mmInfo.Lines.Add('['+E.Classname+'] '+E.Message);
raise EXDataHttpUnauthorized.Create('Internal Error: TR');
end;
end;
// Record Action History
try
{$Include sql\system\action_history_insert\action_history_insert.inc}
Query1.ParamByName('PERSONID').AsInteger := User.Claims.Find('usr').asInteger;
Query1.ParamByName('IPADDRESS').AsString := TXDataOperationContext.Current.Request.RemoteIP;
Query1.ParamByName('APPLICATION').AsString := User.Claims.Find('app').asString;
Query1.ParamByName('VERSION').AsString := User.Claims.Find('ver').asString;
Query1.ParamByName('ACCESSED').AsDateTime := TTimeZone.local.ToUniversalTime(ElapsedTime);
Query1.ParamByName('ACTIONS').AsString := ActionLog;
Query1.ExecSQL;
except on E: Exception do
begin
DBSupport.DisconnectQuery(DBConn, Query1);
MainForm.mmInfo.Lines.Add('['+E.Classname+'] '+E.Message);
raise EXDataHttpUnauthorized.Create('Internal Error: EHI');
end;
end;
// Keep track of endpoint history
try
{$Include sql\system\endpoint_history_insert\endpoint_history_insert.inc}
Query1.ParamByName('PERSONID').AsInteger := User.Claims.Find('usr').asInteger;
Query1.ParamByName('ENDPOINT').AsString := 'SystemService.Renew';
Query1.ParamByName('ACCESSED').AsDateTime := TTimeZone.local.ToUniversalTime(ElapsedTime);
Query1.ParamByName('IPADDRESS').AsString := TXDataOperationContext.Current.Request.RemoteIP;
Query1.ParamByName('APPLICATION').AsString := User.Claims.Find('app').asString;
Query1.ParamByName('VERSION').AsString := User.Claims.Find('ver').asString;
Query1.ParamByName('DATABASENAME').AsString := User.Claims.Find('dbn').asString;
Query1.ParamByName('DATABASEENGINE').AsString := User.Claims.Find('dbe').asString;
Query1.ParamByName('EXECUTIONMS').AsInteger := MillisecondsBetween(Now,ElapsedTime);
Query1.ParamByName('DETAILS').AsString := '['+User.Claims.Find('anm').asString+']';
Query1.ExecSQL;
except on E: Exception do
begin
DBSupport.DisconnectQuery(DBConn, Query1);
MainForm.mmInfo.Lines.Add('['+E.Classname+'] '+E.Message);
raise EXDataHttpUnauthorized.Create('Internal Error: EHI');
end;
end;
// All Done
try
DBSupport.DisconnectQuery(DBConn, Query1);
except on E: Exception do
begin
MainForm.mmInfo.Lines.Add('['+E.Classname+'] '+E.Message);
raise EXDataHttpUnauthorized.Create('Internal Error: DQ');
end;
end;
end;There are many ways to capture this "action log" data that we're after. What we're going to be doing here is simply keeping two versions - one log to show the user if they wish to see it, and a "current" version that only contains entries since the last JWT renewal. This is so as to limit the upload to whatever actions were taken in the last 15 minutes, for example. When logging out, this is all that we need to send.
But what if we don't log out, but rather just close the browser tab? We can attempt to log out here as well, by using the browser's beforeunload event to try and run the logout function. It may not always get executed (if the browser itself is killed or crashes for example) but it might catch most of the scenarios, making our "action log" data reasonably accurate. There is also the option of having this generate a browser-supplied popup message about the window closing, but those can be irritating so we've commented it out here. This has been added to the end of MainForm.WebFormCreate.
  // What to do if the browser closes unexpectedly
  asm
    window.addEventListener('beforeunload', function (e) {

// Option 1:
// This logs out user when tab is closed
// Highest security
//      pas.UnitMain.MainForm.Logout('Browser Closed');

// Option 2:
// Do nothing
// Lower security but more convenient
// - don't have to login as often.
// - survvies browser restart.

// Option 3:
// This enables annoying browser dialog
// Can be used with either of the above options
//      e.preventDefault();
//      e.returnValue = '';
    });
For Renew, we've got a few more steps to complete, including of course creating a
new JWT from the existing JWT. Something to remember here is that, while we are generating a new JWT, we're not doing as much checking for anything that has changed. There is a check to see if either the original
JWT has been revoked, or if the "Login" role has been revoked - these are more security-related items. But
otherwise, the new JWT is recreated from the existing JWT.
The thinking here is that we'd like this renewal to happen as quickly as possible from the server perspective - it isn't really adding much value (aside from the very important security implications) so we don't really want to incur any costs that we don't have to. If we have hundreds of users, there are likely to be a handful of renewals happening every minute, so keeping these light (as light as we can, anyway) is perhaps more important. Note that it is generally invisible from the user's perspective. However, if we detect that a role has changed, we put up a Toast suggesting that they log out and log in again to get access to the updated roles.
function TSystemService.Renew(ActionLog: String): TStream;
var
  DBConn: TFDConnection;
  Query1: TFDQuery;
  DatabaseEngine: String;
  DatabaseName: String;
  ClientTimeZone: TBundledTimeZone;
  ValidTimeZone: Boolean;
  ElapsedTime: TDateTime;

  PersonID: Integer;
  ApplicationName: String;
  Roles: String;
  EMailAddress: String;
  PasswordHash: String;

  OldJWT: String;
  JWT: TJWT;
  JWTString: String;
  IssuedAt: TDateTime;
  ExpiresAt: TDateTime;

  User: IUserIdentity;
begin
  // Returning JWT, so flag it as such
  TXDataOperationContext.Current.Response.Headers.SetValue('content-type', 'application/jwt');

  // Time this event
  ElapsedTime := Now;

  // We're creating a JWT now that is valid for JWT_PERIOD minutes
  IssuedAt := Now;
  ExpiresAt := IncMinute(IssuedAt, JWT_PERIOD);

  // Get data from the JWT
  User := TXDataOperationContext.Current.Request.User;
  OldJWT := TXDataOperationContext.Current.Request.Headers.Get('Authorization');
  if (User = nil) then raise EXDataHttpUnauthorized.Create('Missing authentication');

  // Setup DB connection and query
  DatabaseName := MainForm.DatabaseName;
  DatabaseEngine := MainForm.DatabaseEngine;
  try
    DBSupport.ConnectQuery(DBConn, Query1, DatabaseName, DatabaseEngine);
  except on E: Exception do
    begin
      DBSupport.DisconnectQuery(DBConn, Query1);
      MainForm.mmInfo.Lines.Add('['+E.Classname+'] '+E.Message);
      raise EXDataHttpUnauthorized.Create('Internal Error: CQ');
    end;
  end;

  // Check if we've got a valid JWT (one that has not been revoked)
  try
    {$Include sql\system\token_check\token_check.inc}
    Query1.ParamByName('TOKENHASH').AsString := DBSupport.HashThis(OldJWT);
    Query1.Open;
  except on E: Exception do
    begin
      MainForm.mmInfo.Lines.Add('['+E.Classname+'] '+E.Message);
      raise EXDataHttpUnauthorized.Create('Internal Error: JC');
    end;
  end;
  if Query1.RecordCount <> 1 then
  begin
    DBSupport.DisconnectQuery(DBConn, Query1);
    raise EXDataHttpUnauthorized.Create('JWT was not validated');
  end;

  // Let's see if they've (still) got the required Login role
  try
    {$Include sql\system\person_role_check\person_role_check.inc}
    Query1.ParamByName('PERSONID').AsInteger := User.Claims.Find('usr').asInteger;
    Query1.Open;
  except on E: Exception do
    begin
      DBSupport.DisconnectQuery(DBConn, Query1);
      MainForm.mmInfo.Lines.Add('['+E.Classname+'] '+E.Message);
      raise EXDataHttpUnauthorized.Create('Internal Error: PRC');
    end;
  end;
  if Query1.FieldByName('role_id').AsInteger <> 0 then
  begin
    DBSupport.DisconnectQuery(DBConn, Query1);
    raise EXDataHttpUnauthorized.Create('Login not authorized');
  end;

  // Login role is present, so let's make a note of the other roles
  Roles := '';
  while not(Query1.EOF) do
  begin
    Roles := Roles + Query1.FieldByName('role_id').AsString;

    // Limit token validity of role expires before token expires
    if not(Query1.FieldByName('valid_until').isNull) and
       (ExpiresAt > TTimeZone.Local.ToLocalTIme(Query1.FieldByName('valid_until').AsDateTime))
    then ExpiresAt := TTimeZone.Local.ToLocalTime(Query1.FieldByName('valid_until').AsDateTime);

    Query1.Next;
    if not(Query1.EOF) then Roles := Roles + ',';
  end;

  // Check if we've got a valid JWT (one that has not been revoked)
  try
    {$Include sql\system\token_check\token_check.inc}
    Query1.ParamByName('TOKENHASH').AsString := DBSupport.HashThis(OldJWT);
    Query1.Open;
  except on E: Exception do
    begin
      MainForm.mmInfo.Lines.Add('['+E.Classname+'] '+E.Message);
      raise EXDataHttpUnauthorized.Create('Internal Error: JC');
    end;
  end;
  if Query1.RecordCount <> 1 then
  begin
    DBSupport.DisconnectQuery(DBConn, Query1);
    raise EXDataHttpUnauthorized.Create('JWT was not validated');
  end;

  // Revoke JWT
  try
    {$Include sql\system\token_revoke\token_revoke.inc}
    Query1.ParamByName('TOKENHASH').AsString := DBSupport.HashThis(OldJWT);
    Query1.ExecSQL;
  except on E: Exception do
    begin
      MainForm.mmInfo.Lines.Add('['+E.Classname+'] '+E.Message);
      raise EXDataHttpUnauthorized.Create('Internal Error: TR');
    end;
  end;

  // Generate a new JWT
  JWT := TJWT.Create;
  try
    // Setup some Claims
    JWT.Claims.Issuer := MainForm.AppName;
    JWT.Claims.SetClaimOfType<string>( 'ver', User.Claims.Find('ver').asString );
    JWT.Claims.SetClaimOfType<string>( 'tzn', User.Claims.Find('tzn').asString );
    JWT.Claims.SetClaimOfType<integer>('usr', User.Claims.Find('usr').asInteger);
    JWT.Claims.SetClaimOfType<string>( 'app', User.Claims.Find('app').asString );
    JWT.Claims.SetClaimOfType<string>( 'dbn', User.Claims.Find('dbn').asString );
    JWT.Claims.SetClaimOfType<string>( 'dbe', User.Claims.Find('dbe').asString );
    JWT.Claims.SetClaimOfType<string>( 'rol', Roles );
    JWT.Claims.SetClaimOfType<string>( 'eml', User.Claims.Find('eml').asString );
    JWT.Claims.SetClaimOfType<string>( 'fnm', User.Claims.Find('fnm').asString );
    JWT.Claims.SetClaimOfType<string>( 'mnm', User.Claims.Find('mnm').asString );
    JWT.Claims.SetClaimOfType<string>( 'lnm', User.Claims.Find('lnm').asString );
    JWT.Claims.SetClaimOfType<string>( 'anm', User.Claims.Find('anm').asString );
    JWT.Claims.SetClaimOfType<string>( 'net', User.Claims.Find('net').asString );
    JWT.Claims.SetClaimOfType<string>( 'aft', FormatDateTime('yyyy-mm-dd hh:nn:ss.zzz',  TTimeZone.local.ToUniversalTime(IssuedAt))+' UTC');
    JWT.Claims.SetClaimOfType<string>( 'unt', FormatDateTime('yyyy-mm-dd hh:nn:ss.zzz',  TTimeZone.local.ToUniversalTime(ExpiresAt))+' UTC');
    JWT.Claims.SetClaimOfType<integer>('iat', DateTimeToUnix(TTimeZone.local.ToUniversalTime(IssuedAt)));
    JWT.Claims.Expiration := ExpiresAt; // Gets converted to UTC automatically

    // Generate the actual JWT
    JWTSTring := 'Bearer '+TJOSE.SHA256CompactToken(ServerContainer.XDataServerJWT.Secret, JWT);
    Result := TStringStream.Create(JWTString);

  finally
    JWT.Free;
  end;

  // Add the JWT to a table that we'll use to help with expring tokens
  try
    {$Include sql\system\token_insert\token_insert.inc}
    Query1.ParamByName('TOKENHASH').AsString := DBSupport.HashThis(JWTString);
    Query1.ParamByName('PERSONID').AsInteger := User.Claims.Find('usr').asInteger;
    Query1.ParamByName('VALIDAFTER').AsDateTime := TTimeZone.local.ToUniversalTime(IssuedAt);
    Query1.ParamByName('VALIDUNTIL').AsDateTime := TTimeZone.local.ToUniversalTime(ExpiresAt);
    Query1.ParamByName('APPLICATION').AsString := User.Claims.Find('app').asString;
    Query1.ExecSQL;
  except on E: Exception do
    begin
      DBSupport.DisconnectQuery(DBConn, Query1);
      MainForm.mmInfo.Lines.Add('['+E.Classname+'] '+E.Message);
      raise EXDataHttpUnauthorized.Create('Internal Error: TI');
    end;
  end;

  // Record Action History
  try
    {$Include sql\system\action_history_insert\action_history_insert.inc}
    Query1.ParamByName('PERSONID').AsInteger := User.Claims.Find('usr').asInteger;
    Query1.ParamByName('IPADDRESS').AsString := TXDataOperationContext.Current.Request.RemoteIP;
    Query1.ParamByName('APPLICATION').AsString := User.Claims.Find('app').asString;
    Query1.ParamByName('VERSION').AsString := User.Claims.Find('ver').asString;
    Query1.ParamByName('ACCESSED').AsDateTime := TTimeZone.local.ToUniversalTime(ElapsedTime);
    Query1.ParamByName('ACTIONS').AsString := ActionLog;
    Query1.ExecSQL;
  except on E: Exception do
    begin
      DBSupport.DisconnectQuery(DBConn, Query1);
      MainForm.mmInfo.Lines.Add('['+E.Classname+'] '+E.Message);
      raise EXDataHttpUnauthorized.Create('Internal Error: EHI');
    end;
  end;

  // Keep track of endpoint history
  try
    {$Include sql\system\endpoint_history_insert\endpoint_history_insert.inc}
    Query1.ParamByName('PERSONID').AsInteger := User.Claims.Find('usr').asInteger;
    Query1.ParamByName('ENDPOINT').AsString := 'SystemService.Renew';
    Query1.ParamByName('ACCESSED').AsDateTime := TTimeZone.local.ToUniversalTime(ElapsedTime);
    Query1.ParamByName('IPADDRESS').AsString := TXDataOperationContext.Current.Request.RemoteIP;
    Query1.ParamByName('APPLICATION').AsString := User.Claims.Find('app').asString;
    Query1.ParamByName('VERSION').AsString := User.Claims.Find('ver').asString;
    Query1.ParamByName('DATABASENAME').AsString := User.Claims.Find('dbn').asString;
    Query1.ParamByName('DATABASEENGINE').AsString := User.Claims.Find('dbe').asString;
    Query1.ParamByName('EXECUTIONMS').AsInteger := MillisecondsBetween(Now,ElapsedTime);
    Query1.ParamByName('DETAILS').AsString := '['+User.Claims.Find('anm').asString+']';
    Query1.ExecSQL;
  except on E: Exception do
    begin
      DBSupport.DisconnectQuery(DBConn, Query1);
      MainForm.mmInfo.Lines.Add('['+E.Classname+'] '+E.Message);
      raise EXDataHttpUnauthorized.Create('Internal Error: EHI');
    end;
  end;

  // All Done
  try
    DBSupport.DisconnectQuery(DBConn, Query1);
  except on E: Exception do
    begin
      MainForm.mmInfo.Lines.Add('['+E.Classname+'] '+E.Message);
      raise EXDataHttpUnauthorized.Create('Internal Error: DQ');
    end;
  end;
end;
As we add more and more endpoints, hopefully, the coding pattern will become obvious and routine. Ultimately we'd like these to be a little shorter to work with - fitting on one screen perhaps. There is quite a bit of commonality between these endpoints, particularly the beginning and ending code. So perhaps sets of {$include} functions are in order, or just more DBSupport functions generally. Overall, though, we've got a coding pattern in place that should make it easy to add dozens or even hundreds of queries, tables, endpoints, and so on, without much concern that anything will break. This is Delphi after all, not an Excel spreadsheet!
For our final logout item, we can also display a warning to the user about a pending auto logout situation,
if no activity has been detected, using the ActivityDetected boolean variable
from MainForm. A little bit tricky, but we can add a setInterval
function to a Toast when it is generated. It can also look at the ActivityDetected
flag and count down if no activity is detected. For the special case of a logout warning (Timeout = 60s) we'll also configure the toast to disappear when any activity is detected via that same Form variable. While we're at it, we might as well add a progress bar for all toasts, just to be fancy-like. If a Toast message contains $S, it will be replaced with the number of seconds remaining, which is what we'll use in our auto-logout message.
procedure TMainForm.Toast(Header, Body: String; Timeout: Integer);
begin
  // Want ID to be unique
  ToastCount := ToastCount + 1;

  asm
    // Create Toast
    var toast = document.createElement('div');
    toast.className = 'toast';
    toast.setAttribute('id','toast'+this.ToastCount);
    toast.setAttribute('role','alert');
    toast.setAttribute('aria-live','assertive');
    toast.setAttribute('aria-atomic','true');
    toast.setAttribute('data-bs-delay', Timeout);
    toast.setAttribute('countdown',parseInt(2*Timeout/1000));

    // Create Toast Header
    var toasth = document.createElement('div');
    toasth.className = 'toast-header bg-danger text-white pb-3 position-relative';
    toasth.innerHTML = '<div style="position:absolute; border-radius: var(--custom-rounding); z-index: 2; display:block; top:37px; left:4px; width:98%; height:5px; background: var(--bs-danger);"></div>'+
                       '<div style="position:absolute; border-radius: var(--custom-rounding); z-index: 1; display:block; top:36px; left:3px; width:98%; height:7px; background: var(--bs-dark);"></div>'+
                       '<strong class="me-auto">'+Header+'</strong>'+
                       '<small class="text-light">just now</small>'+
                       '<button type="button" onclick="pas.UnitMain.MainForm.ActivityDetected = true;"; class="btn-close" data-bs-dismiss="toast" aria-label="Close"></button>';

    // Create Toast Body
    var toastb = document.createElement('div');
    toastb.className = 'toast-body';
    toastb.innerHTML = Body.replace('$S',parseInt(Timeout/1000));

    // Make Toast
    toast.appendChild(toasth);
    toast.appendChild(toastb);
    divToasts.appendChild(toast);

    // Add countdown timer
    const toastc = setInterval(function() {
      if (((Timeout == 60000) && (pas.UnitMain.MainForm.ActivityDetected == true)) || ((toast.getAttribute('countdown') | 0) <= 0)) {
        clearInterval(toastc);
        toast.remove();
      }
      else {
        toast.setAttribute('countdown',toast.getAttribute('countdown')-1);
        toast.lastElementChild.innerHTML = Body.replace('$S',parseInt(toast.getAttribute('countdown')/2));
        toast.firstElementChild.firstElementChild.style.setProperty('width', parseInt(98*toast.getAttribute('countdown')/(Timeout/500))+'%');
      }
    },500);

    // Show Toast
    var newtoast = new bootstrap.Toast(toast).show();

  end;
end;
There is a separate timer, tmrJWTRenewalWarning, that is set to an interval that is 60 seconds prior to the interval for tmrJWTRenewal, which is itself set to 30 seconds prior to the JWT expiration time.
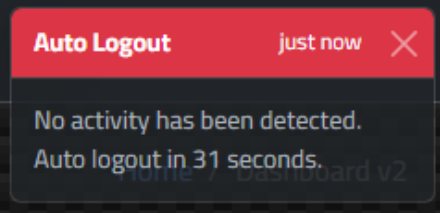
Inactivity Auto Logout Toast.
And with that, we can now start exploring other parts of the AdminLTE template and our application framework
generally.
Menus.
The AdminLTE menu (specifically, the sidebar menu) has several kinds of elements. Simple menu items. Collapsible menu items. Groups. Labels. And so on. To really make this useful, we'll want to be able to
generate our own menu using these elements. We can edit the template directly if we want a static menu, but
most often we'll want to create a custom menu based on the dashboard or other form that was loaded, starting
with a blank menu and adding elements that we'd like via code.
Let's start by adding a TWebHTMLDiv component that is linked to where the menu items are to be added. We can then add elements to this component, using the same HTML that we have in the template, to get our items onto the page. To help keep our code organized, we'll use a new unit, UnitMenus, aka DMMenus, to store any common code. Most of the work will be done in the dashboard units themselves, though, as it is envisioned that each dashboard will have its own menu, apart from perhaps the first section that lists the dashboards themselves.
As a side note, I seem to have gotten into the habit of adding DataModules instead of simpler units for non-visual supporting code, as is the case here, and previously with UnitIcons. This is primarily because of past (VCL) experiences where there were plenty of non-visual components being added in - surprise - database-specific supporting code. Not having a place to drop components is strangely discomforting, even if there isn't a need to drop components in the first place.
Normally, the HTML for the page that is used for a given dashboard would be empty to start with, but in case
it isn't we can clear the menu just by clearing all of its children. The rationale here is that setting innerHTML
to an empty string (via the HTML property of TWebHTMLDiv) is potentially slower,
and may leave event handlers behind. Calling replaceChildren() function, on the
other hand, without passing any children, does a better job of clearing an element.
  // Clear menu
  asm
    menuSidebar.replaceChildren();
  end;
Every dashboard is likely to have a menu that starts with the list of all of the other available dashboards for that particular user. For now, we'll configure the list of dashboards as a function of the roles assigned to a user. Perhaps another user attribute would make more sense, listing the dashboards explicitly, but then that's another thing to manage. Or perhaps there will be a separate way to link roles to dashboards that we can use without coding it like this. But for now, we can iterate through the list of roles and create a menu item for each. The raw HTML that we're adjusting for this first menu originally looks something like this.
          <li class="nav-item menu-open">
          <a href="javascript:;" class="nav-link active">
            <i class="nav-icon fa-solid fa-gauge-high"></i>
            <p>
              Dashboard
              <i class="nav-arrow fa-solid fa-angle-right"></i>
            </p>
          </a>
          <ul class="nav nav-treeview">
            <li class="nav-item">
              <a href="./index.html" class="nav-link">
                <i class="nav-icon fa-regular fa-circle"></i>
                <p>Dashboard v1</p>
              </a>
            </li>
            <li class="nav-item">
              <a href="./index2.html" class="nav-link active">
                <i class="nav-icon fa-regular fa-circle"></i>
                <p>Dashboard v2</p>
              </a>
            </li>
            <li class="nav-item">
              <a href="./index3.html" class="nav-link">
                <i class="nav-icon fa-regular fa-circle"></i>
                <p>Dashboard v3</p>
              </a>
            </li>
          </ul>
        </li>
It looks more complicated than it is, as is typical for HTML, but we'll want to make a few changes here while
we're implementing this. First, we'd like to use different icons much of the time. We'll leave the defaults
in place for those who prefer them, but we can use our existing icon infrastructure to replace them as we
like. The only hiccup is that there are other little classes tacked on. We'll include them in the icon definitions as
well, with a separate _Nav suffix (for example) in the icon component name in case we want to use them
elsewhere later.
We'll also be dispensing with anything resembling an anchor <a> tag - these are links - anywhere we see them in the AdminLTE template. We
don't need them and we really don't want them - they are responsible for the little status bar popup that is
shown at the bottom of the browser window when hovering over page elements.
There are many ways to construct HTML like this. In other cases, we'll just pair up HTML elements with components in our form, and change our component properties to match or alter the HTML. That works great when the HTML already includes everything we need. Here, though, we'll be adding many stanzas that aren't already there, so we have to manage the HTML a little differently.
One approach is to just create a text block and assign it
via an innerHTML property (or equivalently, the HTML property of
a TWebHTMLDiv component). Another is to create a pile of createElement()
calls combined with calls to appendChild() to build a tree of elements. Or both
could be used. Here we're kind of mashing together a combination of the two to get the desired result.
procedure TDMMenus.AddDashboards(SideMenu: String; Dashboard: String);
begin
  asm
    // Setup a link to the sidebar menu and to our icons
    var menu = document.getElementById(SideMenu);
    var icon = pas.UnitIcons.DMIcons.Lookup;
    var roles = JSON.parse('['+pas.UnitMain.MainForm.Roles+']');

    // Top-level of this menu block
    var menuTop = document.createElement('li');
    menuTop.className = 'nav-item menu-open';

    // Header for this menu block
    var menuName = document.createElement('div');
    menuName.className = 'nav-link active px-1 cursor-pointer';
    menuName.innerHTML = '<strong>'+icon["Dashboard_Nav"]+'</strong><p><strong>Dashboards</strong>'+icon["ArrowRight_Nav"]+'</p>';

    // Add to page
    menu.appendChild(menuTop);
    menuTop.appendChild(menuName);

    // Build tree
    var menuTree = document.createElement('ul');
    menuTree.className = 'nav nav-treeview';

    // Use roles to generate the list of dashboards
    var dashboards = new Set();
    for (var i = 0; i < roles.length; i++) {
      // Administrator Dashboards
      if (roles[i] == 1) {
        dashboards.add('Administrator');
        dashboards.add('People');
        dashboards.add('Labels');
      }
    }

    // For each element of the list, add a menu item
    dashboards.forEach(dash => {

      // Create menu item
      var menuEntry = document.createElement('li');
      menuEntry.className = 'nav-item cursor-pointer';
      menuEntry.setAttribute('id',dash.replace('_','')+'_Dashboard_'+Dashboard.replace('_','')+'Sub');
      var menuLink = document.createElement('div');
      menuLink.innerHTML = icon[dash.replace('_','')+'_Menu']+'<p>'+dash+'</p>';

      // Highlight dashboard item if it is the current dashboard
      if (dash == Dashboard) { menuLink.className = 'pe-none nav-link active'; }
      else { menuLink.className = 'pe-none nav-link'; }

      // And menu item to menu tree
      menuTree.appendChild(menuEntry);
      menuEntry.appendChild(menuLink);

      // Add click event
      menuEntry.addEventListener('click', (menu) => {
        pas.UnitMenus.DMMenus.MenuClicked(
          menu.target.id.split('_')[0],
          menu.target.id.split('_')[1],
          menu.target.id.split('_')[2],
          true
        );
      });
    });

    // Add the menu tree to the menu
    menuTop.appendChild(menuTree);
  end;

end;
Near the end of this code, we use addEventListener() to add a click event to the menu item we've created. This will then call the Delphi MenuClicked event in DMMenus, passing it the name of the menu that was clicked. As this is a dashboard menu (which is linked directly to individual forms), we can just call MainForm.LoadForm with the name of the dashboard.
procedure TDMMenus.MenuClicked(Dashboard: String; MenuGroup: String; MenuName: String; UserAction: Boolean);
begin
  // Load either a new dashboard or a subform on the current dashboard
  if MainForm.CurrentFormName = Dashboard+'Form' then
  begin
    // Load a SubForm (aka Page)
    if (UserAction) then MainForm.LogAction('Page Selected ['+Dashboard+'] ['+MenuGroup+'] ['+MenuName+']',true);
    MainForm.LoadSubForm(MenuName,DMIcons.Icon(MenuName+'_Menu'));
  end
  else
  begin
    // Load a Form (aka Dashboard)
    if (UserAction) then MainForm.LogAction('Dash Selected ['+Dashboard+'] ['+MenuGroup+'] ['+MenuName+']',true);
    MainForm.LoadForm(Dashboard+'Form',DMIcons.Icon(Dashboard+'_Menu'));
  end;
end;
Other menu items are created in a similar way, but with more functions to build up a menu one item at a time. To create a structure equivalent to the dashboard menu above, let's use two methods - one for the group and one for the item. This is roughly the same code but split up into these two functions. Extra care is taken to process underscores - either removing them or replacing them with spaces, depending on where they appear.
procedure TDMMenus.AddMenuGroup(SideMenu: String; MenuGroup:String; Dashboard: String);
begin
  asm
    // Setup a link to the sidebar menu and to our icons
    var menu = document.getElementById(SideMenu);
    var icon = pas.UnitIcons.DMIcons.Lookup;

    // Top-level of this menu block
    var menuTop = document.createElement('li');
    menuTop.className = 'nav-item menu-close';

    // Header for this menu block
    var menuName = document.createElement('div');
    menuName.className = 'nav-link active px-1 cursor-pointer';
    menuName.innerHTML = '<strong>'+icon[MenuGroup.replace('_','')+'_Menu']+'</strong><p class="pe-none"><strong>'+MenuGroup.replace('_',' ')+'</strong>'+icon["ArrowRight_Nav"]+'</p>';

    // Add to page
    menu.appendChild(menuTop);
    menuTop.appendChild(menuName);

    // Build tree
    var menuTree = document.createElement('ul');
    menuTree.className = 'nav nav-treeview';
    menuTree.id = 'Menu_'+Dashboard.replace('_','')+'_'+MenuGroup.replace('_','');
    menuTop.appendChild(menuTree);
  end;

end;

procedure TDMMenus.AddMenuItem(MenuGroup, MenuItem, Dashboard: String);
begin
  asm
    var menuTree = document.getElementById('Menu_'+Dashboard.replace('_','')+'_'+MenuGroup.replace('_',''));
    var icon = pas.UnitIcons.DMIcons.Lookup;

    // Create menu item
    var menuEntry = document.createElement('li');
    menuEntry.className = 'nav-item cursor-pointer';
    menuEntry.setAttribute('id',Dashboard.replace('_','')+'_'+MenuGroup.replace('_','')+'_'+MenuItem.replace('_',''));
    var menuLink = document.createElement('div');
    menuLink.innerHTML = icon[MenuItem.replace('_','')+'_Menu']+'<p>'+MenuItem.replace('_',' ')+'</p>';
    menuLink.className = 'pe-none nav-link';

    // And menu item to menu tree
    menuTree.appendChild(menuEntry);
    menuEntry.appendChild(menuLink);

    // Add click event
    menuEntry.addEventListener('click', (menu) => {
      pas.UnitMenus.DMMenus.MenuClicked(
        menu.target.id.split('_')[0],
        menu.target.id.split('_')[1],
        menu.target.id.split('_')[2],
        true
      );
    });
  end;
end;
Using AdministratorForm as an example, we can use the above
functions, calling AddMenuGroup or AddMenuItem as often as necessary. Combined with the previous menu work, we
end up with the following.
procedure TAdministratorForm.CreateMenu;
begin
  // Clear menu
  asm menuSidebar.replaceChildren(); end;

  // Add Available Dashboards
  DMMenus.AddDashboards(menuSidebar.ElementID, 'Administrator');

  // Administrator Database Menu
  DMMenus.AddMenuGroup(menuSidebar.ElementID, 'Database', 'Administrator');
  DMMenus.AddMenuItem('Database', 'Endpoints', 'Administrator');
  DMMenus.AddMenuItem('Database', 'Logins', 'Administrator');
  DMMenus.AddMenuItem('Database', 'Failed_Logins', 'Administrator');

  // Administrator Network Menu
  DMMenus.AddMenuGroup(menuSidebar.ElementID, 'Network', 'Administrator');
  DMMenus.AddMenuItem('Network', 'Tokens', 'Administrator');
  DMMenus.AddMenuItem('Network', 'IP_Allow', 'Administrator');
  DMMenus.AddMenuItem('Network', 'IP_Block', 'Administrator');

end;
Icons are assigned to each term, suffixed with _Menu as we did with the dashboard items. Here's what it looks like. The Database and Network menus are collapsed by default when the form loads initially.
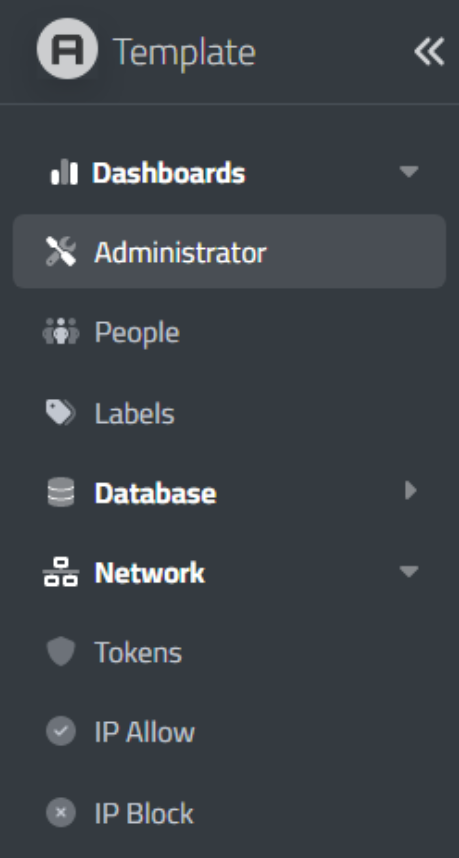
Customized Menu.
The AdminLTE menu system is based primarily on a typical HTML list. Adding additional elements is possible following the same pattern, but anything could be added here - images or <select> elements, for example. In the default AdminLTE template, anchor links are used to navigate between pages. In our TMS WEB Core project, we don't use links for that kind of thing, at least within our own application. Instead, we just show and hide different forms or different elements on the page to achieve a similar result, without requiring page loads.
Note also that this menu uses JavaScript from the AdminLTE template to handle expanding and collapsing. That code is linked when we call the DomContentLoaded event, as we've covered previously. Calling that repeatedly seems to mess up the links, though (probably duplicate events?). The workaround at the moment is to call the CreateMenu method again. Will have to keep an eye on this as the AdminLTE 4 template approaches its official release.
Structure.
The main item left, then, is, well, the main content of the page. So let's talk a bit about how we want to approach this. The idea so far is that we have a collection of forms, each corresponding to a dashboard, that we can load up into divHost. The dashboard is intended to serve as the main page for that entire section of our application. It will have elements that are generally what you think of when you think of a dashboard - summary charts, indicators, top-level figures, that sort of thing.
From these elements, and from the sidebar menu, we can dive deeper into specific areas and see more
detail, or perhaps have elements that are more complex, for editing data or interacting with data in other ways,
that are not really dashboard-worthy functions. It may very well be that all of the dashboards in our application
look and work the same, or they may share very little in terms of content or functionality.
A dashboard for a system administrator might look very different than a dashboard for a customer or vendor. The Administrator dashboard might show the number of people currently logged in, how many logins have been
recorded today, how many failed logins have been recorded today, and how many IP addresses have been allowed
or blocked. Clicking on, say, the number of IP addresses that have been blocked might lead to a different page
where the list can be viewed in detail, and perhaps edited in some way, to add or remove IP addresses. The
main header of the dashboard might have elements related to the organization - links to people, notifications,
chats, and that kind of thing.
A customer dashboard might not even have a menu on the left, or a simpler one if it does. And the elements
across the top are likely to be more concerned with branding and customer tools, not so much anything to do
with the organization's communications infrastructure. There may also be an entirely different theme used for
a particular dashboard - perhaps related to department-specific themes or something like that. So switching
dashboards is treated as a "whole page" kind of transition. Switching between different pages within the same
dashboard shouldn't really impact the sidebar menu, the header, or the footer.
When the dashboard form first loads, it will therefore need to present a set of elements on the page. When we get to that, shortly, we'll see that this can work in much the same way as it does with how we managed the HTML for the menu system. Simply remove the block of HTML and replace it with something else. But unlike the menu system, these main elements will be changing substantially, and there will be considerably greater variability in terms of the number and complexity of elements that are visible at any given time. If we have a very complex suite of elements that make up everything under the Administrator heading, we might end up with dozens of different pages that we will want to navigate around. And we might even have a few such pages that are common across more than one dashboard.
What does all this mean? Well, it means that we're going to have to create more forms and use those as subforms within our dashboard forms. Starting to get a little hard to follow. But if we envision having hundreds of pages of content, this might be the least crazy way to do it. Also, moving between very small forms (maybe a handful of elements) is pretty painless. But if you build a form with hundreds of elements, moving between forms can sometimes take quite a bit longer. So we'd like to avoid that as much as possible.
We'll use an element within the dashboard form as the host element, in this case, referenced by divSubForm,
and then swap subforms just as we swap dashboard forms. And those subforms don't have to be directly tied to
a given dashboard - they could be whatever we like. Let's set up a form for the user profile, and one for
viewing the user action log, to see how this works.
Profile.
For this subform, we'll want to display a header and then a bit of information about the user currently logged in. Nothing too fancy just yet as we're just trying to get this all to work properly. For all subforms, the header is likely to be the same. A title and some breadcrumbs on the right. We can wire up the current dashboard to the breadcrumbs by using an id attribute, and then connecting that to a TWebLabel and ElementID property, as we've been doing elsewhere.
        <div class="app-content-header">
          <div class="container-fluid">
            <div class="row">
              <div class="col-sm-6">
                <h3 id="labelDashboard" class="mb-0">User Profile</h3>
              </div>
              <div class="col-sm-6">
                <ol class="breadcrumb float-sm-end">
                  <li id="bcDashboards" class="breadcrumb-item">Dashboards</li>
                  <li id="bcDashboard" class="breadcrumb-item">Dashboard</li>
                  <li id="bcCurrent" class="breadcrumb-item active" aria-current="page">User Profile</li>
                </ol>
              </div>
            </div>
          </div>
        </div>
In WebFormCreate for our subform, we can update this block of HTML with all the icons and text. A click event
is also wired up to the "bcDashboard" element so that clicking on it will return us to the main Administrator
page.
procedure TUserProfileSubForm.WebFormCreate(Sender: TObject);
begin
  labelDashboard.HTML := DMIcons.Icon('Profile_Menu')+'User Profile';
  bcDashboards.HTML := DMICons.Icon('Dashboard_Menu')+'Dashboards';
  bcDashboard.HTML := mainForm.CurrentFormIcon+MainForm.CurrentFormName;
  bcCurrent.hTML := DMIcons.Icon('Profile_Menu')+'User Profile';
end;

procedure TUserProfileSubForm.bcDashboardClick(Sender: TObject);
begin
  DMMenus.MenuClicked(StringReplace(MainForm.CurrentFormName,'Form','',[]),'Dashboard',StringReplace(MainForm.CurrentFormName,'Form','',[])+'Sub', True)
end;
This then makes up the common pieces that we'll use for every subform unit that we create - the title on the
left and the breadcrumbs on the right. For each remaining element, we'll have to do what we did with the
menus - add a block of HTML corresponding to the AdminLTE theme conventions to get a new "block" on the page
that we can then populate with data or adjust with whatever settings are available to that block. And we'll
have to retrieve data from the XData server, most of the time, to populate the block.
For the User Profile, let's add a set of "info-box" boxes similar to the default template we were using
before. Just some arbitrary bits of information. The Bootstrap classes in the HTML in this case can be
adjusted to allow for a 6-across display of info-boxes instead of the 4-across that was in the original
template. Typically, Bootstrap works with a set of 12 columns, so any factors of 12 make even column
splitting easy. Here's what we want to display.
- Birthday.
- Work Anniversary.
- E-Mail address.
- Phone Number.
- Last Logged In.
- Number of Logins (past 7 days / all-time)
Then, let's have a section where we can display profile information, like the user's photo, name, and contact information. We'll need to get these from XData as well, in case they've changed since the application started. And finally, let's have a little section where we show the recent login history.
The work of retrieving all this data can be simplified by combining it into one endpoint, just as we did for the main dashboard. We'll get a block of JSON back that we can then process to update the elements on the page, also as we did previously.
To add each bit of data to the page, we'll use a block of HTML copied from the AdminLTE templates. The info-boxes are one, but there are others, like the collapsible sections, where we can add whatever we like inside and still have it work normally. With the menus, we were building this HTML directly as we didn't know how many blocks we'd need. Here, though, the blocks are largely static - just the contents are changing - so the HTML for the blocks can be edited directly as HTML. The tough part is populating them with data. Which we'll do as soon as the form is loaded.
procedure TUserProfileSubForm.WebFormCreate(Sender: TObject);
var
  ResponseString: String;

begin
  labelDashboard.HTML := DMIcons.Icon('Profile_Menu')+'User Profile';
  bcDashboards.HTML := DMICons.Icon('Dashboard_Menu')+'Dashboards';
  bcDashboard.HTML := mainForm.CurrentFormIcon+MainForm.CurrentFormName;
  bcCurrent.hTML := DMIcons.Icon('Profile_Menu')+'User Profile';

  ResponseString := await(MainForm.JSONRequest('IPersonService.profile',[]));
  if ResponseString <> '' then
  begin
    asm
      var icon = pas.UnitIcons.DMIcons.Lookup;
      var data = JSON.parse(ResponseString);

      console.log(data);
//      luxon.DateTime.fromISO('2023-03-06T13:34:37',{zone:"utc"}).setZone("system").toFormat('yyyy-MMM-dd HH:mm:ss');

      iconBirthday.innerHTML = icon['Birthday'];
      labelBirthday.innerHTML =  luxon.DateTime.fromISO(data['Profile'][0]['birthdate'].split(' ')[0]).toFormat('yyyy-MMM-dd');

      iconAnniversary.innerHTML = icon['Anniversary'];
      labelAnniversary.innerHTML = luxon.DateTime.fromISO(data['Role'][0]['valid_after'].split(' ')[0]).toFormat('yyyy-MMM-dd');

      var email = -1;
      var phone = -1;
      for (var i = 0; i < data['Contact'].length; i++) {
        if (data['Contact'][i]['list_contact'] == 1) {
          if (email == -1) {
            email = i;
          }
        }
        else if (data['Contact'][i]['list_contact'] == 3) {
          if (phone == -1) {
            phone = i;
          }
        }
      }
      iconEMail.innerHTML = icon['EMail'];
      if (email !== -1) {
        labelEMail.innerHTML = '<a title="'+data['Contact'][email]['value']+'" href=mailto:"'+data['Contact'][email]['value']+'">'+data['Contact'][email]['value']+'</a>';
      }
      iconPhone.innerHTML = icon['Telephone'];
      if (phone !== -1) {
        labelPhone.innerHTML = '<a title="'+data['Contact'][phone]['value']+'" href="tel:'+data['Contact'][phone]['value']+'">'+data['Contact'][phone]['value']+'</a>';
      }

      var lastlogin = luxon.DateTime.fromISO(data['RecentLogins'][0]['logged_in'].split(' ').join('T'),{zone:"utc"}).setZone("system").toFormat('yyyy-MMM-dd HH:mm');
      iconLastLogin.innerHTML = icon['Login'];
      labelLastLogin.innerHTML = '<span title="'+lastlogin+'">'+lastlogin+'</span>';

      iconRecentLogins.innerHTML = icon['Clock'];
      labelRecentLogins.innerHTML = data['RecentLogins'].length+' <small class="text-secondary me-3"> 7d </small> '+data['Logins'][0]['logins']+' <small class="text-secondary"> All </small>';

      titleImage.innerHTML = icon['Photo']+'<span class="ms-2">Profile Photo</span>';
      imageProfile.innerHTML = data['Photo'];
      imageProfile.firstElementChild.style.setProperty('width','100%');
      imageProfile.firstElementChild.style.setProperty('border-bottom-left-radius','var(--custom-rounding)');
      imageProfile.firstElementChild.style.setProperty('border-bottom-right-radius','var(--custom-rounding)');

      titleContacts.innerHTML = icon['AddressBook']+'<span class="ms-2">Contacts for '+data['Profile'][0]['first_name']+' '+data['Profile'][0]['last_name']+'</span>';
      var tablerows = '';
      for (var i = 0; i < data['Contact'].length; i++) {
        tablerows += '<tr>'
        var contact_icon = data['Contact'][i]['contact_attributes'];
        if (contact_icon.indexOf(':') == 0) {
          contact_icon = icon[contact_icon.replace(':','')];
        }
        tablerows += '<td>'+contact_icon+'</td>';
        tablerows += '<td>'+data['Contact'][i]['contact_type']+'</td>';
        tablerows += '<td>'+data['Contact'][i]['value']+'</td>';
        tablerows += '</tr>'
      }
      tableContacts.innerHTML = tablerows;

      titleHistory.innerHTML = icon['Clock']+'<span class="ms-2">Recent Login History</span>';
      tableHistory.style.setProperty('max-height','525px');
      tableHistory.style.setProperty('border-bottom-left-radius','var(--custom-rounding)');
      tableHistory.style.setProperty('border-bottom-right-radius','var(--custom-rounding)');
      var tabHistory = new Tabulator("#tableHistory",{
        data: data['RecentLogins'],
        layout: "fitColumns",
        selectable: 1,
        columns: [
          { title: "Logged In", field: "logged_in", formatter: function(cell, formatterParams, onRendered) {
            return luxon.DateTime.fromISO(cell.getValue().split(' ').join('T'),{zone:"utc"}).setZone("system").toFormat('yyyy-MMM-dd HH:mm:ss');
          }},
          { title: "IP Address", field: "ip_address" }
        ]
      });

    end;
  end;
Here we've got examples of pretty much everything. An image. A regular HTML table. And even a Tabulator table that has been themed to look like a normal HTML, more or less. There's a bit of work to sort out converting the server's UTC timestamps into something in the local timezone. Luxon is good for that. Plenty of icons are displayed in a few new situations, like in the table. And even some custom scrollbars have been thrown in for good measure. And we end up with a workable end result.
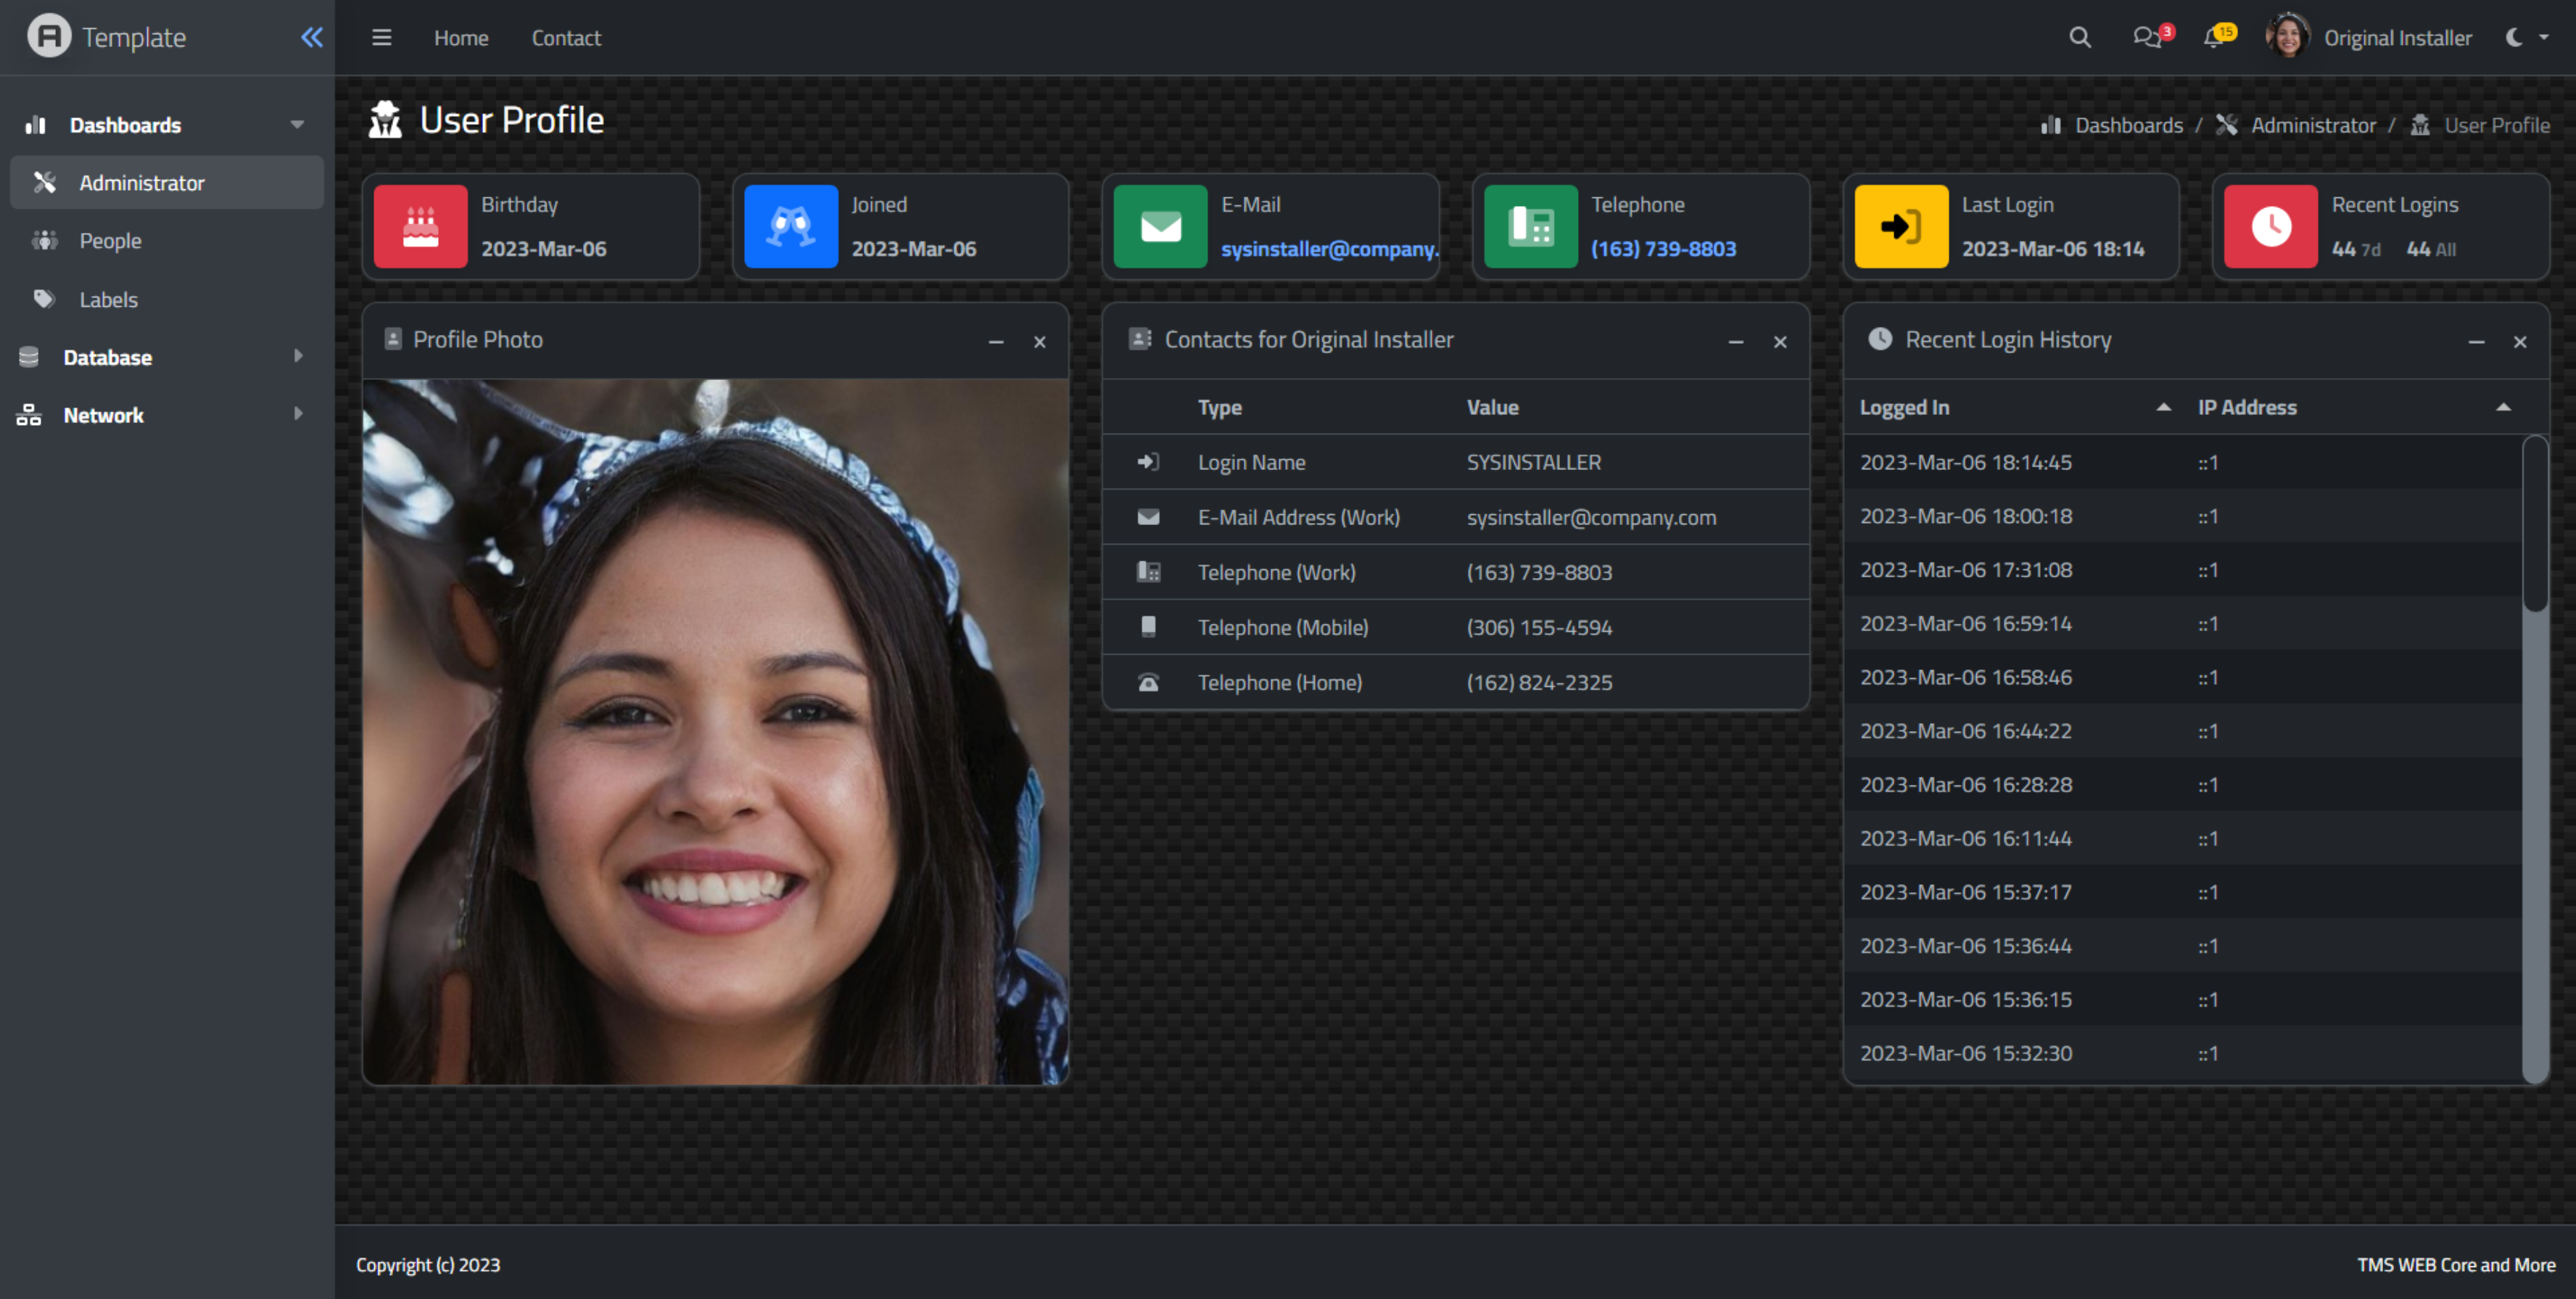
Profile Page.
The block "tools" in this case are simple - just providing options for minimizing or closing. The tools available can be expanded to include custom menus, footers, buttons, and so on. And if there's a Tabulator table sitting there all sweet and innnocent-like, there's really no limit on what else can be done.
The purpose of this page, though,
is just for someone to check up on what data is in their profile. Or the beginnings of that. And not
necessarily something where they'd be doing any editing directly themselves, at least in this instance. Maybe we'll add an extra
security option so people could change some of this data if they wanted, but generally (in corporate environments, anyway) this
kind of information is more tightly controlled and would only be changed by an administrator of some kind or through official channels.
Actions.
The actions page is intended to display the action log, that log that we started generating at the very beginning of our TMS WEB Core template project. Originally, we just had a button that would drop the contents of the ActionLog TStringList into a <div> element so we could look at it. The same approach is taken here, just that the <div> element is buried within another chunk of the AdminLTE template. A bit of extra care is taken to try and fit the AdminLTE block into the page without adding any page scrollbars - the block itself will have scrollbars of its own. But overall, this is one of the simpler pages we'll ever have to create using the AdminLTE template.
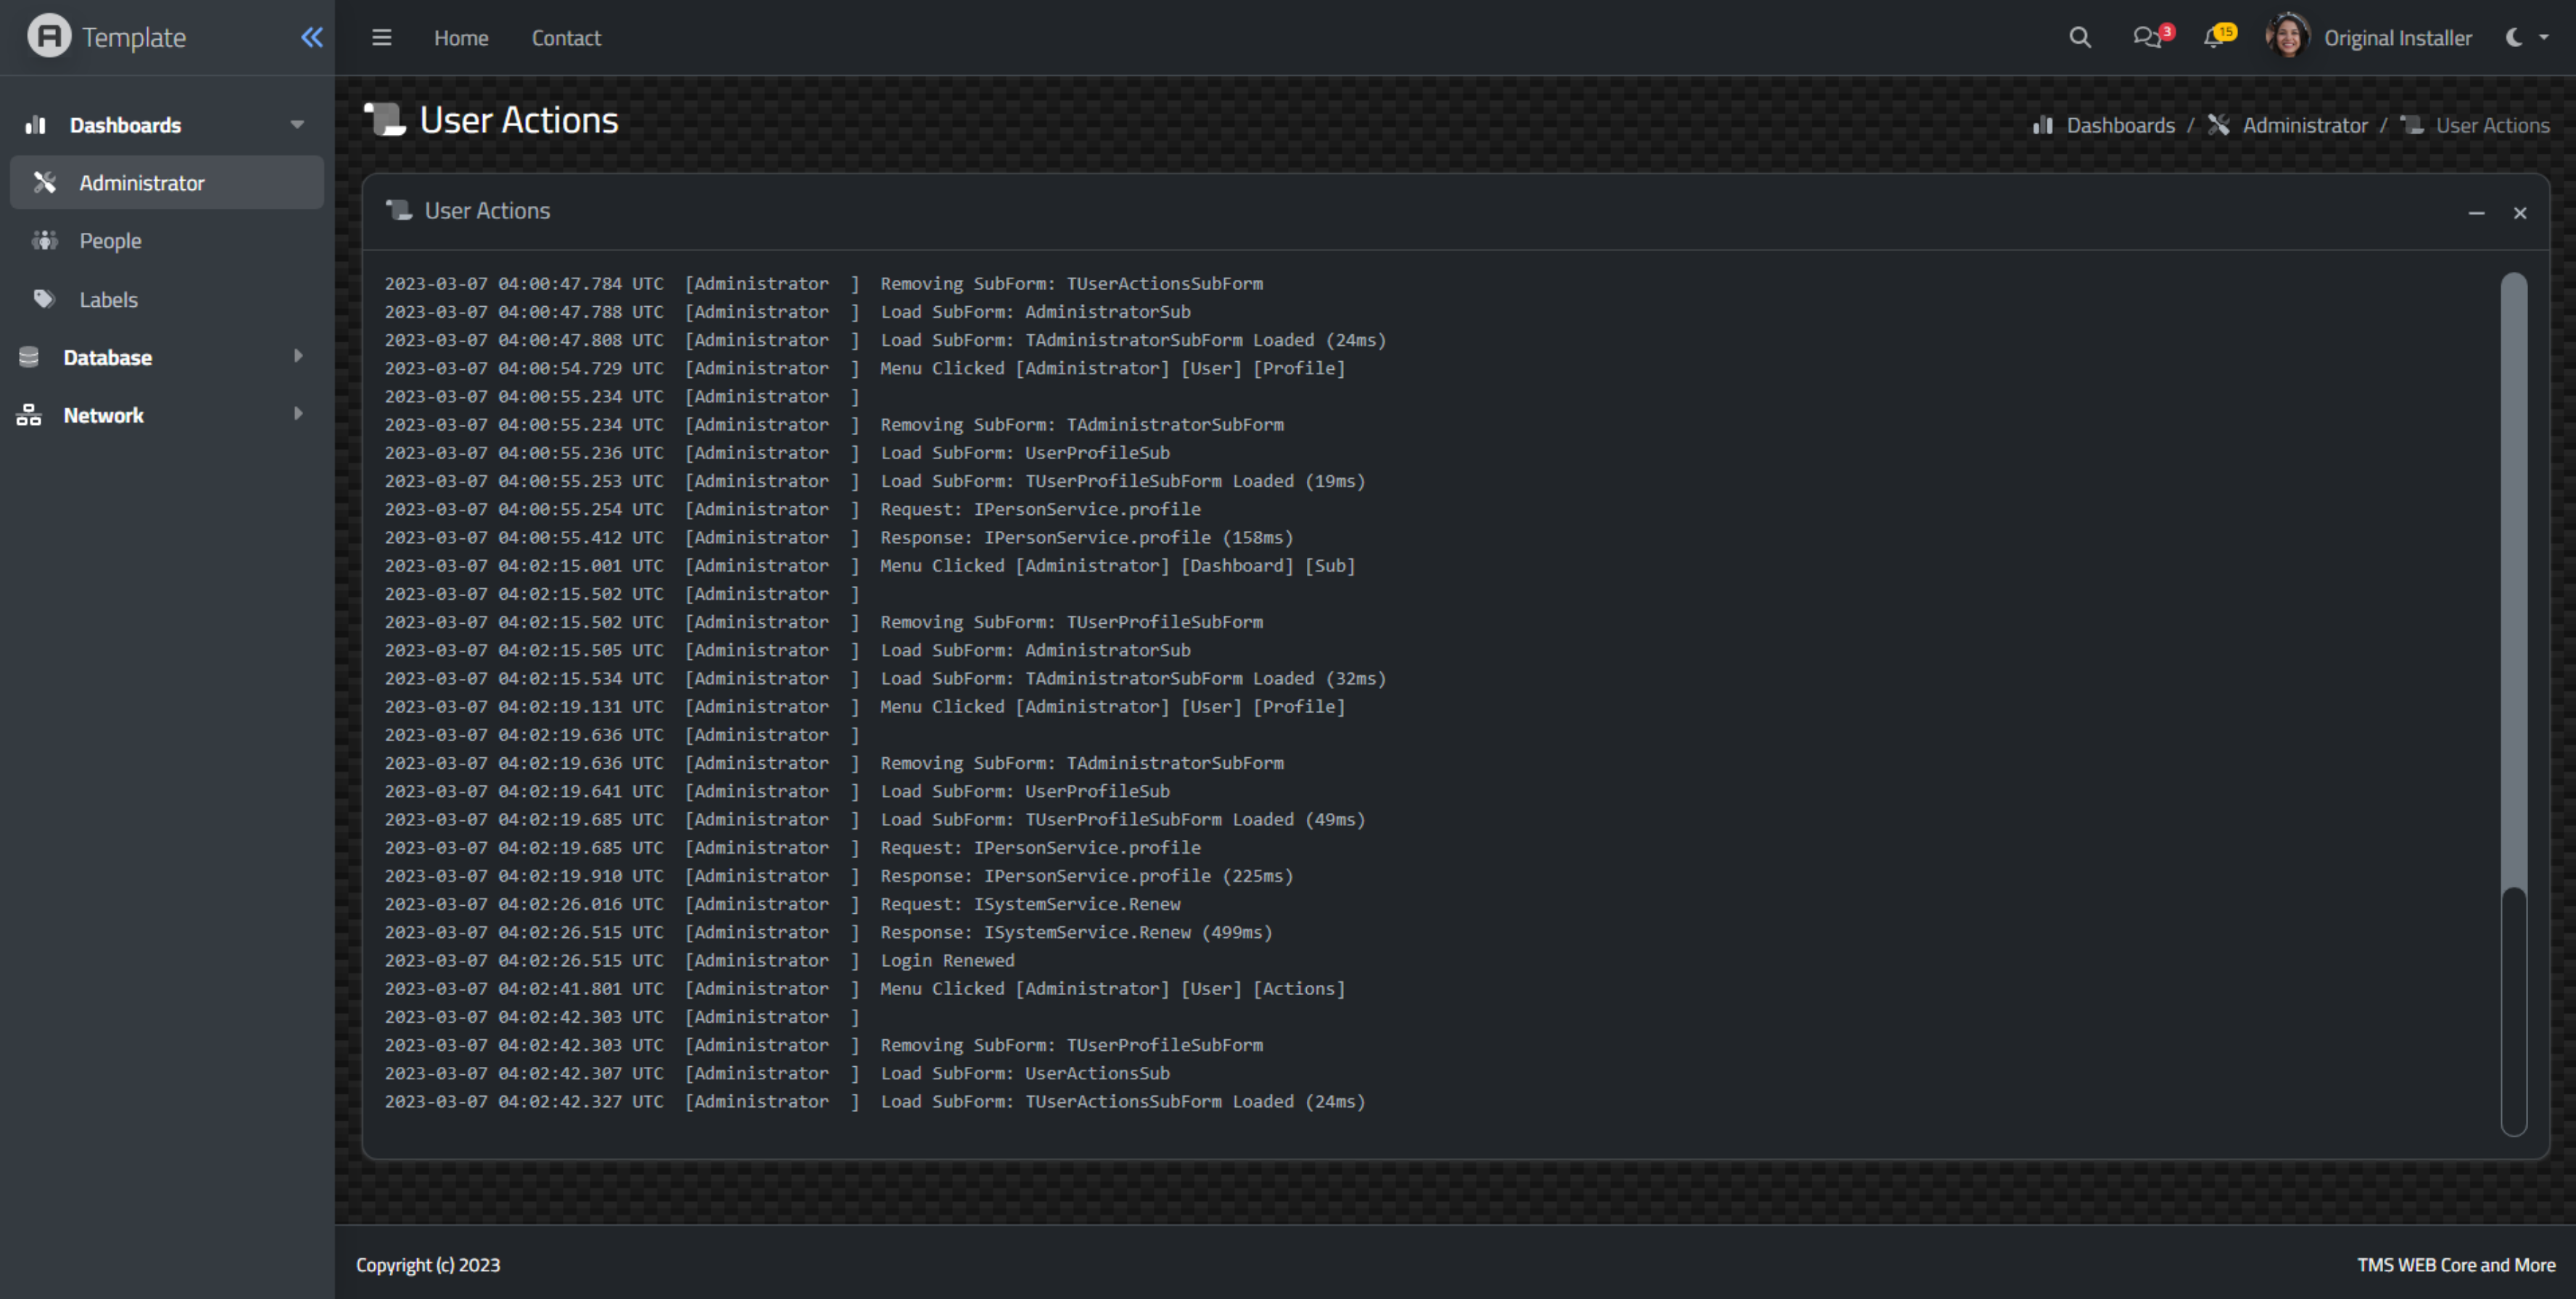
Actions Log in the AdminLTE Template.
While this is one of the simpler pages, it also helps when it comes to testing out various things.
We now have three pages (the Profile page, this page, and the original AdminLTE example page). We can move around a bit and see how the page switching works, including transitions. And while working through this post, we've also added a few more tables and queries to the XData server, and a whole pile of icons. Well on our way to creating something more substantial.
Printing.
Printing web pages is often a notoriously troublesome affair. The browser in effect renders a new page, often with different dimensions than the page we're normally looking at. This causes content to reflow, elements to take up unexpected amounts of space relative to one another, and results in generally just a seemingly endless series of problems.
To help with this, we can apply special CSS @media rules specific to printing. This essentially applies whatever rules we want to our existing page so that when it is rendered for printing, we have a little more control. The main thing we're interested in here is disabling the various menu bars and related UI elements that tend to cover the content we're interested in - the main part of the page. We can add CSS rules that just hide that content. We can also add a class, no-print, that we can add wherever content is being printed that we don't want included, such as the main (and now hidden) part of our UI - those extra buttons. This gets us started.
@media print {
  .app-header,
  .app-footer,
  .app-sidebar,
  .no-print, .no-print * {
    display: none !important;
  }
}
Individual components can also cause a bit of grief. In this case, the ChartJS chart in the default template
we're using wants to print wider than the page width. We can add a bit of CSS for this as well. ChartJS
charts are <canvas> elements, so we can craft a rule to catch them all at once (attribution). If we end up using another component that also uses <canvas> elements, we might have to update this to
be more specific, and potentially add something for the new component as well.
    canvas {
        min-height: 100%;
        max-width: 100%;
        max-height: 100%;
        height: auto!important;
        width: auto!important;
    }
Ultimately, though, leaving the print formatting to the browser is likely to be only a stop-gap measure. Anything of consequence that is to be routinely printed should be set up with a separate printing function,
ideally with a PDF output option. Tables, generally, are a good candidate for this kind of thing as they will
surely get mangled, truncated, or otherwise made unusable if they are in any way complex.
What's Next?
That potentially covers a pile of additional setup work for anyone interested in using this TMS WEB Core/TMS XData template pair. Anything missing? Please post a comment!
TMS WEB Core Template Demo Repository on GitHub
TMS XData Template Demo Data Repository on GitHub
Related Posts:
Templates - Part 1 of 2: TMS XData
Templates - Part 2 of 2: AdminLTE 4
Templates: Bonus Content
Follow Andrew on 𝕏 at @WebCoreAndMore or join our 𝕏 Web Core and More Community.
Andrew Simard

This blog post has received 4 comments.
 2. Wednesday, March 15, 2023 at 1:27:46 AM
Ah, the code in this case is included in the GitHub repository. I''ve just added a link to that. You can download the code directly using the Code button at the middle-top-right-ish part of the page, where a Download ZIP option is available.
2. Wednesday, March 15, 2023 at 1:27:46 AM
Ah, the code in this case is included in the GitHub repository. I''ve just added a link to that. You can download the code directly using the Code button at the middle-top-right-ish part of the page, where a Download ZIP option is available.
Andrew Simard
3. Thursday, October 12, 2023 at 6:37:02 AM
Hi, This is awesome, if we want try it, what is the login we can use ?
Alain Villeneuve
4. Wednesday, October 18, 2023 at 1:39:21 AM
Hi Alain - the default username is SYSINSTALLER and the default password is TMSWEBCore. Note that this is set in the XData project, in the DDL for the ''person'' table.
Andrew Simard
All Blog Posts | Next Post | Previous Post
DERNEGI CANSUYU