Blog
All Blog Posts | Next Post | Previous Post

 TMS Web Core and More with Andrew:
Working with Home Assistant - Part 6: Climate
Friday, February 17, 2023

In this post, we'll get a look at sending more complex commands to Home Assistant, as we go through
setting up the UI for changing the set point values for a thermostat. We'll have a look at creating a more
dynamic UI where we don't know in advance what to expect, as we work through the lighting UI. And we'll do a bit
more work directly in Home Assistant as well, as we set up a handful of statistics to help address some UI
challenges. Here's what we're looking to create.
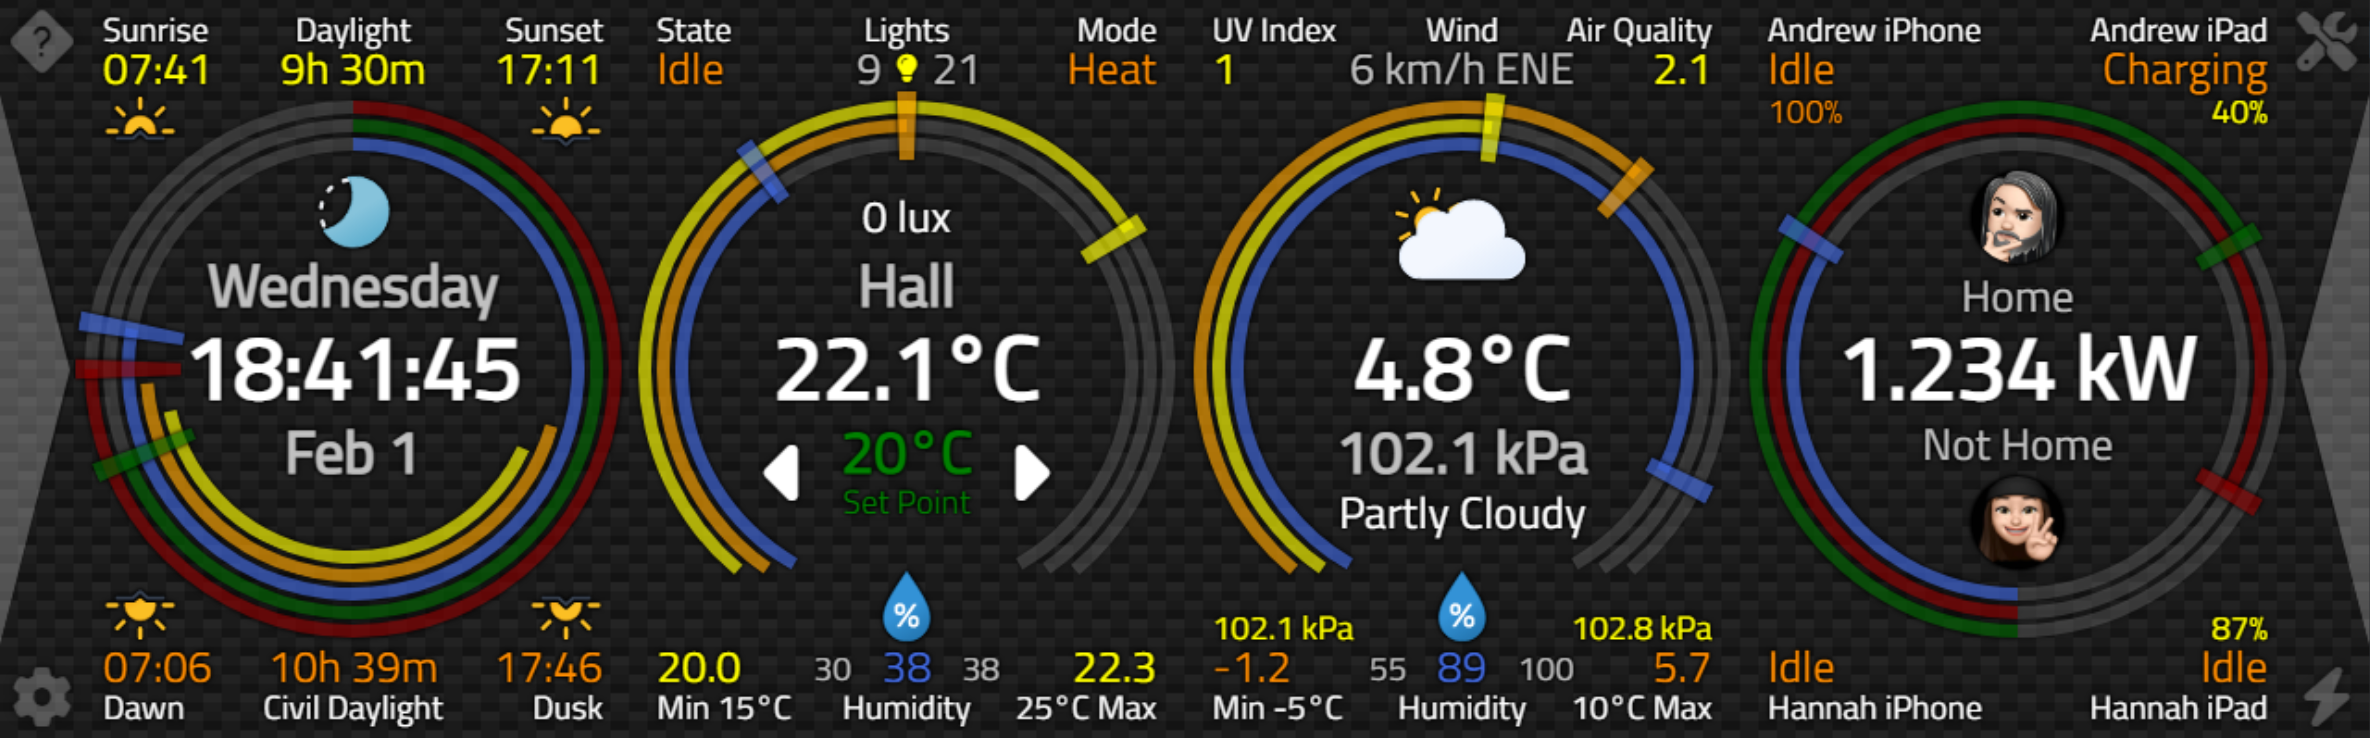
Catheedral Home Page.
Climate Data.
In the second panel above, we've got a few rings, some data about lights at the top, thermostat information, and a pile of numbers related to temperature, humidity, and even an ambient light sensor (showing 0 lux). We'll leave the discussion about lights for a little later, but first, let's focus on the climate data and how we're going to incorporate that into our project.
Smart thermostats are a popular item in Home Assistant, with direct support for many popular brands. These typically report the current temperature and humidity and may include many more features related to actively heating or cooling a home.
In order to provide sensible Integrations for
Home Assistant, the majority of these kinds of thermostats will "fill in" common states or attributes within
Home Assistant, which then makes it possible for a given "card" to display data without having to know the inner
workings of every smart thermostat vendor. But this same kind of data can come from other sensors as well. Motion sensors might report temperature and humidity, and even ambient light, as we shall soon see. Even
Apple's HomePod Mini smart speakers have recently been upgraded to report temperature and humidity.
To help determine what data appears on the Home page, we'll use our existing Configuration UI to select which sensors we want to use to extract the information we're after. Ideally, we'd like to have access to a thermostat sensor that reports everything we're after, along with providing the Home Assistant "service" interface that allows us to change the temperature set point. Temperature and humidity values are usually included, and we can even use the units for temperature that were retrieved when we processed the data from the call to "get_config". This was explored back in Part 3.
Depending on the thermostat, we may also get a few other bits of information, such as the current
"mode", like "Heat" or "Cool", which is currently anticipated if the set point is reached. And,
naturally, the "State" - what is currently happening - "Idle", "Heating", or "Cooling" being likely
possibilities.
In order to draw our rings, we'd also like to know what the limits are. For humidity, a ring of 0% - 100% is likely fine. For temperature, though, it may vary a little bit, so limiting the range makes a little more sense. Also, we don't know what units are used, so we can't just pick a range out of thin air.
Having a bit of
history would provide additional context, but here we run into a bit of a problem. Home Assistant will happily
serve up the current temperature and humidity values but generally doesn't keep track of any history that is
easily accessible. It has the history data, by default for the past ten days, but these don't appear as part of
the values returned by the sensors. So we have our first little diversion to deal with.
Statistics.
To get around this, we can make use of another Home Assistant feature called Statistics. This mechanism allows us to create additional sensor values that can summarize sensor data, reset running values at certain times, or limit calculations to certain periods. Let's say that we want to know the
minimum and maximum temperature and humidity values for the past 48 hours for a particular set of sensors. We
can add these statistics values to the Home Assistant configuration.yaml file using the following, and then restart the Home Assistant server for these to become active.
  - platform: statistics
    name: "Climate Minimum Temperature"
    entity_id: sensor.mysa_1cbbb0_current_temperature
    state_characteristic: value_min
    max_age:
      hours: 48
    sampling_size: 480

  - platform: statistics
    name: "Climate Maximum Temperature"
    entity_id: sensor.mysa_1cbbb0_current_temperature
    state_characteristic: value_max
    max_age:
      hours: 48
    sampling_size: 480

  - platform: statistics
    name: "Climate Minimum Humidity"
    entity_id: sensor.mysa_1cbbb0_current_humidity
    state_characteristic: value_min
    max_age:
      hours: 48
    sampling_size: 480

  - platform: statistics
    name: "Climate Maximum Humidity"
    entity_id: sensor.mysa_1cbbb0_current_humidity
    state_characteristic: value_max
    max_age:
      hours: 48
    sampling_size: 480
In this example, I'm using the "sensor.mysa_1cbbb0" thermostat in my home, a Mysa electric baseboard heater thermostat. It works well with Home Assistant and the Apple HomeKit ecosystem, as well as others, and supports high-voltage electric baseboard heaters. In the code above, we're looking for the min/max temperature and humidity over the past 48 hours, sampling every 10 minutes. If we were to add these sensors to the Home Assistant dashboard, they could be displayed using cards and might look something like this.
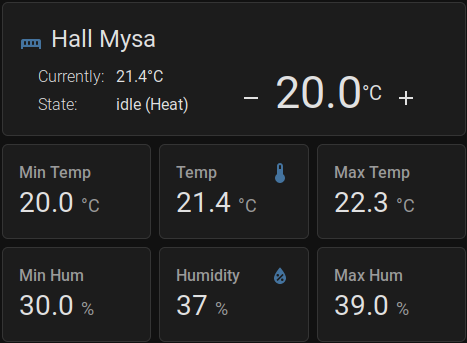
Home Assistant Thermostat + Statistics.
We could do something similar for each thermostat if we had more than one in our home, and we wanted to place a Catheedral device in each room that had a different thermostat so that the same interface could be displayed on the Home page.
But one more thing about Home Assistant Statistics before moving on. As we've discussed
previously, Home Assistant doesn't really like to maintain old state when it comes to its sensors, and Statistics
are no exception. So, when a Home Assistant server restarts, all the Statistics values may be unavailable for a
short period of time while it recalculates them. How long it takes for the Statistics data to appear depends on
many factors. In my system, this is usually around a minute or so. Fortunately, when it does, the
"subscribe_events" mechanism reports the new sensor values.
Ambient Light.
Just one more piece of data we're going to consider including. Some sensors report an ambient light value, typically in "lux" units. Home Assistant can make use of this to help trigger other events. For example, if the ambient light level is too low, turn on some lights. Or if the ambient light level is really high, maybe lower the window shades. That sort of thing. It can also play a role in how thermostat set points might be managed.In any event, let's add an ambient light sensor to the mix. In my home, this is going to come from a Philips Hue
Motion Sensor. Presumably due to power saving reasons, this value is reported very infrequently. Certainly, if
this was a key part of your home automation system, you'd want to use a device that updates much more often. Perhaps an ambient light sensor attached to a Raspberry Pi will make an appearance later in this series. We'll
need to tell Catheedral about the sensor, whichever sensor you want to use, or if you want to even use one at all.
Connecting Sensors.
In order for our Home page to know which thermostat, which ambient light sensor, or even which minimum and maximum temperature and humidity values to use for the Home page, we'll need to supply the sensor names using the Configuration interface. This involves adding extra "Features" to our Tabulator table and then populating them with the sensor names that are available in Home Assistant. The Tabulator side is easy enough, as it just involves adding a few more items to our Features array that we were using previously. {"id": 7, "feature":"Climate Sensor" , "example":"eg: climate.room_thermostat" },
{"id": 8, "feature":"Indoor Light Sensor" , "example":"eg: sensor.motion_illuminance" },
{"id": 9, "feature":"Min Climate Temp" , "example":"eg: sensor.climate_minimum_temperature" },
{"id": 10, "feature":"Max Climate Temp" , "example":"eg: sensor.climate_maximum_temperature" },
{"id": 11, "feature":"Min Climate Humidity" , "example":"eg: sensor.climate_minimum_humidity" },
{"id": 12, "feature":"Max Climate Humidity" , "example":"eg: sensor.climate_maximum_humidity" },
Then, in Catheedral, we can just fill in the values that we want to use. This is what I'm using currently.
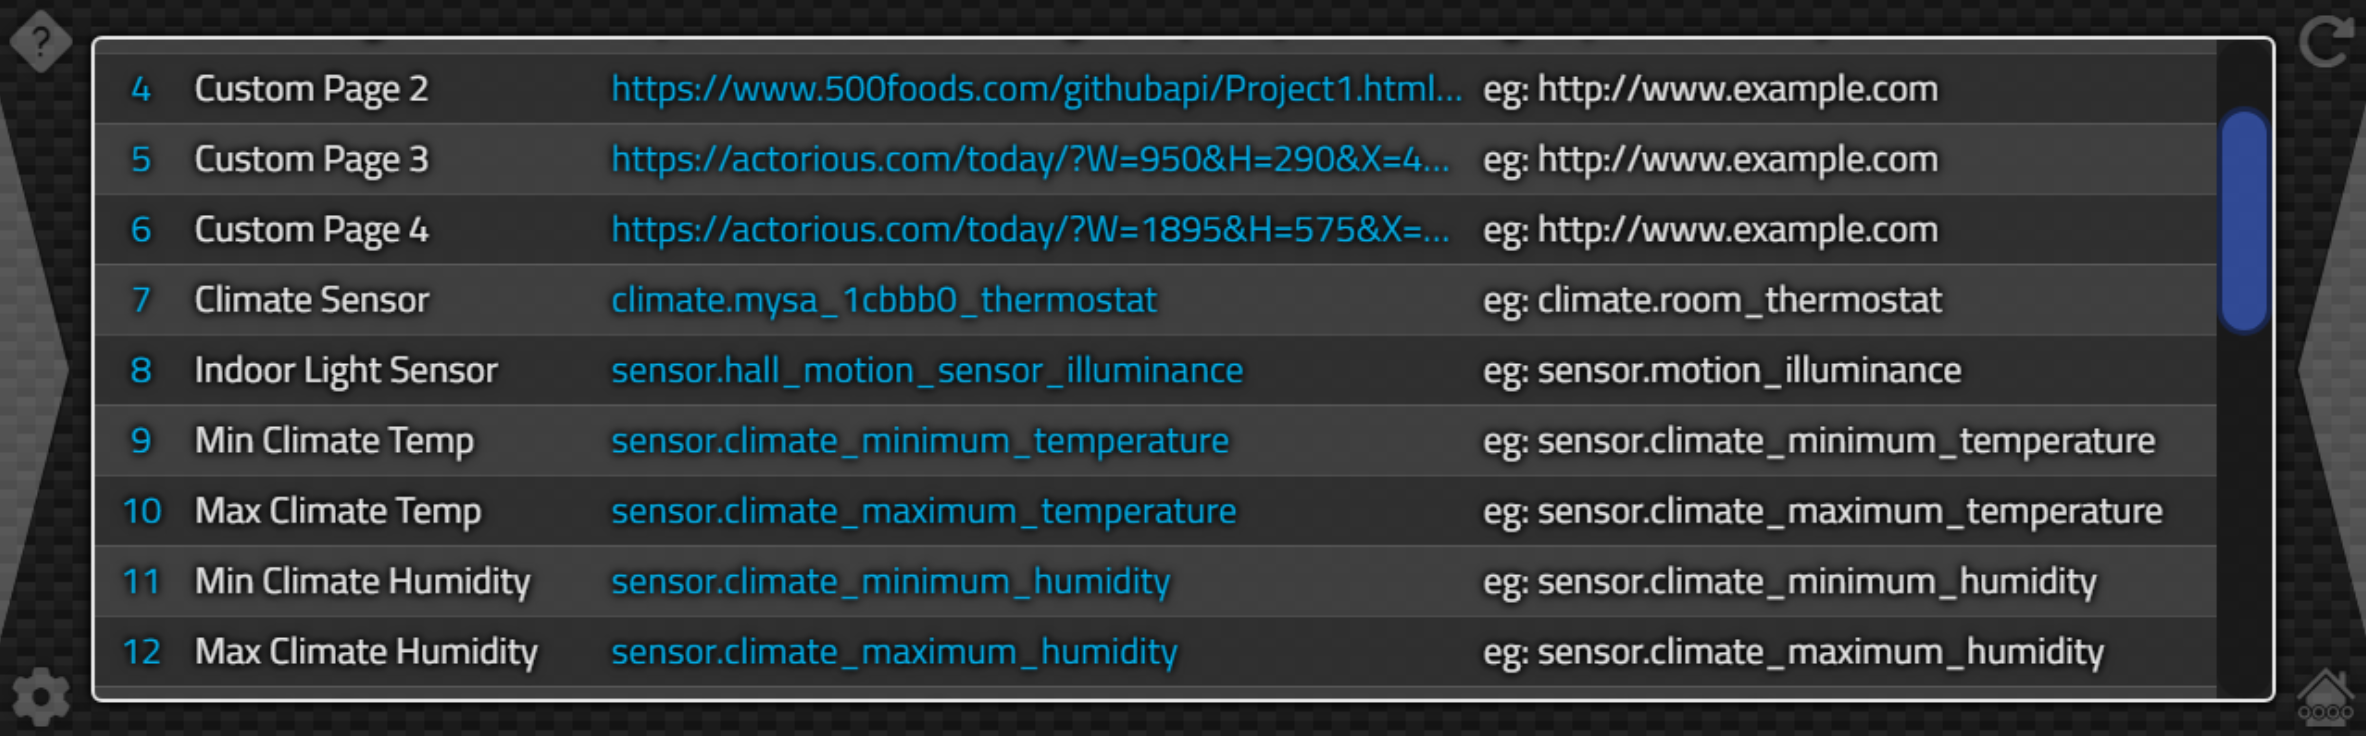
Catheedral Climate Sensor Configuration.
Now, when Catheedral receives data from one of these sensors, it knows it has to process it and make the data
available (the 'plucking' process we referred to in the last post). This is where the specifics of the thermostat
or other sensors come into play. If you're working with a thermostat that interfaces with Home Assistant using
different attributes, then the "StateChanged" Delphi procedure will need to be updated accordingly. Hopefully
not, though.
We'll encounter the same issue with how Home Assistant handles weather data in the next post - variations based on weather providers add to the complexity of getting the data we need where we need it. But for now, let's have a look at what we're doing with the climate data we've identified.
  if (Entity = ClimateSensor) then
  begin
    asm
      this.ClimateName = window.CapWords(State.attributes.friendly_name).replace('Thermostat','').trim();
      this.ClimateMin = State.attributes.min_temp;
      this.ClimateMax = State.attributes.max_temp;
      this.ClimateHumidity = State.attributes.current_humidity;
      this.ClimateCurrent = State.attributes.current_temperature;
      this.ClimateSetPoint = State.attributes.temperature;
      this.ClimateState = window.CapWords(State.state).trim();
      this.ClimateMode = window.CapWords(State.attributes.hvac_action).trim();
    end;
  end
  else if (Entity = ClimateMinTempSensor) then asm if (!isNaN(State.state)) { this.ClimateMinTemp = parseFloat(State.state) } end
  else if (Entity = ClimateMaxTempSensor) then asm if (!isNaN(State.state)) { this.ClimateMaxTemp = parseFloat(State.state) } end
  else if (Entity = ClimateMinHumiditySensor) then asm this.ClimateMinHumidity = parseFloat(State.state) end
  else if (Entity = ClimateMaxHumiditySensor) then asm this.ClimateMaxHumidity = parseFloat(State.state) end
  else if (Entity = DaylightSensor) then asm this.ClimateLight = (State.attributes.light_level+' '+State.attributes.unit_of_measurement).replace('lx','lux') end
The first section is simple enough, just looking for some of the attributes, where objects like "current_temperature" and "current_humidity" don't cause much of a problem. We're using our "CapWords" to capitalize the first letter of words when it comes to the "State" and "Mode" values returned by the thermostat. Also, this thermostat uses "min_temp" and "max_temp" in the context of its set points, not anything to do with statistics. For the statistics, they aren't part of the thermostat attributes, so we have to extract them individually.
For the minimum and maximum temperature sensors, we're a little more careful about whether we're updating our
values as these are used in calculating the outer two rings. We'd rather stick with the default values or the
last values we had and just ignore the NaN values that appear during a Home Assistant server restart. In the case
of the minimum and maximum humidity values, we actually don't care if the values returned are NaN as these values
are simply displayed in the UI. In fact, this is a visual indication that the Home Assistant server has been
recently restarted and that the statistics have not been updated. When the statistics are updated, they pass
through here again, so this works out pretty well.
Updating the Climate Panel.
With all of our data in hand, all we're left with is updating the panel with these Form variables. First, we just update the current temperature and the name of the thermostat. This is happening inside the tmrSecondsTimer() event. We don't necessarily want to update this every second, and if we have to do a big update, let's do it at the :15s part of the minute so as to not have a bunch of updates from everything all at once. We'd also not want to update the rings if we don't have to, so we've got some flags for those as well.
     // Updates once a minute at 15s mark
    if (current_seconds_60 = 15) or (tmrSeconds.Tag = 1) then
    begin

      UpdateRing1 := False;
      UpdateRing2 := False;
      UpdateRing3 := False;

      // Main Temperature Display
      if labelHomeTempName.Caption <> ClimateName
      then labelHomeTempName.Caption := ClimateName;
      display := Trim(FloatToStrF(ClimateCurrent,ffNumber,5,1)+HATemperatureUnits);
      if dataHomeTemperature.Caption <> display then
      begin
        dataHomeTemperature.Caption := display;
        UpdateRing1 := True;
      end;
Next, we want to sort out the minimum and maximum temperatures that we're going to include in our rings. This is likely more complex than it needs to be, but as we're just getting started with this sort of thing, the thinking is to have more information that we can turn off later, rather than not having enough information to assess what is being displayed.
Specifically, we're calculating what the minimum and maximum values are for the outermost and
middle rings. Here, we're just rounding the values and adding a 5deg buffer. This range is included in the UI as
part of the "Min" and "Max" labels at the very bottom. The idea is that these won't fluctuate all that much - perhaps seasonally.
      // Temp rounded to 5, then +/- 5 to get Range
      ClimateMinTempRange := (Round(ClimateMinTemp / 5) * 5) - 5;
      ClimateMaxTempRange := (Round(ClimateMaxTemp / 5) * 5) + 5;

      if not(HAStatesLoaded) then
      begin
        ClimateMinTempRange := 0;
        ClimateMaxTempRange := 100;
      end;

      // Minimum Climate Temperature
      display := Trim(FloatToStrF(ClimateMinTemp,ffNumber,5,1));
      if DataHomeMin.Caption <> display then
      begin
        DataHomeMin.Caption := display;
        UpdateRing1 := True;
        UpdateRing2 := True;
      end;
      display := 'Min '+FloatToStr(ClimateMinTempRange)+HATemperatureUnits;
      if LabelHomeMin.Caption <> display then
      begin
        LabelHomeMin.Caption := display;
        UpdateRing1 := True;
        UpdateRing2 := True;
      end;

      // Maximum Climate Temperature
      display := Trim(FloatToStrF(ClimateMaxTemp,ffNumber,5,1));
      if DataHomeMax.Caption <> display then
      begin
        DataHomeMax.Caption := display;
        UpdateRing1 := True;
        UpdateRing2 := True;
      end;
      display := FloatToStr(ClimateMaxTempRange)+HATemperatureUnits+' Max';
      if LabelHomeMax.Caption <> display then
      begin
        LabelHomeMax.Caption := display;
        UpdateRing1 := True;
        UpdateRing2 := True;
      end;
The humidity display is a bit fancier in that we've got another Meteocons icon added to the mix, as well as some extra styling to ensure that the minimum, maximum, and current values are displayed nicely.
      // Humidity
      display := '<div class="d-flex flex-wrap w-100 align-items-center justify-content-center">'+
                   '<div class="w-100 m-auto"><img style="width:80px; height:80px; margin-bottom:-25px;" src="weather-icons-dev/production/fill/svg-static/humidity.svg"></div>'+
                   '<div style="width:60px; text-align: right;" class="TextSM Gray">'+Trim(FloatToStrF(ClimateMinHumidity,ffNumber,5,0))+'</div>'+
                   '<div style="width:60px; text-align: center;">'+Trim(FloatToStrF(ClimateHumidity,ffNumber,5,0))+'</div>'+
                   '<div style="width:60px; text-align: left;" class="TextSM Gray">'+Trim(FloatToStrF(ClimateMaxHumidity,ffNumber,5,0))+'</div>'+
                 '</div>';
      if dataHomeHumidity.HTML <> display then
      begin
        dataHomeHumidity.HTML := display;
        UpdateRing3 := True;
      end;
For the thermostat set point, we've got a pair of buttons and a value to display. This is primarily configured for heating at the moment, given that my particular thermostat controls an electric baseboard heater. Likely not a lot different if other thermostat capabilities were available, though it might be handy to add something later to allow switching modes. For now, the minimum and maximum values pertaining to the set point just limit how high or low a value we can select, and if we've got values to work with, the buttons are enabled. We'll get to what is behind those buttons very shortly.
      // SetPoint UI
      display := Trim(FloatToStrF(ClimateSetPoint,ffNumber,5,0)+HATemperatureUnits);
      if dataHomeSetPoint.Caption <> display then
      begin
        dataHomeSetPoint.Caption := display;
        UpdateRing2 := True;
      end;

      // Decide whether buttons should be enabled
      // Note ClimateMin/Max = Thermostat SetPoint Min/Max
      if (ClimateSetPoint <= Max(ClimateMin, ClimateMinTempRange)) or (labelHomeTempName.Caption = 'Not Configured')
      then btnHOmeTempDown.Enabled := False
      else btnHomeTempDown.Enabled := True;
      if (ClimateSetPoint >= Min(ClimateMax, ClimateMaxTempRange)) or (labelHomeTempName.Caption = 'Not Configured')
      then btnHOmeTempUp.Enabled := False
      else btnHomeTempUp.Enabled := True;
The next values are just displaying whatever is coming in from Home Assistant. The thermostat "state" and "mode" indicate what the thermostat is doing (or thinking about doing), and the daylight sensor is just reporting a value.
      // Thermostat State / Mode
      if dataHomeState.Caption <> ClimateState
      then dataHomeState.Caption := ClimateState;
      if dataHomeMode.Caption <> ClimateMode
      then dataHomeMode.Caption := ClimateMode;

      // Daylight Sensor
      if dataHomeLightLevel.Caption <> ClimateLight
      then dataHomeLightLevel.Caption := ClimateLight;
All we've got left to deal with, then, is the rings. For our UI, the idea was to try and make things a little interesting, so we're using a horseshoe-style ring, freeing up a little bit of extra space at the bottom. This has some fun implications we'll get to eventually when it comes to scenarios where we have no data, but otherwise, it just tends to complicate our math a little bit.
The outermost rings are for the current temperature and the current set point. As we'll see when we get to the section about adjusting the set point, we can move the marker back and forth, relative to the current temperature, and if we pass the threshold, the thermostat will switch from "Idle" to "Heating" and back again. On a day-to-day basis, this is just a nice visual indication about whether we're nearing the point where heating (or cooling) will be needed, just by looking at how close the two outermost markers are to one another.
      if (UpdateRing1 = True) or (tmrSeconds.Tag = 1) then
      begin
        // Climate Temperature (Ring 1)
        segment_start := Trunc(((ClimateCurrent-ClimateMinTempRange)*280) / (ClimateMaxTempRange-ClimateMinTempRange));
        segment := IntToStr(segment_start)+','+IntToStr(280-segment_start)+',80';
        Sparkline_Donut(
          55, 5, 290, 290,                                      // T, L, W, H
          ringClimateTemperature,                               // TWebHTMLDiv
          segment,                                              // Data
          '["var(--CxRing1)","var(--CxRingB)","transparent"]',  // Fill
          '220deg',                                             // Rotation
          138,                                                  // Inner Radius
          ''                                                    // Text
        );

        // Climate Temperature Marker (Ring 1)
        rotation := IntToStr(220+Trunc(((ClimateCurrent-ClimateMinTempRange)*280) / (ClimateMaxTempRange-ClimateMinTempRange))-2);
        Sparkline_Donut(
          50, 0, 300, 300,                                      // T, L, W, H
          ringClimateTemperatureMarker,                         // TWebHTMLDiv
          '4/360',                                              // Data
          '["var(--CxRing1)","transparent"]',                   // Fill
          rotation+'deg',                                       // Rotation
          113,                                                  // Inner Radius
          ''                                                    // Text
        );
      end;

      if (UpdateRing2 = True) or (tmrSeconds.Tag = 1) then
      begin
        // Setpoint (Ring 2)
        segment_start := Trunc(((ClimateSetPoint-ClimateMinTempRange)*290) / (ClimateMaxTempRange-ClimateMinTempRange));
        segment := IntToStr(segment_start)+','+IntToStr(290-segment_start)+',70';
        Sparkline_Donut(
          65, 15, 270, 270,                                     // T, L, W, H
          ringSetPoint,                                         // TWebHTMLDiv
          segment,                                              // Data
          '["var(--CxRing2)","var(--CxRingB)","transparent"]',  // Fill
          '215deg',                                             // Rotation
          128,                                                  // Inner Radius
          ''                                                    // Text
        );

        // SetPoint Marker (Ring 2)
        rotation := IntToStr(215+Trunc(((ClimateSetpoint-ClimateMinTempRange)*290) / (ClimateMaxTempRange-ClimateMinTempRange))-2);
        Sparkline_Donut(
          50, 0, 300, 300,                                      // T, L, W, H
          ringSetPointMarker,                                   // TWebHTMLDiv
          '4/360',                                              // Data
          '["var(--CxRing2)","transparent"]',                   // Fill
          rotation+'deg',                                       // Rotation
          113,                                                  // Inner Radius
          ''                                                    // Text
        );
      end;
Everything we covered last time applies here, in terms of using CSS to set the colors, along with the ring dimensions and positions. The main new consideration is that we're only drawing a portion of the ring, so there's a transparent component as the third data element in the ring to hide that segment. Note that the hidden segment shrinks a little for each ring to give the display we're after here. Humidity is a little simpler in that it is just a 0% - 100% range.
      if (UpdateRing3 = True) or (tmrSeconds.Tag = 1) then
      begin
        // Humidity (Ring 3)
        segment_start := Trunc((ClimateHumidity*300) / 100);
        segment := IntToStr(segment_start)+','+IntToStr(300-segment_start)+',60';
        Sparkline_Donut(
          75, 25, 250, 250,                                     // T, L, W, H
          ringClimateHumidity,                                  // TWebHTMLDiv
          segment,                                              // Data
          '["var(--CxRing3)","var(--CxRingB)","transparent"]',  // Fill
          '210deg',                                             // Rotation
          118,                                                  // Inner Radius
          ''                                                    // Text
        );

        // Humidity Marker (Ring 3)
        rotation := IntToStr(210+Trunc((ClimateHumidity*300) / 100)-2);
        Sparkline_Donut(
          50, 0, 300, 300,                                      // T, L, W, H
          ringClimateHumidityMarker,                            // TWebHTMLDiv
          '4/360',                                              // Data
          '["var(--CxRing3)","transparent"]',                   // Fill
          rotation+'deg',                                       // Rotation
          113,                                                  // Inner Radius
          ''                                                    // Text
        );
      end;
And with that, we've got all of our climate data displayed! We'll deal with lighting in a moment, but first, one
more thing.
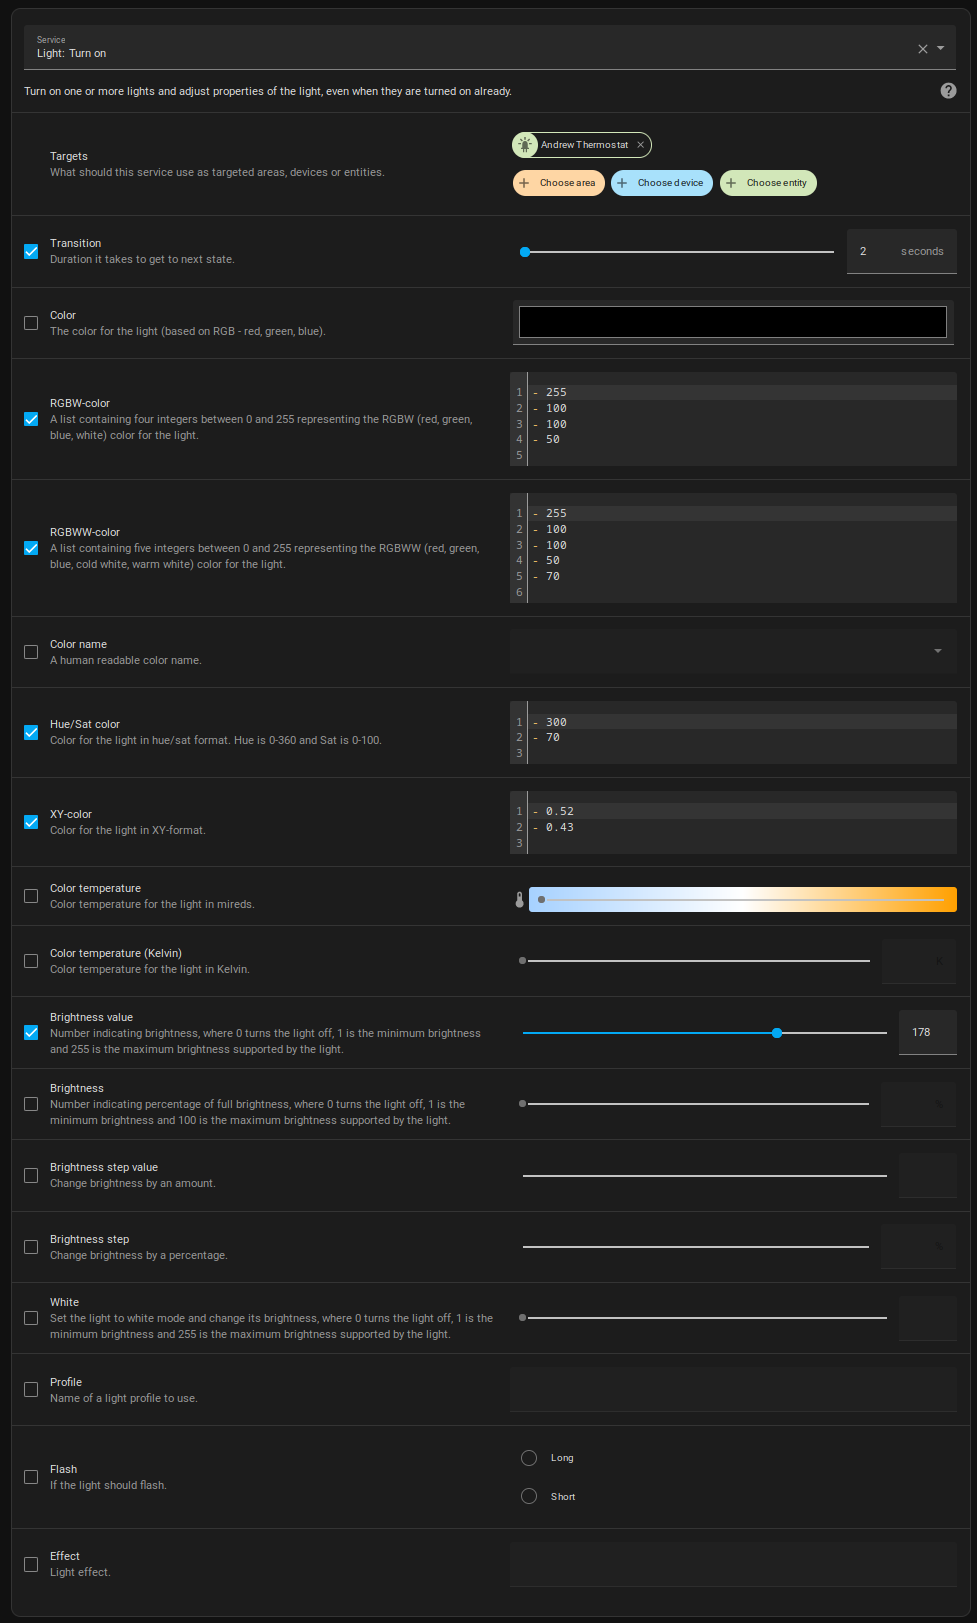
Changing the Set Point.
The buttons for adjusting the thermostat set point are already setup in our UI, and will automatically be disabled if we don't have any set point data or if the set point is at the limit of what the thermostat has indicated, via its "min_temp" and "max_temp" attributes. But what happens when we click on the buttons? All we need to do is call the appropriate service and pass it the new value that we'd like. Easy, right?Actually, it is! But as this is a new aspect of working with Home Assistant, a bit of background might help. Within Home Assistant, there is a collection of "services" that are made available by various integrations. We saw one previously, with the variables, where we were using the "var.set" service. Any time we want to change something in Home Assistant, we'd prefer to use a "service" if one is available.
This is different than, say, changing an entity. We could change an entity's attribute, for example, as we do with variables, but that just updates a database entry somewhere. With variables, that's exactly what we want. But in other cases, we want to update a database entry somewhere, but as a result of something physically changing, not just as a database entry on its own.
In our current situation, we're looking to actually change the thermostat's set point value. If that actually happens, then the thermostat itself will tell Home Assistant that its set point value has changed, which will cause Home Assistant to update its database, which then triggers the "subscribe_events" handler to tell us that, actually, the set point has changed.
In a fun series of events, then, we can fire off service commands and we don't have to do anything to handle the change in our UI - we've already built the mechanism that deals with that, by handling whatever is coming from Home Assistant. In this case, the service we're interested in is the "set_temperature" service that is found in the "climate" domain.
procedure TForm1.btnHomeTempDownClick(Sender: TObject);
begin
  HAID := HAID + 1;
  HAWebSocket.Send('{"id":'+IntToStr(HAID)+', "type":"call_service", "domain": "climate", "service": "set_temperature", "service_data": {"temperature":'+IntToStr(Trunc(ClimateSetPoint - 1))+'}, "target": {"entity_id":"'+ClimateSensor+'"}}');
end;

procedure TForm1.btnHomeTempUpClick(Sender: TObject);
begin
  HAID := HAID + 1;
  HAWebSocket.Send('{"id":'+IntToStr(HAID)+', "type":"call_service", "domain": "climate", "service": "set_temperature", "service_data": {"temperature":'+IntToStr(Trunc(ClimateSetPoint + 1))+'}, "target": {"entity_id":"'+ClimateSensor+'"}}');
end;
This means that when we click on a button, the following sequence occurs.
- We send the "set_temperature" command to Home Assistant.
- Home Assistant sends the command to the thermostat.
- The thermostat makes the change to its set point value.
- If the threshold for heating or cooling is met, then heating or cooling begins.
- The thermostat sends back the new set point value, current state, and current mode back to Home Assistant.
- If any of those values (set point, status, or mode) is different, Home Assistant updates its database.
- After updating its database, Home Assistant issues any necessary "subscribe_event" notifications.
- Catheedral receives the "subscribe_event" notifications and updates its Form variables.
- The Climate panel is updated to reflect any changes to those Form variables.
This all happens very quickly, usually in less than a second. Here's an example of what it looks like when the
set point is raised enough to trigger heating.
Climate Panel - Changing the Set Point Value.
This same pattern of sending commands to Home Assistant and then doing nothing is going to come in handy when we
get to lighting, up next. All the infrastructure we've constructed to have data flow to our UI through handling data
arriving from "get_states" and "subscribe_events" dramatically reduces the amount of work we have to do. But
we've still got a lot of ground to cover before we're done for today!
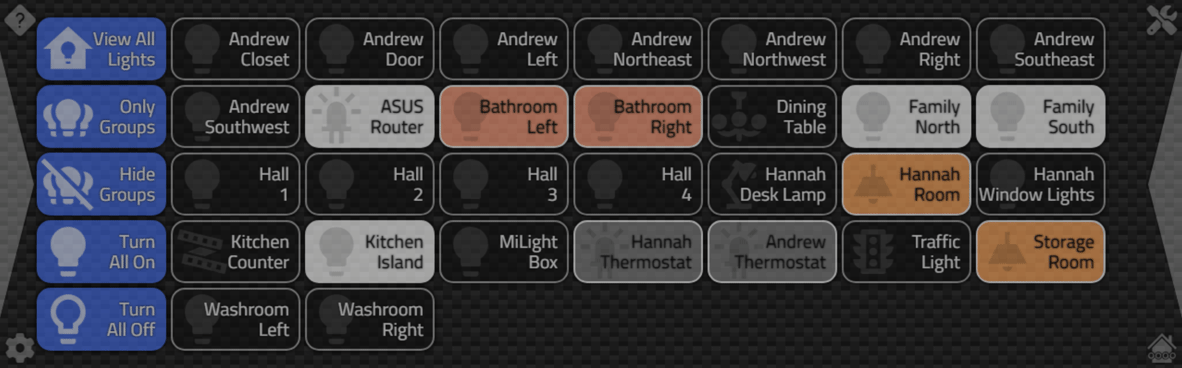
Lighting 101.
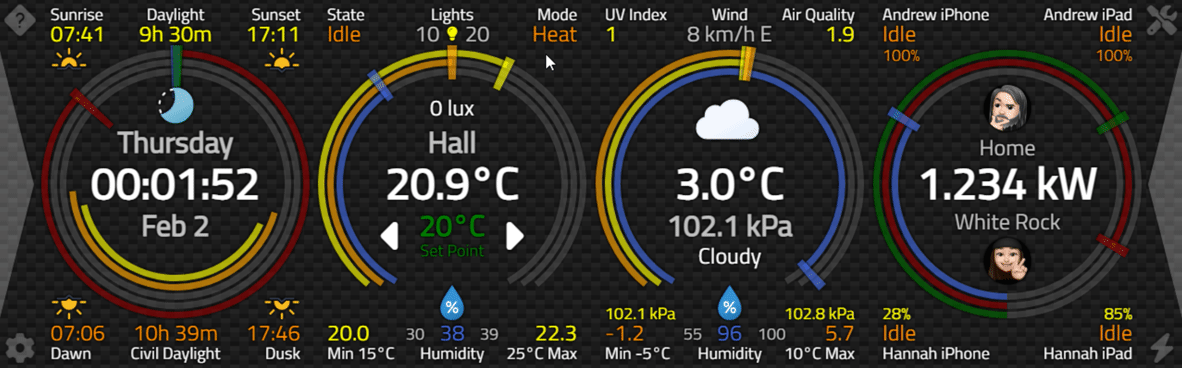
At the top of the Climate panel on the Catheedral Home page, we've got a little counter for our lights. In the animation above, we can see that currently there are 10 lights on and 20 lights off. But I live in a small condo. Do I really have 30 smart lights? Well, yes and no. Let's first have a look at how Home Assistant handles lights.
Generally speaking, anything remotely resembling a light exists as an object in Home Assistant, and usually with an "entity_id" that has a "light." prefix. Sometimes these are actual smart lights, like a Philips Hue bulb connected to a Philips Hue Hub.
Sometimes these aren't really "lights" in the normal sense, but rather switches that control lights. Such as a desk lamp, for example. And sometimes there are lights that just happen to be part of completely different devices that are exposed for you to control within Home Assistant.
I have an ASUS router, for example, where the LED lights on the front can be turned on or off. And my thermostats have a simple LED display as well, that can be turned on or off or even adjusted in terms of brightness.
And sometimes
lights are defined that are just groups of other lights that can be created in other places, like the Philips Hue
app, or even within Home Assistant itself.
A key thing to be aware of, then, is that lights might be associated with different kinds of control mechanisms.
A desk lamp might only have an on/off capability. My thermostats have a brightness capability. And many of my
lights can have their color adjusted with an RGB value.
When working with groups, if the lights within the group are all the same, then the control mechanism can be the same. A group of color lights can have all their lights set to the same color at the same time, for example. Or entire groups can be turned on or off without having to adjust them individually.
Depending on how smart your lights happen to be, and how they're wired up to the rest of your smart home, they may also go "missing" from time to time. For example, if you have a smart light that is controlled with a regular old-fashioned light switch, turning off the light switch will likely turn off the power to the smart light and will make it unavailable to be controlled until the light switch is turned on again.Fortunately, smart lights these days tend to remember their settings pretty well, so this can be a functional way to operate smart lights if there isn't another "smart switch" readily available. Regardless, the idea here is that we have to be mindful that lights might disappear and reappear from time to time. And we'd really rather not have to go through the chore of having to tell Catheedral about our lights. Rather, we'd just rather it figure out everything on its own and "just work" if at all possible.
And before we do our deep dive into how Catheedral handles lighting, there's also the idea that this is likely the most used aspect of any smart home and as such, there is a lot of customization that happens. Lights typically have meaningful names. There may be as many groups, also with meaningful names, as there are individual lights.
Within Home Assistant and other home automation ecosystems, lights can typically be assigned a representative icon to visually indicate what kind of lights they might be, such as a light bulb, a vanity set, or perhaps an LED strip light. And colors. A great deal of work is put into these kinds of interfaces to make it easy to adjust colors, brightness, and so on. We're generally trying to mimic the simplicity of a light switch after all, which is about as simplistic as a UI can possibly get! Anything more complex than that needs to be carefully tested to ensure that everything works as smoothly as possible.
Lighting Data.
To get started with lighting, let's have a look at the data that we're working with. All the lighting data we'll ever need is returned by both "get_states" and "subscribe_events". Parsing that data to figure out what is a light, and what kind of light it is, is our first challenge. The main things we're after out of the gate are whether a light is "available", whether it is an individual light or part of a group, and whether it is on or off. We're going to be using a bit of fancy JavaScript here to make this all work. Initially, in our "get_states" processing, we can build our Form variables for tracking light information. // There are FOUR lights ;)
this.LightsOn = hadata.result.filter(
function(o) {
return ((o.entity_id.indexOf("light.") == 0) && (o.state == "on") && (o.attributes.lights == undefined) && (o.entity_id.indexOf("_group") == -1) && (o.entity_id.indexOf("_hide") == -1));
}).length;
Here, we're getting the count of the number of lights that are "on" currently. The "hadata.result" object contains all of the Home Assistant objects, so we're using a JavaScript array filter to find all objects starting with "light." that are on, that are not groups (having _group in the name or having an attribute of "lights" which indicates what lights are in the group) and have not been hidden explicitly by having "_hide" in the name. The "_group" and "_hide" aren't really Home Assistant things, but rather a way we can ensure that certain groups or certain lights do not get included in the count.
         this.LightsOff = hadata.result.filter(
          function(o) {
           return ((o.entity_id.indexOf("light.") == 0) && (o.state == "off") && (o.attributes.lights == undefined) && (o.entity_id.indexOf("_group") == -1) && (o.entity_id.indexOf("_hide") == -1));
          }).length;
This is the same sort of thing, but looking for the number of lights that are turned off.
         this.Lights = hadata.result.filter(
          function(o) {
           return ((o.entity_id.indexOf("light.") == 0) && (o.attributes.lights == undefined) && (o.entity_id.indexOf("_group") == -1) && (o.entity_id.indexOf("_hide") == -1) && ((o.state == "off") || (o.state == "on")));
          }).sort((a,b) => (a.entity_id > b.entity_id) ? 1: -1);
Here, rather than getting a count, we're getting the actual list of lights. At this stage, the list contains just the individual lights, and we're sorting the list by the "entity_id" name.
        // Lets include the groups so we can use them later, but not include them in the counts
        this.LightGroups = hadata.result.filter(
          function(o) {
           return ((o.entity_id.indexOf("light.") == 0) && ((o.attributes.lights !== undefined) || (o.entity_id.indexOf("_group") !== -1)) && (o.entity_id.indexOf("_hide") == -1) && ((o.state == "off") || (o.state == "on")));
          }).sort((a,b) => (a.entity_id > b.entity_id) ? 1: -1);
This time, we're doing the same thing, but only for groups, also sorted.
        this.Lights = [...this.Lights, ...this.LightGroups];
        this.LightsCount = this.LightsOn + this.LightsOff;
And finally, we combine the two lists to get a list of lights first sorted by individual lights and then by the
groups. This is done mostly to make it easier to look at the underlying data and doesn't really make a difference
anywhere else as we'll still extract and re-sort this list as needed later. We get our count of
total lights, being the sum of lights on and lights off. In our Climate panel display, all we're really showing
is the first two values. In the tmrSeconds event, this is made a bit more complex by throwing an icon in the
middle, but here's what it looks like.
      // If lights have changed, then update them
      Lights := '<div class="d-flex justify-content-center">'+
                  '<div class="TextRG Gray text-end" style="width:50px;">'+IntToStr(LightsOn)+'</div>'+
                  '<div><i class="fa-solid fa-lightbulb Yellow fa-2xs px-2"></i></div>'+
                  '<div class="TextRG Gray text-start" style="width:50px;">'+IntToStr(LightsOff)+'</div>'+
                '</div>';
      if dataHomeLights.HTML <> Lights
      then dataHomeLights.HTML := Lights;
If data arrives from Home Assistant via the "subscribe_events" pathway instead of "get_states", then we need to update all of our Form variables. Recall that this may include lights that had disappeared or reappeared, so we'll need to update the array values rather than just being able to regenerate them like we can do whenever "get_states" returns a batch of objects.
        // Update light counts
        if (hadata.event.data.entity_id.indexOf("light.") == 0) {
          var lightidx = this.Lights.findIndex(o => o.entity_id == hadata.event.data.entity_id);
          if (lightidx > -1) {
            this.Lights[lightidx] = hadata.event.data.new_state;
          } else {
            // Got a new light??
            this.Lights.push(hadata.event.data.new_state);                             }
          this.LightsOn = this.Lights.filter(
            function(o) {
             return ((o.entity_id.indexOf("light.") == 0) && (o.state == "on") && (o.attributes.lights == undefined) && (o.entity_id.indexOf("_group") == -1) && (o.entity_id.indexOf("_hide") == -1));
            }).length;
          this.LightsOff = this.Lights.filter(
            function(o) {
             return ((o.entity_id.indexOf("light.") == 0) && (o.state == "off") && (o.attributes.lights == undefined) && (o.entity_id.indexOf("_group") == -1) && (o.entity_id.indexOf("_hide") == -1));
            }).length;
          this.LightsCount = this.LightsOn + this.LightsOff;
        }
We start this process by checking to see if the newly arrived "subscribe_events" object is, in fact, a light. And
if it is, is it a light we've seen previously? If so, we'll replace the old data with the new, otherwise, we'll
just append a new light. Then we recalculate all the light counts we had calculated previously. Note that this might get
executed frequently, anytime a light changes, for example. The previous code for "get_states" only gets run,
generally, whenever the connection to the Home Assistant server is reset. They aren't substantially different,
and the JavaScript filter function is surprisingly efficient, so no worries really about this kind of code.
More Lights.
Naturally, we're after a lot more than just a count of how many lights are on or off. So we'll need a new page in our UI and a means to get to it. Ultimately, this isn't intended to be the main interface for adjusting lights. For example, we'll eventually get to "scenes" and "rooms" where lights can be controlled more easily and in larger numbers, potentially. But depending on the user, this might still get quite a lot of use. And in any event, some of the UI work we're undertaking here we can reuse later when building those other mechanisms.
To get at our page, then, let's use a tap at the top of the Climate panel (on the "Lights" part of the panel) as the means to get at the page. We could add a "click" event to the label and the lightbulb and so on, but we want that click (or tap) to work without needing to be all that precise, so let's add a "cover" <div> over the area that we're generally interested in, and add the "click" event to that. We can set it to be invisible so it serves more or less as a "tap zone" of sorts to get us to our page. The code for the "click" event is pretty simple at this point.
procedure TForm1.divHomeLightsCoverClick(Sender: TObject);
begin
  // Home Page -> Lights
  SwitchPages(1,16);
end;
So what do we want the page to look like? Well, it would be handy to be able to look at all the lights, just the light groups, or just the individual lights. And it might be fun to have an "all lights on" and "all lights off" button as well. But we don't know how many lights we'll have. Maybe there will be more than might fit on the screen at one time. And how can we display enough information to be useful and not be overwhelming? Well, "overwhelming" might be hard to quantify. By default, then, let's just show the individual lights.

Lights Page.
Here, we've got our buttons on the left to control which set of lights we're looking at, as well as our "all lights on" and "all lights off" buttons. Let's first have a look at those. Home Assistant has a "toggle" service for lights, so to turn on all the lights, we just need to toggle the lights that are currently off.
procedure TForm1.btnLightsAllOnClick(Sender: TObject);
var
  lights: Array of String;
  i: integer;
begin
  // Turn on all the lights that are off.
  // This processes the individual lights, excluding light groups
  if HAWebSocket.Active then
  begin
    asm
      lights = this.Lights.filter(
        function(o) {
          return ((o.entity_id.indexOf("light.") == 0) && (o.state == "off") && (o.attributes.lights == undefined) && (o.entity_id.indexOf("_group") == -1) && (o.entity_id.indexOf("_hide") == -1));
        }).map( obj => obj.entity_id ).sort();
    end;

    for i := 0 to length(lights) do
    begin
      HAID := HAID + 1;
      HAWebSocket.Send('{"id":'+IntToStr(HAID)+', "type":"call_service", "domain": "light", "service": "toggle", "target": {"entity_id":"'+lights[i]+'"}}');
    end;
  end;
end;
Here, we're getting a list of lights using the same JavaScript array filtering we've used before. We then send the toggle command to each of the lights. The main reason the list is sorted is so that, potentially, the display will update with the same sequence as the lights are actually turned on. And again, we're not doing anything other than sending the command. The lights listed on the page will get turned on when we receive the individual light notifications from "subscribe_events" that a given light has, in fact, changed in some fashion. Turning all lights off works the same way.
The icons on the left are static - they don't change at all. But how they're drawn might be interesting. This is what the Caption property of the "Turn All On" button contains.
<div class="LightText">Turn<br />All On</div><div class="LightBtnIcon mdi mdi-lightbulb"></div>
Not too scary, right? Well, no, but there's a bit more to the story hidden behind that "LightBtnIcon" class. Also, we'll be using the "Material Design Icons" for most of the work on this page as that's what's used throughout Home Assistant. We touched on those briefly in Part 4. The fun part here is in the layout of the icon. Kind of going for a background left-aligned look here, to match the light buttons on the rest of the page. Here's what's hiding behind that CSS class.
.LightBtnIcon {
  display: flex;
  position:absolute;
  top: 0px;
  left: 0px;
  width: 100%;
  height: 100%;
  font-size: 64px;
  opacity: 0.75;
  justify-content: start;
  align-items: center;
  pointer-events: none;
  z-index: 1;
}
A little bit overkill perhaps, but gets us the look we're after. We'll use the same approach (and the same CSS) for all the buttons on this page. And before we get to the lights themselves, we'd like the transition between sets of lights to be handled the same way as switching pages generally. To get this to work the way we want, we'll make use of another timer. First, we fade out the current page and set up the parameters we need. For the top button, this is what we're up to.
procedure TForm1.btnLioghtsShowAllClick(Sender: TObject);
begin
  if LightsMode <> 1 then
  begin
    tmrLights.Tag := 1;
    divAllLights.ElementHandle.style.setProperty('opacity','0');
    tmrLights.Enabled := True;
  end;
end;
And then in the timer, we bring in the new set of lights.
  tmrLights.Enabled := False;
  LightsMode := tmrLights.Tag;
  LightsAll := '';
  UpdateNow;
  divAllLights.ElementHandle.style.setProperty('opacity','1');
The call to "UpateNow" eventually calls the same tmrSeconds routine to draw the lights, which uses the "LightsMode" Form variable to decide which batch of lights to display. Using a transition on the <div> holding the list of lights gets us the following result.
Individual Lights > All Lights.
We can also see here what happens when there are altogether too many lights to display. Yep, a giant scroll bar.
Displaying Lights.
So how do we generate a dynamic list of buttons like that? Well, there are likely dozens of ways to do this. But what is a button, really? A <div> with a certain style, maybe with a :hover style as well, and of course the all-important "click" mechanism.More important for our situation here is how they're laid out on the page. This is a pretty solid case for using CSS flex (have a look at this post if you're not already familiar with that topic). Adding a pile of <div> elements to a container, then? Well, really, that's about it. But we're particular about certain things, like having the top row of buttons aligned with the top left button when the button list is scrolled to the top, and the bottom row of buttons aligned with the bottom left button when the button list is scrolled to the bottom. Very important. Well, to me, anyway. So as we build our list of buttons, there are alot of extra little details being inserted everywhere.
   /////////////////////////////////////////////////////////////////////////////////////////////////
  // Lights Page
  /////////////////////////////////////////////////////////////////////////////////////////////////

  if (pages.TabIndex = 16) or (tmrSeconds.Tag = 16) then
  begin

    asm
      var lights = JSON.stringify(this.Lights);
      if (lights !== this.LightsAll) {

        // Save this state
        this.LightsAll = lights;

        // Stay on this page if someone is fiddling with the lights ;)
        pas.Unit1.Form1.ResetInactivityTimer(null);

        // ALL lights
        var all = [];
        if (this.LightsMode == 1) {
          all = this.Lights.sort((a,b) => (a.entity_id > b.entity_id) ? 1: -1);
        }

        // Only Groups
        else if (this.LightsMode == 2) {
          all = this.Lights.filter(
            function(o) {
              return ((o.entity_id.indexOf("light.") == 0) && ((o.attributes.lights !== undefined) || (o.entity_id.indexOf("_group") !== -1)) && (o.entity_id.indexOf("_hide") == -1) && ((o.state == "off") || (o.state == "on")));
            }).sort((a,b) => (a.entity_id > b.entity_id) ? 1: -1);
        }

        // Hide Groups
        else if (this.LightsMode == 3) {
          all = this.Lights.filter(
            function(o) {
              return ((o.entity_id.indexOf("light.") == 0) && ((o.attributes.lights == undefined) && (o.entity_id.indexOf("_group") == -1)) && (o.entity_id.indexOf("_hide") == -1) && ((o.state == "off") || (o.state == "on")));
            }).sort((a,b) => (a.entity_id > b.entity_id) ? 1: -1);
        }

        divAllLights.replaceChildren();

        if (all.length > 0) {
          for (var i = 0; i < all.length; i++) {

            // Create a new button
            var lightbtn = document.createElement("div");
            lightbtn.id = 'light-'+all[i].entity_id;
            lightbtn.classList.add('LightButton');

            var lighttxt = document.createElement("div");
            lighttxt.textContent = all[i].attributes["friendly_name"].replace(' ','\n');
            lighttxt.classList.add('LightText');

            // Add margin to buttons on first and last rows
            if (i < 7) {
              lightbtn.style.setProperty("margin-top","18px");
            }
            else if (i >= (Math.trunc(all.length / 7) * 7)) {
              lightbtn.style.setProperty("margin-bottom","18px")
            }

            // If button is "on" we might also be able to set its color
            if (all[i].state == "on") {
              lightbtn.classList.add('LightOn');
              if (all[i].attributes["hs_color"] !== undefined) {
                var rgb = window.rgbFromHSV(
                  parseInt(all[i].attributes["hs_color"][0] || 0),
                  parseInt(all[i].attributes["hs_color"][1] || 0) / 100,
                  parseInt(all[i].attributes["brightness"]/2.56 || 0) / 100
                )
                lightbtn.style.setProperty("background-color","rgb("+rgb[0]+","+rgb[1]+","+rgb[2]+")")
              }
              else if (all[i].attributes["brightness"] !== undefined) {
                var rgb = parseInt(all[i].attributes["brightness"] || 0);
                lightbtn.style.setProperty("background-color","rgb("+rgb+","+rgb+","+rgb+")")
              }
            }
            // If button is off or disabled, color not usually available
            else if (all[i].state == "off") {
              lightbtn.classList.add('LightOff');
            }
            else {
              lightbtn.classList.add('LightOther');
            }

            // Find the Home Assistant Icon to use
            var lighticon = document.createElement("div");
            var icon = "mdi-lightbulb";
            if (all[i].attributes["icon"] !== undefined) {
              icon = all[i].attributes["icon"].replace(":","-");
            }

            // Add button to the page
            divAllLights.appendChild(lightbtn);

            // Add Icon to the button
            lightbtn.appendChild(lighticon);
            lighticon.classList.add("LightIcon","mdi",icon);

            // Add Text to the button
            lightbtn.appendChild(lighttxt);

            // Call Delphi function when someone clicks on a button
            lightbtn.addEventListener('click',function(e){pas.Unit1.Form1.LightButtonClicked(e.target.id); e.stopPropagation;});

          }
        }
      }
    end;
  end;
The comments in the code here explain pretty well what's going on. We're essentially constructing light buttons from scratch one at a time. We start by figuring out what set of lights we're working with based on the LightsMode Form variable. We also don't bother doing anything if the entire block of JSON that defines the lights hasn't changed. No need to be wasteful, after all. But there are a few little nuggets mixed in there worth sharing in a little more detail.
- If you want to empty out all of the elements of a <div>, one approach is to use the "replaceChildren()" function and simply not provide any children to replace. This is better than setting "innerHTML" to an empty string as it also removes any event listeners, which is exactly what we want.
- e.StopPropagation() is something called to help ensure that the handling of a JavaScript event doesn't "bubble
up" to other event handlers attached to other elements on the page. I can't recall if this was an issue here
or not, but not a terrible thing to add in any case.
- This is a much bigger topic than a bullet point might suggest, but setting the color of a light, or
retrieving the color of a light, is perhaps best done using HSV rather than RGB. They should be
equivalent in many respects, particularly in terms of the color space that they reference, but in practice,
they are not equivalent in terms of how lights physically interpret the values.
For example, sending RGB(0,0,0) to a light will be ignored, and sending RGB(128,0,0) will end up being processed as RGB(255,0,0) in some cases - red but not dark red. Passing, instead, a brightness value along with Hue and Saturation works much better! However, in a cruel twist of fate, CSS doesn't know what HSV is, only HSL, despite HSL, HSV, and RGB all sharing the same color space. So we've got a conversion routine added in to deal with that. Check out the source code for details. - If a light can have a brightness value but not a color value, then we adjust the background to have the same
brightness (r = g = b = brightness value).
- We're using the Material Design Icons here again, along with CSS similar to what we used with the buttons on the left. There might be the thought of using a different set of icons, or SVG icons, or perhaps Iconify or other means to get icons into the picture more efficiently. I tried them all! At the end of the day, we're back to where we started because every other option resulted in icons "flickering" whenever this code was run. Presumably, it takes considerably more CPU to render a pile of SVG icons than it does a font-based icon. Or so it would seem. We end up paying an upfront cost to load Material Design Icons, but this appears to be the fastest way to display them. Which is a little unexpected.
There's a lot going on in this code, regenerating all those icons, but it happens quickly enough that flicking a light on or off simply appears to change the background color of the button, even though we know that it is redrawing all the buttons on the page whenever that happens. Something to keep an eye on in case that doesn't work out so magically sometime later.
This could be improved by only updating the button that has changed. But
that would be more work. And what if a new button appeared? Would we want it just tacked on to the end of the
list? No, we most certainly would not. Which would be more work again. For little benefit, if this continues to be fast
enough. Fingers crossed!
Toggling Lights.
Of course, we don't want to just look at the lights. We want to interact with them. When we created all those
buttons, we also attached a Delphi procedure to be able to do just that. The first and most obvious thing we
want to do is to turn them off and on. We already saw the code for turning them all off or on, but for an
individual light, it looks like this. Exactly what the "toggle" service was intended to do.
procedure TForm1.LightButtonClicked(light: String);
var
  LightID: String;
begin
  LightID := Copy(light,7,length(light));
  if pos('light-',light) = 1 then
  begin
    HAID := HAID + 1;
    HAWebSocket.Send('{"id":'+IntToStr(HAID)+', "type":"call_service", "domain": "light", "service": "toggle", "target": {"entity_id":"'+LightID+'"}}');
  end;
end;
When Home Assistant finally gets around to turning the light on or off (milliseconds later!), it generates a
new "subscribe_events" data packet, which then runs our code above to refresh all of the light buttons. The
same happens if you turn on a light using another interface. This all works pretty well. But we can do better!
At long last, we come to the first use of our "Change" button in the top-right corner of the Catheedral interface. While on the Lights page, clicking the "Change" button will result in the icon changing color and pulsing, indicating that you're now in "Change Mode". While in this mode, clicking a button brings up an extra bit of UI that allows you to make additional changes.
What kinds of changes? Well, that depends on the light. As we
discussed earlier, some lights are just on/off lights - nothing else to do really. Others just have a brightness
option. And some have color support. So what to do? Well, let's add a pop-up UI that corresponds to the light
button that we've clicked on.
Light Switch.
For our first scenario, let's look at a light with just an on/off capability. We could just pretend that
there's nothing special and toggle the light as we were doing previously. But we like to be consistent with our
UI, so let's show a pop-up but the only option is to turn the light on or off. A recent blog post covered Shoelace
web components, so let's try and use some of those in our project. To get started with Shoelace, we'll need to add the usual entries to our Project.html file or use the Manage JavaScript Libraries feature of Delphi to do the
equivalent. The day that post was published, coincidentally, Shoelace officially hit its 2.0.0 release, no
longer beta after three years!
    <!-- Shoelace Web Components -->
    <link rel="stylesheet" href="https://cdn.jsdelivr.net/npm/@shoelace-style/shoelace@2.0.0/dist/themes/light.css" />
    <script type="module" src="https://cdn.jsdelivr.net/npm/@shoelace-style/shoelace@2.0.0/dist/shoelace.js"></script>
For our light switch, we're going to (surprise!) use a Shoelace switch component. We'll need a TWebHTMLDiv component to
serve as our pop-up panel, and we'd like to add a button for the light that we're switching, in addition to the
switch itself. For the switch, we can add a TWebHTMLDiv component with the following HTML properties to get everything
sized up and styled the way we want.
    <sl-switch id="switchlight" class="bigswitches" style="--width: 150px; --height: 50px; --thumb-size: 75px"></sl-switch>

    <style>
    .bigswitches::part(label) {
      padding-left: 15px;
    }
    .bigswitches::part(thumb) {
        filter: drop-shadow(0px 0px 2px black) drop-shadow(0px 0px 2px black);
      border-width: 5px;
    }
    .bigswitches::part(control) {
      border-radius: 15px;
      filter: drop-shadow(0px 0px 2px black) drop-shadow(0px 0px 2px black);
    }
    </style>
In order for our "pop-up" to, well, pop up, there are many approaches one might take. What I've done, for several reasons, and being lazy is surely among them, is to drop a TWebHTMLDiv component on the bottom of the main Delphi Form, below where it would normally be visible. When needed, a transition property is used to bring it up into view and then moved back down after we're done with it. A bit of opacity fiddling for good measure, and we end up with the following.

Light Switch.
Clicking outside of the pop-up, clicking either navigation control, or clicking any of the Main Buttons will hide the pop-up panel. When the pop-up panel is displayed, the main TWebPageControl component is adjusted with a lower opacity and mouse events are removed, leaving it to the divBackground element to handle the pop-up dismissal event.
A little bit crazy, but the TWebHTMLDiv component used for the pop-up panel is (deliberately) above the TWebPageControl component and
not embedded in the Lights page. This means we can use it later if we want to control a light from a different
page. Handy. Less handy is that we also have to update both the switch and the light button at the top of the
pop-up panel when the switch is used. This first falls to our LightButtonClicked event, which now has to deal
with presenting the pop-up panel and setting the current state of the switch.
        // De-prioritize main TWebPageControl
        pages.style.setProperty('transition', 'opacity 0.4s ease');
        pages.style.setProperty('opacity','0.25');
        pages.classList.add('pe-none');

        // We'll need this later
        this.PopupVisible = true;
        this.CurrentLightID = LightID;

        // Clone the light button from the main display
        var cloneobj = document.getElementById(light).cloneNode(true);
        cloneobj.id = 'lightswitch-'+LightID;
        cloneobj.classList.replace('LightButton','LightButtonLabel');
        cloneobj.style.setProperty("margin-top","0px");
        cloneobj.addEventListener('click',function(e){pas.Unit1.Form1.LightButtonClicked(light); e.stopPropagation;});

        // Figure out which kind of light control to display
        var lightattr = lightobj.attributes["supported_color_modes"];

        if ((lightattr == undefined) || (lightattr.length == 0) ||  (lightattr.includes("onoff"))) {
          // Add Light
          labelLightSwitch.replaceChildren(cloneobj);

          // Setup Event
          switchlight.replaceWith(switchlight.cloneNode(true)); // get rid of any existing event listeners (?!)
          switchlight.addEventListener('click',function(e){pas.Unit1.Form1.LightButtonSwitched(light); e.stopPropagation;});

          // Set Current State
          if (lightobj.state == "on") {
            switchlight.setAttribute('checked','');
          }
          else {
            switchlight.removeAttribute('checked');
          }

          // Show UI
          this.LightsWhichSwitch = 1;
          divLightSwitch.style.setProperty('opacity','1');
          divLightSwitch.style.setProperty('top','10px');
        }

(continues)
There are two things in particular worth looking at in more detail. First, we're placing the light button at
the top of the pop-up panel by literally cloning the button from the original Light page. Cloning doesn't carry
the event listener with it, though, so we have to add that back as part of this process. This is the same
regardless of which type of light we're dealing with.
Second, as we'll be using the same form and the same
switch over and over again, we have to have a way to get rid of the last event listener that we used. A bit of
JavaScript sleight of hand is used here to clone an object with itself, which has the side effect of removing
all the event listeners. How strange is that? Pretty strange, I think. But it works.
The remainder of the code here deals with how the switch works - by adding/removing the "checked"
attribute, we can change the state of the switch directly. But we have another problem. What if this popup is
being displayed when the light changes state by another means? Well, we'd like the switch to update in that
case as well. To accomplish that, we have to check for the pop-up panel at the end of our process of updating
the list of lights. If there's a pop-up showing, then we have to again clone our button onto the pop-up panel
and then adjust the state of the switch.
          if (this.PopupVisible == true) {
            if (this.CurrentLightID !== '') {
              var currid = "light-"+this.CurrentLightID;
              var cloneobj = document.getElementById(currid).cloneNode(true);
              cloneobj.id = 'lightswitch-'+this.CurrentLightID;
              cloneobj.classList.replace('LightButton','LightButtonLabel');
              cloneobj.addEventListener('click',function(e){pas.Unit1.Form1.LightButtonClicked(currid); e.stopPropagation;});

              if (this.LightsWhichSwitch == 1) {
                labelLightSwitch.replaceChildren(cloneobj);
                if (this.Lights.find(o => o.entity_id === this.CurrentLightID).state == "on") {
                  switchlight.setAttribute('checked','');
                }
                else {
                  switchlight.removeAttribute('checked');
                }
              }
This mimics what we did previously. Note that when we add the event listener for the button at the top of the pop-up panel, we're calling the LightButtonClicked event, as we would normally do, but passing in the ID of the original button rather than the ID of the cloned button. What about the code that actually triggers the switch?
procedure TForm1.LightButtonSwitched(light: String);
var
  LightID: String;
begin
  LightID := Copy(light,7,length(light));
  // Switching light on/off or Changing Color?
  if pos('light-',light) = 1 then
  begin
    HAID := HAID + 1;
    HAWebSocket.Send('{"id":'+IntToStr(HAID)+', "type":"call_service", "domain": "light", "service": "toggle", "target": {"entity_id":"'+LightID+'"}}');
  end;
end;
This is similar to what we've seen before, where we're still using the "toggle" service to do the work.
Light Dimmer.
For our next challenge, let's consider the scenario where we have a light that only offers a brightness control. Like the Mysa thermostat display, for example. Or perhaps other smart lights that are not full color. In this situation, our "Change Mode" should give us a pop-up panel with a brightness slider.
Same deal as
before, but instead of a Shoelace "switch" web component, we'll need a Shoelace "range" component. And, well,
that's a problem. Well, not a problem with Shoelace or its range web component, but rather with HTML and range
elements generally. They're terrible! Styling is notoriously difficult, with cross-browser shenanigans every
step of the way. Shoelace does a reasonable job, giving some options for styling. Other components have
similar problems. When the Web Audio API blog posts were written (check them out here
and here),
I gave up entirely and opted to just make my own range sliders! Which worked, but were not particularly great
either. This time, let's give the Shoelace variant a try.
<sl-range id="dimmerlight" class="bigrange" tooltip="none" style="--track-height: 30px; --thumb-size: 70px; --track-color-active:white; --track-color-inactive:
gray;"></sl-range>

<style>
.bigrange::part(base){
  width: 500px;
}
.bigrange::part(input) {
  border-radius: 25px;
  border: 3px solid gray;
  filter: drop-shadow(0px 0px 2px black) drop-shadow(0px 0px 2px black);
}
.bigrange::part(base) > input::-webkit-slider-thumb {
  border: 3px solid royalblue;
  color: white;
  filter: drop-shadow(0px 0px 2px black) drop-shadow(0px 0px 2px black);
}
</style>
The main problem is that we don't have any ability to style the thumb, which is particularly curious as we can do that perfectly well with the switch (as we've just done) and the color picker (coming up next!). To deal with that, we'll get into some shenanigans of our own - we'll just plop our own thumb on top of the range control, and move it whenever the range value changes. Just crazy enough that it might work. We'd also like to display the brightness as an actual value. So, in LightButtonClicked, we end up with the following.
        else if (lightattr.includes("brightness")) {
          // Add Light
          labelLightDimmer.replaceChildren(cloneobj);

          // Setup Event
          dimmerlight.replaceWith(dimmerlight.cloneNode(true)); // get rid of any existing event listeners (?!)
          dimmerlight.addEventListener('sl-input',function(e){
            divDimmerThumb.style.setProperty("left",50 + (e.target.value * 4.25) +'px');
            labelDimmerValue.textContent = e.target.value+' %';
            pas.Unit1.Form1.LightButtonDimmed(light, parseInt(e.target.value * 2.56));
            e.stopPropagation;
          });

          // Set Current State
          dimmerlight.value = 100 * ((parseFloat(lightobj.attributes["brightness"]) || 0) / 255);
          divDimmerThumb.style.setProperty("left",50 + (dimmerlight.value * 4.25) + 'px');
          labelDimmerValue.textContent = (parseInt(dimmerlight.value) || 0)+' %';

          // Show UI
          this.LightsWhichSwitch = 2;
          divLightDimmer.style.setProperty('opacity','1');
          divLightDimmer.style.setProperty('top','10px');
        }
As this value may also change while the pop-up panel is displayed, we've got to do the same thing in the code
that draws the light buttons in the first place, just as we did with the light switch.
              else if (this.LightsWhichSwitch == 2) {
                labelLightDimmer.replaceChildren(cloneobj);
                if (this.Lights.find(o => o.entity_id === this.CurrentLightID).state == "on") {
                  var light = this.Lights.find(o => o.entity_id === this.CurrentLightID).attributes;
                  var lightvalue = 100 * ((parseFloat(light["brightness"]) || 0) / 255);
                  dimmerlight.value = lightvalue;
                  divDimmerThumb.style.setProperty("left",50 + (lightvalue * 4.25) + 'px');
                  labelDimmerValue.textContent = (parseInt(lightvalue) || 0)+' %';
                }
                else {
                  dimmerlight.value = 0;
                  divDimmerThumb.style.setProperty("left","50px");
                  labelDimmerValue.textContent = "0 %";
                }
              }
Note that "brightness" in Home Assistant is a [0..255] value, while in our control it is a [0..100] value.
Light Dimmer.
So that works pretty well. One of the curious things that comes up, though, is that sometimes lights don't change states all that quickly. Usually, this is deliberate. For example, going from 0% brightness to 100% brightness might take 1s, which gives a much nicer feel to the whole process. Unlike a traditional light switch that flicks on or off instantly, for comparison.
In our UI, though, sometimes this means that the range control gets updated with these intermediate values, particularly if you drag the thumb. This could be made smoother by only sending commands when the thumb is stationary, while still updating our fake thumb as often as the underlying thumb moves. We can set up two events. JavaScript "input" events tend to refer to any and all updates made to an element's value, whereas "change" events tend to get issued less frequently, like when the thumb of a slider is released. So we can improve our slider-dragging behavior by using the "input" event to just update our fake thumb, and the "change" event to actually make the change.
          // Setup Event
          dimmerlight.replaceWith(dimmerlight.cloneNode(true)); // get rid of any existing event listeners (?!)
          dimmerlight.addEventListener('sl-input',function(e){
            labelDimmerValue.textContent = e.target.value+' %';
            divDimmerThumb.style.setProperty("left",50 + (e.target.value * 4.25) +'px');
            e.stopPropagation;
          });
          dimmerlight.addEventListener('sl-change',function(e){
            pas.Unit1.Form1.LightButtonDimmed(light, parseInt(e.target.value * 2.56));
            e.stopPropagation;
          });
This also means that if the point we've dragged to ends up being different than what the final value of the light becomes, the UI will kind of get bumped into the final value a very brief moment later. It isn't much of an issue with brightness, as the values get translated pretty accurately back and forth without issue. This is more of a problem with colors. What about the code to change the brightness of the actual light?
procedure TForm1.LightButtonDimmed(light: String; brightness: Integer);
var
  LightID: String;
begin
  LightID := Copy(light,7,length(light));
  // Switching light on/off or Changing Color?
  if pos('light-',light) = 1 then
  begin
    HAID := HAID + 1;
    HAWebSocket.Send('{"id":'+IntToStr(HAID)+', "type":"call_service", "domain": "light", "service": "turn_on", "target": {"entity_id":"'+LightID+'"}, "service_data":{"brightness":'+IntToStr(brightness)+'}}');
  end;
end;
Similar to before, but in this case, we're using the "turn_on" service call, and in the data, we're passing
"brightness" as one of the attributes to change.
Light Colors.
And for our last trick of the day, we're going to add a color picker to our Light page. Like the switch and dimmer, we've got a Shoelace web component we can use here as well - their color picker. This worked pretty well in our Shoelace blog post, and it offers a ton of customizations and all kinds of complex UI elements that can be endlessly fiddled with. But it doesn't really fit all that well in our display orientation. Particularly the swatches at the bottom. So we'll have to do our own swatches separate from the control. But that's OK because we've got some fun things planned for them anyway. Let's start with our color picker web component.<sl-color-picker
id="colorlight"
class="fancyslider"
style="
--grid-height: 164px;
--grid-width: 320px;
--slider-height: 30px;
--slider-handle-size: 45px;
"
inline
uppercase
format="rgb"
value="maroon"
></sl-colorpicker>
<style>
.fancyslider::part(base) {
border: none;
border-radius: 12px;
background-color: #F0F0FF80;
filter: drop-shadow(0px 0px 2px black) drop-shadow(0px 0px 2px black);
}
.fancyslider::part(grid) {
border-top-left-radius: 11px;
border-top-right-radius: 11px;
}
.fancyslider::part(hue-slider) {
margin-left: 20px;
margin-right: 20px;
margin-top: 5px;
margin-bottom: 7px;
border-radius: 10px;
filter: drop-shadow(0px 0px 2px black) drop-shadow(0px 0px 2px black);
}
.fancyslider::part(slider-handle) {
border: 4px solid royalblue;
filter: drop-shadow(0px 0px 1px black) drop-shadow(0px 0px 1px black);
}
.fancyslider::part(preview) {
display: none;
width: 0px;
height: 0px;
}
.fancyslider::part(input) {
border: none;
border-radius: 10px;
--sl-input-border-radius-medium: 10px;
filter: drop-shadow(0px 0px 2px black) drop-shadow(0px 0px 2px black);
}
.fancyslider::part(format-button) {
border:none
border-radius: 10px;
margin-right: 1px;
filter: drop-shadow(0px 0px 2px black) drop-shadow(0px 0px 2px black);
}
.fancyslider::part(eye-dropper-button) {
border: none;
border-radius: 10px;
margin-left: 2px;
filter: drop-shadow(0px 0px 2px black) drop-shadow(0px 0px 2px black);
}
.fancyslider::part(format-button__base) {
border-top-left-radius:10px;
border-bottom-left-radius:10px;
}
.fancyslider::part(eye-dropper-button__base) {
border-top-right-radius: 10px;
border-bottom-right-radius: 10px;
}
</style>There's a lot more going on here, but that's in part because the color picker web component is made up of about a dozen other web components of its own. Fortunately, this all works pretty well, with just two issues that need addressing. But before we get to those, let's have a look at what we've got for our LightButtonClicked code.
        else {
          // Add Light
          labelLightColor.replaceChildren(cloneobj);
          colorlight.replaceWith(colorlight.cloneNode(true)); // get rid of any existing event listeners (?!)

          // Setup Event
          colorlight.addEventListener('sl-change',function(e){
            pas.Unit1.Form1.LightButtonColor(
              light,
              e.target.getFormattedValue('hsv')
            );
            e.stopPropagation;
          });

          // Set Current State
          if (lightobj.attributes["rgb_color"] !== undefined) {
            colorlight.value = "hsv("+lightobj.attributes["hs_color"][0]+","+
                                      lightobj.attributes["hs_color"][1]+"%,"+
                                      parseInt(lightobj.attributes["brightness"]/2.56)+'%'+
                                  ")";
          }
          else {
            colorlight.value = "rgb(0,0,0)";
          }

          // Show UI
          this.LightsWhichSwitch = 3;
          divLightColor.style.setProperty('opacity','1');
          divLightColor.style.setProperty('top','10px');

        }
And its companion code in the tmrSeconds handler looks like this, very similar.
              else if (this.LightsWhichSwitch == 3) {
                labelLightColor.replaceChildren(cloneobj);
                if (this.Lights.find(o => o.entity_id === this.CurrentLightID).state == "on") {
                  var light = this.Lights.find(o => o.entity_id === this.CurrentLightID).attributes;
                  colorlight.value = "hsv("+light["hs_color"][0]+","+
                                            light["hs_color"][1]+"%,"+
                                            parseInt(light["brightness"] / 2.56)
                                        ")";
                }
                else {
                  colorlight.value = "rgb(0,0,0)";
                }
              }
There's a bit more work here in dealing with the colors themselves. The lights contain several attributes that are color-related. The most obvious choice to work with would be "rgb_color" but as we were discussing earlier, this isn't particularly great when dealing with lights. The seemingly equivalent (color space-wise) "hs_color" is a better choice, and combined with the "brightness" value we end up with our HSV color value. We can pass this directly to the color picker and it deals with it just fine. What about changing the color of the actual light?
procedure TForm1.LightButtonColor(light: String; hsv: String);
var
  LightID: String;
  Hue: Integer;
  Sat: Integer;
  Bri: Integer;
  Command: String;
begin
  LightID := Copy(light,7,length(light));
  hsv := StringReplace(StringReplace(StringReplace(StringReplace(hsv,'HSV(','',[]),')','',[]),'%','',[rfReplaceAll]),' ','',[rfReplaceAll]);

  asm
    Hue = parseInt(hsv.split(',')[0] || 0);
    Sat = parseInt(hsv.split(',')[1] || 0);
    Bri = parseInt(parseInt(hsv.split(',')[2] || 0) * 2.56);
  end;

  // Switching light on/off or Changing Color?
  if pos('light-',light) = 1 then
  begin
    HAID := HAID + 1;
    HAWebSocket.Send('{"id":'+IntToStr(HAID)+', "type":"call_service", "domain": "light", "service": "turn_on", "target": {"entity_id":"'+LightID+'"}, "service_data":{"transition":0.4,"brightness":'+IntToStr(Bri)+',"hs_color":['+IntToStr(Hue)+','+IntToStr(Sat)+']}}');
  end;
end;
Here, we're taking the HSV value and adjusting it to suit the ranges for the "hs_color" attributes in Home Assistant, and separating out the values so we can update "hs_color" and "brightness" separately. There's also a "transition" attribute added in case that was of interest. We're using the same "turn_on" service call as we used for the brightness variant. Note that there are many other values that can be passed in this service call, including other color formats.
Home Assistant "turn_on" Service Call Options.
The first of the two problems is that we'd like the font in the main input area to be different - Cairo, like the
rest of our application. Shoelace supports themes and has CSS overrides for many elements. But here, we're
trying to change the style of a CSS part that is nested several layers deep in other parts, and these aren't
exposed directly. And creating a theme just to change a font seems like a lot of work. So does reading
documentation about themes. Being JavaScript, though, we can kind of brute force our way around and come up with
this approach. Solid candidate for further research!
           // Changing the input element's font (there's got to be a better way!)
          customElements.whenDefined('sl-color-picker').then(() => {
            setTimeout(function() {
              var a = colorlight.shadowRoot;
              var b = a.querySelectorAll('[part~="input"]');
              var c = b[0].shadowRoot;
              var d = c.querySelectorAll('[part~="input"]');
              var e = d[0];
              e.style.setProperty('font-family','Cairo');
              e.style.setProperty('font-size','18px');
              e.style.setProperty('padding-left','5px');
              e.style.setProperty('padding-right','0px');
            },50);
          });
It's ugly but it works, for now at least. All to get our pretty Cairo font on display. I didn't change the font of the color space selector button because that seemed less important. Here, I wanted to make the font bigger, and the original font was also not centered as well as it could have been. Happy with the results, but not how this should be done normally, I don't think!
The second problem relates to the swatches. There's no room at the bottom. So let's just add a bunch of buttons, and we can set the colors and then have them set the color of the color picker. Just for fun, let's also pull the colors and color names of the swatches directly from the CSS file. We can define CSS variables in the : root stanza of our CSS file, so let's do that first.
  /* Color Swatches */

  --Swatch-0:  white;
  --Swatch-1:  #CCCCCC;
  --Swatch-2:  #999999;
  --Swatch-3:  #666666;
  --Swatch-4:  #333333;
  --Swatch-5:  black;

  --Swatch-6:  lightpink;
  --Swatch-7:  lightyellow;
  --Swatch-8:  lightgreen;
  --Swatch-9:  lightsalmon;
  --Swatch-10: lightskyblue;
  --Swatch-11: paleturquoise;

  --Swatch-12: maroon;
  --Swatch-13: olive;
  --Swatch-14: green;
  --Swatch-15: teal;
  --Swatch-16: navy;
  --Swatch-17: purple;

  --Swatch-18: red;
  --Swatch-19: yellow;
  --Swatch-20: lime;
  --Swatch-21: aqua;
  --Swatch-22: blue;
  --Swatch-23: fuchsia;

  --Swatch-Name-0:  "White";
  --Swatch-Name-1:  "Gray-80%";
  --Swatch-Name-2:  "Gray-60%";
  --Swatch-Name-3:  "Gray-40%";
  --Swatch-Name-4:  "Gray-20%";
  --Swatch-Name-5:  "Black";

  --Swatch-Name-6:  "Light Pink";
  --Swatch-Name-7:  "Light Yellow";
  --Swatch-Name-8:  "Light Green";
  --Swatch-Name-9:  "Light Salmon";
  --Swatch-Name-10: "Light Sky Blue";
  --Swatch-Name-11: "Pale Turquoise";

  --Swatch-Name-12: 'Maroon';
  --Swatch-Name-13: 'Olive';
  --Swatch-Name-14: 'Green';
  --Swatch-Name-15: 'Teal';
  --Swatch-Name-16: 'Navy';
  --Swatch-Name-17: 'Purple';

  --Swatch-Name-18: 'Red';
  --Swatch-Name-19: 'Yellow';
  --Swatch-Name-20: 'Lime';
  --Swatch-Name-21: 'Aqua';
  --Swatch-Name-22: 'Blue';
  --Swatch-Name-23: 'Fuchsia';
To read these into our application, we'll first define some Delphi string arrays to hold them. We can then use this code to get the values and set up our buttons at the same time.
    // Load Swatch information from CSS
    var GetSwatch = function(SwatchNum) {
      const here = pas.Unit1.Form1;
      here.SwatchColors[SwatchNum] = window.getComputedStyle(document.documentElement).getPropertyValue('--Swatch-'+SwatchNum);
      here.SwatchNames[SwatchNum]  = window.getComputedStyle(document.documentElement).getPropertyValue('--Swatch-Name-'+SwatchNum).replace(/[''""]+/g, '');
      var swatch = document.getElementById('btnSwatch'+SwatchNum);
      swatch.style.setProperty('background-color', here.SwatchColors[SwatchNum]);
      swatch.setAttribute('title', here.SwatchNames[SwatchNum]);
    }
    for (var i = 0; i <= 23; i++) {
      GetSwatch(i);
    }
I'm sure somewhere there's an eyebrow being raised about using CSS to pass actual text data to an application. Not really what is supposed to happen, but we're all learning, so no judging here. We'll get to an i18n discussion at some point where this will be revisited. But now, all we've got left to do is handle swatch button clicks.
procedure TForm1.ColorSwatchSelected(Sender: TObject);
var
  NewColor: String;
begin
  if ((Sender is TWebButton) and ((Sender as TWebButton).Tag >= 0)) then
  begin
    NewColor := SwatchColors[(Sender as TWebButton).Tag];
    asm
      colorlight.value = NewColor;
      colorlight.updateComplete.then(() => {
        colorlight.dispatchEvent(new Event('sl-change'));
      });
    end;
  end;
end;
This gets the selected color from the array, updates the color picker, and then dispatches the "change" event to have the color applied to the light. Here's what this all looks like when put together.
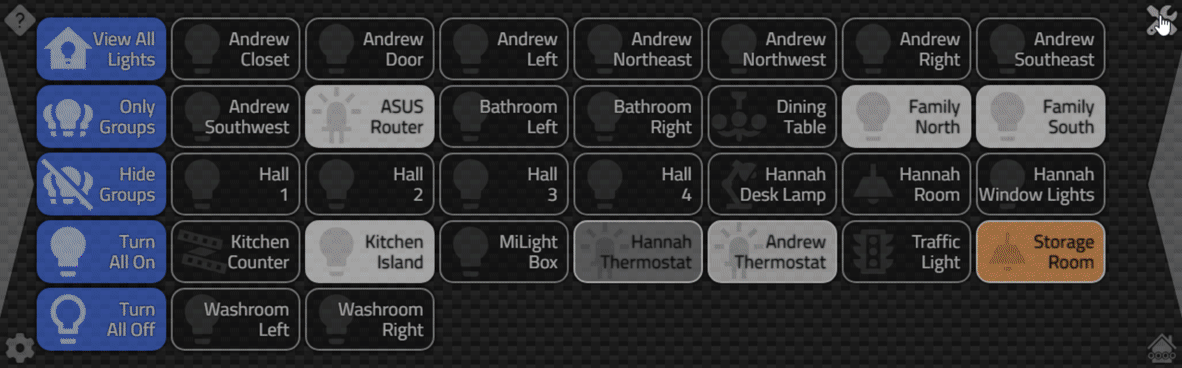
Light Color.
This works pretty well, but there are repeated updates as the light changes from one color to another, which can
be a bit distracting. Adjusting the transition speed doesn't seem to help much. Usable, but perhaps further
refinements are possible with respect to how those particular updates are handled.
Next Time.
That about covers it for today. Next time we'll have a look at the Weather panel on the Catheedral Home page. A little less complicated in terms of UI, certainly, but more variation in the underlying data presents a few new challenges.
We're now six posts in on this "Working with Home Assistant" mini-series. What do you think so far? What would you like to see more of in terms of Catheedral functionality? Is there anything we've covered so far that needs a little more attention? Comments and feedback are strongly encouraged, as always.
Here's a link to the GitHub repository.
https://github.com/500Foods/Catheedral
Andrew Simard

This blog post has not received any comments yet.
All Blog Posts | Next Post | Previous Post