Blog
All Blog Posts | Next Post | Previous Post

 TMS WEB Core and More with Andrew:
GitHub and GitHub Desktop
Tuesday, December 6, 2022

In this "TMS WEB Core and More" series, we're exploring how to use TMS WEB Core outside its default Delphi development environment, and where it fits in with the rest of the modern developer ecosystem. We've previously had a look at other development environments, including Visual Studio Code and Lazarus. We've looked at deploying to different platforms using both the Miletus Framework and the Electron Framework. In addition to the usual Windows, macOS, and Linux targets, we've also had an initial look at using TMS WEB Core with Raspberry Pi.
All of this is in addition to the normal deployment of regular web applications that are 100% JS/HTML/CSS and capable of running in any modern browser, mobile or otherwise, including deploying PWA apps. So a TMS WEB Core web application can be deployed everywhere and using whatever platform you prefer.
While each of those posts could be followed up with at least another post or two (or ten when it comes to VSC or
Raspberry Pi), there are many other areas to explore as well. In particular, using or integrating TMS WEB Core
with other established web applications. Today we're going to have a look at GitHub,
specifically using GitHub
Desktop with TMS WEB Core projects.
Motivation.
GitHub as a platform reportedly has more than 80 million users and more than 28 million public code repositories, in addition to more than 200 million code repositories that are not public. It is incredibly popular when it comes to open-source projects in particular. Nearly every JavaScript library we've looked at in the "Extend" blog series is available publicly on GitHub. And there's a good chance that software you use regularly might also be managed there as well, even if it is a commercial product. Netflix might be one such example. But as developers, where does the motivation come to use GitHub in the first place? Here are some ideas.
- Code Sharing. If you want others to see your code, it has to be made visible somewhere. Sure, we can exchange .zip files, but having it in GitHub makes things a little easier, particularly when it comes to keeping track of updates and accessing older revisions of the code. This applies even if we don't want the code to be public.
- Code Contributions. One of the major reasons to post code on GitHub is to get help improving it. Took me a while to learn that "PR" in GitHub-speak is a "pull request" - their term for contributing code
improvements back to a project.
- Code Backup. Developing from a local codebase is the natural starting place most of the time. Having it backed up elsewhere is always a good idea. Again, you can do this with .zip files or even with the
Git integration in Delphi. But having another potentially simpler option with GitHub Desktop may work better
for some.
- Code Examples. Naturally, having access to code written by others makes for a great resource when
trying to find solutions for any problems you're trying to solve.
- Code Libraries. As we've been exploring with the "Extend" blog series, there are a lot of libraries available in GitHub that we can readily use in our own TMS WEB Core projects. And as good developers, if we find problems with those libraries, GitHub has many tools to help, from issue queues to mechanisms for contributing back to projects directly.
- Code Source. Like having access to code for learning generally, having access to the source code of third-party tools often helps. There are times when public code repositories come up a bit short in the documentation department, so having the ability to go in and look at the code directly can save a lot of time and effort in troubleshooting certain kinds of problems.
- Code Parking. Sometimes we work on projects that are just one-off kinds of things, something to
address a niggly little problem, perhaps. Contributing these kinds of projects to GitHub can be a way to get
some value from that kind of work, in terms of participating in the larger developer community. What might not
have any value to you might be useful to someone else.
Thinking of TMS WEB Core developers as a community, it would perhaps be a pretty good thing if there were many more repositories on GitHub, as this can sometimes be seen as a reflection of how vibrant and active a developer community might actually be.
Beyond accessing the repositories, issue queues, and other parts of GitHub using their regular web interface, GitHub has also been integrated into many other developer tools, including its own GitHub Desktop tool. This is intended to be a simpler way to get your projects into GitHub and perform many of the most common tasks. GitHub also has a REST API for those interested in monitoring their repositories, which we're also going to have a look at in today's example project.
TMS WEB Core Repositories.
Doing a search on GitHub for "TMS WEB Core" repositories doesn't generate all that many results. Some have nothing to do with TMS WEB Core, some are empty, and some might be familiar to regular blog readers. Expanding the search to "webcore" gets many more results, but not many related to TMS WEB Core as it turns out that "webcore" is part of Apple's WebKit.Here's what I've found that might be of interest. I've excluded any projects where no Delphi source code was present, but even some of these are pretty light, just examples from webinars, for instance. I've also added a blog-related repository that didn't show up in the search, Survey Server, as it is an XData project and not specifically a TMS WEB Core project.
Not Related to TMS Software Blog Posts.
- https://github.com/DeveloppeurPascal/Faire-une-application-web-avec-Delphi
- https://github.com/qadram/generator-tms-web-core
- https://github.com/AlexandrePedroDeveloper/TMS_WebCore
- https://github.com/amadorsoy/TMSWebCoreWebinar
- https://github.com/mauparizotto/TMS-Web-Core
- https://github.com/smxi-software/Web-Core-Utils
- https://github.com/abatic-st/CursoTMSWebCoreForVSCode
- https://github.com/qadram/electron-calculator
- https://github.com/SigmaSciences/mORMot-Web
- https://github.com/GeorgeBairaktaris/MultipleFormHosting
Related to TMS Software Blog Posts.
- (blog) https://github.com/daveake/PiPADD
- (blog) https://github.com/500Foods/TMS-WEB-Core-JSExtend
- (blog) https://github.com/500Foods/TMS-WEB-Core-JSON-Primer
- (blog) https://github.com/500Foods/TMS-WEB-Core-LabelsExample
- (blog) https://github.com/500Foods/TMS-WEB-Core-ActorInfo
- (blog) https://github.com/500Foods/TMS-WEB-Core-DocumentEditor
- (blog) https://github.com/500Foods/TMS-WEB-Core-TrackEditor
- (blog) https://github.com/500Foods/TMS-WEB-Core-SurveyClientExample
- (blog) https://github.com/500Foods/TMS-Web-Core-SurveyAdminClient
- (blog)
https://github.com/500Foods/TMS-XData-SurveyServerExample
There may well be other TMS WEB Core repositories or repositories that include TMS WEB Core examples as part of a larger set of examples. Perhaps some of the TMS FNC repositories, for example. And if the repository doesn't explicitly include "TMS WEB Core" somewhere in its description, then it might also have been overlooked.
Is there a GitHub repository that you know about that was overlooked? Please add it in the comments below. Or better yet, consider crafting a blog post to tell us all about it! Also, If there's a blog post that has a project that would benefit from being included in a GitHub repository, that can be rectified as well.
Git vs. GitHub vs. GitHub Desktop vs. GitHub API
These are three very different things, and it is worth a moment or two to understand the relationship between
them.- Git. This is the underlying version control system, originally created by Linus Torvalds for
managing the Linux code repository. Due to its lineage, its natural environment is the Linux shell, where
various commands can be used to interact with code repositories, both local and remote. Support for Git is
included in Delphi as well. Using git isn't a particularly intuitive or welcoming experience, but it is used
by a huge number of projects, teams, and organizations. We're not going to delve into anything to do with
natively using git in this post.
- GitHub. This is a website (now owned by Microsoft) used primarily for managing remote code
repositories. While not strictly a web front-end to git, it is possible to use git commands to interact with
repositories on GitHub. And using GitHub is considerably easier than using git commands much of the time. GitHub maintains the "true" version of a given repository and helps with managing branches and other
versioning aspects. It also adds a host of other features that make it easy to interact with a community of
developers, including things like issue queues, optional discussion forums, and other tools. And while
GitHub is easier to interact with than git, it is not really all that simple either. In particular, uploading
and rearranging files isn't the greatest experience.
- GitHub Desktop. This is a Windows/macOS app created with the Electron framework. There is also a
way to get a Linux build, but this isn't offered on their download page for reasons that aren't immediately
clear. The idea behind GitHub Desktop is to make it even easier to connect your work to GitHub. You can
create a repository and then point it at your own source code, and it will help ensure that your local code
changes are updated in the repository. It also supports some basic functionality for assigning license
information and other repository setup steps. And, for our purposes, it makes it really easy to take a local
project and upload it to GitHub. Far easier than trying to do it manually through the GitHub web interface.
- GitHub API. This is an alternate way to look at your own data within GitHub. Nothing to do with Git
or GitHub Desktop. We're going to use it to retrieve data about our repositories.
Much of the rest of this post is therefore going to be about creating a new project that is used to access data from the GitHub API. We're going to manage this project as a repository in GitHub using GitHub Desktop. And as we make changes, those will be pushed to GitHub. We can add comments during this process that are then reflected in the GitHub repository, along with the ability to see the version history of each file.
GitHub API Token.
For the example project for this post, we're going to create a little app to retrieve a bit more information about
our repositories, using the GitHub API. Nothing too fancy, just enough to demonstrate how to use GitHub, GitHub
Desktop, and the GitHub API with a TMS WEB Core project.To start with, we'll need to have an account on GitHub. Once we've got our account, we'll need to create a GitHub API token that we'll need later. You can access this under the Account | Settings option. Here's what it looks like.
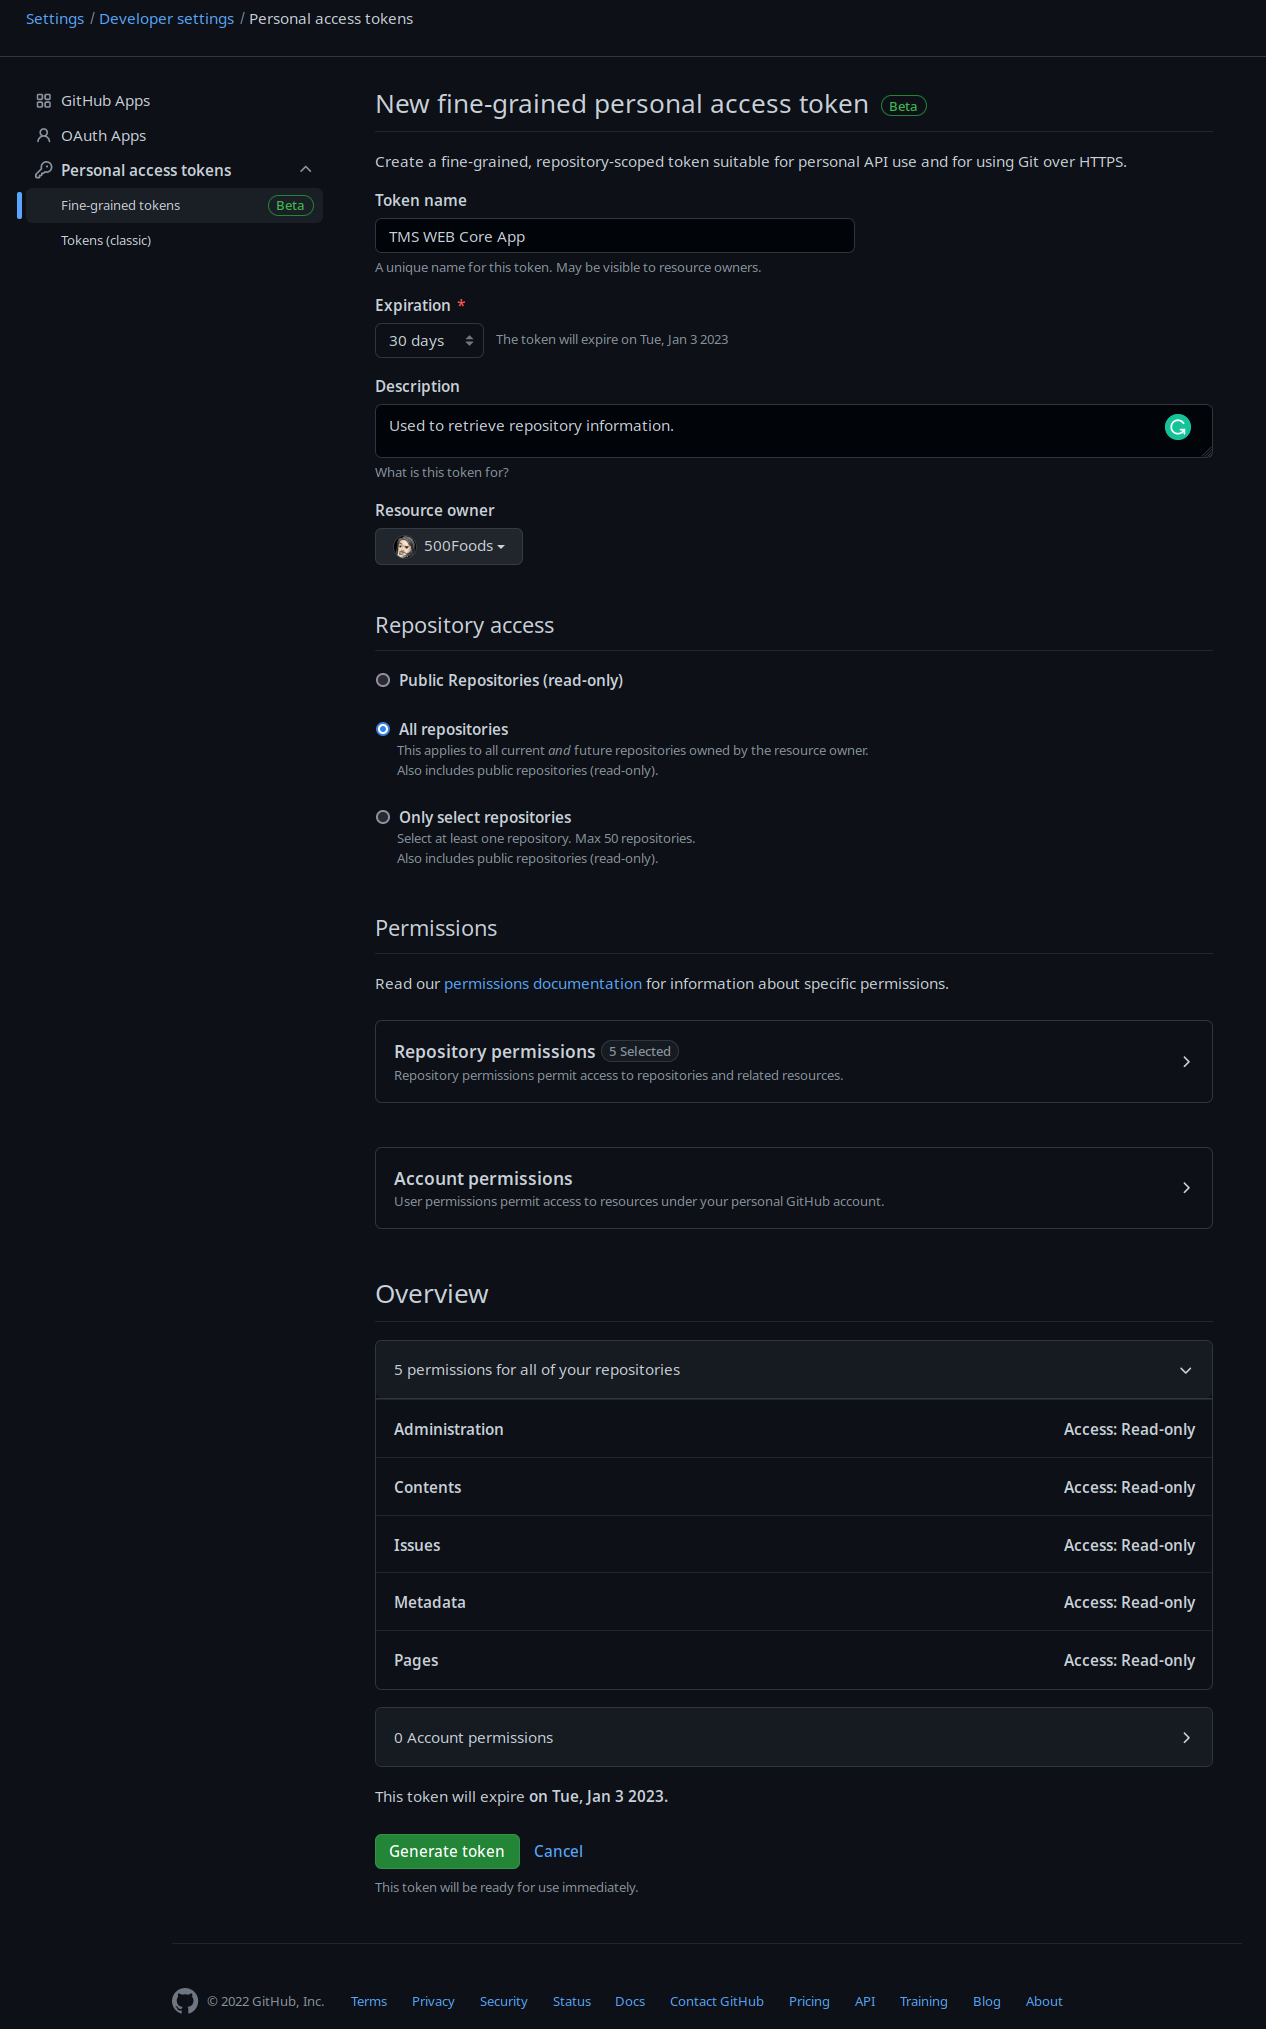
Generating a GitHub API Token.
We don't need much in the way of permissions for our example application, but let's add a few in case we want to
do some other things later. Once this page is all filled out, clicking the "Generate Token" will get us to the
next page, where the actual token is shown. Be sure to copy this somewhere as you'll not be able to bring it up
again once you leave that screen. This should be a long text string starting with "github_pat_" (personal access
token). We'll need that later when making requests to the GitHub API from our application.
GitHub Desktop Installation.
Next, we'll need to install GitHub Desktop. If you are using Windows or macOS, this can be downloaded from the GitHub Desktop website and installed much like any other app. If you're using Linux, you'll have to look through their Community Releases section and see if there's a version for your platform. The usual Linux suspects are all there - Debian, Ubuntu, Red Hat, CentOS, Fedora, and Arch Linux are mentioned explicitly, for example. Keep in mind it is just an Electron app, so support should be reasonably broad. Honestly, it is hard to fathom why Linux support isn't accessible directly from their main website, but perhaps that will change in the future.
Creating a Repository.
To get started with our TMS WEB Core example project, we're going to start with creating a repository. There is also the option to create a repository when the project already exists, but for simplicity, we're going to create the repository first. In the GitHub Desktop app, we can create a repository from the File | New Repository... menu item. There are just a few questions to get started.
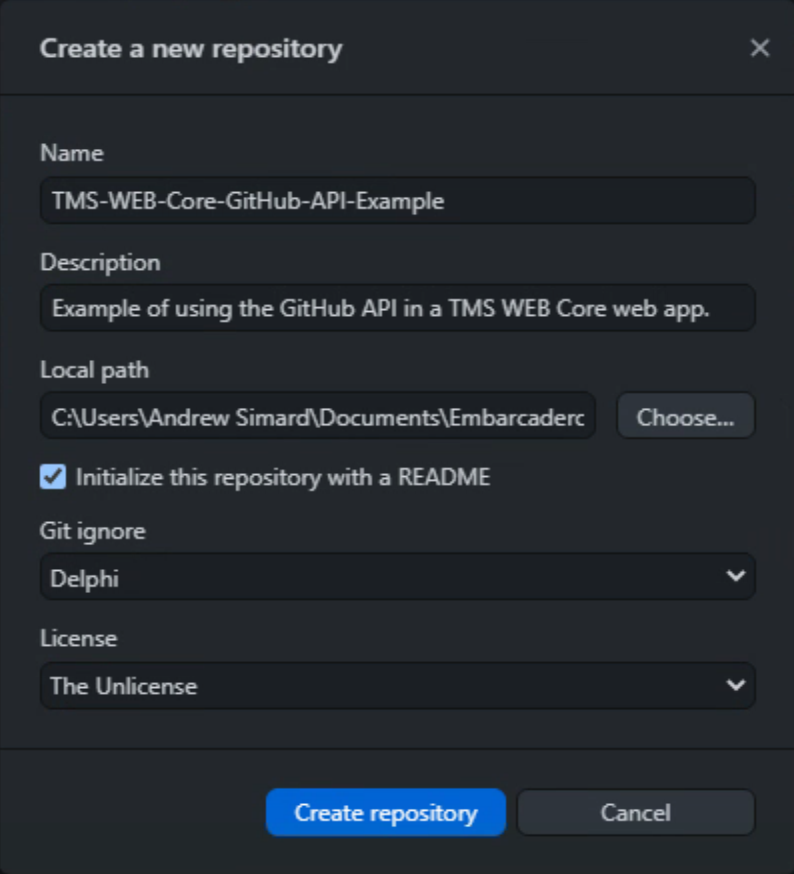
GitHub Desktop New Repository UI.
The "Name" and "Description" are pretty self-explanatory. Note that no spaces are allowed in the name - it will
replace them with hyphens as is the case above. For "Local Path" I've selected the usual Delphi "Projects" folder. We'll
update the README when we have a bit more to add to it, but we'll create it initially. "Git ignore" refers to
files that will not automatically be synced between the local project folder and GitHub. We'll address this a bit
later as well, but choosing "Delphi" is a good start.
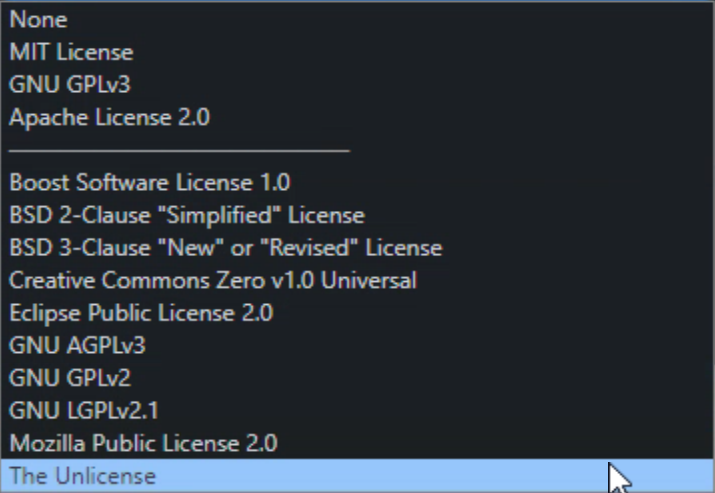
And finally, select a "License". As the code for these examples isn't particularly proprietary, I tend to like "The Unlicense" license, but there are plenty to choose from depending on your project. Or you can of course create your own.
GitHub Repository License Selection.
Clicking the "Create repository" button creates the repository - locally. This involves creating a folder with
the "Name" value in the "Local Path" folder specified, and then adding in various bits. There are the LICENSE,
README, and .gitignore files based on the options filled out in the New Repository UI. There is a .git folder with
all kinds of files in it, presumably all related to keeping this local copy in sync with the remote copy on GitHub
servers. And a .gitattributes file for good measure.
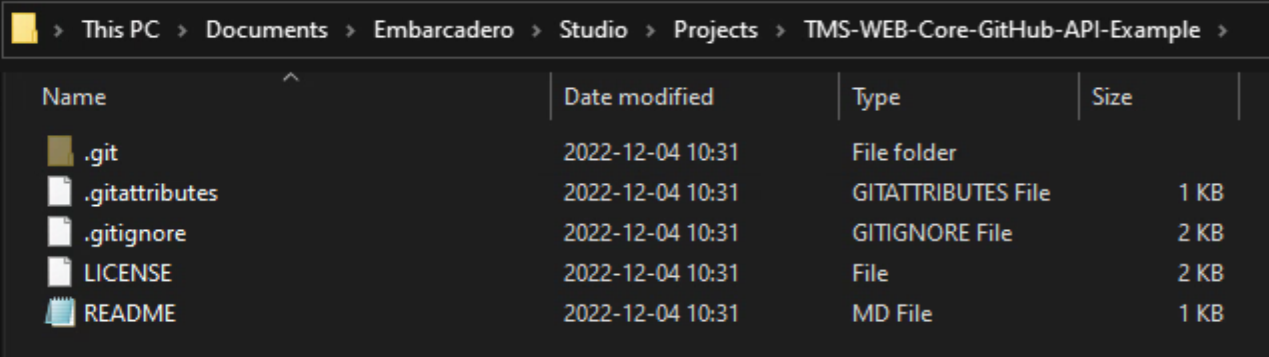
Empty Local GitHub Repository.
In order to finish creating the repository, we'll need to publish it to GitHub. Which is what we're presented with as soon as the repository is created.
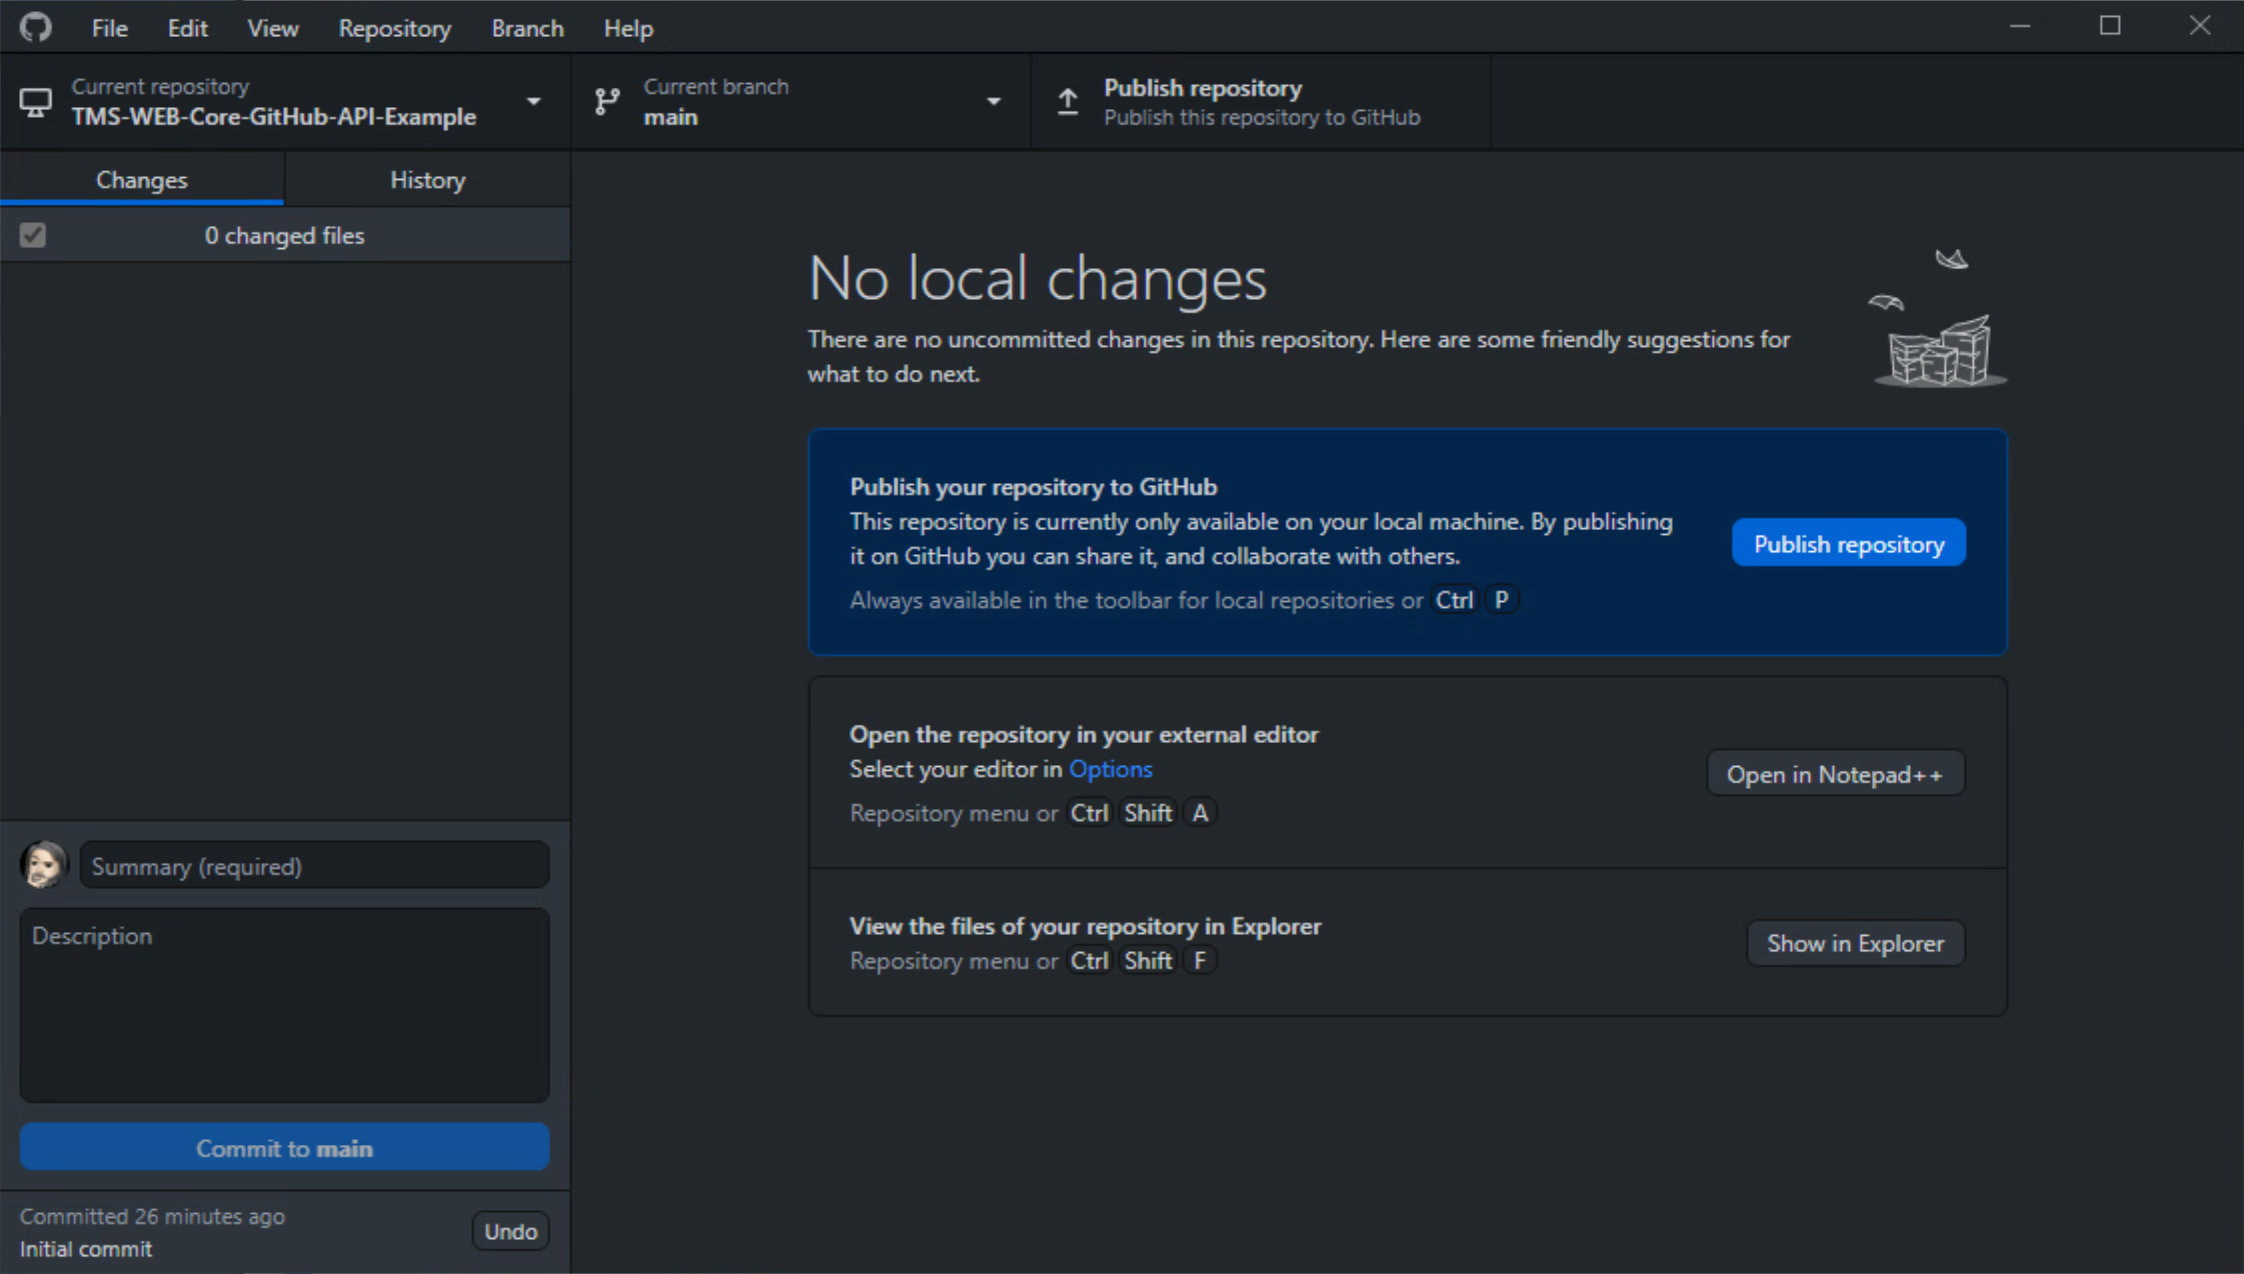
Publish Repository.
Now, if we go and have a look at GitHub, we should see our new (empty) repository.
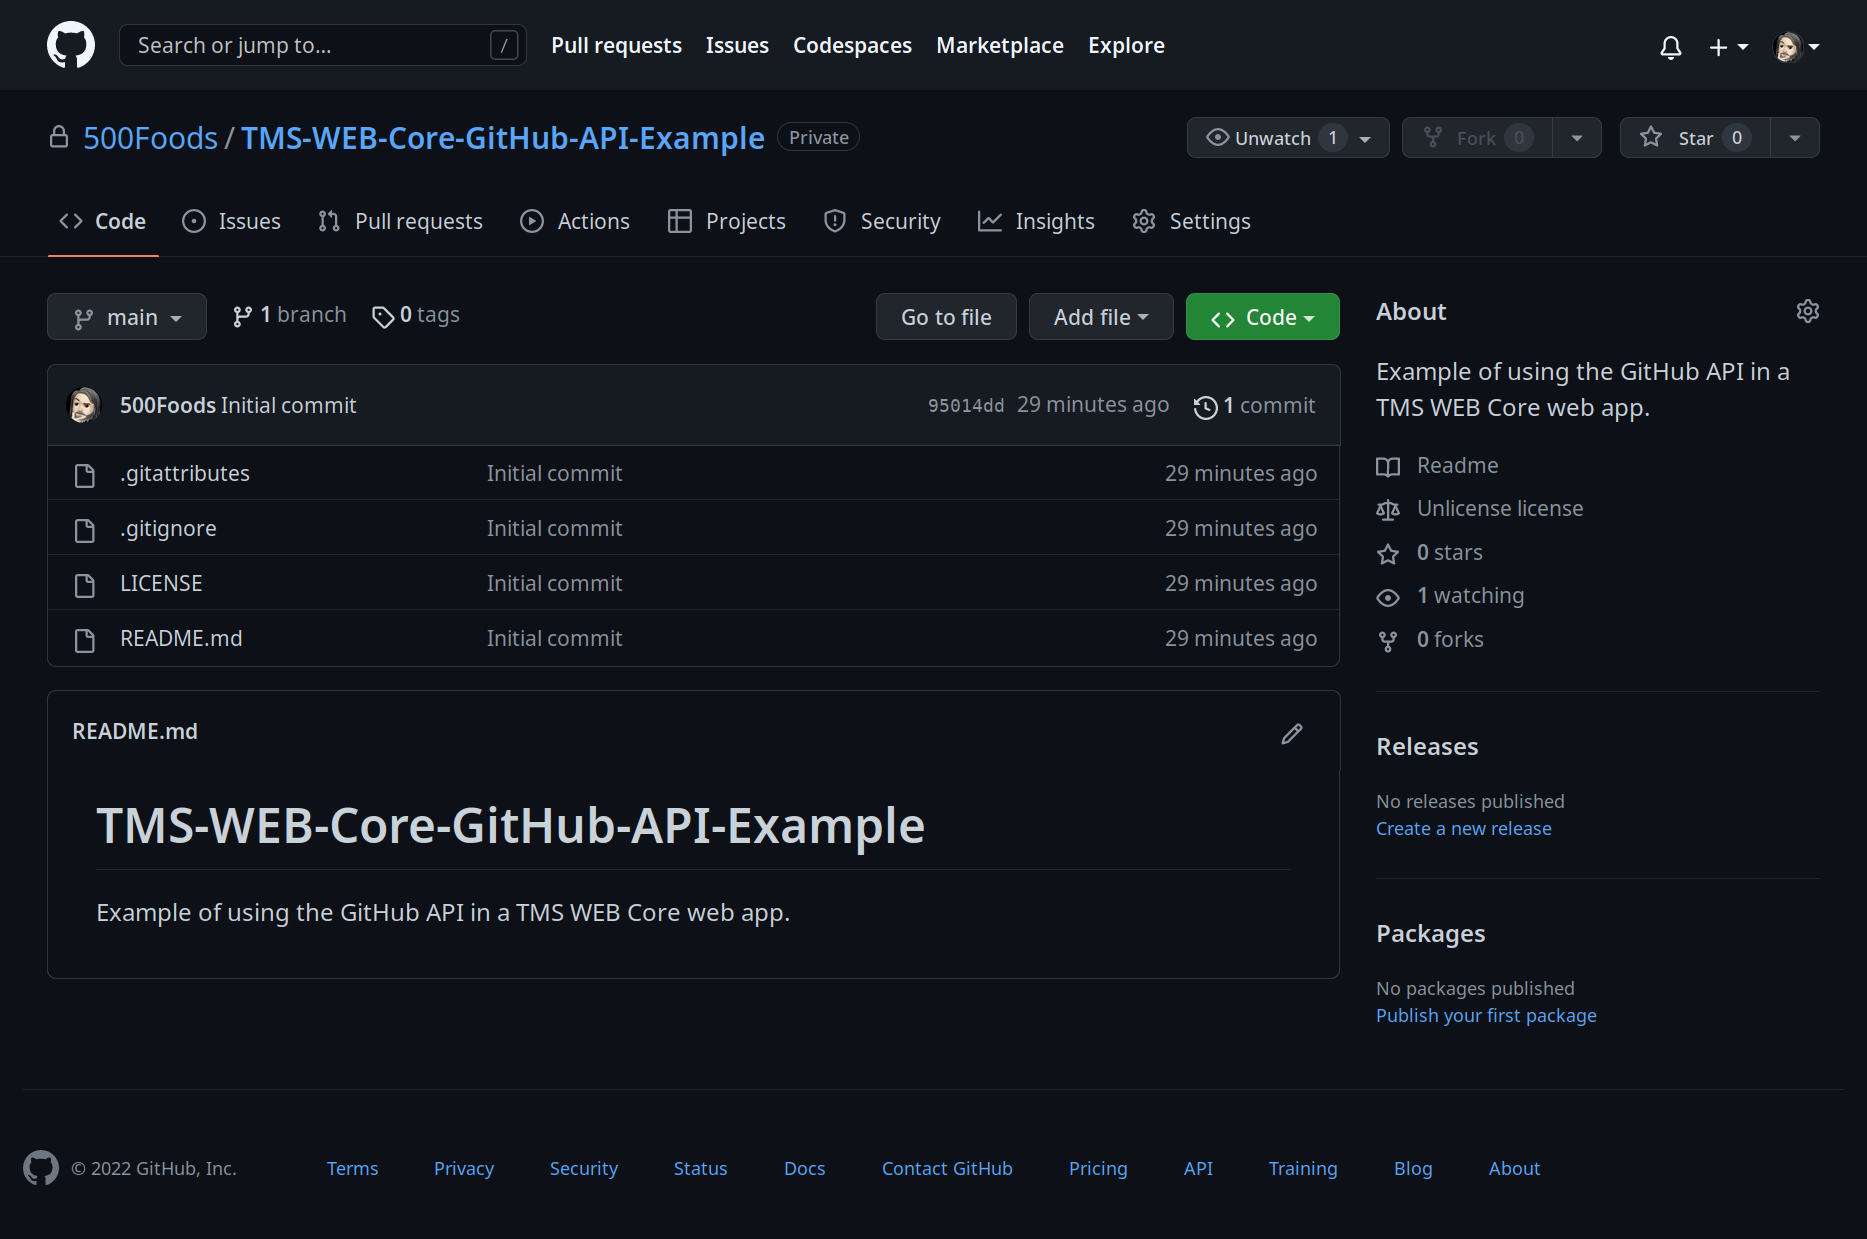
GitHub Repository Published.
And with that, our repository is now on GitHub. Various defaults are set. For example, there is an Issues tab
and various other tabs. These can be adjusted in the repository settings if desired. But the defaults are fine
for the moment. As you may have noticed, nothing we've done so far has anything to do with TMS WEB Core or
even Delphi for that matter. This is just an empty shell of a GitHub repository.
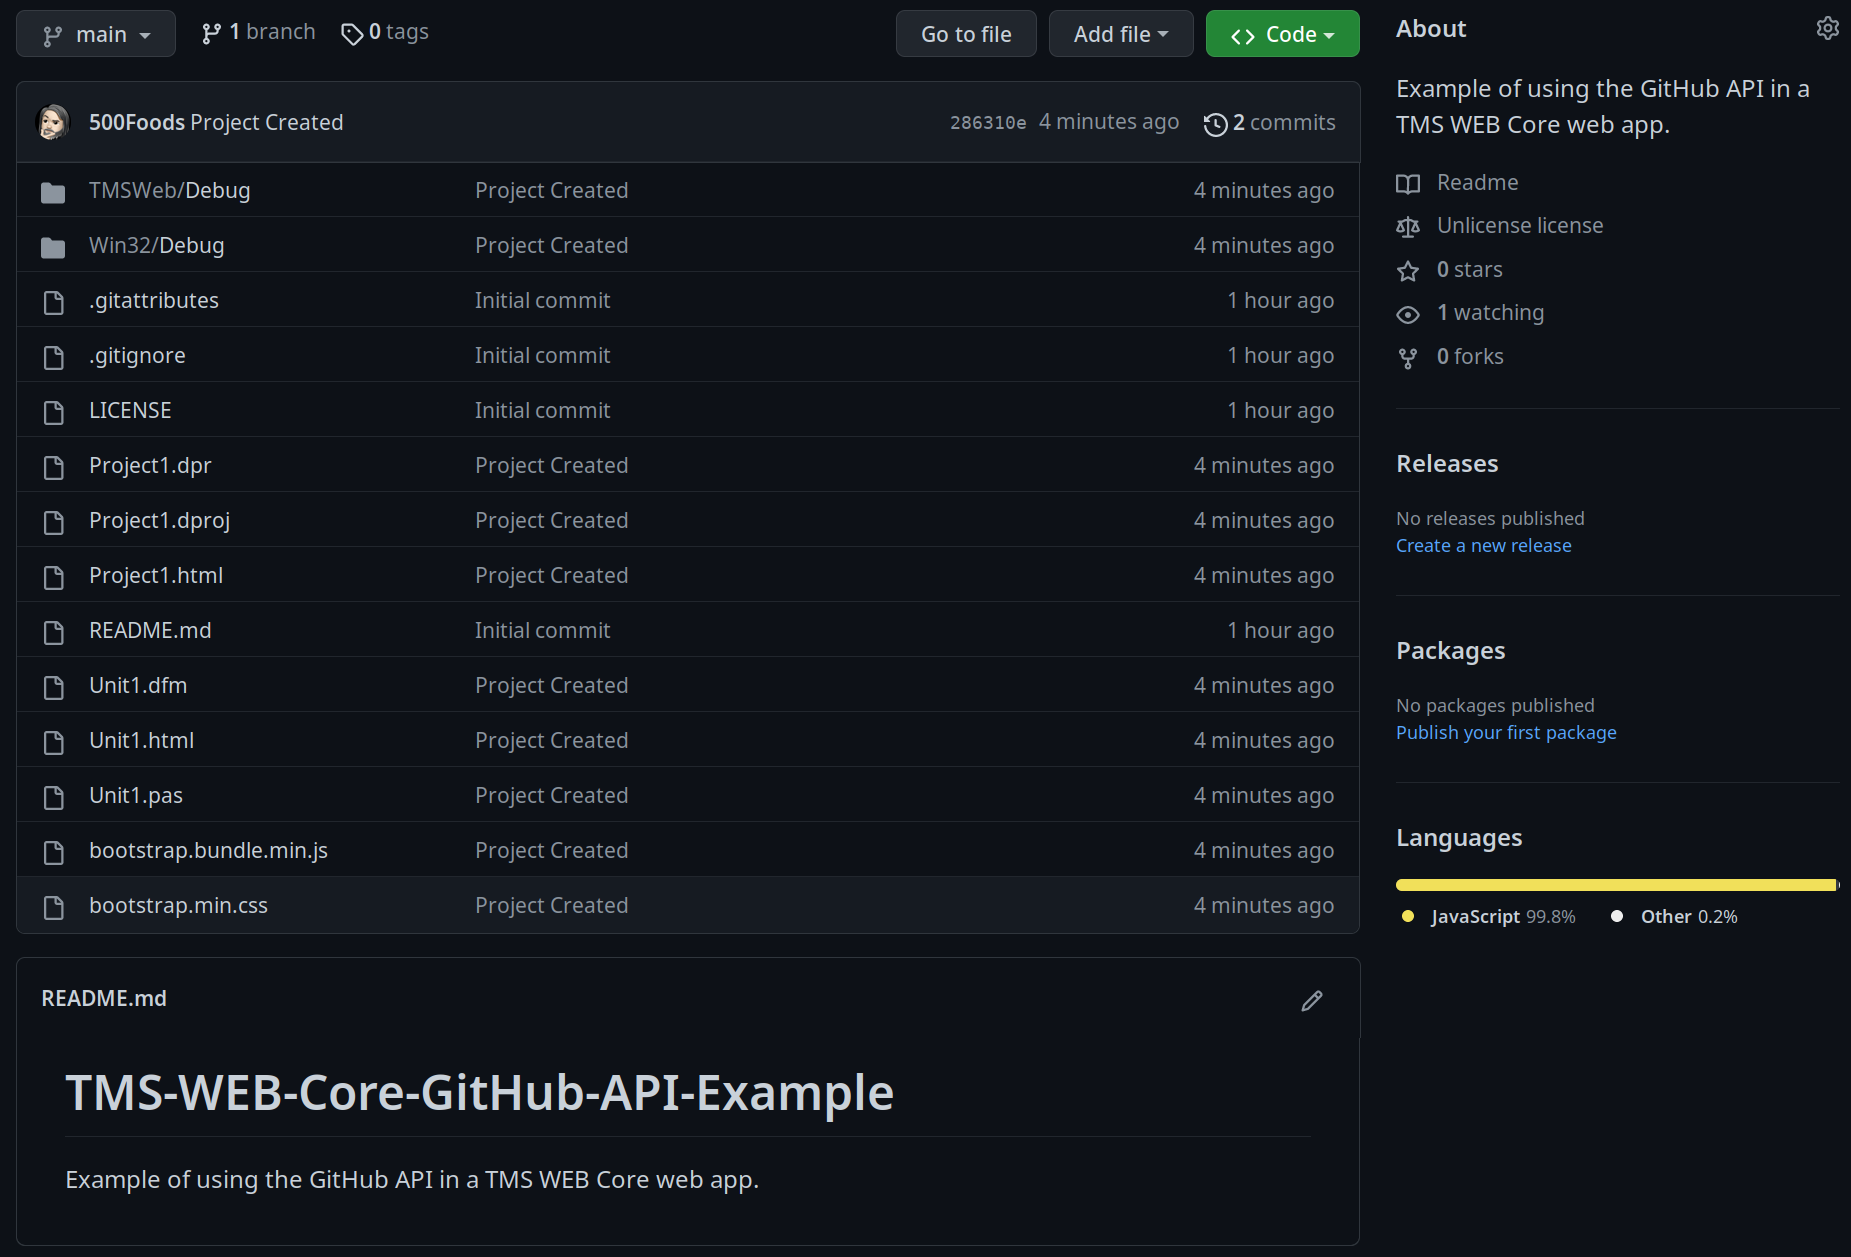
Example Project.
For our example project, let's use the TMS WEB Core Bootstrap Application template. To start with, we'll just create a new project using that template, and then immediately "Save Project As..." and then save it into the folder created by GitHub Desktop. If we leave GitHub Desktop running in the background, it will automatically pick up on file changes as we make them. It can also be closed and, when opened again, it will scan the project folder and figure out what has changed.
For our sample project UI, let's just add a <div> to the middle of the page to get started. We can use Bootstrap classes to sort out the positioning and some Bootstrap theme elements. In the ElementClassName for Form1, we'll use "vw-100 vh-100 d-flex p-5". And we'll set ElementPosition to "epIgnore". This gives us a full-page form with a wide margin (padding, technically).
Then, we'll add a TWebHTMLDiv component to the form and set its ElementClassName to "flex-fill rounded border border-secondary border-2 bg-dark". We'll also set its ElementPosition to "epIgnore", as well as HeightStyle and WidthStyle to "ssAuto". The end result, after running the project, is a web page with a rectangle in the middle of it.
NOTE: An upcoming TMS Software Blog Post will go into more detail about the use of Bootstrap classes in this
kind of scenario, and specifically more about CSS Flex (aka flexbox).

Blank TMS WEB Core Project.
Nothing too exciting just yet. But this tells us that Bootstrap is loaded and everything is working as expected. Resizing the web page automatically resizes the rectangle to fit, and will also remain centered. If we now flip over to GitHub Desktop, it has been keeping track of all of this. If we click on one of the files, we'll see what has changed. As this was just created, the diff contains, well, everything in the file.
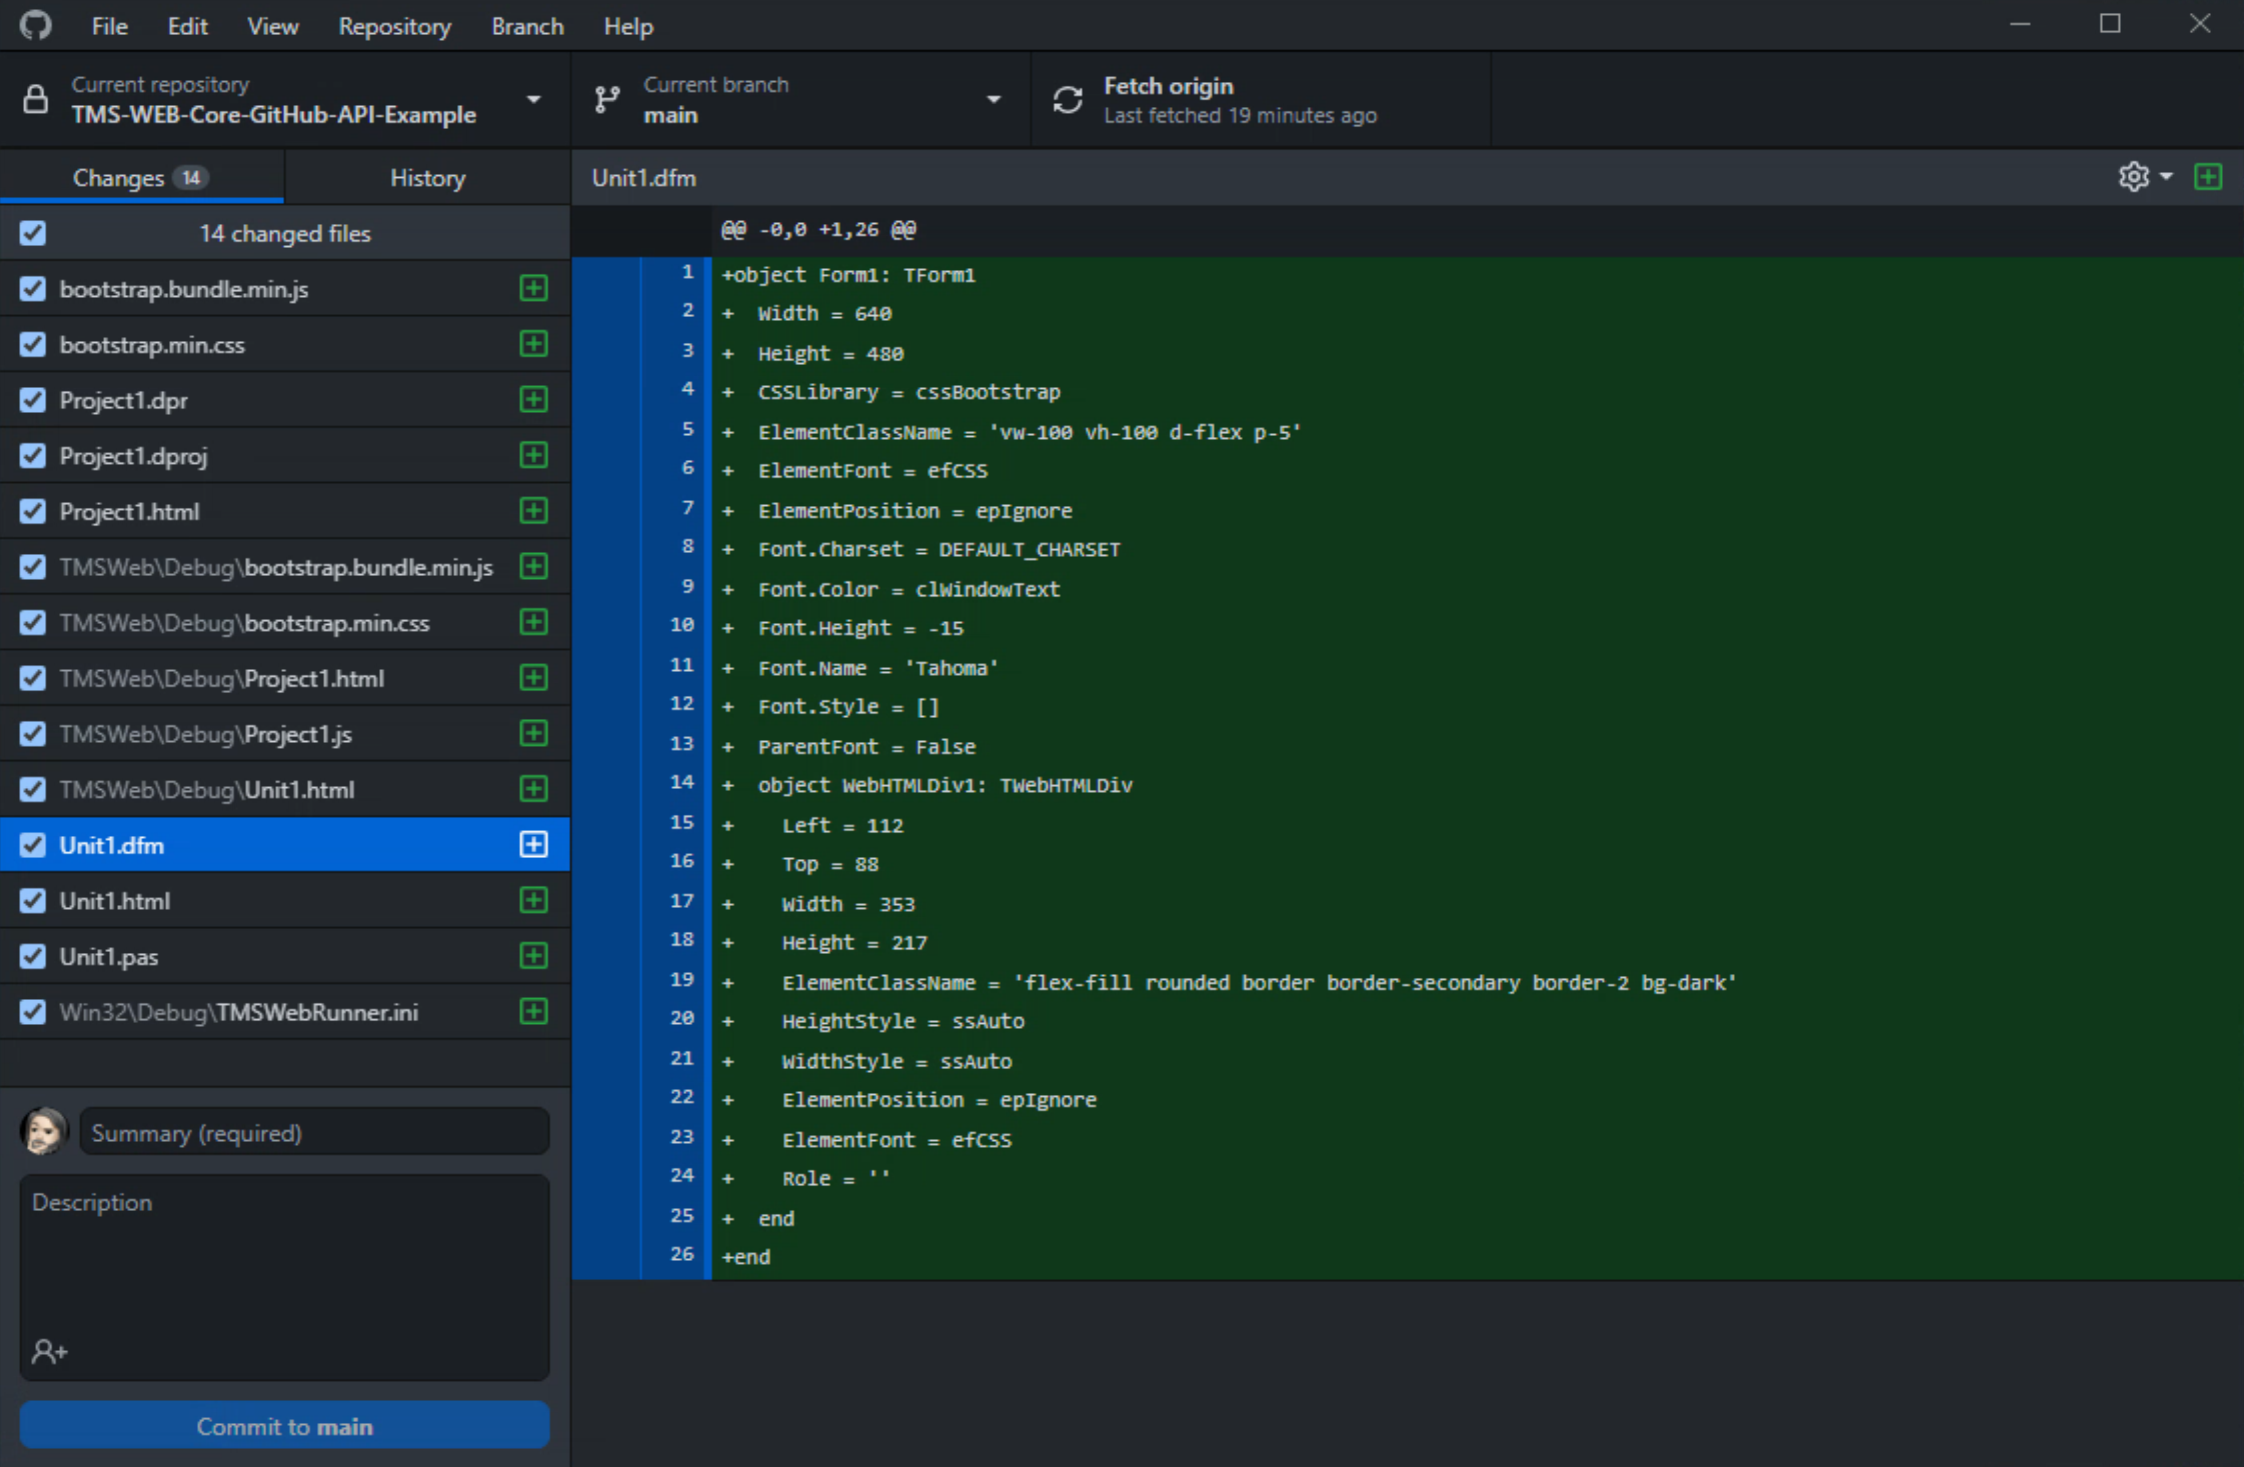
GitHub Desktop Monitoring Project Changes.
If we've made a change that is significant enough to warrant publishing, we'll need to fill out the section at the
bottom left. At least the summary. Something short would be good, as this will appear alongside the impacted
files. For this example, we'll just call it "Project Created". Clicking the "Commit to main" button will package
up all these changes and prepare them for sending to the server. It also marks all the files as "unchanged" at
this point, resulting in the following screen.
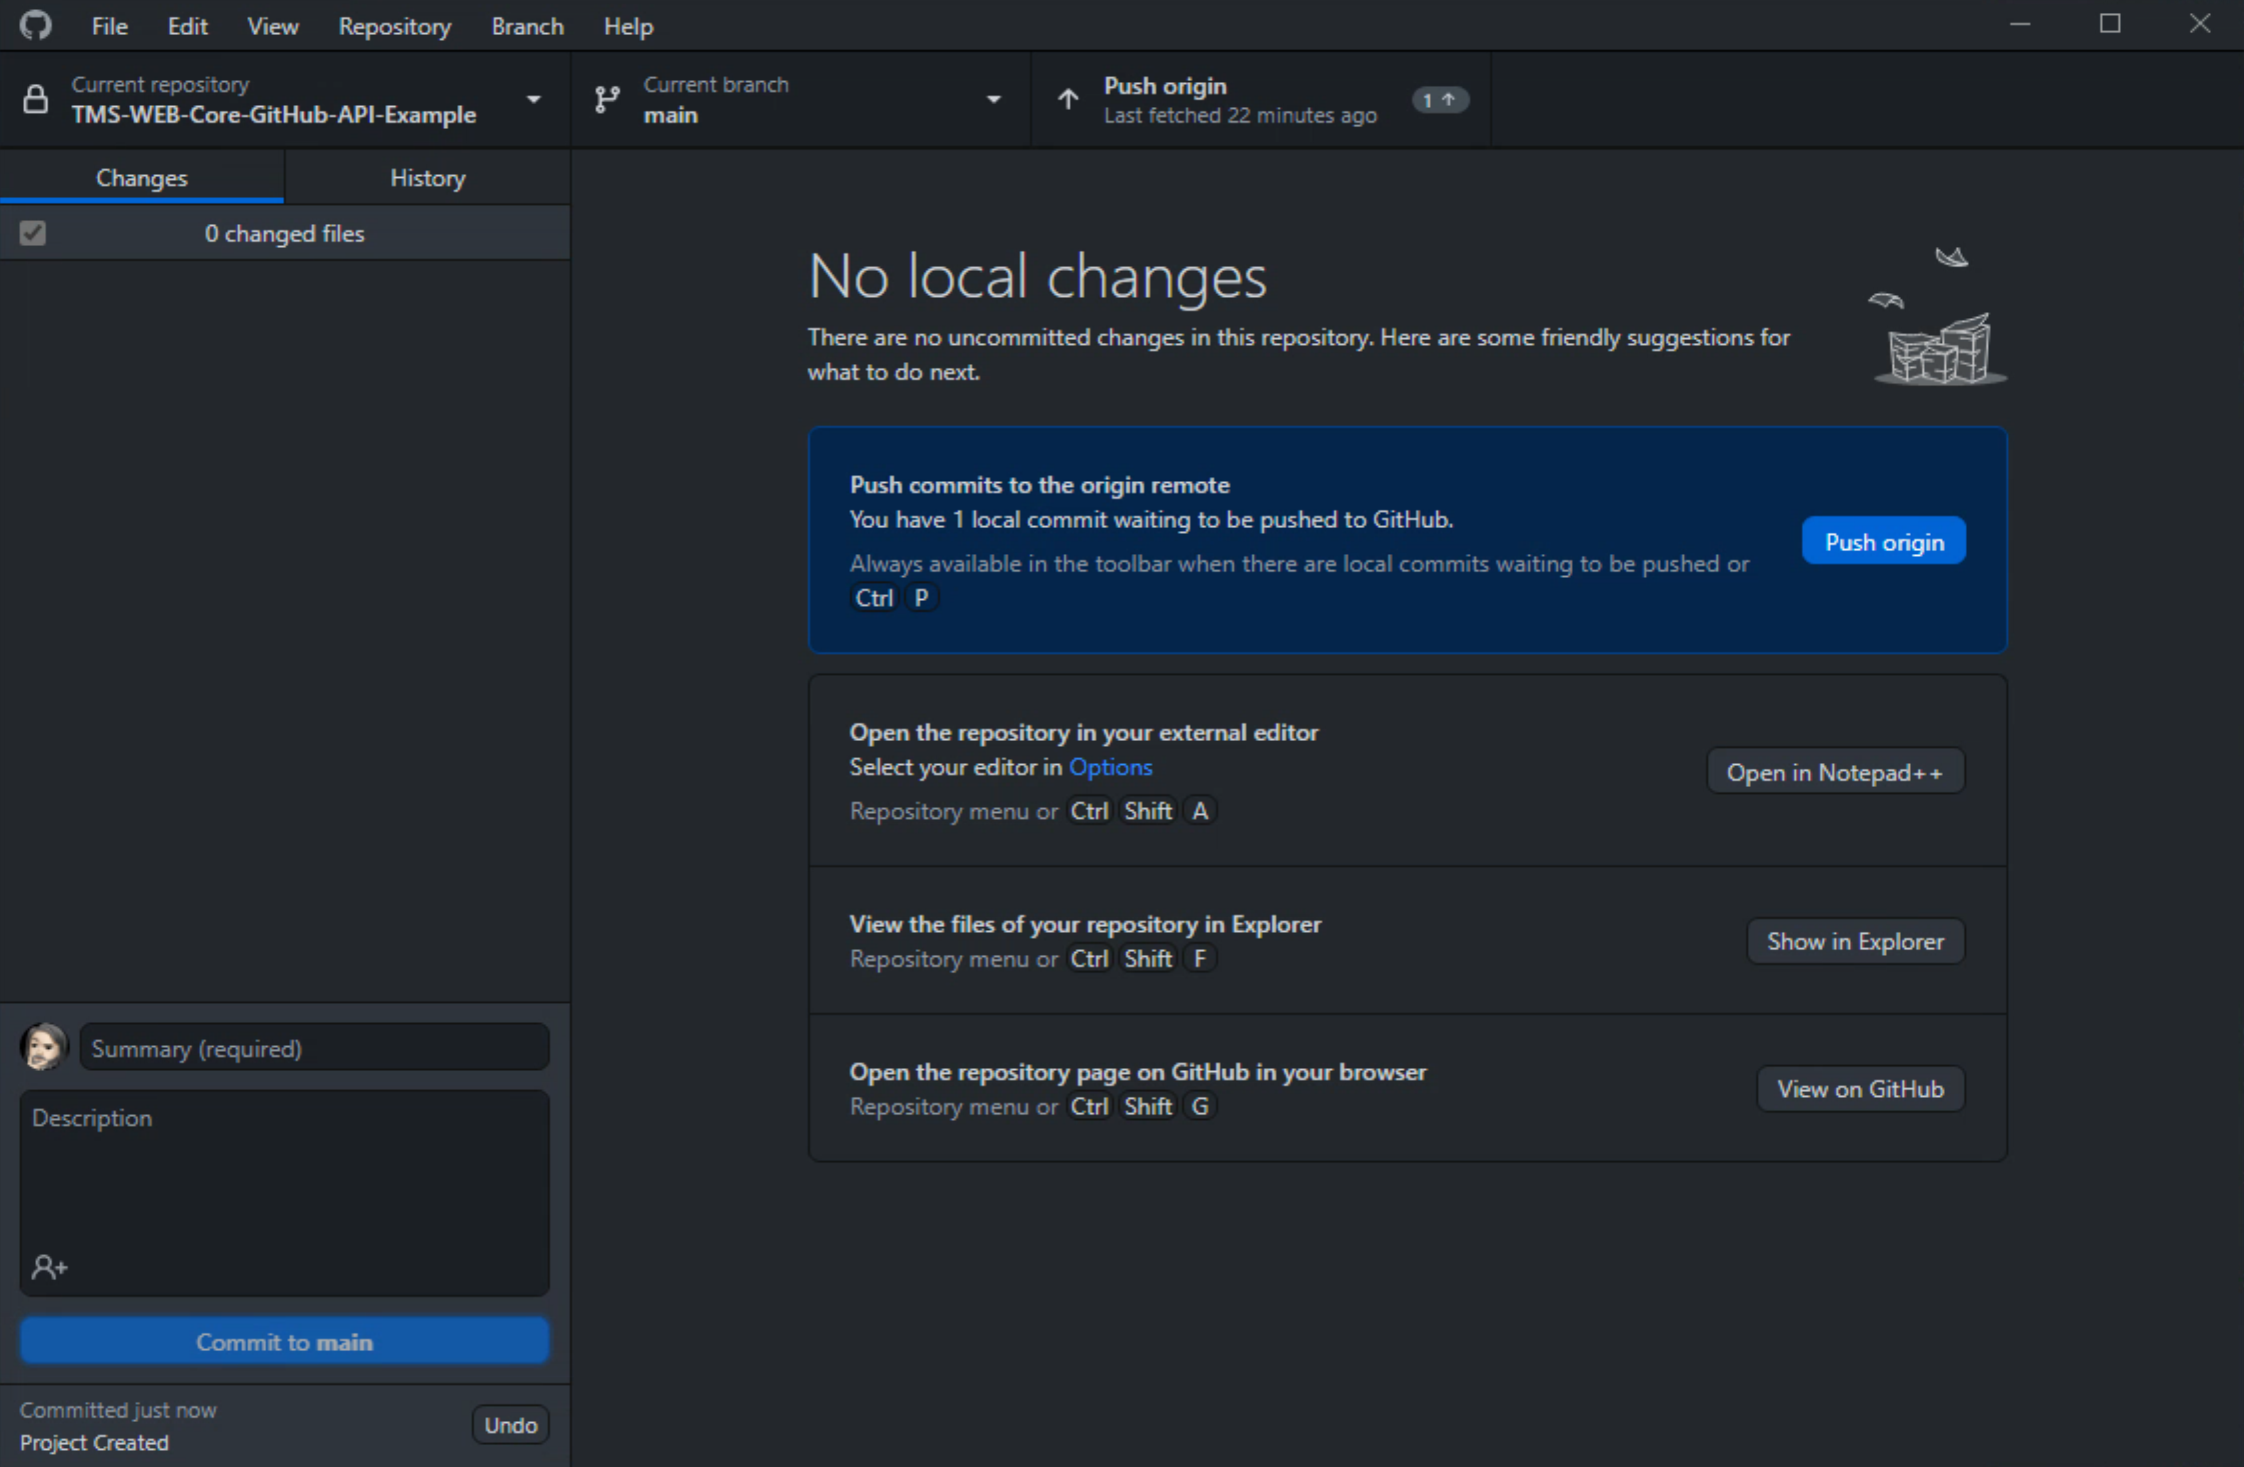
Committing Changes to Remote Repository.
From here, as can be seen above, all the changes can be pushed to the GitHub repository. Depending on how many
changes have been made since this was last done, this may take a few seconds or a few minutes. When complete, we
can then go over to GitHub and see the entire project online.
TMS WEB Core App Published on GitHub.
Now, we can continue working on our app. Anytime we are so inclined, we can commit changes to GitHub the same
way. Ideally, this would be done as we finish up certain parts of the project, or when we're done working on it
for a period of time. There isn't (currently?) an option to automatically commit changes to the project at this
point, so still, a bit of manual work is needed.
Public vs. Private Repositories.
By default, our repository, created via GitHub Desktop, was set up with its visibility set to "private". If you were to instead create a repository more directly via the GitHub website, you'd have been given the option for "public" or "private".To make that change now, we'll have to resort to using the GitHub website. This change is reversible, so if you change your mind, one way or another, it isn't a problem. Note that once it is marked as "Public" on GitHub, anyone can clone the repository, so absolutely do not put anything into a public repository (API keys, for example!) that you wouldn't want to be published.
To change the visibility of the repository, go to the repository's GitHub page and click on the "Settings" button. Near the bottom, in the section marked "Danger Zone", you'll find the option to change from "private" to "public". It asks you to confirm this change a whole bunch of times and even requires an extra login authentication on top of that. So not something that could be changed accidentally.
Third-Party Libraries.
A note about third-party libraries. Ideally, you wouldn't include any third-party libraries in your repository directly. This is one of the benefits of using CDNs for linking to such libraries - there is no local code to worry about. There are a number of reasons for this.
- You don't want to mistakenly add someone's library to your repository if that library is not fully public
domain. They don't much like it when you do that. Remember that a library with no discernible license does
not at all mean that it is public domain, so beware of including such libraries in your repository.
- Even if the licensing permits inclusion, you're essentially setting yourself up to maintain that version of the library, meaning that subsequent fixes and security updates will not automatically find their way into your repository under normal circumstances. This is not ideal.
- Even if you have permission to include the library, and you are prepared to maintain the version of the
library in case of updates, it can still be undesirable in terms of wasting space and resources syncing
libraries that are common everywhere. Like Bootstrap, for example.
- Most CDNs support some variation of major/minor versioning. Linking to a CDN at a specific major version
level should mean that your code will work even after small fixes or security updates, the vast majority of
the time.
Regardless of what is going on with the library situation, it is a very good idea to, at the very least, document libraries you are using that are dependencies when it comes to compiling or otherwise using your repository. If your project depends on jQuery, for example, it is a very good idea to mention that up-front so people can take appropriate steps.
You don't really want to include the jQuery files in your repository. The same goes for Bootstrap and any other JavaScript library. Certainly for less well-known libraries, including a link would also be helpful (and a GitHub link even more so).
Because we chose the "TMS WEB Core Bootstrap" template, we've found ourselves with the Bootstrap library
directly included in our project. Instead, let's use a CDN with a link to the latest Bootstrap release, and
then remove those files from our project. Here are the links from the Bootstrap website that we can use, for
example. These replace the links that were automatically added to our Project.html file.
    <!-- CSS only -->
    <link href="https://cdn.jsdelivr.net/npm/bootstrap@5.2.3/dist/css/bootstrap.min.css" rel="stylesheet" integrity="sha384-rbsA2VBKQhggwzxH7pPCaAqO46MgnOM80zW1RWuH61DGLwZJEdK2Kadq2F9CUG65" crossorigin="anonymous">
    <!-- JavaScript Bundle with Popper -->
    <script src="https://cdn.jsdelivr.net/npm/bootstrap@5.2.3/dist/js/bootstrap.bundle.min.js" integrity="sha384-kenU1KFdBIe4zVF0s0G1M5b4hcpxyD9F7jL+jjXkk+Q2h455rYXK/7HAuoJl+0I4" crossorigin="anonymous"></script>
With those in place, we can delete the Bootstrap files from our project folder, as well as from the debug folder they were copied to when the project was compiled. And we'll also need to remove them from the Project Manager in the Delphi IDE.
Now, when we run the project, everything looks and works the same. But we're using
the jsdelivr CDN version of Bootstrap rather than the locally installed copy. If we flip over to GitHub
Desktop, we can see all of our changes reflected.
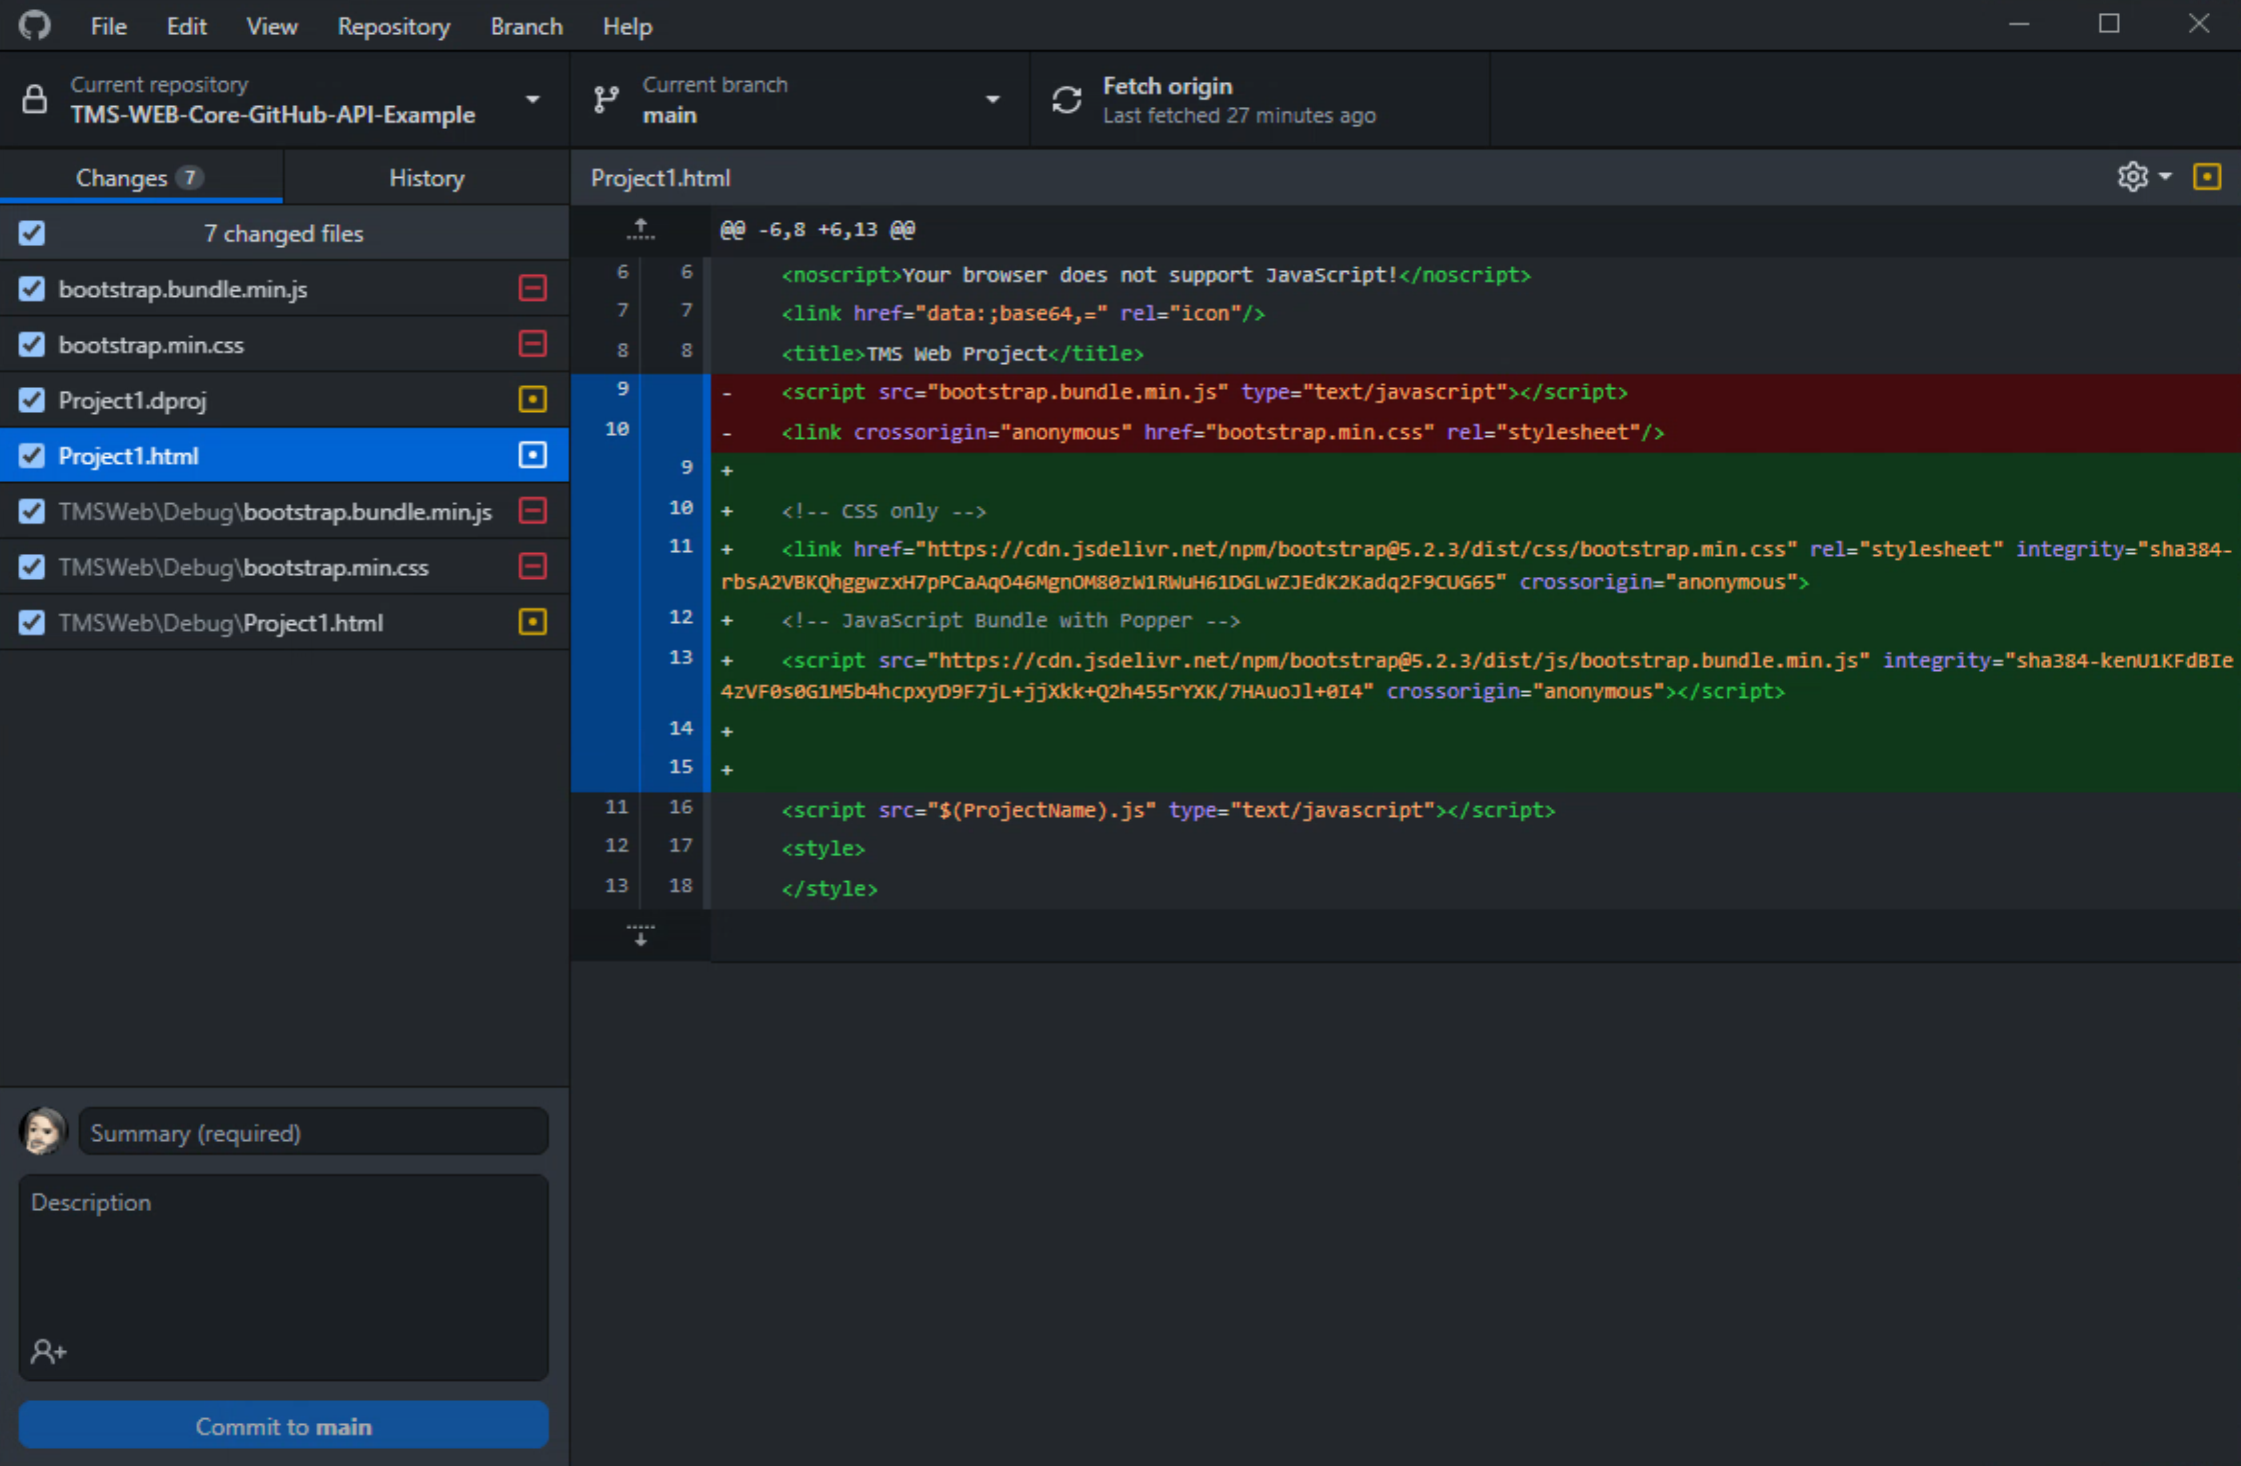
GitHub Desktop Tracking Project Changes.
We can then commit this change, adding a "summary" value of "Bootstrap CDN" to help us keep track of what we're
changing. The end result is that the Bootstrap files are removed from GitHub and the necessary updates are
applied to the files, with the summary value appearing beside the updated files.
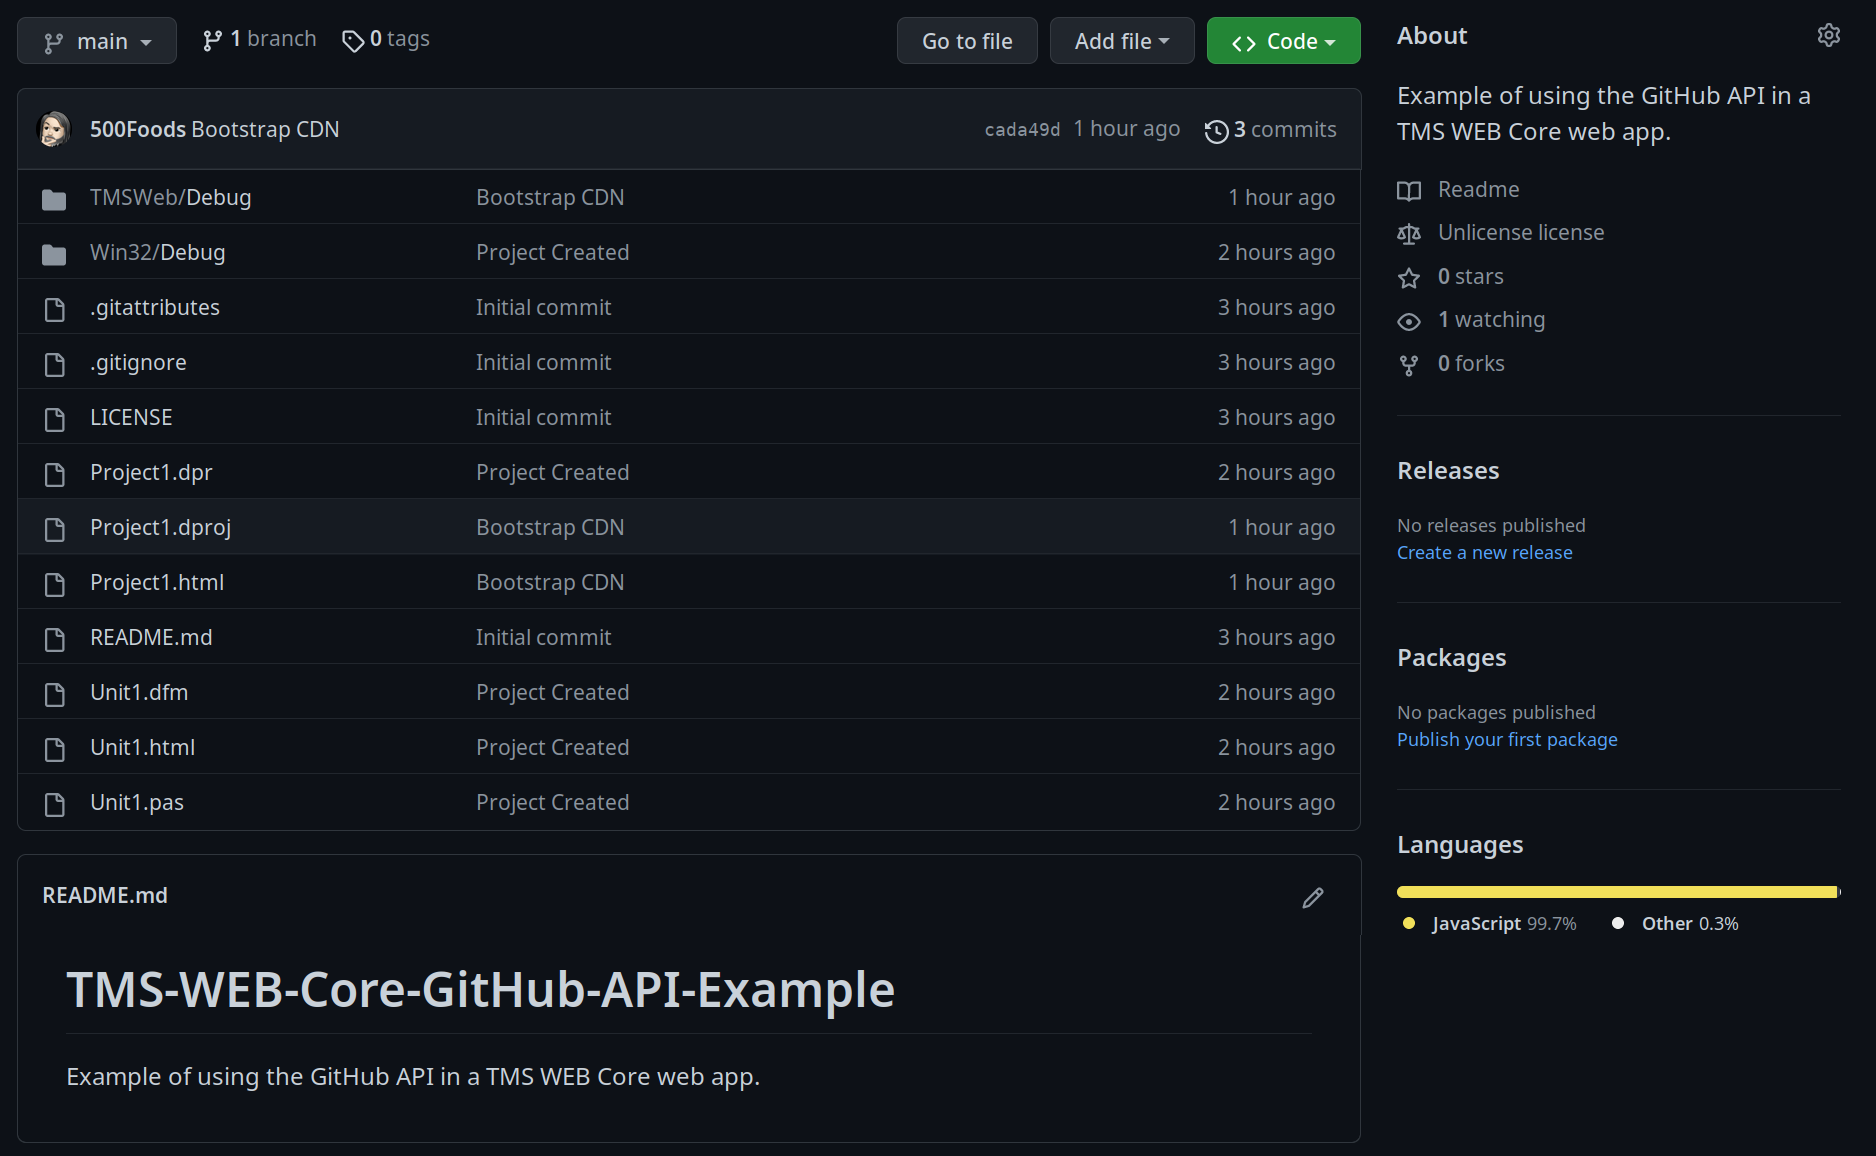
Repository Updated with Bootstrap CDN.
Ignoring Files.
With that taken care of, there's just the matter of the TMSWeb/Debug and Win32/Debug folders. These don't need to be included in the repository, typically, as they are regenerated whenever a TMS WEB Core project is compiled. Likewise, if you've switched to Release mode, there will be TMSWeb/Release and Win32/Release folders automatically added to the project.
You may want to include them in certain instances. For example, if you're
doing all your development work on Windows, but your deployment is on a remote Linux system, you could keep the
contents of the TMSWeb/Release folder as part of the repository, and then use one of those command-line git
commands to pull the contents of TMSWeb/Release into your production deployment folder.
GitHub handles these kinds of exceptions through its .gitignore file. When we selected Delphi during the setup of our repository, a default .gitignore file was created with the following contents.
# Uncomment these types if you want even more clean repository. But be careful.
# It can make harm to an existing project source. Read explanations below.
#
# Resource files are binaries containing manifest, project icon and version info.
# They can not be viewed as text or compared by diff-tools. Consider replacing them with .rc files.
#*.res
#
# Type library file (binary). In old Delphi versions it should be stored.
# Since Delphi 2009 it is produced from .ridl file and can safely be ignored.
#*.tlb
#
# Diagram Portfolio file. Used by the diagram editor up to Delphi 7.
# Uncomment this if you are not using diagrams or use newer Delphi version.
#*.ddp
#
# Visual LiveBindings file. Added in Delphi XE2.
# Uncomment this if you are not using LiveBindings Designer.
#*.vlb
#
# Deployment Manager configuration file for your project. Added in Delphi XE2.
# Uncomment this if it is not mobile development and you do not use remote debug feature.
#*.deployproj
#
# C++ object files produced when C/C++ Output file generation is configured.
# Uncomment this if you are not using external objects (zlib library for example).
#*.obj
#

# Delphi compiler-generated binaries (safe to delete)
*.exe
*.dll
*.bpl
*.bpi
*.dcp
*.so
*.apk
*.drc
*.map
*.dres
*.rsm
*.tds
*.dcu
*.lib
*.a
*.o
*.ocx

# Delphi autogenerated files (duplicated info)
*.cfg
*.hpp
*Resource.rc

# Delphi local files (user-specific info)
*.local
*.identcache
*.projdata
*.tvsconfig
*.dsk

# Delphi history and backups
__history/
__recovery/
*.~*

# Castalia statistics file (since XE7 Castalia is distributed with Delphi)
*.stat

# Boss dependency manager vendor folder https://github.com/HashLoad/boss
modules/
All we have to do is add any folders we want to exclude (or file extensions, potentially) to this list. The current .gitignore file for a repository can be updated from the GitHub Desktop app using the Repository | Repository setttings... menu. In this case, we'll just need to add the following.
TMSWeb/
Win32/
Before we do that, though, It would be easiest to first remove these folders from your project and commit the
changes. Then update .gitignore. If you don't do the delete/commit two-step first, you'll have to delete them
manually from the repository on the GitHub website.
Note also that when changing the contents of .gitignore,
GitHub Desktop prepares a commit with a summary of "Update .gitignore", ready for you to commit. Once
committed, you can now run your TMS WEB Core project, and the changes made with respect to the TMSWEb and Win32
folders will not be included in the repository.
Pascal vs. JavaScript vs HTML.
One little item left with respect to GitHub repositories. GitHub examines the files contained in the repository
and adds a breakdown, shown in the bottom-right corner of the main repository page. As a TMS WEB Core project
is primarily a Pascal project, we'd expect this to be reflected in the GitHub assessment. However, other files,
like the HTML and CSS files included in the project, and particularly the JavaScript files if you've not
excluded the TMSWeb folder, will easily dwarf the Pascal file, typically, skewing the results.
To address this, you can make changes to the .gitattributes file using the GitHub website. By adding directives telling GitHub to not look at certain files when calculating this breakdown, you can shift the final value to something more representative of the repository generally. If you actually have a substantial amount of code that isn't Pascal, then this can be adjusted as needed. Here's what the new .gitattributes file looks like for our project.
# Auto detect text files and perform LF normalization
* text=auto
*.css linguist-detectable=false
*.js linguist-detectable=false
*.html linguist-detectable=false
This can be refined further, referencing sub-directories as well, for example. But as our current repository
doesn't have any sub-directories, this will work pretty well as-is. Note that when you make changes to the
GitHub website, you'll need to copy those down to your local repository using GitHub Desktop. And making
changes to .gitattributes certainly qualifies here.
GitHub Desktop will let you know if you forget, as you
won't be able to upload any new commits if there are any commits outstanding from the remote repository. Recall
that GitHub considers its copy of the repository to be the "true" version, so if your local copy doesn't match,
that has to be resolved first. With all the commits in place, we now see the desired breakdown for this
project.
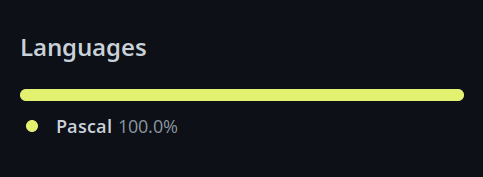
GitHub Code Breakdown Analysis.
Accessing the GitHub API.
With all that taken care of, we can now continue on with a completely different aspect of GitHub - the GitHub API. Earlier, we went about creating a GitHub Token. The basic principle, typical for this kind of thing, is that we can access the GitHub API as any other REST API, and we'll need to pass that token to get access to any actual data.
The next thing we'll need in our application is a place to fill in the token value, and maybe a way to view the list of repositories that it has access to. The GitHub API token we created earlier is essentially the same as a JWT token that we might be familiar with when working with TMS XData. A quick and easy way to check whether the token works is to try and use it to retrieve a list of repositories. If you've got access to a Linux system (or anything with curl generally) you can try something like this.
curl -H "Accept: application/vnd.github+json" -H "Authorization: Bearer github_pat_xxxx" https://api.github.com/user/repos
Naturally, replace the github_pat_xxxx with your own token. This will return all of the repositories that the
token has access to as well as a great deal of other information. The data is returned as a JSON array, with
each top-level array element containing a JSON object for a particular repository. For our newly created
repository, here's what it looks like.
  {
    "id": 574209455,
    "node_id": "R_kgDOIjm9rw",
    "name": "TMS-WEB-Core-GitHub-API-Example",
    "full_name": "500Foods/TMS-WEB-Core-GitHub-API-Example",
    "private": false,
    "owner": {
      "login": "500Foods",
      "id": 41052272,
      "node_id": "MDQ6VXNlcjQxMDUyMjcy",
      "avatar_url": "https://avatars.githubusercontent.com/u/41052272?v=4",
      "gravatar_id": "",
      "url": "https://api.github.com/users/500Foods",
      "html_url": "https://github.com/500Foods",
      "followers_url": "https://api.github.com/users/500Foods/followers",
      "following_url": "https://api.github.com/users/500Foods/following{/other_user}",
      "gists_url": "https://api.github.com/users/500Foods/gists{/gist_id}",
      "starred_url": "https://api.github.com/users/500Foods/starred{/owner}{/repo}",
      "subscriptions_url": "https://api.github.com/users/500Foods/subscriptions",
      "organizations_url": "https://api.github.com/users/500Foods/orgs",
      "repos_url": "https://api.github.com/users/500Foods/repos",
      "events_url": "https://api.github.com/users/500Foods/events{/privacy}",
      "received_events_url": "https://api.github.com/users/500Foods/received_events",
      "type": "User",
      "site_admin": false
    },
    "html_url": "https://github.com/500Foods/TMS-WEB-Core-GitHub-API-Example",
    "description": "Example of using the GitHub API in a TMS WEB Core web app.",
    "fork": false,
    "url": "https://api.github.com/repos/500Foods/TMS-WEB-Core-GitHub-API-Example",
    "forks_url": "https://api.github.com/repos/500Foods/TMS-WEB-Core-GitHub-API-Example/forks",
    "keys_url": "https://api.github.com/repos/500Foods/TMS-WEB-Core-GitHub-API-Example/keys{/key_id}",
    "collaborators_url": "https://api.github.com/repos/500Foods/TMS-WEB-Core-GitHub-API-Example/collaborators{/collaborator}",
    "teams_url": "https://api.github.com/repos/500Foods/TMS-WEB-Core-GitHub-API-Example/teams",
    "hooks_url": "https://api.github.com/repos/500Foods/TMS-WEB-Core-GitHub-API-Example/hooks",
    "issue_events_url": "https://api.github.com/repos/500Foods/TMS-WEB-Core-GitHub-API-Example/issues/events{/number}",
    "events_url": "https://api.github.com/repos/500Foods/TMS-WEB-Core-GitHub-API-Example/events",
    "assignees_url": "https://api.github.com/repos/500Foods/TMS-WEB-Core-GitHub-API-Example/assignees{/user}",
    "branches_url": "https://api.github.com/repos/500Foods/TMS-WEB-Core-GitHub-API-Example/branches{/branch}",
    "tags_url": "https://api.github.com/repos/500Foods/TMS-WEB-Core-GitHub-API-Example/tags",
    "blobs_url": "https://api.github.com/repos/500Foods/TMS-WEB-Core-GitHub-API-Example/git/blobs{/sha}",
    "git_tags_url": "https://api.github.com/repos/500Foods/TMS-WEB-Core-GitHub-API-Example/git/tags{/sha}",
    "git_refs_url": "https://api.github.com/repos/500Foods/TMS-WEB-Core-GitHub-API-Example/git/refs{/sha}",
    "trees_url": "https://api.github.com/repos/500Foods/TMS-WEB-Core-GitHub-API-Example/git/trees{/sha}",
    "statuses_url": "https://api.github.com/repos/500Foods/TMS-WEB-Core-GitHub-API-Example/statuses/{sha}",
    "languages_url": "https://api.github.com/repos/500Foods/TMS-WEB-Core-GitHub-API-Example/languages",
    "stargazers_url": "https://api.github.com/repos/500Foods/TMS-WEB-Core-GitHub-API-Example/stargazers",
    "contributors_url": "https://api.github.com/repos/500Foods/TMS-WEB-Core-GitHub-API-Example/contributors",
    "subscribers_url": "https://api.github.com/repos/500Foods/TMS-WEB-Core-GitHub-API-Example/subscribers",
    "subscription_url": "https://api.github.com/repos/500Foods/TMS-WEB-Core-GitHub-API-Example/subscription",
    "commits_url": "https://api.github.com/repos/500Foods/TMS-WEB-Core-GitHub-API-Example/commits{/sha}",
    "git_commits_url": "https://api.github.com/repos/500Foods/TMS-WEB-Core-GitHub-API-Example/git/commits{/sha}",
    "comments_url": "https://api.github.com/repos/500Foods/TMS-WEB-Core-GitHub-API-Example/comments{/number}",
    "issue_comment_url": "https://api.github.com/repos/500Foods/TMS-WEB-Core-GitHub-API-Example/issues/comments{/number}",
    "contents_url": "https://api.github.com/repos/500Foods/TMS-WEB-Core-GitHub-API-Example/contents/{+path}",
    "compare_url": "https://api.github.com/repos/500Foods/TMS-WEB-Core-GitHub-API-Example/compare/{base}...{head}",
    "merges_url": "https://api.github.com/repos/500Foods/TMS-WEB-Core-GitHub-API-Example/merges",
    "archive_url": "https://api.github.com/repos/500Foods/TMS-WEB-Core-GitHub-API-Example/{archive_format}{/ref}",
    "downloads_url": "https://api.github.com/repos/500Foods/TMS-WEB-Core-GitHub-API-Example/downloads",
    "issues_url": "https://api.github.com/repos/500Foods/TMS-WEB-Core-GitHub-API-Example/issues{/number}",
    "pulls_url": "https://api.github.com/repos/500Foods/TMS-WEB-Core-GitHub-API-Example/pulls{/number}",
    "milestones_url": "https://api.github.com/repos/500Foods/TMS-WEB-Core-GitHub-API-Example/milestones{/number}",
    "notifications_url": "https://api.github.com/repos/500Foods/TMS-WEB-Core-GitHub-API-Example/notifications{?since,all,participating}",
    "labels_url": "https://api.github.com/repos/500Foods/TMS-WEB-Core-GitHub-API-Example/labels{/name}",
    "releases_url": "https://api.github.com/repos/500Foods/TMS-WEB-Core-GitHub-API-Example/releases{/id}",
    "deployments_url": "https://api.github.com/repos/500Foods/TMS-WEB-Core-GitHub-API-Example/deployments",
    "created_at": "2022-12-04T18:58:31Z",
    "updated_at": "2022-12-04T21:57:59Z",
    "pushed_at": "2022-12-04T22:14:43Z",
    "git_url": "git://github.com/500Foods/TMS-WEB-Core-GitHub-API-Example.git",
    "ssh_url": "git@github.com:500Foods/TMS-WEB-Core-GitHub-API-Example.git",
    "clone_url": "https://github.com/500Foods/TMS-WEB-Core-GitHub-API-Example.git",
    "svn_url": "https://github.com/500Foods/TMS-WEB-Core-GitHub-API-Example",
    "homepage": null,
    "size": 311,
    "stargazers_count": 0,
    "watchers_count": 0,
    "language": "Pascal",
    "has_issues": true,
    "has_projects": true,
    "has_downloads": true,
    "has_wiki": true,
    "has_pages": false,
    "has_discussions": false,
    "forks_count": 0,
    "mirror_url": null,
    "archived": false,
    "disabled": false,
    "open_issues_count": 0,
    "license": {
      "key": "unlicense",
      "name": "The Unlicense",
      "spdx_id": "Unlicense",
      "url": "https://api.github.com/licenses/unlicense",
      "node_id": "MDc6TGljZW5zZTE1"
    },
    "allow_forking": true,
    "is_template": false,
    "web_commit_signoff_required": false,
    "topics": [

    ],
    "visibility": "public",
    "forks": 0,
    "open_issues": 0,
    "watchers": 0,
    "default_branch": "main",
    "permissions": {
      "admin": true,
      "maintain": true,
      "push": true,
      "triage": true,
      "pull": true
    }
  },
That's already quite a lot of information to help us get started. In order to retrieve this data and use it in our TMS WEB Core application, we'll need a place to enter the token, and then we'll need a place to display the data. As the data is already in a handy JSON format, my natural inclination is to use a Tabulator table. So let's give it a try.
A simple TWebEdit component will be used to enter the token. Once we've got the token, we can hide that part of the interface and then display the table. To fit the TWebEdit field inside our rectangle, we can set its ElementClassName property to something like "w-100 p-2 rounded m-auto border border-secondary border-2". We'll also need to add a few more Bootstrap classes to the outer TWebHTMLDiv for this to work properly, such as "d-flex p-5" so that the TWebEdit is positioned properly.
We'll fix the height of the TWebEdit but leave the
rest. Note that if you wanted the TWebEdit text to wrap (the GitHub Token is pretty long...) you'd be better
off using a TWebMemo instead. Here's our entry interface. Pretty simple!
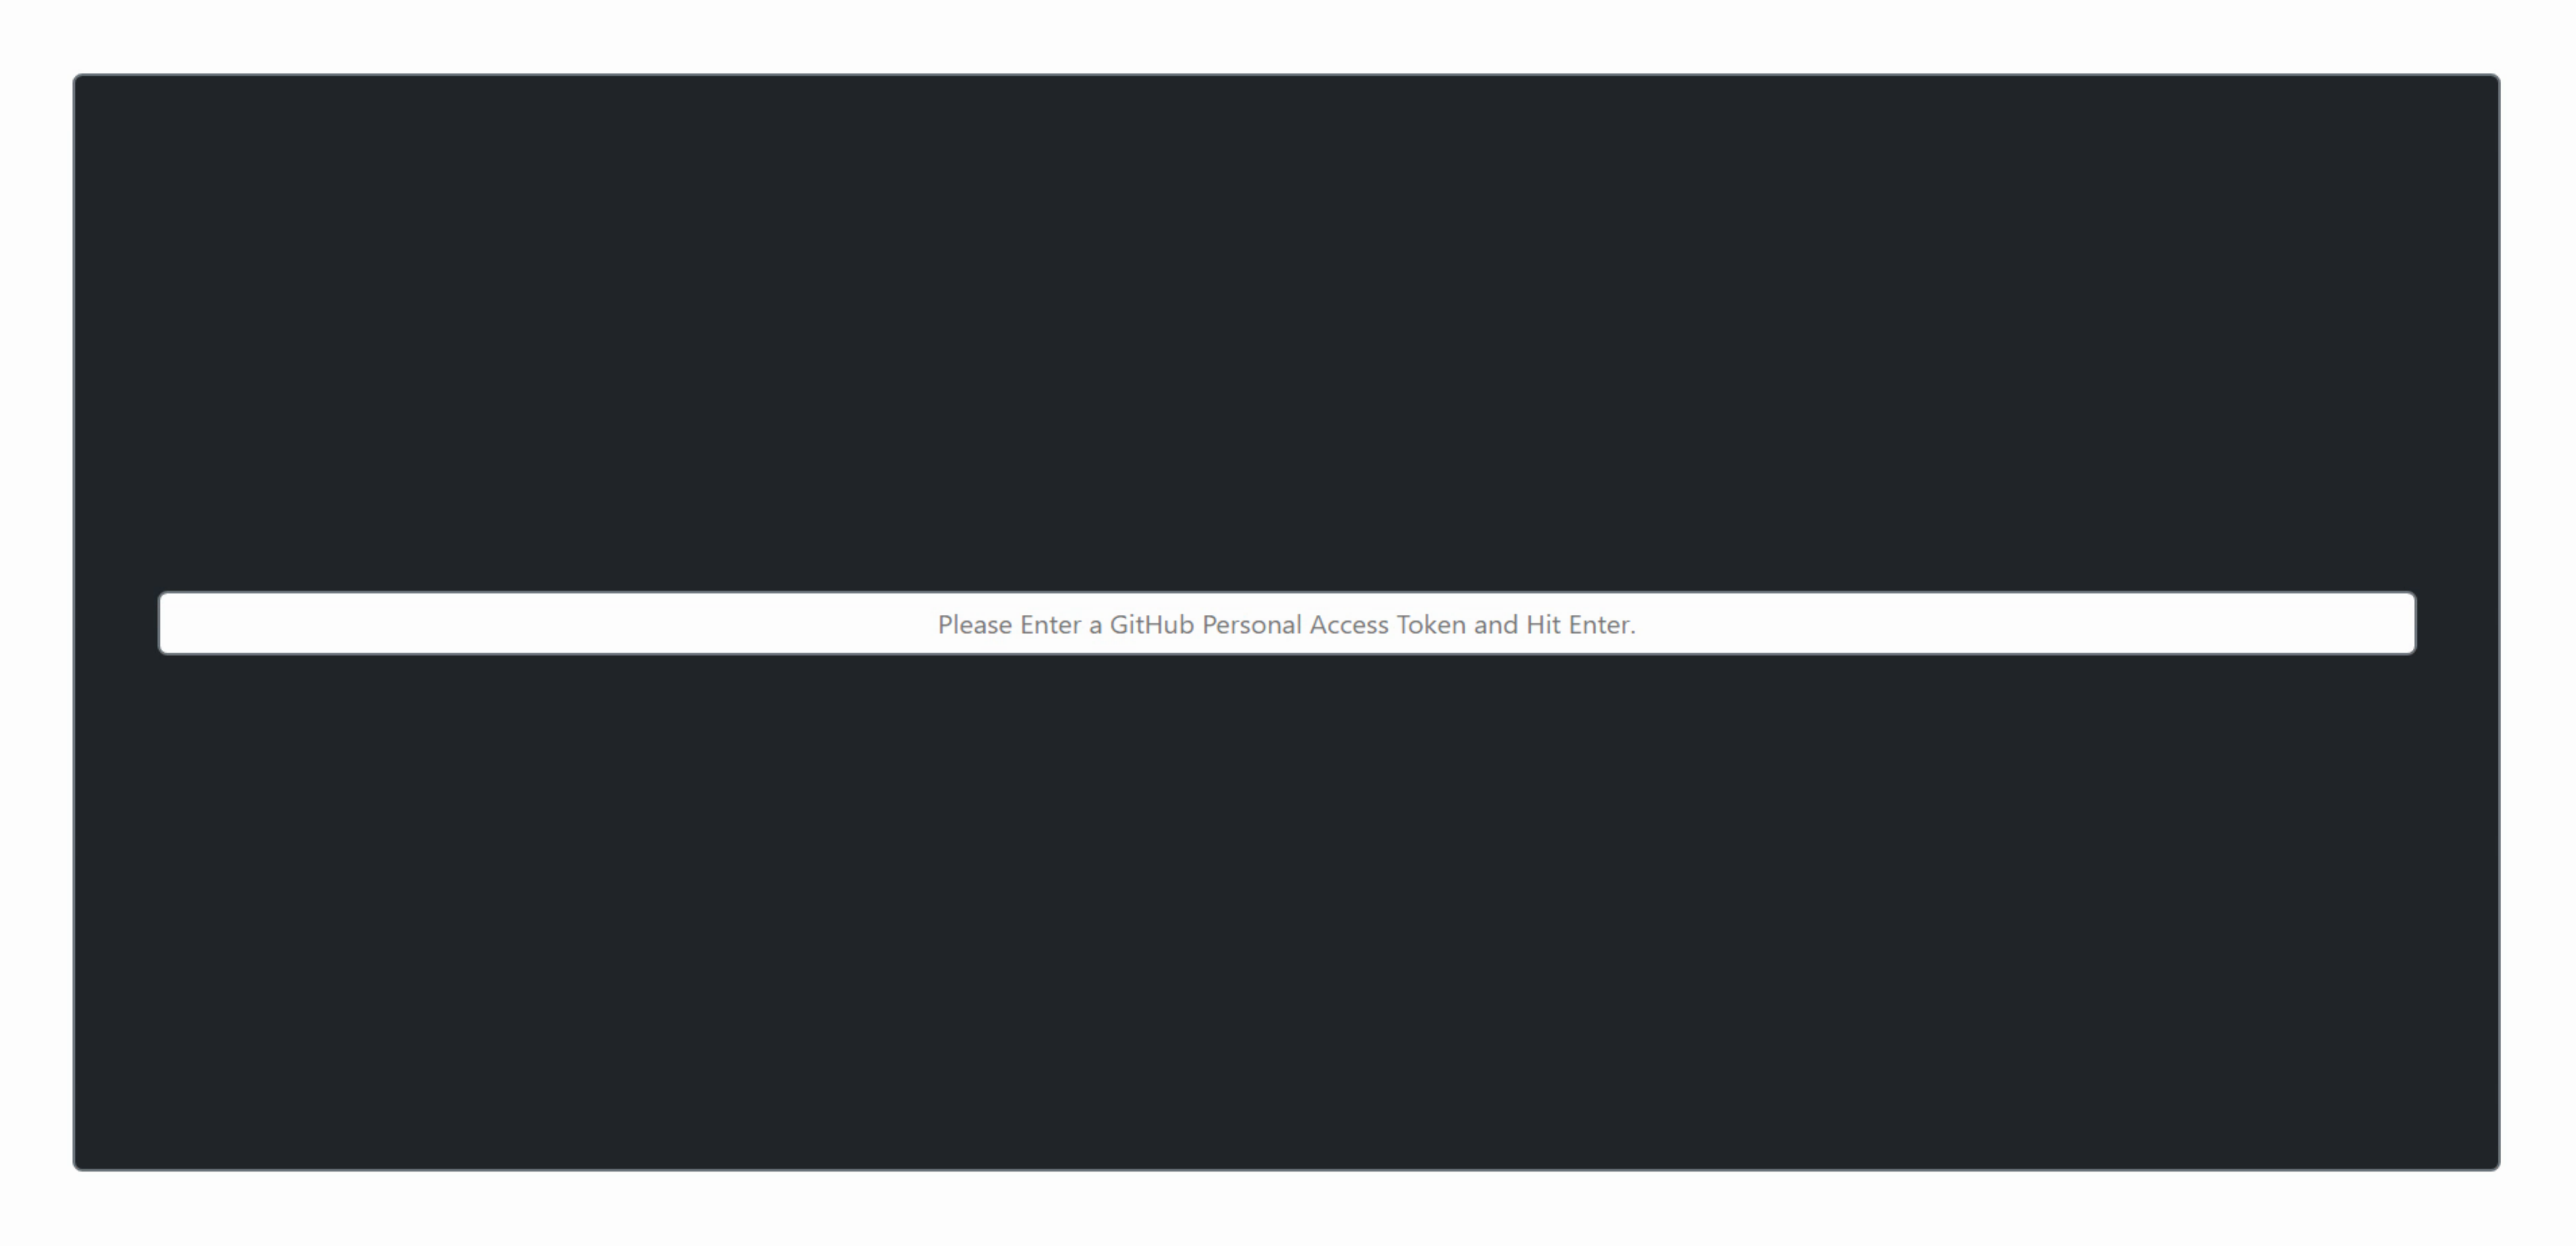
UI For Accepting GitHub Token.
We can do some basic checks about the length of the token entered, and ask the user to try again if it is not
long enough. More extensive validation checks could be done, but we're just trying to help if they forgot to
paste in the token, nothing more really. If we get a valid token, then we can retrieve the JSON data and
display it in a Tabulator table. This can all be handled in TWebEdit's OnKeyDown event like this.
procedure TForm1.WebEdit1KeyDown(Sender: TObject; var Key: Word; Shift: TShiftState);
var
  GitHubToken: String;
  WebRequest: TWebHTTPRequest;
  WebResponse: TJSXMLHTTPRequest;
  Data: String;
  JSONData: TJSONArray;

begin

  if Key = VK_RETURN then
  begin
    GitHubToken := WebEdit1.Text;

    if Length(GitHubToken) < 50 then
    begin
      WebEdit1.Text := '';
      WebEdit1.TextHint := 'Token is too short. Please try again.';
    end
    else
    begin
      WebEdit1.Text := '';
      WebEdit1.TextHint := 'Retrieving Repositories. Please Wait.';

      WebRequest := TWebHTTPRequest.Create(Self);
      WebRequest.URL := 'https://api.github.com/user/repos';
      WebRequest.Headers.AddPair('Accept','application/vnd.github+json');
      WebRequest.Headers.AddPair('Authorization','Bearer '+GitHubToken);
      WebResponse := await(TJSXMLHTTPRequest, WebRequest.Perform());
      Data := String(WebResponse.Response);

      try
        JSONData := TJSONObject.ParseJSONValue(Data) as TJSONArray;
        asm
//          console.log(JSON.parse(Data));
          this.tabRepos.setData(JSON.parse(Data));
        end;
        WebEdit1.Visible := False;
        divTabulator.ElementHandle.classList.remove('d-none');

      except on E: Exception do
        begin
          WebEdit1.Text := '';
          WebEdit1.TextHint := 'Retrieval Failed. Please try again.';
        end;
      end;
    end;
  end;
end;
Note that we just did a simple check of the JSON returned, by trying to convert the text to JSON. If it fails,
the user can try again. If it succeeds, we do it again in JavaScript as part of loading the table anyway.
The table is originally hidden by having a "d-none" Bootstrap class (aka display:none), and is made visible by removing the very same "d-none" Bootstrap class, while at the same time hiding the TWebEdit.
As for the
Tabulator table, not really too fancy, just adding in a bunch of columns from the data that is returned. It is
created in WebFormCreate like this.
procedure TForm1.WebFormCreate(Sender: TObject);
begin
  asm
    this.tabRepos = new Tabulator("#divTabulator", {
      layout: "fitColumns",
      columns: [
        { title: "Repository", field: "name", bottomCalc: "count", widthGrow: 3,
            formatter: function(cell, formatterParams, OnRendered){
              return '<a href='+cell.getRow().getCell('url').getValue()+' target="_blank" style="text-decoration: none; color: black;">'+cell.getValue()+'</a>';
            }
        },
        { title: "URL", field: "url", visible: false },
        { title: "Updated", field: "updated_at", widthGrow: 2 },
        { title: "License", field: "license.name", widthGrow: 2 },
        { title: "Language", field: "language", widthGrow: 2 },
        { title: "Private", field: "priv", formatter: "tickCross" },
        { title: "Forks", field: "forks", bottomCalc: "sum" },
        { title: "Issues", field: "open_issues_count", bottomCalc: "sum" },
        { title: "Watchers", field: "watchers_count", bottomCalc: "sum" },
        { title: "Stars", field: "stargazers_count", bottomCalc: "sum" }
      ]
    });
  end;
end;
A few things to note in relation to Tabulator. The first column contains a link to the repository but is shown using the name of the repository. In order for this to work, the URL must be defined as another (invisible) field in the table so it can be accessed by the formatter function.
Column widths are mostly dynamic, but the "widthGrow" value apportions a larger amount of the overall space when larger values are assigned (the default is 1). In this example, the Repository gets 3x the available space, and the numeric columns get 1x the available space, with the others getting 2x. Works out pretty well, but this could also be done by assigning explicit widths. Lots of options.
In order to display a boolean value, a formatter of "tickCross" is used
which, as one might guess, displays a tick or a cross. The boolean value in this case is just whether the
repository is still private or not. Here's what the table looks like with all of the repositories listed, after
clamping down on some of the padding.
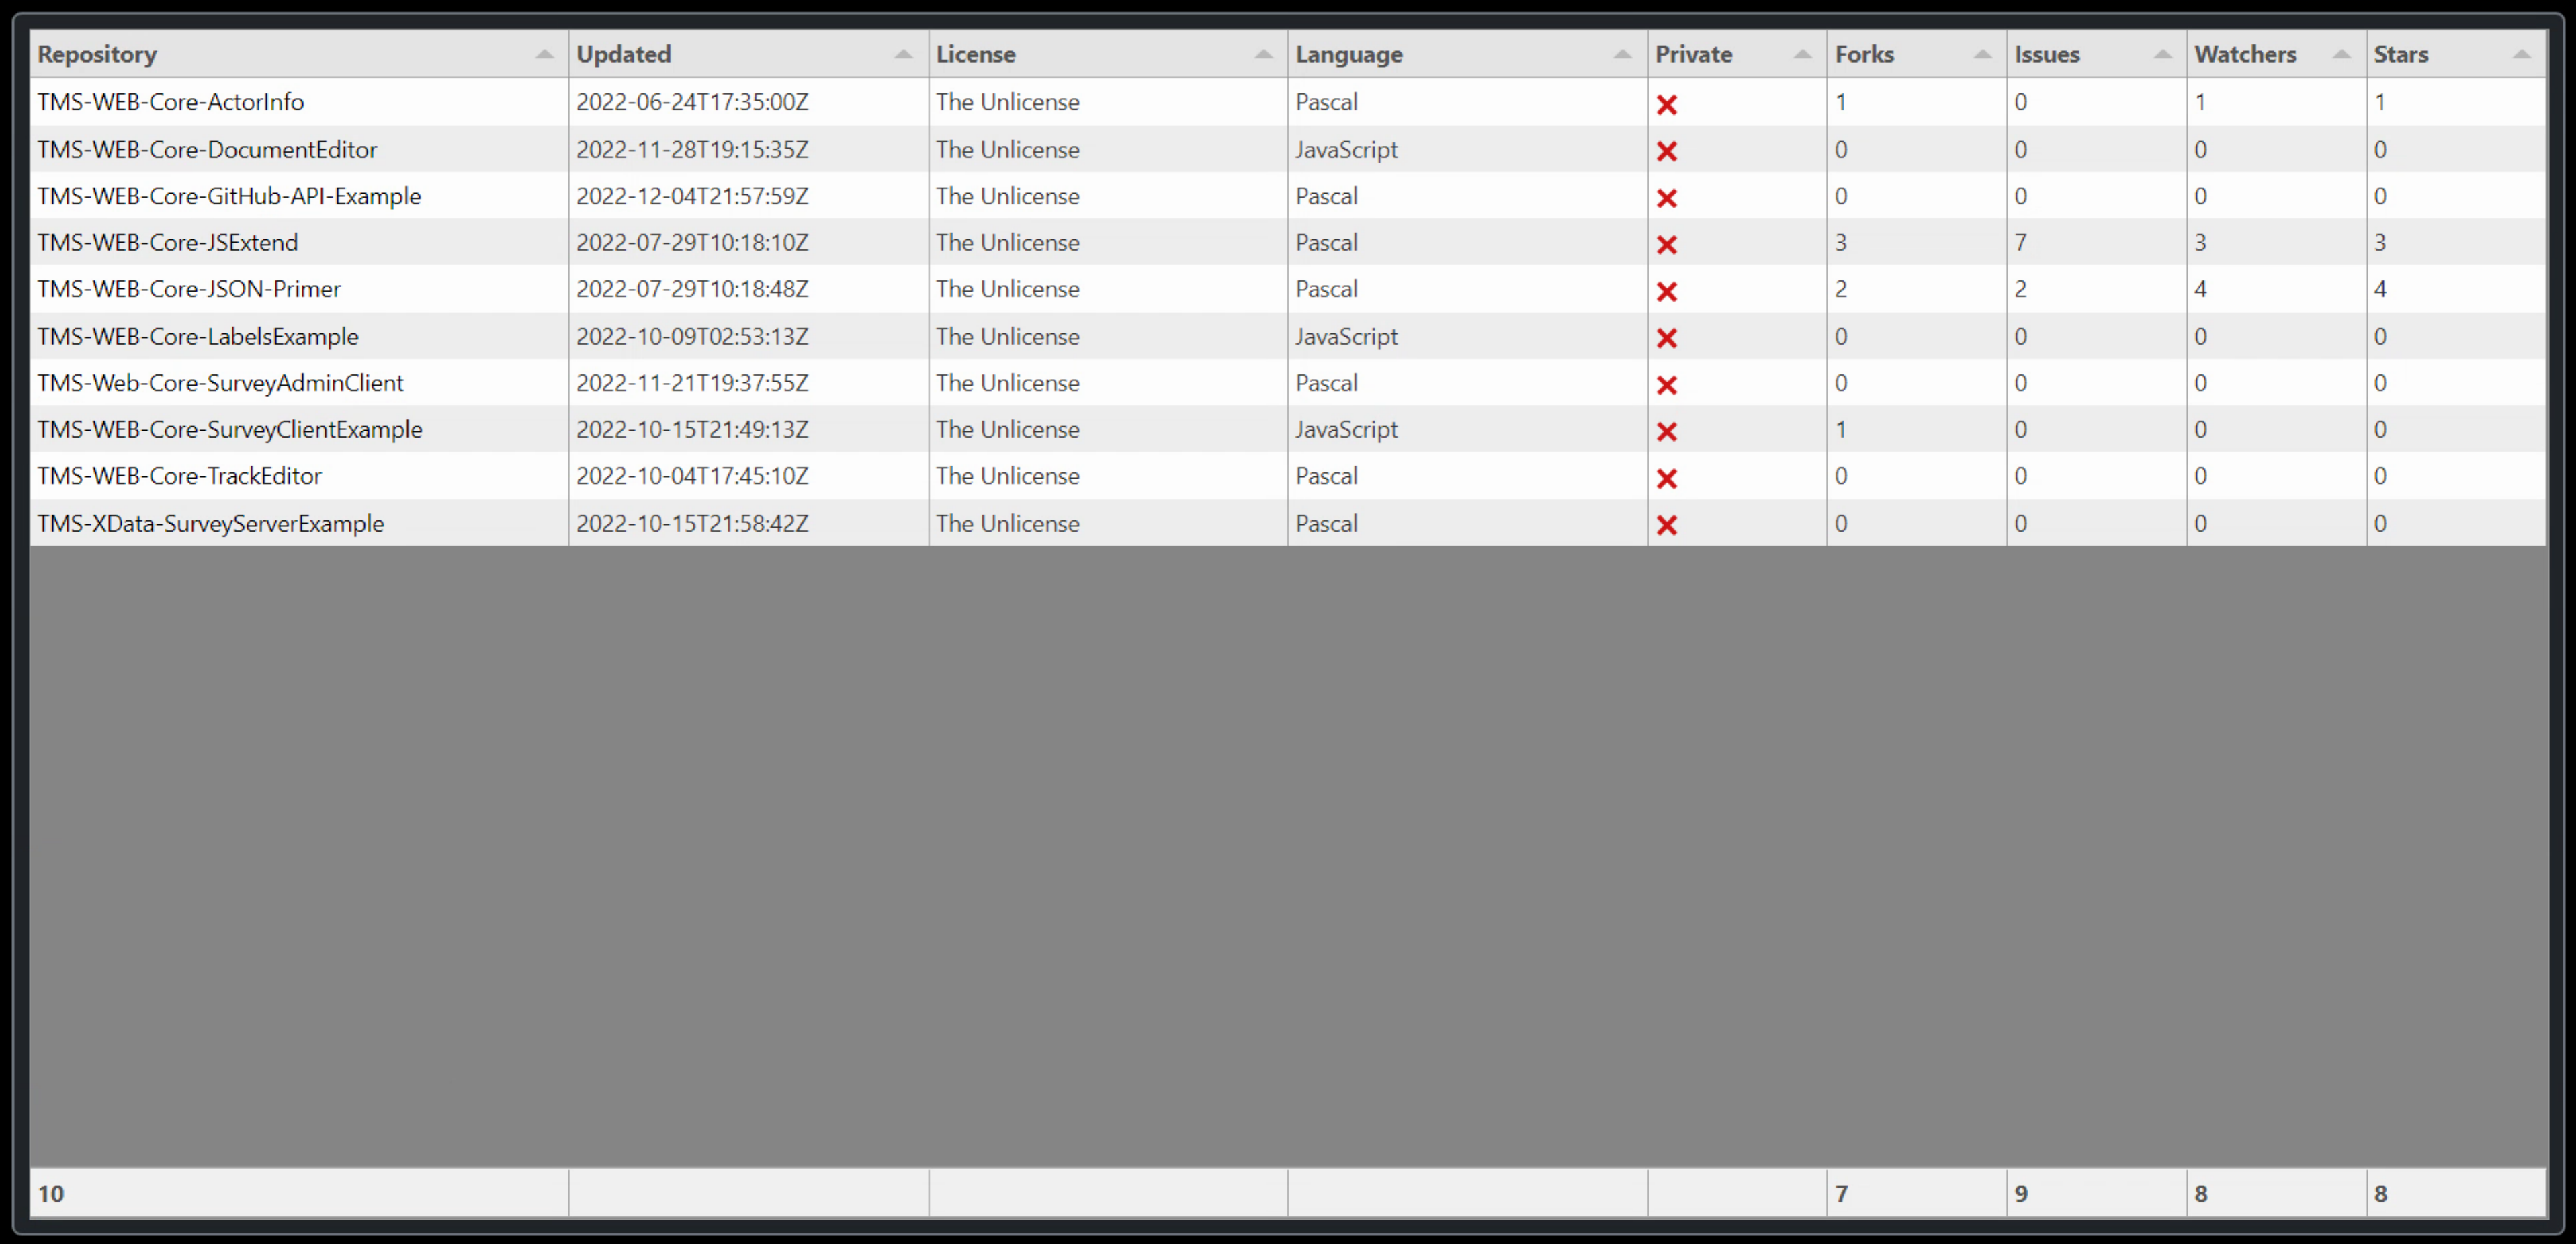
GitHub API Data in Tabulator.
This works pretty well, and we even get a bit of a summary of the columns at the bottom right. Plenty of other
formatting could be done, as well as adding other columns. Formatting dates would probably be next on the list,
for example. But we've got what we were after here - a view of the GitHub API data.
Traffic Data.
There is more data in the GitHub API that might be of interest. While it is helpful to see metrics like the number of forks, issues, watchers, or stars, it might also be interesting to see other traffic statistics.
The
GitHub API exposes a bit of traffic data, including page views, unique page views, referral sources, clones, and
unique clones. This is limited to the past two weeks, in either a daily or weekly format. Let's have a look
at the daily unique visitors and display them in a chart. To make this a little more interesting, let's display
only the selected repositories in a stacked bar chart.
To do this, we'll add an event to our Tabulator table that is triggered whenever the row selection is changed. This
event will then retrieve the traffic data for each repository that is selected, adding it to an array. This
array will then be displayed using D3
Charts. So we'll need that library to begin with.
    <!-- D3 Charts -->
    <script src="https://cdn.jsdelivr.net/npm/d3@7/dist/d3.min.js"></script>
To call a Delphi function whenever a change is made to the selected rows, we can add a Tabulator event function like this, which can be found in the WebFormCreate method, right after the table definition. While the selected rows are available in this function, we'll just look them up in the function that we're calling (UpdateChart). If we wanted to pass these kinds of things, we could use a data type of JSValue and then not have to worry about what kind of data is contained in variables like 'data' or 'rows'.
    this.tabRepos.on("rowSelectionChanged", function(data, rows){
      pas.Unit1.Form1.UpdateChart();
    });
To create a chart, we're going to need data aggregated into something we can pass to D3 Charts. But before we get to that, we'll need to get the data first. This will involve making similar calls to the GitHub Rest API that we did previously. In this case, though, we have to request data using the name of the repository to get the history. A separate function was written to handle this.
function TForm1.GetTrafficData(repo: String): JSValue;
var
  WebRequest: TWebHTTPRequest;
  WebResponse: TJSXMLHTTPRequest;
  Data: String;
  JSONData: TJSONObject;

begin
  WebRequest := TWebHTTPRequest.Create(Self);
  WebRequest.URL := 'https://api.github.com/repos/'+repo+'/traffic/views';
  WebRequest.Headers.AddPair('Accept','application/vnd.github+json');
  WebRequest.Headers.AddPair('Authorization','Bearer '+Form1.GitHubToken);
  WebResponse := await(TJSXMLHTTPRequest, WebRequest.Perform());
  Data := String(WebResponse.Response);
  try
    JSONData := TJSONObject.ParseJSONValue(Data) as TJSONObject;
    asm
      // this is the original JSON
      var traffic = JSON.parse(Data);

      // Want to convert it into something we can display in a chart
      var convert = {};

      // [{<date> <count>}]
      traffic.views.forEach(function(trafficdate){
        convert[trafficdate.timestamp.substr(0,10)] = trafficdate.uniques;
      });

      Result = JSON.stringify(convert);
    end;
  except on E: Exception do
    begin
      asm
        Result = '{}';
      end;
    end;
  end;
end;
This returns a JSON string containing a set of date/count pairs for the given repository. The date is just the first 10 characters of the timestamp returned by the GitHub API. Note that the data is aggregated based on the UTC date, which isn't necessarily ideal but not much we can do about that. If no data is found, an empty JSON string is returned.
This function is called repeatedly from within UpdateChart. The traffic data from each repository is then combined into one dataset This is then rearranged to have a filled array, meaning that any missing repository data is populated with zeroes, and the data is sorted by date and repository.
Kind
of a mess, to be honest, but we needed it in this format in order to pass it to the D3 Chart "stack" function.
Once that is done, we can just continue on with D3 Chart construction as we've done previously. A bit of work
to sort out the first time through, but not so bad after using it a few times. Certainly fast. In fact,
resizing the page will re-download the data and draw the chart again on the fly. Here's the code.
procedure TForm1.UpdateChart;
var
  NumRepos: Integer;
begin
  if (tabReposBuilt) then
  begin

    NumRepos := 0;

    asm
      var allrepodata = {};
      var repodata = {};
      var repolist = [];
      var repo = '';
      var title = '';

      // Figure out if any repositories are currently selected
      var table = pas.Unit1.Form1.tabRepos;
      var rows = table.getSelectedRows();

      NumRepos = rows.length;

      // If there are, we can draw a chart

      if (NumRepos > 0) {

        divChart.classList.remove('d-none');
        divTabulator.classList.replace('h-100','h-50');

        // Get data from all of the repositories

        for (var i = 0; i < NumRepos; i++) {
          repo = rows[i].getCell('full_name').getValue();
          title = rows[i].getCell('name').getValue();

          repodata = JSON.parse(await pas.Unit1.Form1.GetTrafficData(repo));

          for (var trafficdate in repodata) {
            allrepodata[trafficdate] = { ...allrepodata[trafficdate], ...{[title]:repodata[trafficdate]} }
          };

          repolist[i] = title;
        }


        // Now have to reorganize the data for charting, basically populating every combination and
        // ensuring zero values are present where needed.


        // This is the array of dates we're going to use (past 14 days)

        var getDaysArray = function(dtstart, dtend) {
          for(var arr=[],dt=new Date(dtstart); dt<=new Date(dtend); dt.setDate(dt.getDate()+1)){
            arr.push(new Date(dt).toISOString().split('T')[0]);
          }
          return arr;
        };
        var trafficdates = getDaysArray(new Date() - (15 * 24 * 60 * 60 * 1000), new Date() - (-1 * 24 * 60 * 60 * 1000));


        // Recreate the data.  Has the benefit of also sorting it
        // [{date: date, repo1: visitors, repo2: visitors, repo3: visitors}]

        var ChartData = [];
        for (var i = 0; i < trafficdates.length; i++) {
          var values = {};
          for (var j = 0; j < repolist.length; j++) {
            var visitors = 0;
            if (allrepodata[trafficdates[i]] !== undefined) {
              visitors = allrepodata[trafficdates[i]][repolist[j]] || 0;
            }
            values = {...values, ...{date:trafficdates[i],[repolist[j]]:visitors} }
          }
          ChartData[i] = values;
        }


//        console.log(trafficdates);
//        console.log(allrepodata);
//        console.log(ChartData);
//        console.log(repolist);


        // Let's make a D3 Stacked Bar Chart!  This is modified from the following links.
        // One of the main changes is to update the code from D3 v3 to D3 v4
        // https://www.educative.io/answers/how-to-create-stacked-bar-chart-using-d3
        // https://observablehq.com/@stuartathompson/a-step-by-step-guide-to-the-d3-v4-stacked-bar-chart

        var margin = 8;
        var width = divChart.offsetWidth - (margin * 6);
        var height = divChart.offsetHeight - (margin * 6);
        var colors = ["#C9D6DF", "#F7EECF", "#E3E1B2", "#F9CAC8"];
        var parseDate = d3.utcParse("%Y-%m-%d");
        var formatDate = d3.timeFormat("%b-%d");           // Jan-01

        // Replace chart whenever we're here
        divChart.innerHTML = '';

        // Chart is an SVG image created in the divChart TWebHTMLDiv component
        // Here we're positioning it with a bit of margin
        var svg = d3.select("#divChart")
                    .append("svg")
                    .attr("width", width + (margin * 6))
                    .attr("height", height + (margin * 6))
//                    .attr("transform", "translate("+margin+","+margin+")")
                    .append("g")
                    .attr("width", width - (margin * 8))
                    .attr("height", height - (margin * 8))
                    .attr("transform", "translate("+(margin * 2) +","+(margin * 2)+")");


        // This is the insanity needed to create the stacked portion of the bar chart
        var stack = d3.stack().keys(repolist)(ChartData);

        stack.map((d,i) => {
          d.map(d => {
            d.key = repolist[i]
            return d
          })
          return d
        });
//       console.log(stack);

        // Search the data to figure out what the largest possible y value will be
        var yMax = d3.max(ChartData, d => {
          var val = 0
          for(var k of repolist){
            val += d[k]
          }
          return val
        });
//        console.log(yMax);


        // Deal with the X-Axis
        var x = d3.scaleLinear().domain([0,ChartData.length-1]).range([margin*5,width]);
        var xAxis = d3.axisBottom(x)
                      .ticks(16)
                      .tickFormat((d, i) => formatDate(parseDate(trafficdates[d])));
        svg.append('text')
           .attr('x', width/2)
           .attr('y', height + 30)
           .attr('text-anchor', 'middle')
           .text('UTC Date');


        // Deal with the Y-Axis
        var y = d3.scaleLinear().domain([0, yMax]).range([height,0])
        var yAxis = d3.axisLeft(y);
        svg.append('text')
           .attr('text-anchor', 'middle')
           .attr('transform', 'translate(-8,'+ height/2 + ')rotate(-90)')
           .text('Unique Visitors');


        // Draw the bar charts
        svg.selectAll('g')
           .data(stack).enter()
           .append('g')
          .selectAll('rect')
          .data(d => d).enter()
            .append('rect')
            .attr('x', (d,i) => x(i) - (width/ChartData.length/2))
            .attr('width', width/ChartData.length)
            .attr('height', d => {
               return y(d[0])-y(d[1])
             })
            .attr('y', d => y(d[1]))
            .attr('fill', "#F00")
            .attr('stroke', 'black')
            .attr('stroke-width', 1)
            .append("title")
            .text(function(d,i) {return d.key });  // hover text

        svg.append('g')
          .attr("transform", "translate("+margin * 5+",0)")
          .call(yAxis);

        svg.append('g')
          .attr("transform", "translate(0,"+(height)+")")
          .call(xAxis);

        svg.selectAll("line").style("stroke", "#6c757d");  // Bootsrap secondary color
        svg.selectAll("path").style("stroke", "#6c757d");
        svg.selectAll("text").style("stroke", "white");
        svg.selectAll("text").style("fill", "white");
        svg.selectAll("text").style("stroke-width", "0.2");
        svg.selectAll("text").style("font-size", "10px");
      }

    end;

    if (NumRepos = 0) then
    begin
      divChart.ElementHandle.classList.add('d-none');
      divTabulator.ElementHandle.classList.replace('h-50','h-100');
    end
  end;
end;
Note that if no repositories are selected, the chart is hidden. Initially, all the repositories are selected. A Tabulator "headerMenu" was added to make it easier to select/deselect all repositories. And a tooltip appears when you hover over one of the elements of the stacked bar chart.
To be fair, there was quite a bit of fiddling to get this to work, even with the examples in the links provided in the code. While there are many examples of how to create D3 Charts, a lot changed between v3 and v4 of D3 Charts, so some of these examples won't work without some effort to convert them to the newer version. But at long last, we get our chart displaying just as we'd like.
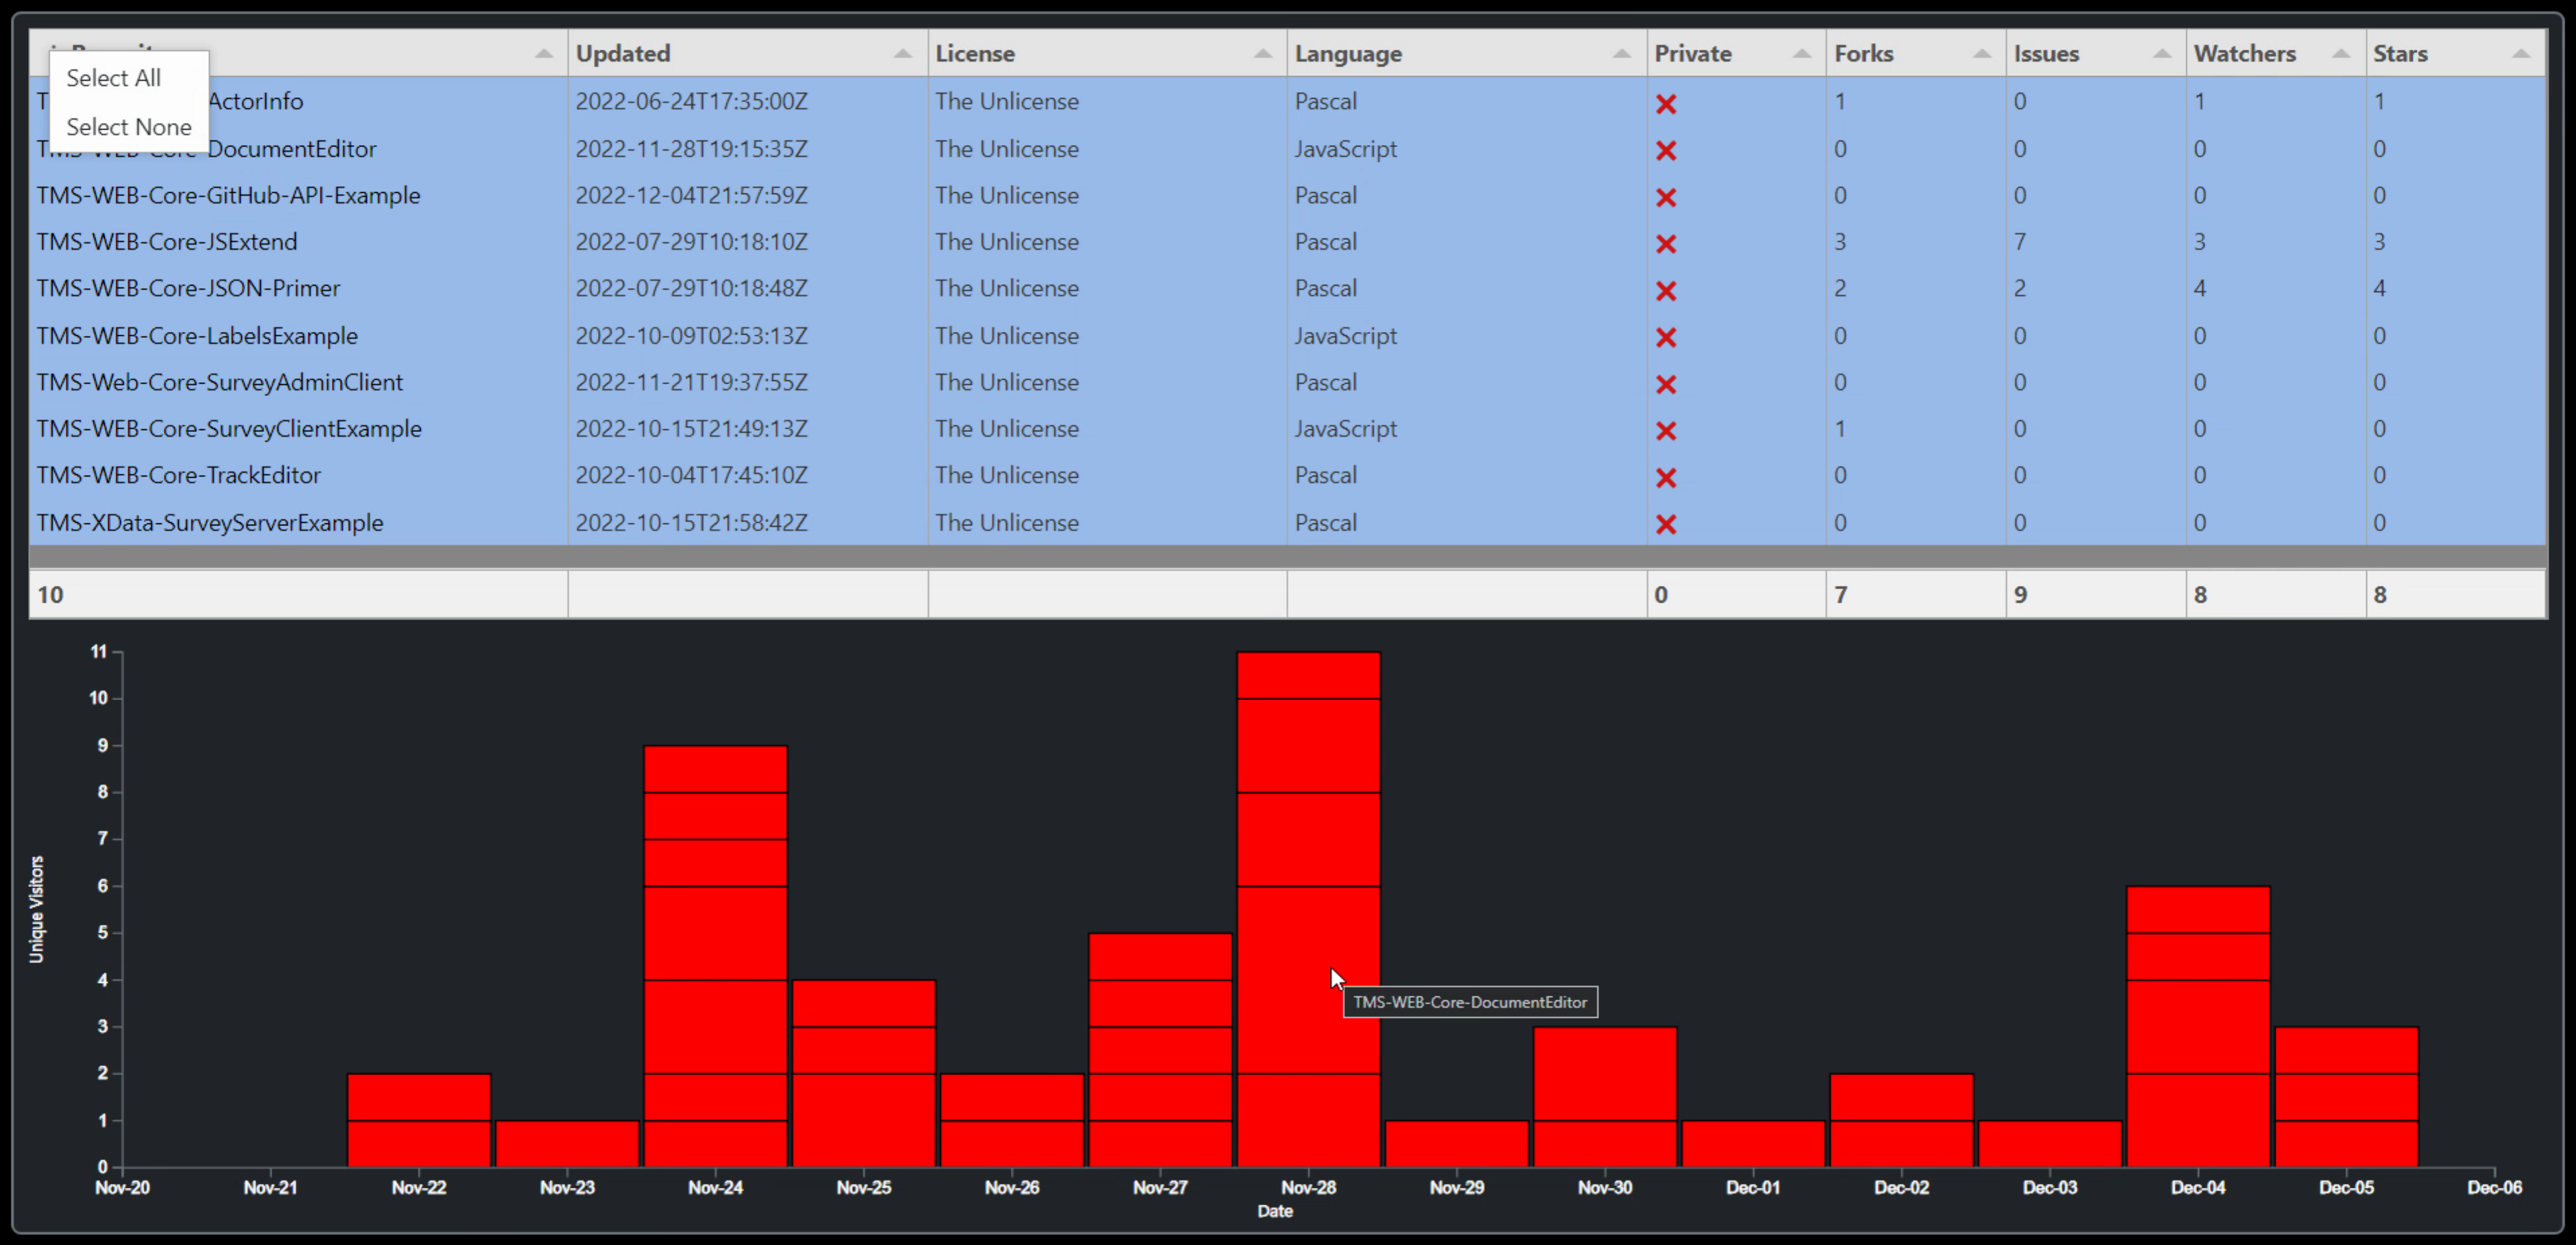
All Repository Traffic - Past 14 Days.
The chart extends an extra day at either end to help deal with the differences between UTC and local time.
Could also trim the data to get rid of them, but it actually helps in laying out the chart to have that extra
bit of space. Selecting a different set of repositories will automatically update the chart to show just those
selected. This is another reason to populate the data with zero values - so that the X-axis doesn't change when
selecting different repository sets.
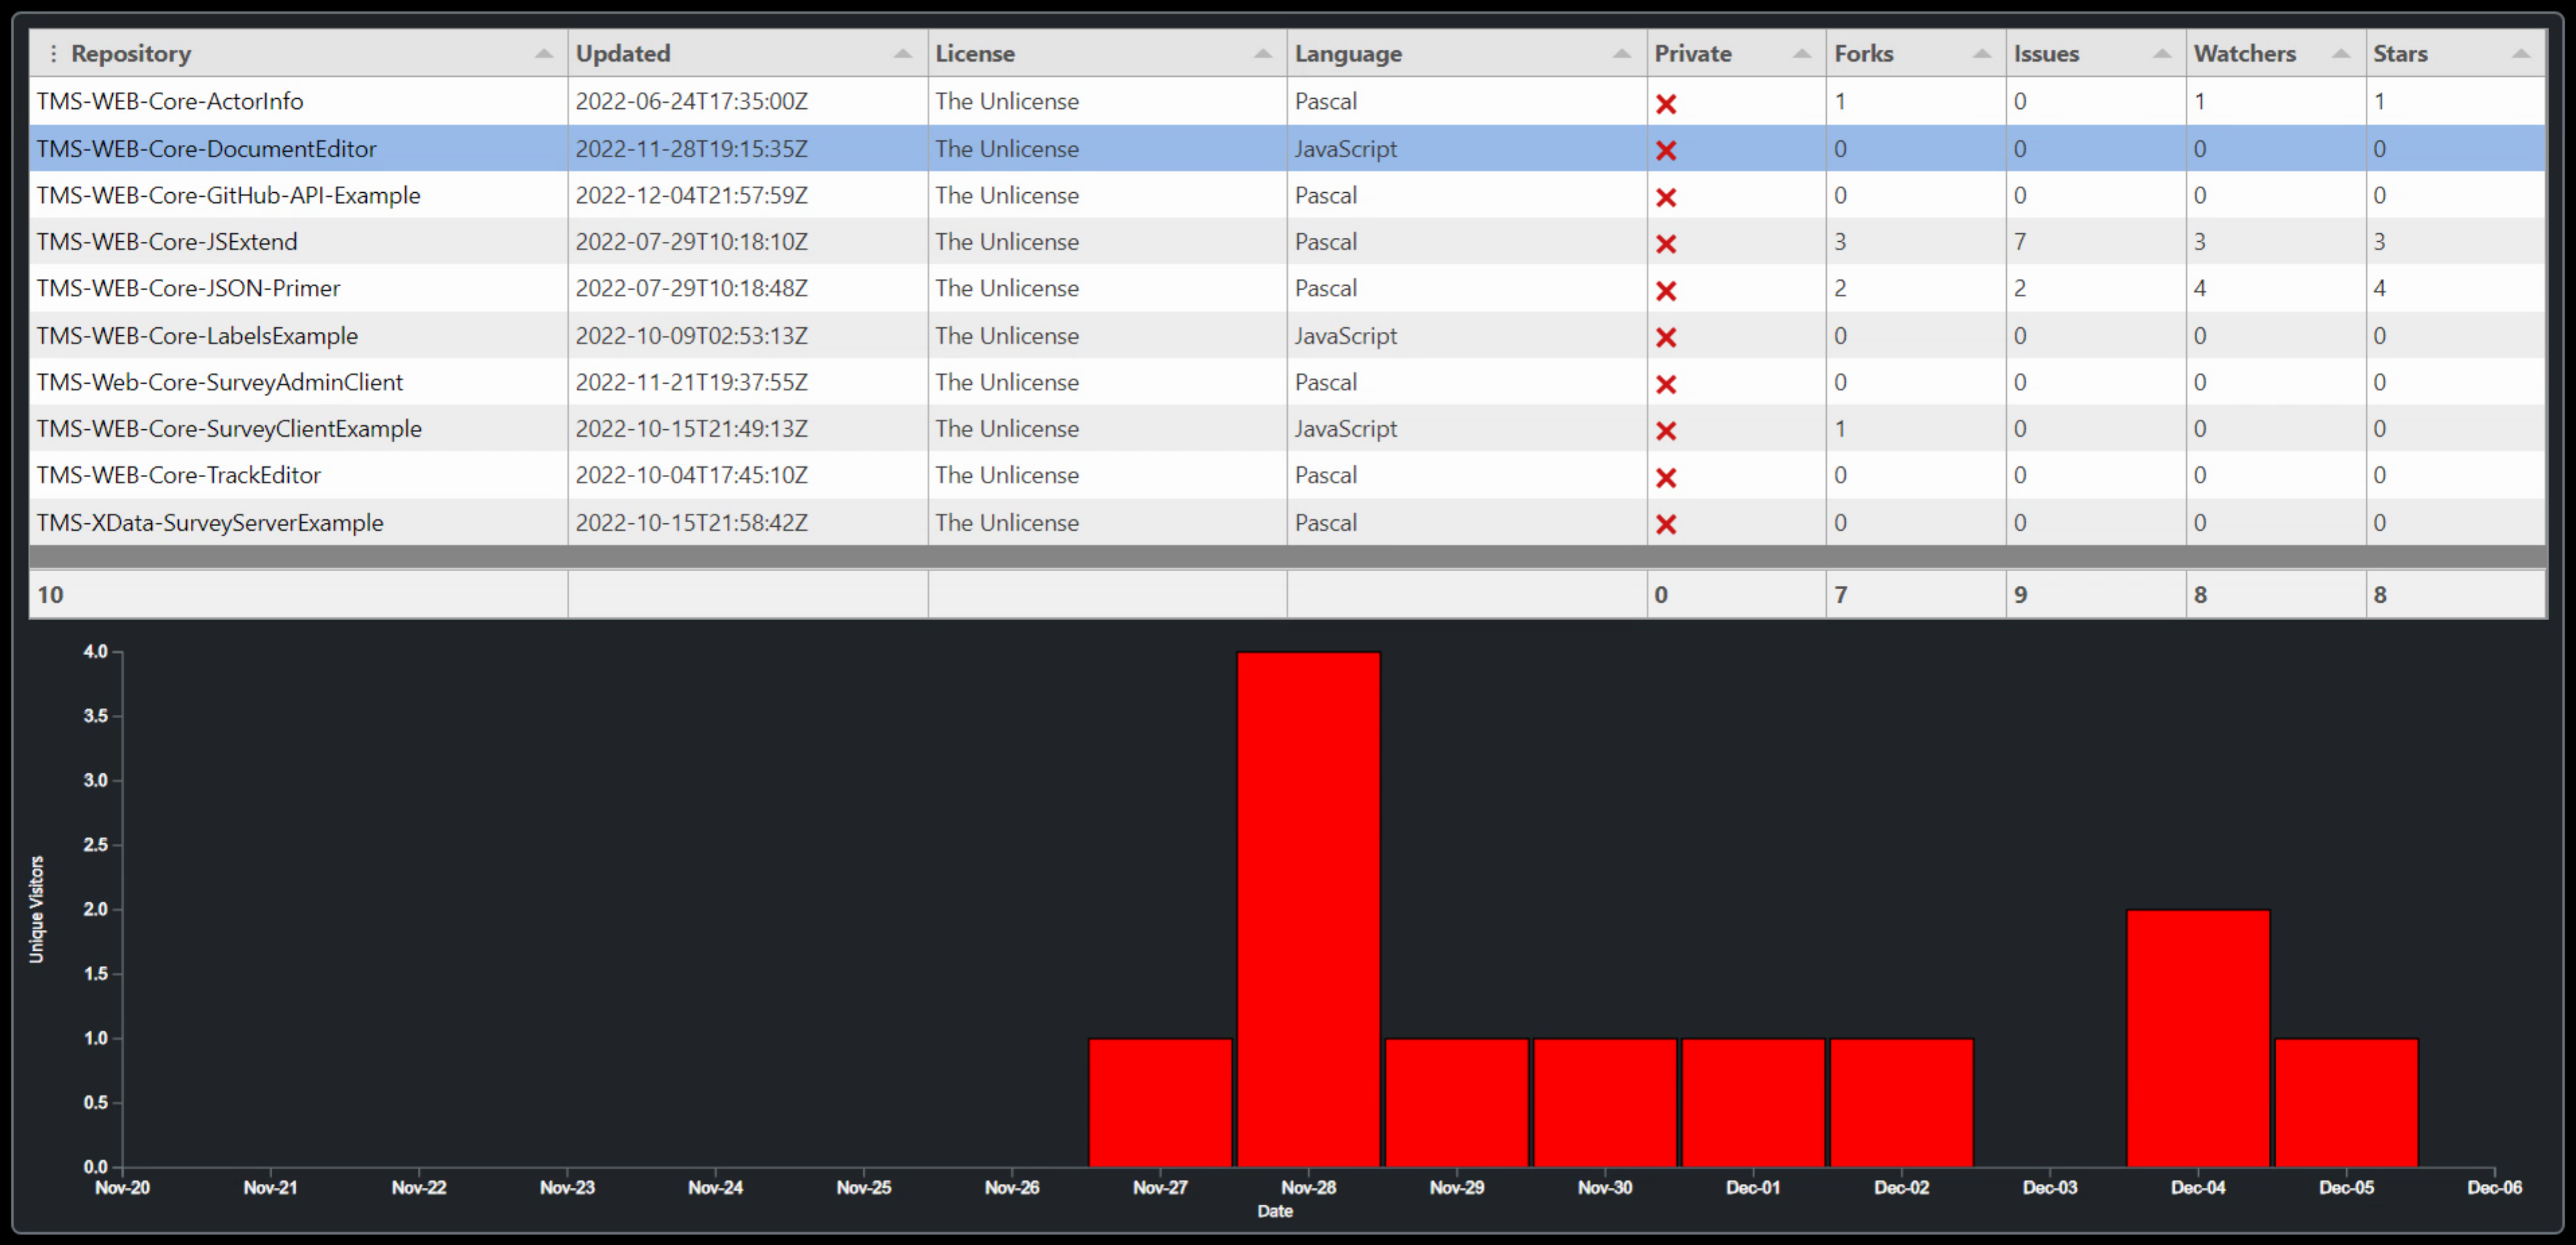
Traffic for One Repository - Past 14 Days.
Another potential option would be to show all the repositories and then change the colof of those that are
selected. Or perhaps include the value (visitors) in the tooltip. Lots of ideas to explore from here. The
hard part is done!
Cloning a Repository.
One last item before we wrap this up. What if you find a repository that looks like it might be worth having a
look at? How do you get it copied over to your local development environment? From the GitHub website, find
the repository that you're interested in. Tucked away under the Code button is the option to "Open with GitHub
Desktop".
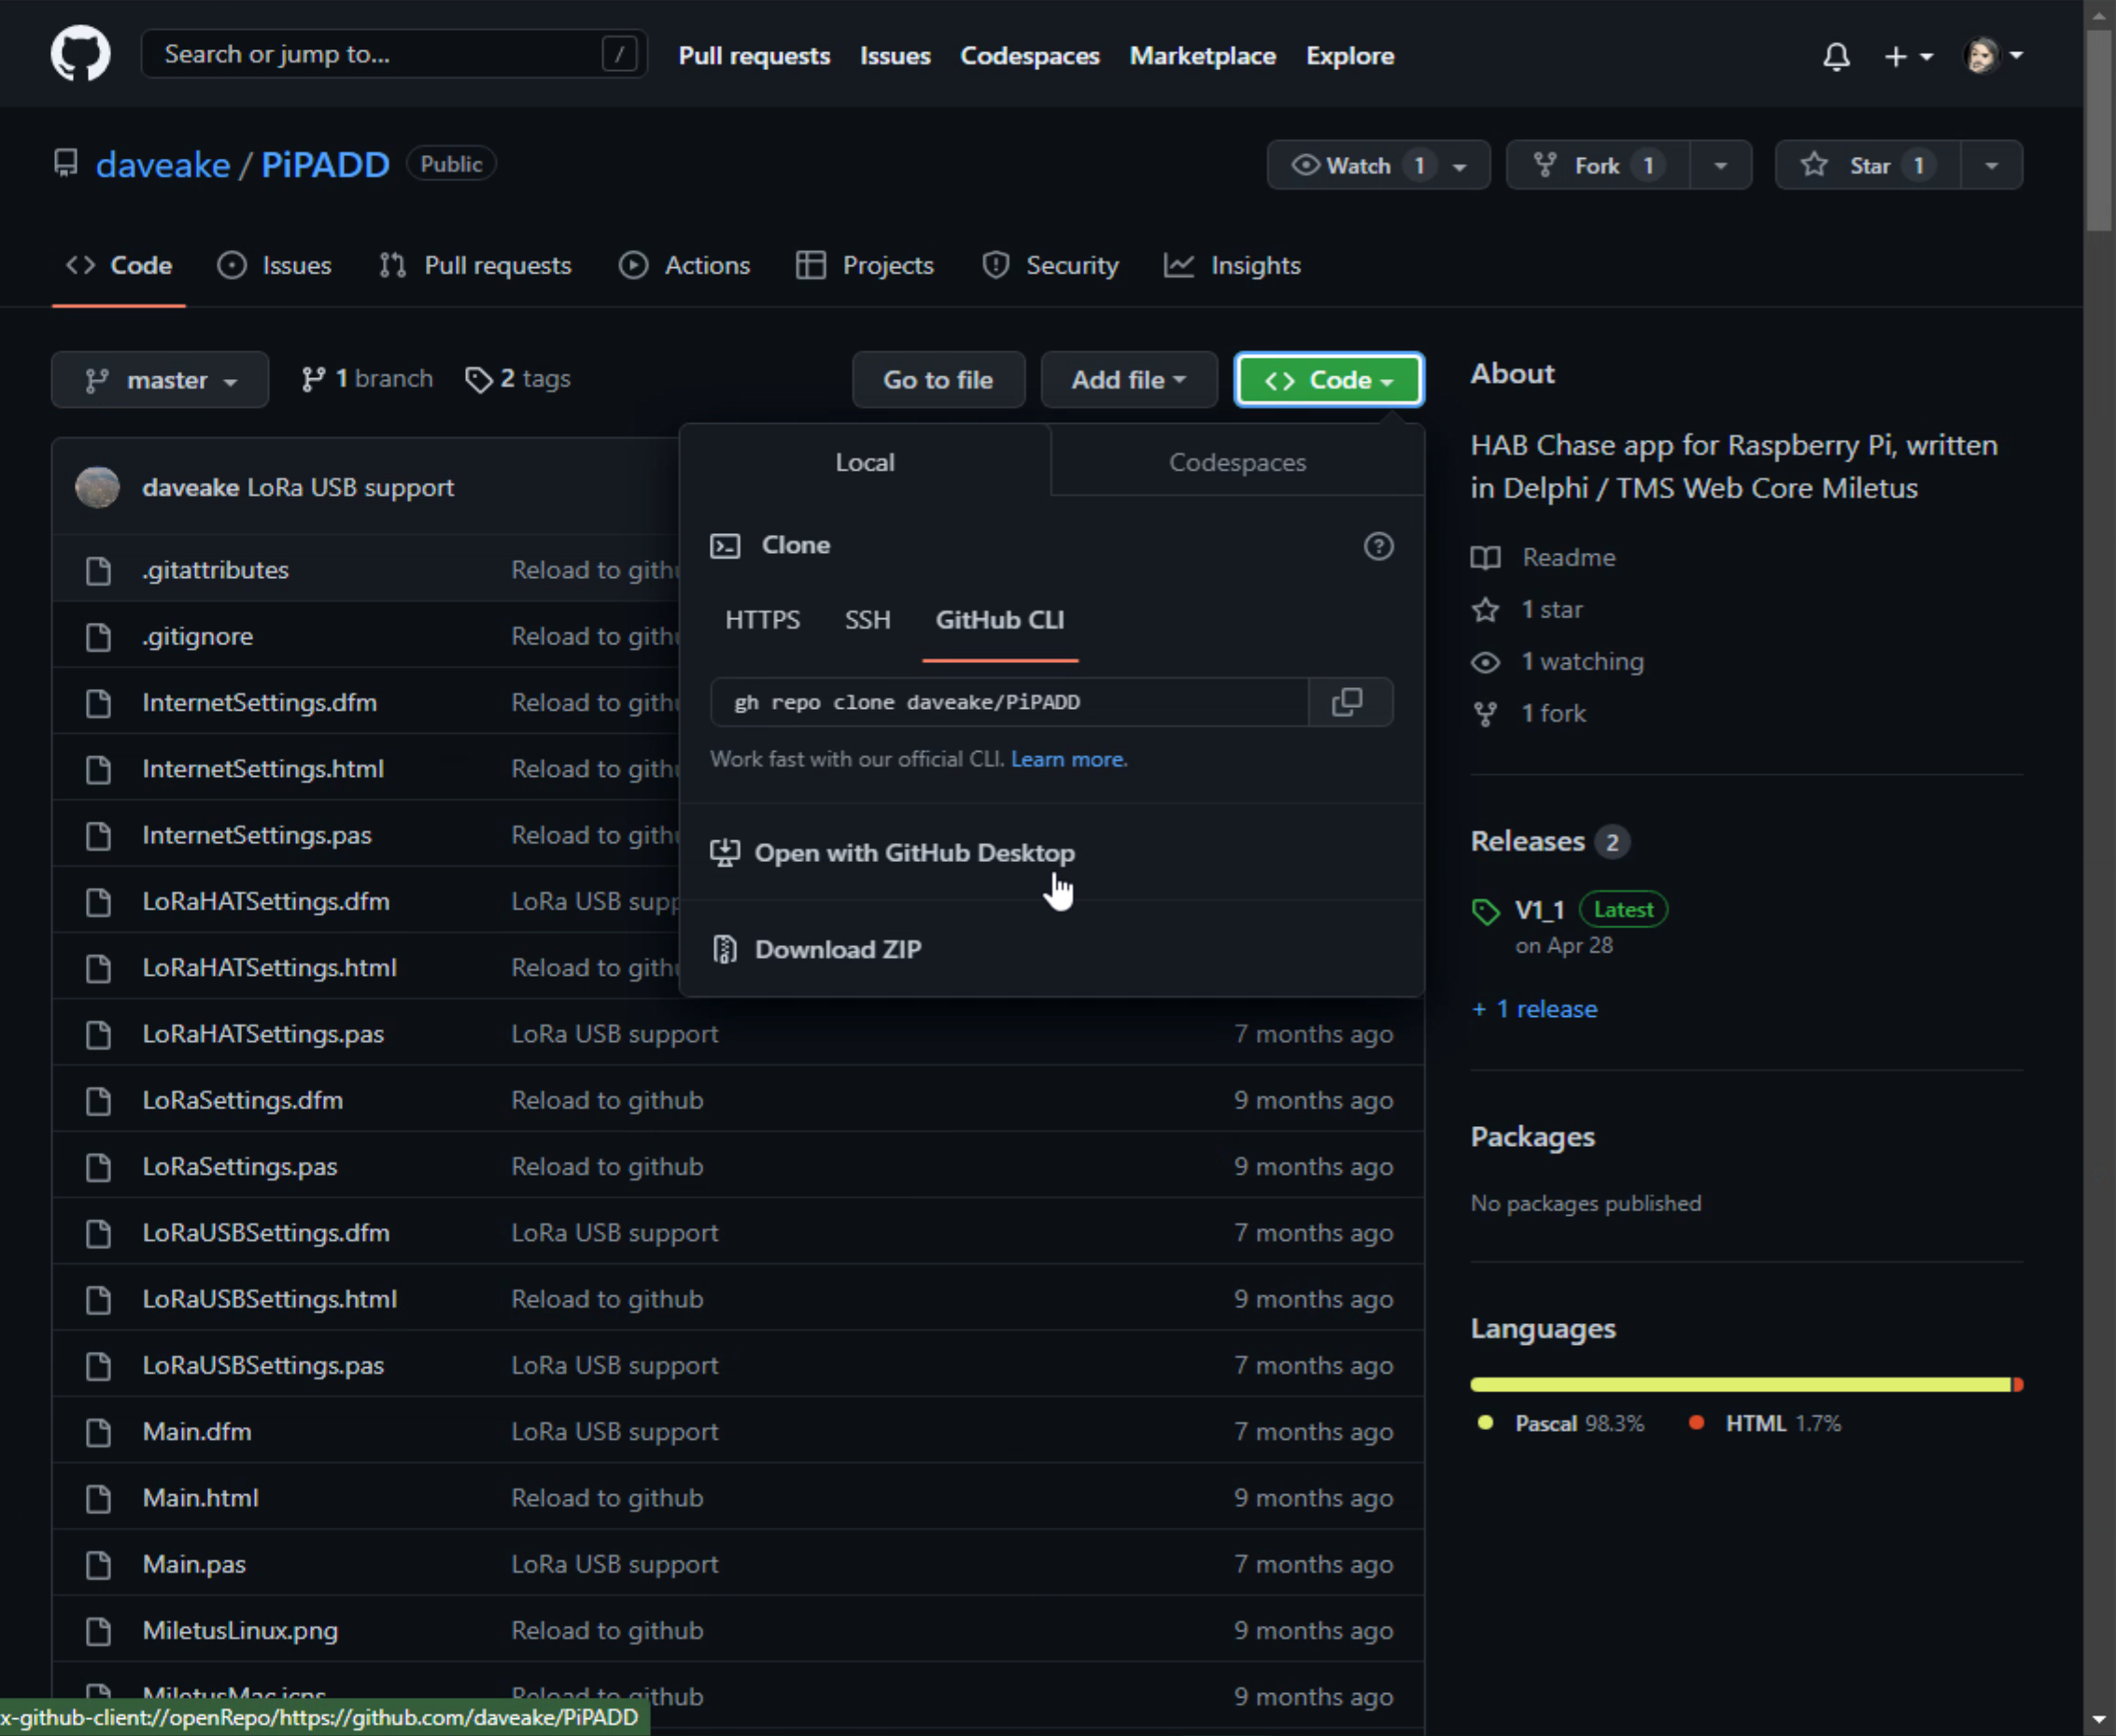
Clone a Repository.
Selecting this option will prompt you for a few things with suitable defaults provided. Like where to store the repository locally. Once it has the necessary information, it clones the repository.
In this case, we're having a look at the HAB Chase app that was listed in the TMS WEB Core repositories near the beginning of this post. More information on this project can be found right here in the TMS Software blog - check out this post for more information.
Adding it to GitHub Desktop drops it into a PiPADD folder in the usual Delphi Projects folder. Assuming you've got the Delphi prerequisites installed (I was missing TMS FNC Dashboard Pack and TMS FNC Maps, for example), the repository can be opened up in Delphi directly. In this project, there's also the need to add a "key.pas" file with your Google Maps API key.

PiPADD App.
Here we can see the PiPADD app running. It uses the Miletus framework and is intended to run on Raspberry Pi, but it can be tested on Windows. The GitHub Desktop app also has links to
creating issues for the current repository, making it easy to report problems.
Where Next?
That's about everything I wanted to cover for GitHub and TMS WEB Core. There are lots of other things you can do in GitHub, so be sure to stroll through the settings on the GitHub website for your repository.
In the meantime, here are the links to the example project for this post. I would like to get a bit of feedback on whether
anything here was useful. Is there another aspect of GitHub that needs a bit more exploration? Or another
versioning system you prefer over GitHub? Let me know in the comments below.
GitHub API Example Download
GitHub API Example on GitHub
Follow Andrew on 𝕏 at @WebCoreAndMore or join our 𝕏 Web Core and More Community.
Andrew Simard

This blog post has not received any comments yet.
All Blog Posts | Next Post | Previous Post