Blog
All Blog Posts | Next Post | Previous Post

 Extend TMS WEB Core with JS Libraries with Andrew:
Syntax Highlighting: HighlightJS vs PrismJS
Monday, November 28, 2022

When it comes to providing an interface for editing code, we had a look at CodeMirror and its impressive syntax-highlighting capabilities. But what if we just want to display syntax-highlighted code, perhaps on a blog or in technical documentation that might be embedded directly within our TMS WEB Core applications? Or what if we've already got a pile of documentation that could benefit from a little extra syntax highlighting? We could in theory use CodeMirror in a read-only mode, but there's an even easier way. By just adding a JavaScript library, any code displayed in <pre><code> elements can automatically get upgraded to have syntax highlighting applied, optionally with a theme, and potentially other features. And there are several libraries available for just this purpose. We're going to have a look at two such libraries, HighlightJS and PrismJS.
Motivation.
There are plenty of great reasons to provide syntax-highlighted code as part of any web page or documentation system. It certainly helps improve the overall visual appeal of a page. Seeing code structure more clearly may also make it easier to follow and understand the code itself. Separating out the code from the surrounding text may also help with breaking up long blocks of text, particularly if blocks of text and blocks of code are interspersed throughout the page.Sometimes highlighting tools also offer other capabilities, like line-numbering or easier copy/paste/clipboard operations. Fortunately, whatever the reason behind the desire for syntax highlighting, the implementation is very simple - often just adding a JavaScript library to your project is all that is needed.
Sample Project.
While adding syntax highlighting to a project can be a simple matter, it is perhaps curious that a project that can benefit from syntax highlighting might not be quite as simple. For example, most of our projects so far have been focused on UI elements like buttons, edit fields, and tables. And while we've covered SunEditor and Summernote WYSIWYG HTML editors, the focus there was on providing the tools, not so much the content generated from them.
For today's project, we're going to very quickly set up a simple document editor using SunEditor and some of those buttons, edit fields, and tables, with the goal of having a place to add code and thus see our syntax-highlighting libraries in action. Perhaps this could form the foundation of something like an Evernote or Microsoft OneNote app - just a generic document editor, using a WYSIWYG HTML editor for its primary editing interface. This means that documents can contain all the usual suspects - lists, images, tables, and so on.
To help keep this (somewhat) simple, we're going to mimic a bunch of work that was done in the Survey Admin Client app that we covered recently, so please check that out for another detailed example of the same sort of thing that we're up to here. All we're really after is a list of documents, and the ability to view and edit both the list of documents and their contents. Nothing too fancy.
We'll use the same libraries we've been using frequently, including Bootstrap, Tabulator, InteractJS, and SunEditor to start with (which itself uses CodeMirror and Katex - a math editing library), and we'll create a new TMS WEB Core project using the PWA template.
As usual, these JavaScript libraries can be added to the Project.html file or alternatively through the Manage JavaScript Libraries feature in the Delphi IDE. We'll also add our own CSS file to make some adjustments to Tabulator and SunEditor, as we've done previously. As we're using the PWA template instead of the Bootstrap template, we'll need to include Bootstrap explicitly as well. Our list of frequently used JavaScript libraries is growing!
<!-- Bootstrap 5.2.1-->
<script crossorigin="anonymous" integrity="sha384-u1OknCvxWvY5kfmNBILK2hRnQC3Pr17a+RTT6rIHI7NnikvbZlHgTPOOmMi466C8" src="https://cdn.jsdelivr.net/npm/bootstrap@5.2.1/dist/js/bootstrap.bundle.min.js"></script>
<link crossorigin="anonymous" href="https://cdn.jsdelivr.net/npm/bootstrap@5.2.1/dist/css/bootstrap.min.css" integrity="sha384-iYQeCzEYFbKjA/T2uDLTpkwGzCiq6soy8tYaI1GyVh/UjpbCx/TYkiZhlZB6+fzT" rel="stylesheet"/>
<!-- FontAwesome v6 Free -->
<link href="https://cdn.jsdelivr.net/npm/@fortawesome/fontawesome-free@6/css/all.min.css" rel="stylesheet"/>
<!-- Google Fonts: Roboto+Cairo -->
<link href="https://fonts.googleapis.com" rel="preconnect"/>
<link crossorigin href="https://fonts.gstatic.com" rel="preconnect"/>
<link href="https://fonts.googleapis.com/css2?family=Roboto&family=Cairo&family=Roboto+Condensed&display=swap" rel="stylesheet"/>
<!-- Tabulator -->
<script src="https://cdn.jsdelivr.net/npm/tabulator-tables@5/dist/js/tabulator.min.js"></script>
<link href="https://cdn.jsdelivr.net/npm/tabulator-tables@5/dist/css/tabulator.min.css" rel="stylesheet"/>
<!-- Interact.js -->
<script src="https://cdn.jsdelivr.net/npm/interactjs/dist/interact.min.js"></script>
<!-- CodeMirror (Code Editor) -->
<link href="https://cdn.jsdelivr.net/npm/codemirror@5.49.0/lib/codemirror.min.css" rel="stylesheet"/>
<script src="https://cdn.jsdelivr.net/npm/codemirror@5.49.0/lib/codemirror.min.js"></script>
<script src="https://cdn.jsdelivr.net/npm/codemirror@5.49.0/mode/htmlmixed/htmlmixed.js"></script>
<script src="https://cdn.jsdelivr.net/npm/codemirror@5.49.0/mode/xml/xml.js"></script>
<script src="https://cdn.jsdelivr.net/npm/codemirror@5.49.0/mode/css/css.js"></script>
<!-- KaTeX (Formula Editor) -->
<link href="https://cdn.jsdelivr.net/npm/katex@0.11.1/dist/katex.min.css" rel="stylesheet"/>
<script src="https://cdn.jsdelivr.net/npm/katex@0.11.1/dist/katex.min.js"></script>
<!-- SunEditor (HTML Editor) -->
<link href="https://cdn.jsdelivr.net/npm/suneditor@latest/dist/css/suneditor.min.css" rel="stylesheet"/>
<script src="https://cdn.jsdelivr.net/npm/suneditor@latest/dist/suneditor.min.js"></script>
<!-- Document Editor custom CSS -->
<link href="editor.css" rel="stylesheet"/>The basic idea for this demo application is to have a grouped and sorted list of documents in a table on the left, with the ability to view, edit, or otherwise make changes to the individual documents using the right side of the interface.
As we've done previously, there are a number of pages in a TWebPageControl that handle this right side of the interface. One for viewing the document, one for editing the document name and group, and one for editing the document itself using a SunEditor instance. The UI for switching pages is provided via a Bootstrap button group, just as we did several times in the Survey Admin Client app. Here's what it looks like initially.
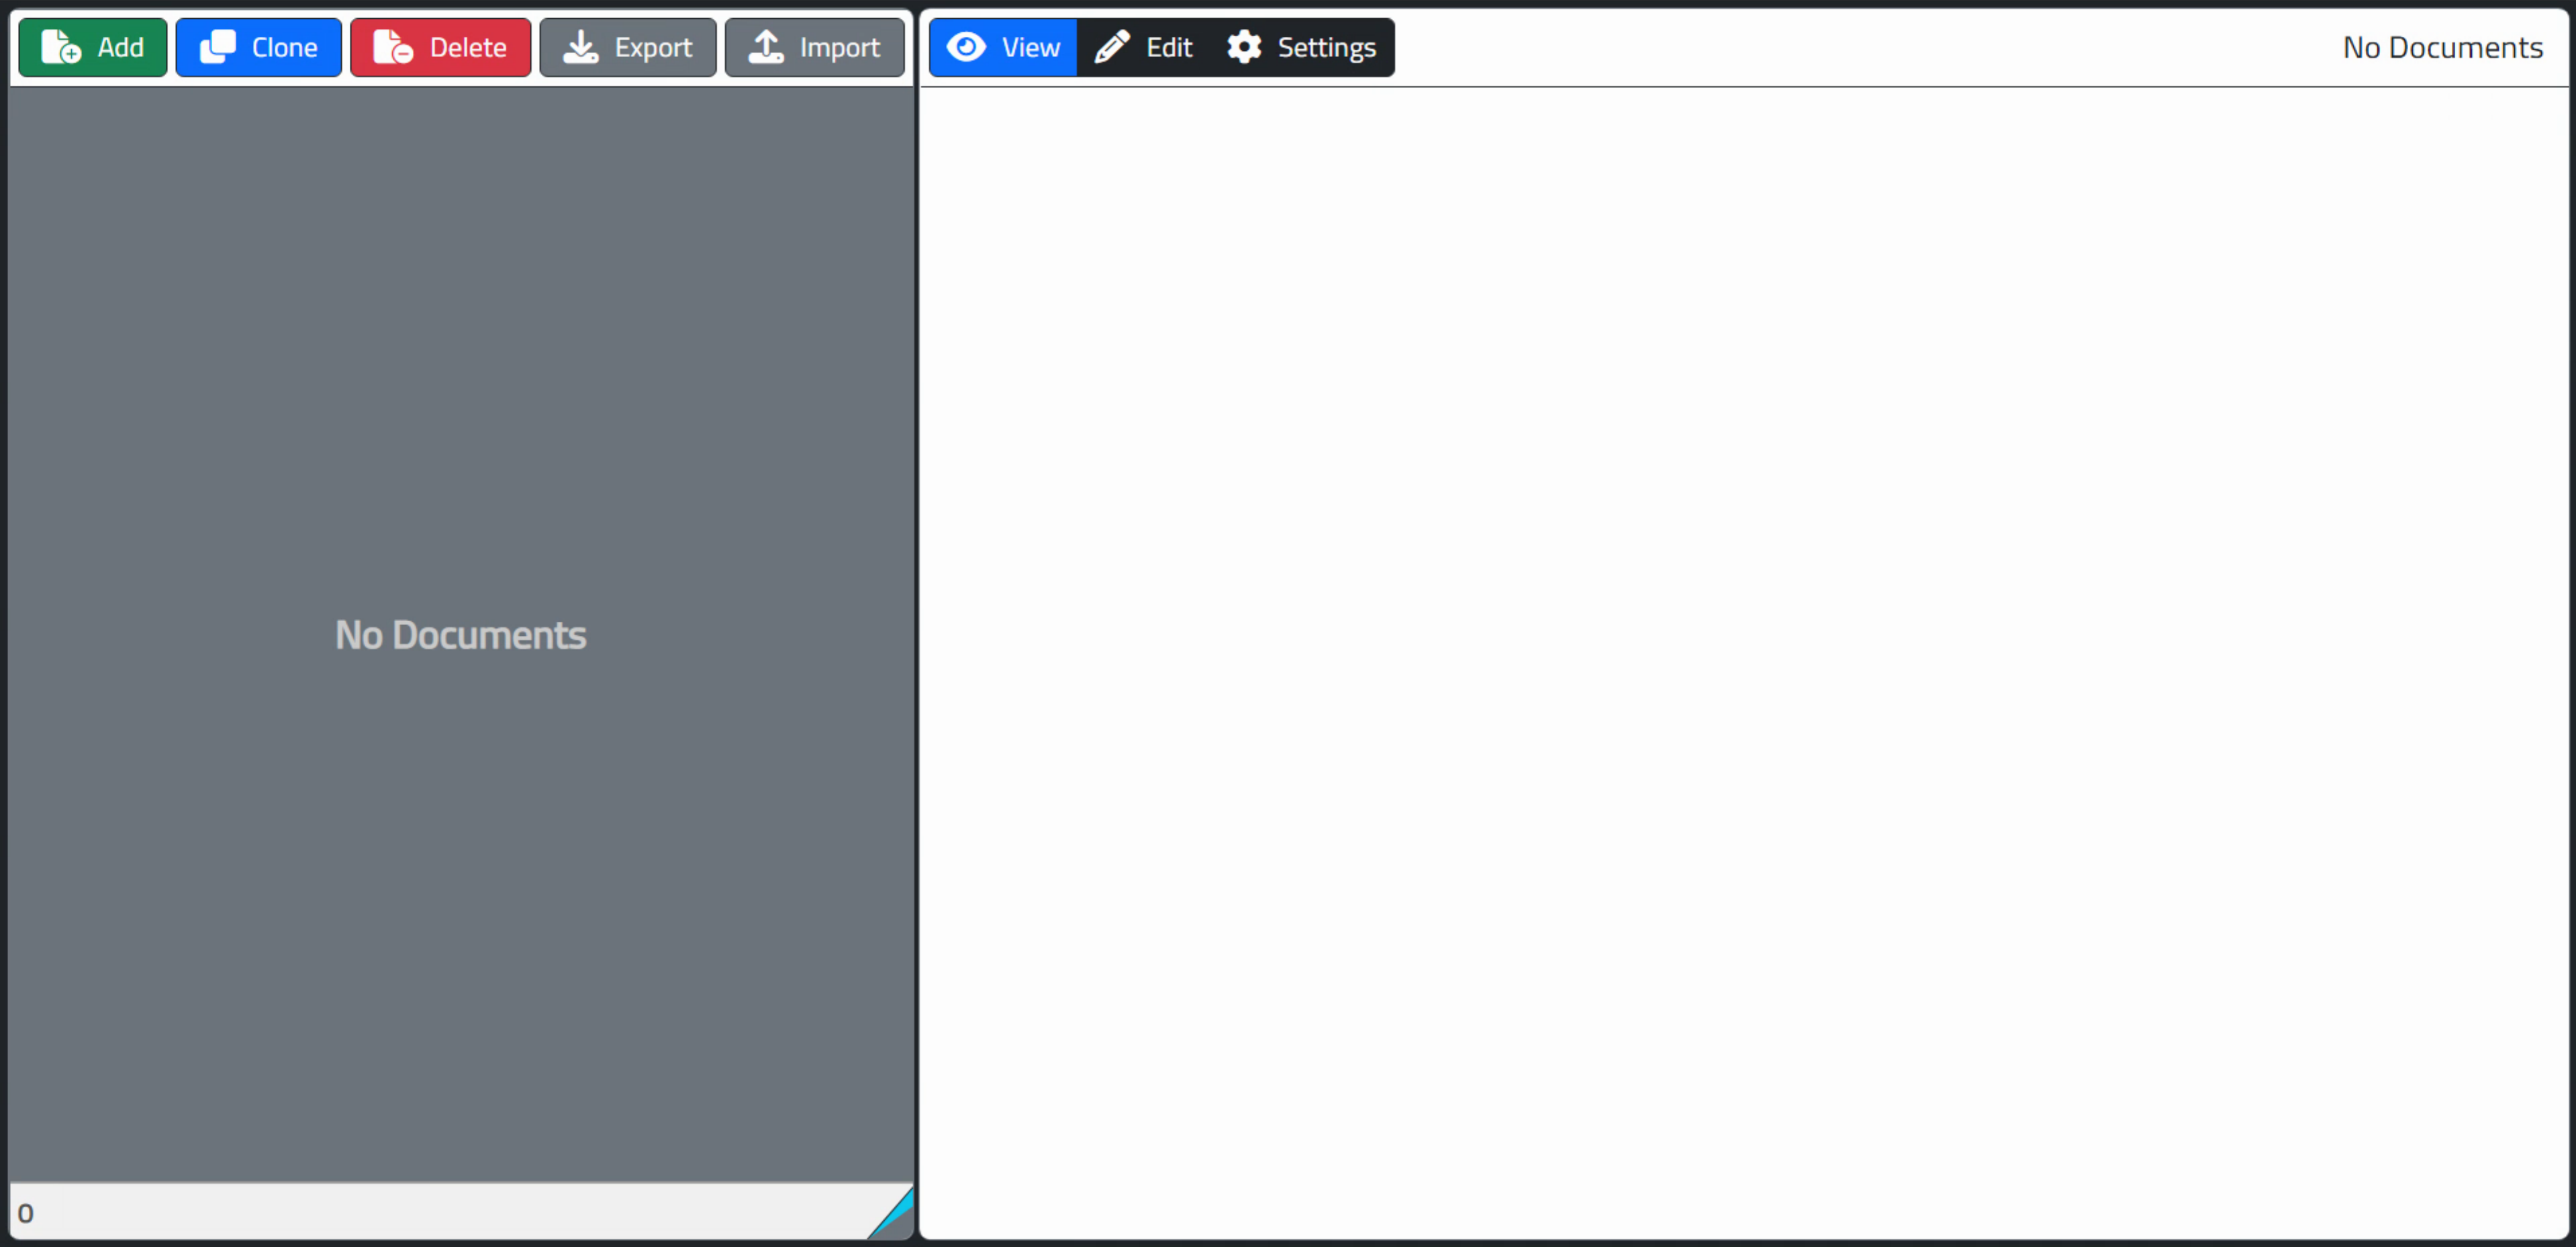
Example Project: DocumentEditor.
The UI is intended to be simple. Documents can be added, cloned, or deleted. The entire set of documents can
be exported (downloaded) or imported (uploaded) all at once. This is done using JSON, which is what the table
(Tabulator in this case) speaks natively, so not much extra effort is required here.
For this simple interface, the settings page just allows for editing a few elements. The term 'collection' refers to the label applied to all the documents and is used as the default filename when exporting and also as the page title.
The Group and Name elements are used in the table on the left, which is sorted first by Group and then by Name. Internally, each document is assigned a GUID which is also used as the index for the table. This means you can have documents with the same name, for example, as the name is just there for display purposes.
Here's what the Settings page looks like after adding a new document.
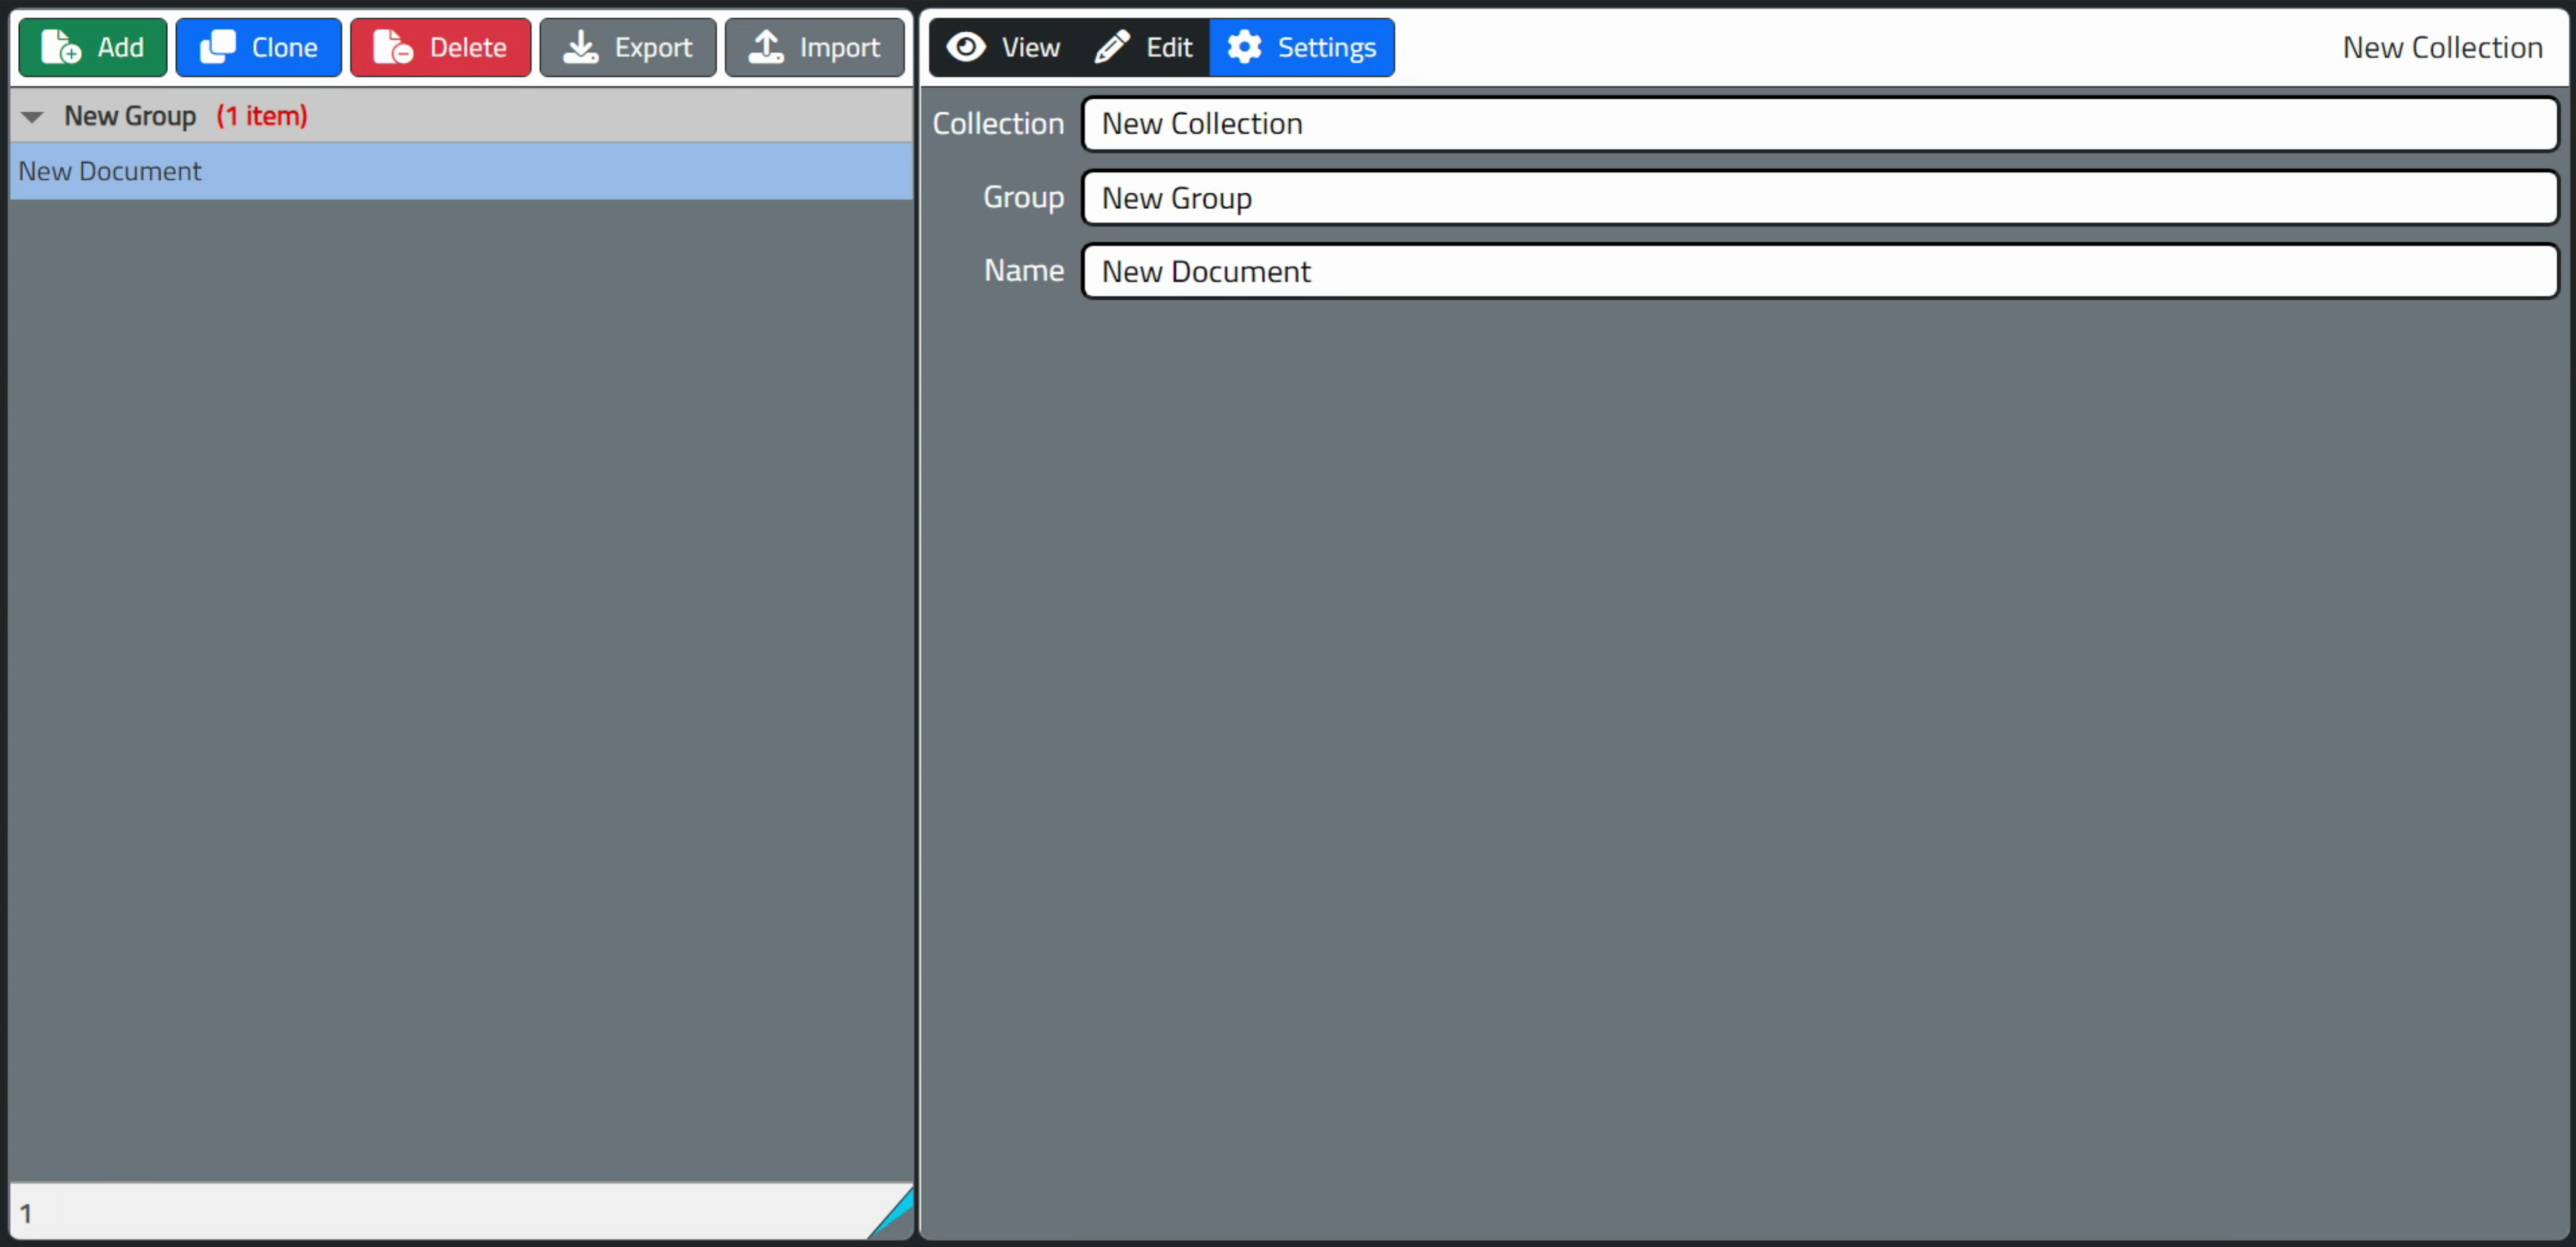
DocumentEditor: Settings.
Finally, the editing interface for the document is just SunEditor with some adjustments to the icon order
(moving the last block of icons to the beginning and changing the setup to use Font Awesome icons). From here,
document editing is just like with any other HTML editor. Images, tables, fonts, styles, and so on can be added as
needed.
In particular, images can be added either as links or by embedding the image directly in the document. In the latter case, it is converted to a Base64 PNG and just stored along with the rest of the HTML. This can be handy if you don't have an online copy of the image to reference, and no need to set up a host somewhere just for that. Less good if the same image is used over and over, however. Here's an example of the editing interface.
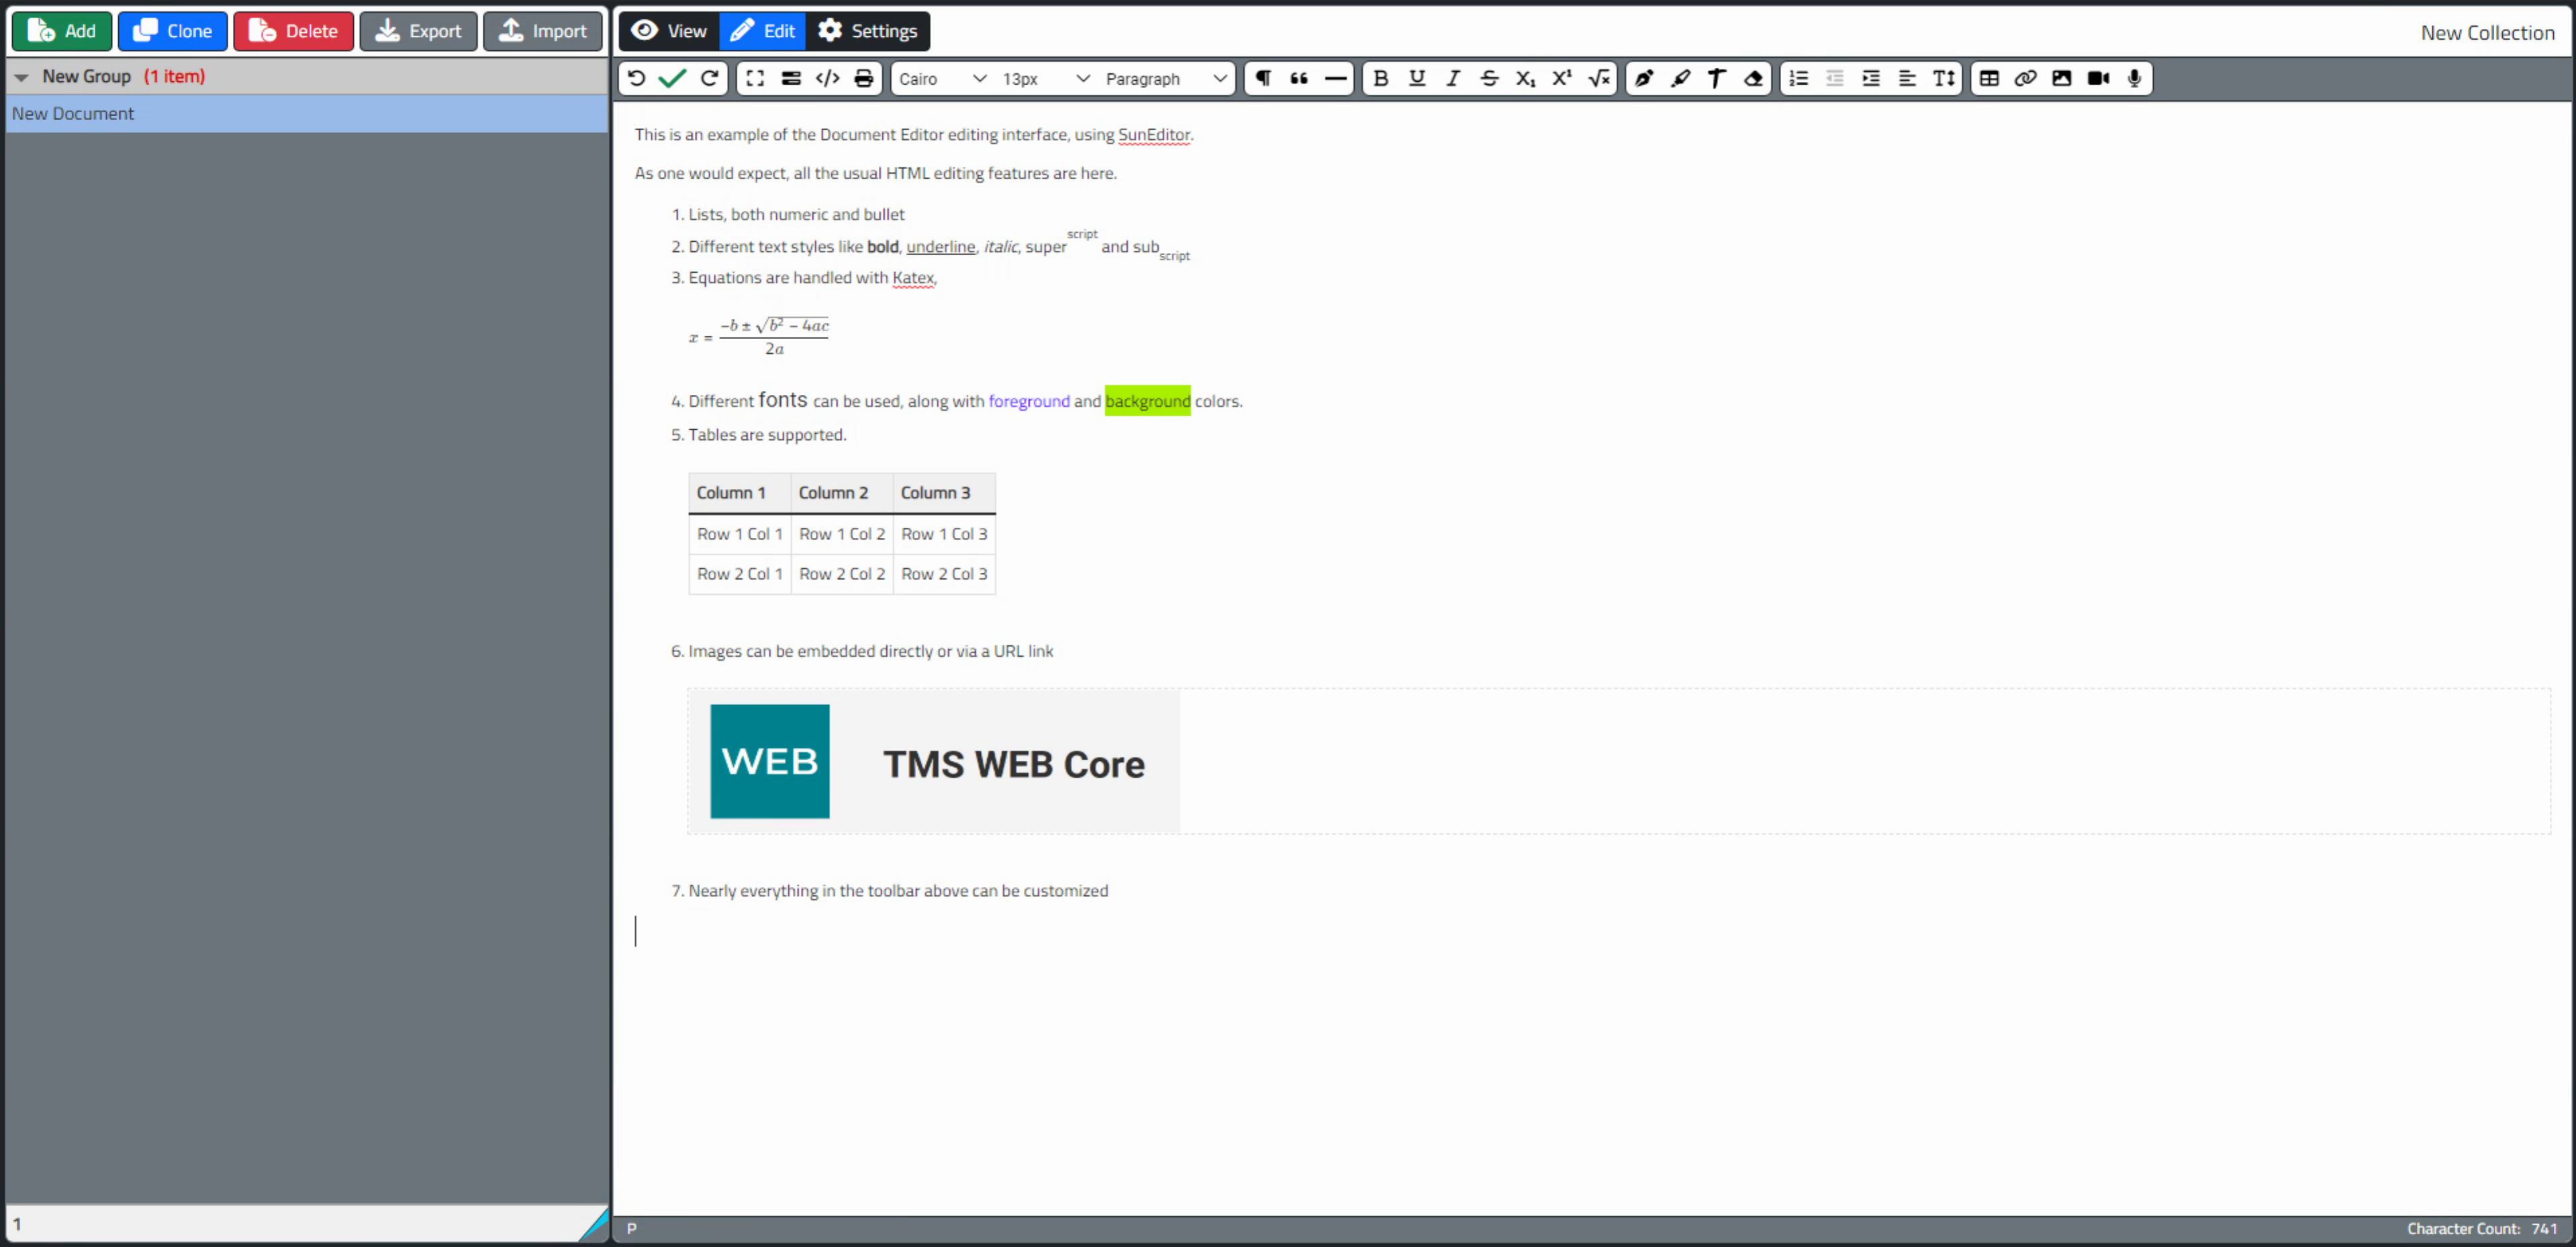
DocumentEditor: WYSIWYG HTML Editor.
Internally, whenever the HTML is saved (using the green check at the beginning of the toolbar between the undo/redo buttons), the content of
the editor (the underlying HTML itself) is stored in a hidden column in the table. Then the HTML is copied over
to the View page where it is displayed 'natively'. This is done (at the moment) just by adding the very same HTML
to the innerHTML property of the TWebHTMLDiv component on that page of the TWebPageControl component.
What, No Splitter?
When building this kind of interface, there is naturally a desire to have the user be able to adjust the relative sizes of the two sides of the application. Normally this would be handled by a TWebSplitter component, something we've used many times before.
In this example, we're doing something a little different. A simple approach might be to add a CSS rule (resize: horizontal) to any <div> that we wanted to resize. While this works pretty well, it has the effect of adding a rather unattractive set of diagonal lines to the corner of the control, and not something that is easily customized either, as it is browser-generated.
Instead, we're going to use InteractJS and
configure it to listen to a particular control. Then we can draw whatever control we like. I was going for a
bit of a "page curl" look with the above. But any number of designs would work well here. The main steps
to implement this include the following.
- Add InteractJS code to WebFormCreate and define class names to handle resizing.
- Add an element inside the component to be resized (the 'handle').
- Add CSS classes to the ElementClassName property of the resizable component and the handle.
- Add CSS code to further customize the design of the handle.
Here's what we've set up for InteractJS and the class names we'll be using.
  /////////////////////////////////////
  // InteractJS: https://interactjs.io
  /////////////////////////////////////
  asm
    interact('.RightSplitter')
      .resizable({
        edges: { right: '.ResizeElement' },
        listeners: {
          move (event) {
            var target = event.target;
            target.style.width = event.rect.width + 'px';
          }
        }
      });
  end;
In this case, the class 'RightSplitter' needs to be added to the ElementClassName of the component to be resized, and the class 'ResizeElement' needs to be added to the ElementClassName of the component that you're going to interact with to do the resizing. For that resizing component, there is a TWebHTMLDiv component added inside the outer <div> holding the table, with an ElementID of 'divDocumentSplitter' and with some <div> elements defined within it.
<div class="InnerTriangle1"></div>
<div class="InnerTriangle2"></div>
Then, in the CSS file, we've got the following.
/* CSS resize corners are terrible.  Let's create our own.
** We'll use these with Interact.js to make certain elements
** resizable as an alternative to using TWebSplitter controls */
.ResizeElement {
  position: absolute;
  bottom: -2px;
  right: -2px;
  width: 26px;
  height: 31px;
  background-color: var(--bs-dark);
  clip-path: polygon(100% 0%, 0% 100%, 100% 100%);
  z-index: 1;
}
.InnerTriangle1 {
  position: absolute;
  bottom: 0px;
  right: 0px;
  width: 25px;
  height: 30px;
  background-color: var(--bs-info);
  clip-path: polygon(100% 0%, 0% 100%, 100% 100%);
}
.InnerTriangle2 {
  position: absolute;
  bottom: 0px;
  right: 0px;
  width: 26px;
  height: 20px;
  background-color: var(--bs-secondary);
  clip-path: polygon(100% 0%, 0% 100%, 100% 100%);
}

/* Resizable components */
#divDocumentsHolder {
  min-width: 150px;
  max-width: 600px;
}
This draws all three triangles (an outer triangle and the two triangles within it) purely using CSS. The constraints for the component being resized (divDocumentsHolder) can also be set here. The cursor property of the divDocumentSplitter was set to 'crHSplit'.
With all that in place, it works as expected, even on mobile devices. If we had more elements that needed resizing, we could just copy/paste the divDocumentSplitter component into them, and add "RightSplitter" to their ElementClassName properties. The only update for the CSS would be if we wanted to add constraints to the other elements being resized.
And in case anyone is wondering, the layout of the handle component deliberately exceeds the boundaries of its parent. While not strictly necessary, it helps when checking things like overflow and also different browser zoom levels, which tend to mess up this kind of thing in all kinds of horrible ways. The main point here is that you can put this kind of control wherever you like, and style it however you like.
Additional Considerations.
Before we get into the highlighting libraries themselves, it would be helpful to cover a few additional items that we'll need to consider.
Most often, the code you want to highlight will just be contained in a simple <pre> tag on the page. The purpose of this type of element normally is to show "preformatted" text, meaning that whatever is between the tags should be left as-is. In particular, this generally means that spaces and line breaks are retained. Normally, HTML discards extra spaces and doesn't pay any attention to line breaks at all, so this is a helpful element to have.
For code specifically, it is also a common convention to wrap the text in an additional <code> tag. So something like <pre><code>console.log('Hello World!');</code></pre> might be a contender for the best way to construct the HTML for this kind of thing.
Generally speaking, the contents of a <pre> tag do not contain tags. The idea is that if you want to display HTML code, for example, the < and > part of the tags are converted to < and > to ensure that whatever is in the <pre> tag is not actually implemented as code in the page. Someone could add a <script> tag, for example, and potentially break the page or cause layout problems or any number of fairly serious security issues.
HTML editors like SunEditor and Summernote usually block or otherwise convert this kind of code, but still worth keeping an eye on. Maybe two. Naturally, <code> seems to be an exception to this. And we'll see shortly that <br> seems to be an exception as well.
Any occurrences of <pre> tags, and particularly <pre><code> tag pairs, would be good candidates for applying a syntax highlighter. The <pre><code> tag pair is in fact the default CSS selector expected for both HighlightJS and PrismJS. We're going to change that a little bit by only requiring a <pre> tag, but we'll get to those details in just a moment.
When JavaScript libraries have functions that alter HTML in some way, such as with syntax highlighting, but also with image handlers and many other kinds of functionality, they are generally configured to look for tags like these and then do their work on just those matching elements. This makes things very performant generally, and for pages containing just static HTML, this works pretty well.
In plenty of cases, though, the contents of the HTML page change over time. Elements may be added or removed from
the page that may need to have this extra work performed. Some libraries include support for tracking changes to
the HTML page (the DOM) and applying their functions as needed. Some don't do this or have the option of not
doing this. Whether this is important or not depends on when the contents of the page change.
A browser mechanism known as a "mutation observer" can be added to a page to track just this sort of thing. We covered this a bit when we looked at handling the lazy-loading of images in Tabulator using Vanilla Lazyload. This was needed because images in a row in the table aren't part of the DOM unless the row of the table is visible on-screen. So as you scroll through the table, images are added or removed from the DOM as the rows themselves are added or removed - referred to as a Virtual DOM. This means that any code that runs on those elements has to be run when the DOM changes and those elements become visible in the DOM.
In a TMS WEB Core application, similar situations arise when the contents of the underlying page change. In our example project, selecting a different document from the list loads it into the DOM, essentially, so any syntax highlighting will need to be applied at that time.
In our case, we're actually going to be showing more than one syntax highlighter at the same time, so we don't really want this automatic mechanism to be quite so automatic. Instead, we're going to apply our own CSS class to the underlying HTML to help ensure that the correct syntax highlighter is assigned.
You wouldn't normally use more than one syntax highlighter in a single project (although... see below), so it is a bit of a unique circumstance here. Most libraries make it rather easy to do this kind of thing (changing the CSS selector) so this isn't very complicated and works well here.
We'll get into the details in a moment, but the gist of what is happening here is that the syntax highlighting will be applied only when we want to apply it (not automatically) and we'll only be applying it to blocks that we specifically assign classes to, so as to not apply syntax highlighting by more than one library or to apply syntax highlighting more than once per block of code.
If you had static HTML, you could just load the syntax highlighter of choice, and assuming that the
<pre><code> convention was being used in the source HTML, nothing further would be required.
SunEditor and Specificity.
SunEditor, a WYSIWYG HTML editor, adds a bit of complexity to our situation. Like many HTML editors, including Summernote and others, SunEditor does its thing by being a bit deliberate about how it uses and applies classes and has plenty of its own CSS and HTML rules and functions to make things work as well as they do. The end result of this is that you end up having to use some of these CSS classes when displaying content that was created (or edited) with SunEditor.
In itself, this isn't a big deal as the CSS is already loaded anyway, and all we need to do is add a couple of classes to whatever <div> displays the HTML, and we're in business. Specifically, any HTML edited with SunEditor should subsequently be displayed in a <div> that has the "sun-editor" and "sun-editor-editable" classes, so as to have the same output as you see in the editor itself.
SunEditor and its kind also tend to make unannounced adjustments to the underlying HTML. For example, switching between "Code view" mode and the normal editing mode sometimes introduces changes, as SunEditor passes the HTML through its own filtering mechanism. This filtering is necessary to remove invalid or disallowed HTML tags (in case someone starts adding <script> tags to their content contributions), but it can also add CSS classes and make other changes that might not be expected normally, usually without changing the look of the document. This creates three problems for us.
First, the CSS that is used by SunEditor during the editing of a <pre> tag might not be all that helpful in our syntax highlighting case. So we'll need to add an extra class to the <pre> tag to tell SunEditor to leave it alone and not add anything to those blocks of code. We'll get to how we're going to do that in a moment. The idea here is that we want SunEditor to do SunEditor things to the rest of the document, but not do anything with the code that we want to highlight.
The end result of this is also that we're not going to apply highlighting to code while we're using SunEditor. This is more for our sanity, as having two (or more) JavaScript libraries actively trying to change the same block of HTML is super-annoying at best, and really infuriating the rest of the time!
Second, there appear to be some differences of opinion on how line breaks can be effectively represented in a <pre> tag. While we might expect a simple LF character (#10, $0A, or even \n) would be plenty sufficient, some are equally happy to add a <br> tag instead. This is kind of amusing when you consider that the <br> tag is, well, a tag inside of a <pre> element and this is generally ill-advised.
Also, any actual HTML within a <pre> tag needs to be properly escaped for things to not go completely sideways, making the presence of <br> tags all the more curious. SunEditor handles this pretty well all on its own, going the route of replacing LF characters with <br> tags. Previous versions of HighlightJS apparently were quite fine with <br> tags but the latest version decidedly is not. So we'll need to persuade it to be a little more accommodating. The same goes for PrismJS.
Third, because the SunEditor classes are being applied to our final documents, even outside of the SunEditor editor page (while looking at them on the View page, for example) we have a problem of specificity, where some of the CSS rules from the SunEditor classes override the some of the rules from the CSS classes added by the syntax highlighters. This seems to be an issue more with HighlightJS than with PrismJS, but something to be mindful of either way. To get around that, we'll add some extra CSS a bit later, adding some overrides to replace the SunEditor values with the values from the syntax highlighter theme.
To get everyone to play nice together, we can of course just be very direct about who can change what, and we do this by assigning specific new classes. In SunEditor, we can change the list of formats to include items that are specifically targeting a particular syntax highlighter, and even apply whatever language classes we want when that format is selected, solving several problems all at once.
And for extra credit, we can also change the formatting of the menu item used to select the highlighter to mimic what the corresponding syntax highlighter generates, somewhat. For our two highlighters in this project, we'll need to add the following to the SunEditor initialization code. There are already quite a number of SunEditor options, all set in our WebFormCreate method, so this isn't particularly problematic.
Also, we can see here one of the first major differences between HighlightJS and PrismJS. HighlightJS will
automatically detect the language, whereas PrismJS will not. So for PrismJS, we have to add an entry for each
language we'd like to include. We've got a shorthand representation of the language here (l-xxx instead of
language-xxx). This is because one of the libraries (PrismJS) defines a bunch of CSS rules based only on the
presence of a "language-xxx" class. This is kind of annoying, to be honest, but to work around it, we just use a
different class name and then change it later.
      formats: ['p','div','blockquote','pre','h1','h2','h3','h4','h5','h6',
        { tag: 'pre', // Tag name
          name: 'HighlightJS',
          command: 'replace',
          class: 'se-code-language HLJS'
        },
        { tag: 'pre', // Tag name
          name: 'PrismJS-Delphi',
          command: 'replace',
          class: 'se-code-language PRISM l-delphi'
        },
        { tag: 'pre', // Tag name
          name: 'PrismJS-JS',
          command: 'replace',
          class: 'se-code-language PRISM l-js'
        },
        { tag: 'pre', // Tag name
          name: 'PrismJS-HTML',
          command: 'replace',
          class: 'se-code-language PRISM l-html'
        },
        { tag: 'pre', // Tag name
          name: 'PrismJS-CSS',
          command: 'replace',
          class: 'se-code-language PRISM l-css'
        },
        { tag: 'pre', // Tag name
          name: 'PrismJS-JSON',
          command: 'replace',
          class: 'se-code-language PRISM l-json'
        }
      ]
Here, the list of original formats is left as-is in the first line. You can pare those down if you're not using them all. The new formats include the "se-code-language" class which is what tells SunEditor to not include its own classes in <pre> tags. We've added ''HLJS" or "PRISM" as a class, just to be unambiguous and so that we can add CSS overrides later, as well as to be able to find those elements destined for syntax highlighting.
Now, when we highlight a block of text and select one of these items, it wraps the text in a <pre> tag with the classes shown. Alternatively (perhaps preferably) we can position the cursor on a blank line and select one of these options, and then paste code into it. Here's what the menu looks like now.
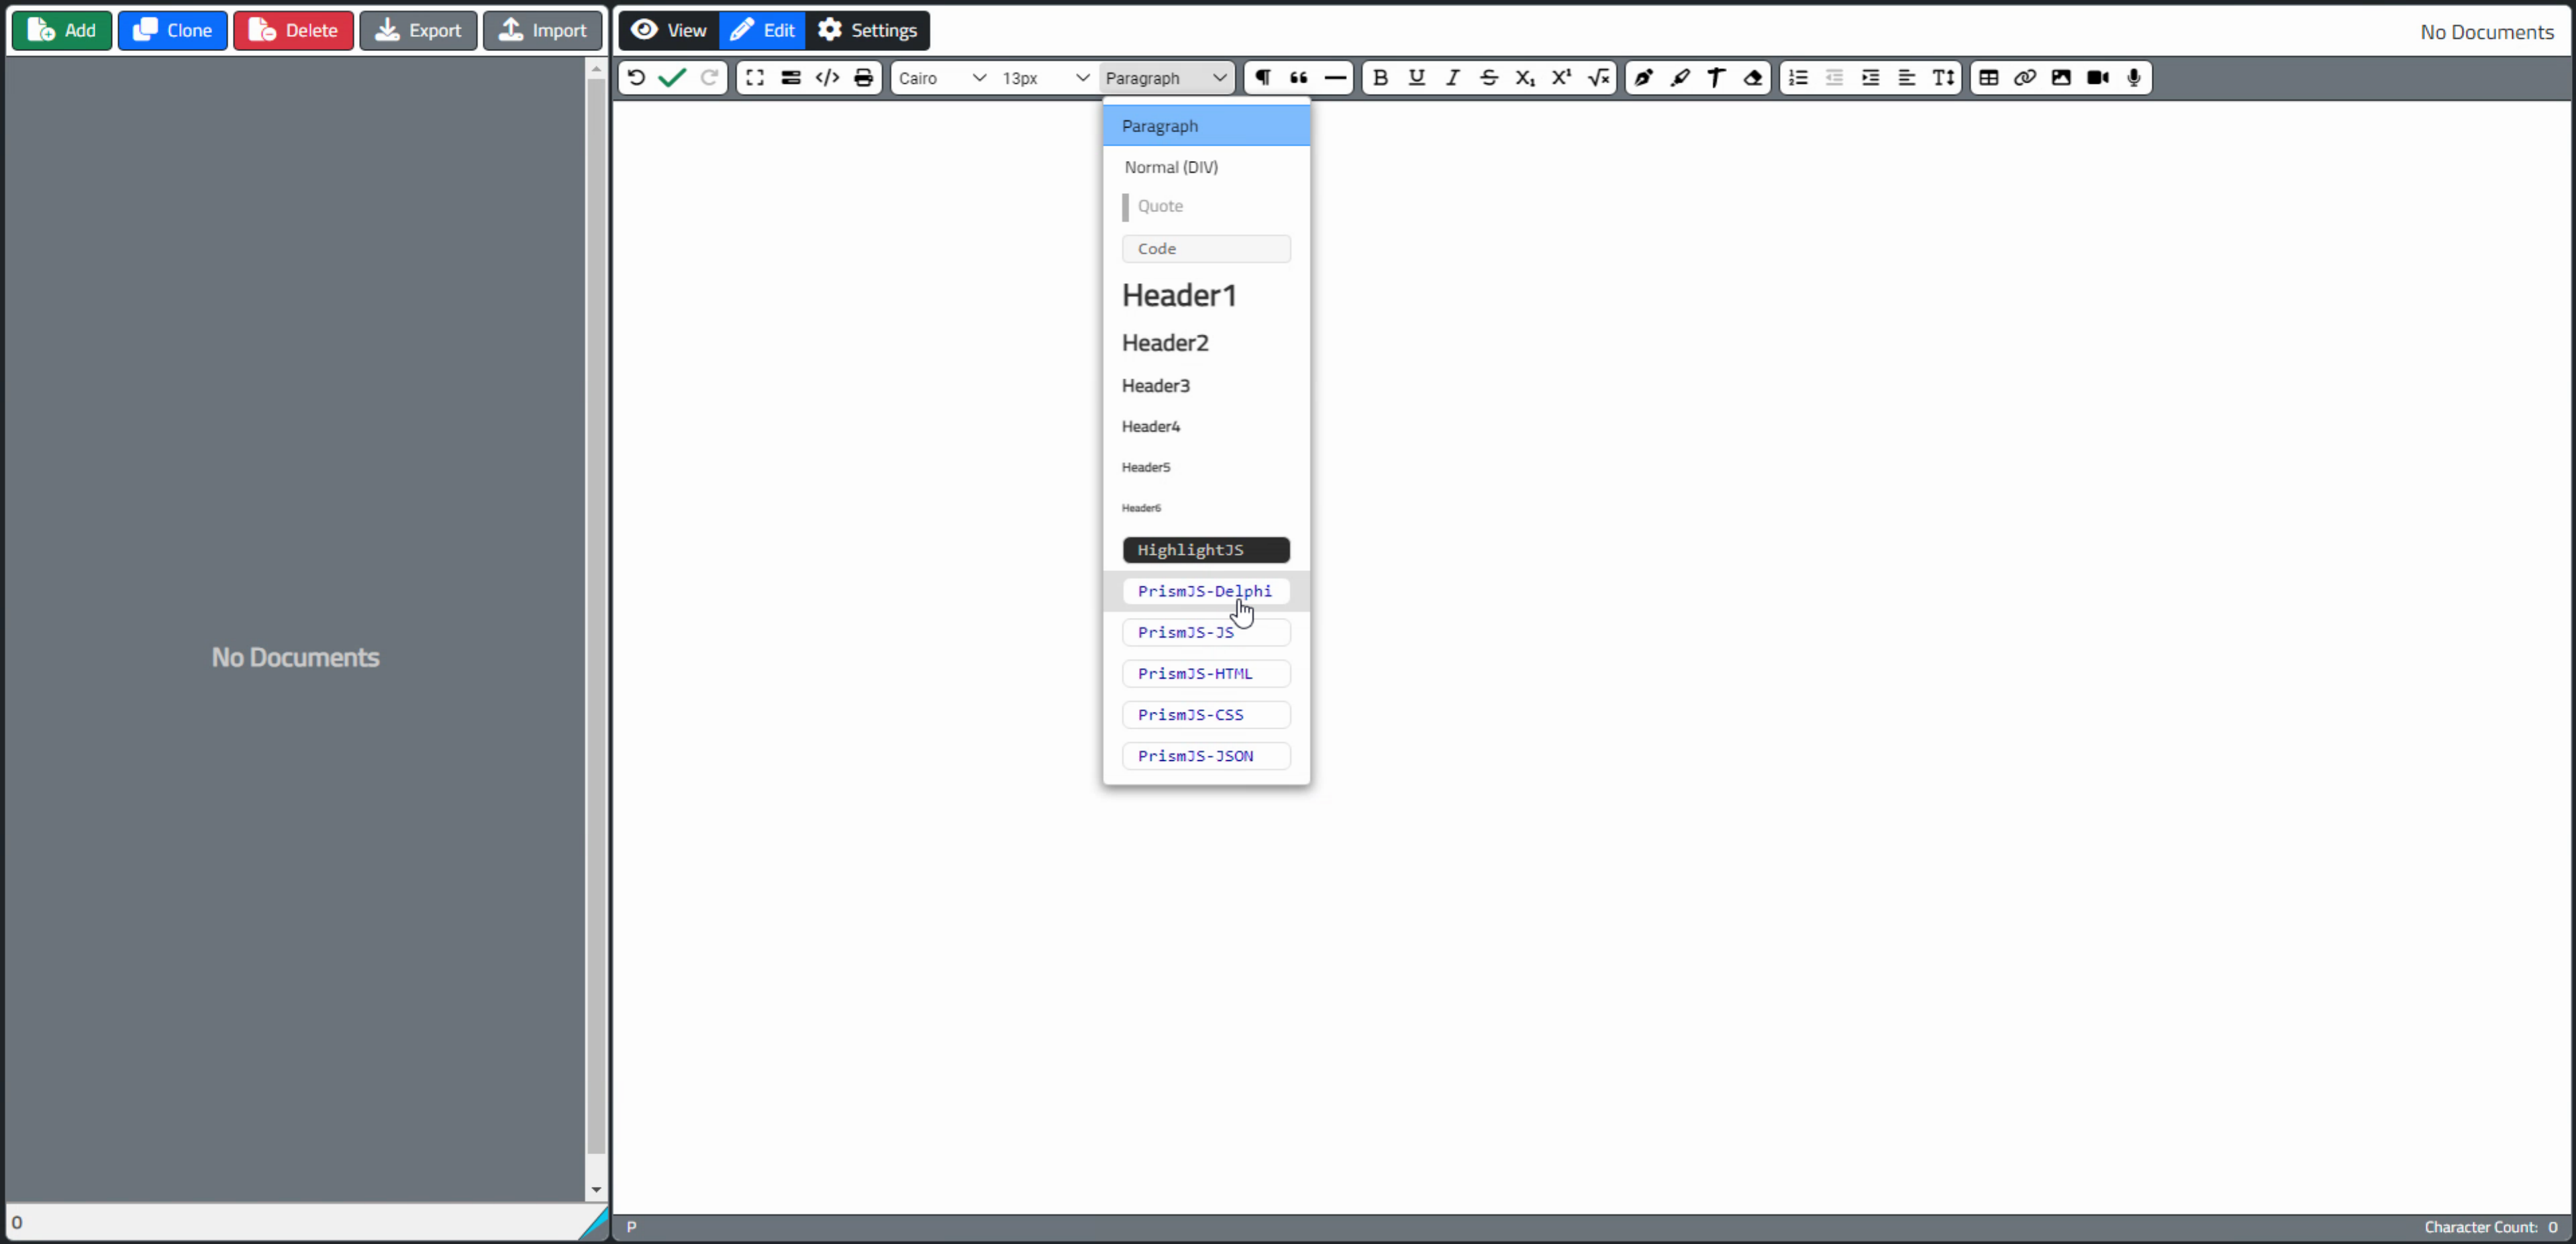
Updated List of Formats.
The styling for the menu items is set via CSS which we'll see a bit later. Really, we're just setting the color and background to be reminiscent of the particular syntax highlighter theme, but this can all be adjusted however you like.
HighlightJS.
The first library we're going to look at is HighlightJS. It currently supports 197 languages and 248 styles, which you can browse here. It is available from many CDNs, or it can be downloaded and added to your project directly. Here's what they suggest if you want to use JSDelivr as the CDN, for example.
<link rel="stylesheet" href="https://cdn.jsdelivr.net/gh/highlightjs/cdn-release@11.7.0/build/styles/default.min.css">
<script src="https://cdn.jsdelivr.net/gh/highlightjs/cdn-release@11.7.0/build/highlight.min.js"></script>
The default build includes quite a few languages, but not Delphi/Pascal. If you need another language that is supported but not included by default, there are a couple of options. First, there is a tool on the HighlightJS website's download page that can be used to build a particular set of languages into one package. The second option, which we are going to be using here, is to just add a link to the language as another CDN request, like this.
<script src="https://cdn.jsdelivr.net/gh/highlightjs/cdn-release@11.7.0/build/languages/delphi.min.js"></script>
Themes work the same way. The default theme is indicated in the link above, but any of the other themes can be enabled by replacing that with another link to the appropriate CSS file. So many to choose from! Let's give this one a try.
<link rel="stylesheet" href="https://cdn.jsdelivr.net/gh/highlightjs/cdn-release@11.7.0/build/styles/base16/eighties.min.css">
As far as the CSS overrides we were talking about, here's what we've got going on there.
/* This is needed by HighlightJS to preserve line breaks in <pre> blocks */
#divViewer > pre.HLJS {
  white-space: pre !important;
  color: #d3d0c8 !important;
  background: #2d2d2d !important;
  border-radius: var(--bs-border-radius) !important;
  padding: 8px;
}
button > pre.HLJS {
  color: #d3d0c8 !important;
  background: #2d2d2d !important;
  border-radius: var(--bs-border-radius) !important;
}
/* hide the stuff that is added by the PrismJS CSS classes */
pre.HLJS[class*=language-]:after, pre.HLJS[class*=language-]:before {
  display: none;
}
The CSS related to the button tag is what is used for the SunEditor format menu item. The last section, as the comment indicates, blocks a bit of the CSS added by PrismJS. This is the CSS bit related to the display of the left and right bottom shadows in the PrismJS theme we're using, but we'll get to that in a bit. The background and color in the first section are taken from the theme we've chosen, and would likely have to be updated if we changed the HighlightJS theme to something else.
Alright. So all that is left then is to tell the HighlightJS library that we want to add syntax highlighting to something. Normally this will only be visible on the View page, so when we update that page, we'll also run the HighlightJS syntax highlighting function.
      // Apply HighlightJS Styling if any HLJS selectors are found
      hljs.configure({ ignoreUnescapedHTML: true });
      divViewer.querySelectorAll('.HLJS').forEach((el) => {
        el.classList.replace('l-delphi','language-delphi');
        el.classList.replace('l-js','language-js');
        el.classList.replace('l-html','language-html');
        el.classList.replace('l-css','language-css');
        el.classList.replace('l-json','language-json');
        el.textContent = el.innerText;
        hljs.highlightElement(el);
      });
This looks for our HLJS tag, and then ultimately runs the hljs.highlightElement() function against it. Before we do that though, there are three other things going on here.
First, the "ignoreUnescapedHTML" is needed because it detects those <br> tags and other things that may or may not have been added by SunEditor (despite our efforts to the contrary), and issues all kinds of warnings. This turns those warnings off. Which can be a potential security risk. You can read about that here. If SunEditor is doing a proper job, then it will have escaped the HTML in the <pre> tags anyway, even while inserting <br> tags of its own.
Second, while HighlightJS can do automatic language detection, it isn't perfect. One of the examples provided was detected as Perl, for example. So here we'll look and see if a language was specified, and if it was, we'll convert it to something that HighlightJS understands.
We do this first by adding, for example, l-delphi as a class to the <pre> tag in SunEditor, using Code view. The tag should already be set up with a class containing "HLJS" and "sun-editor-code-language" so not too troublesome. Then, we replace that tag with 'language-delphi' which is what HighlightJS is expecting. Recall that we're doing this little two-step so that the language-xxx class doesn't appear until we need it here. Otherwise, some of this CSS styling seeps into SunEditor.
Third, there's that little replacement of el.textContent = el.innerText. This is the final ingredient that helps
us deal with line breaks. Kind of strange that this works, but this is far from the strangest thing we'll be encountering on this particular adventure. When all is said and done, we see this in the SunEditor interface:

Delphi Code without Syntax Highlighting.
Then, after highlighting the text, selecting the HighlightJS format, saving the document, and switching to the
View tab, we see this:
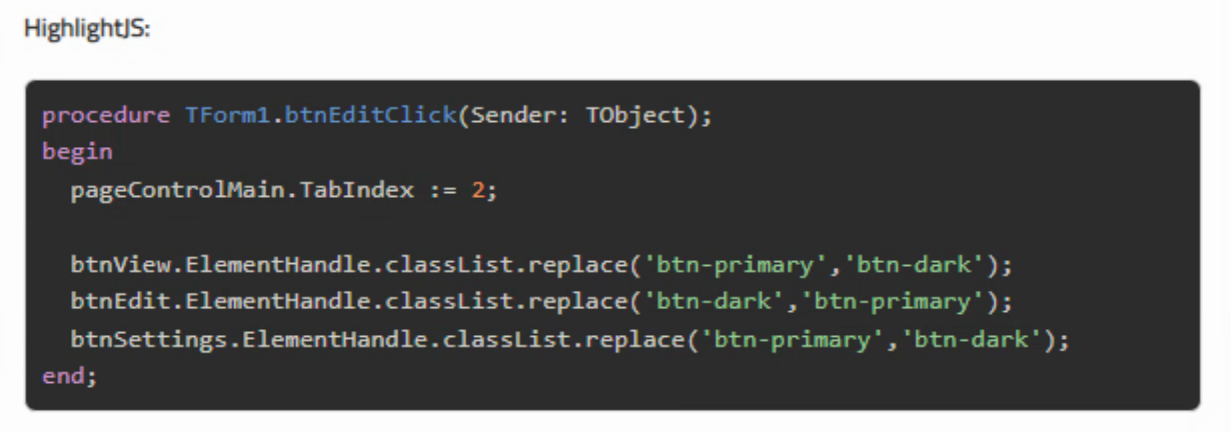
Delphi Code with HighlightJS/Eighties Theme.
Which is the end goal we're after. But that's a lot of steps to follow if we change something and want to see what it looks like. Perhaps without saving the document first. SunEditor has a "preview" function which we can use
to see the highlighting before it is saved, and without having to switch views. The catch is that it doesn't know
about HighlightJS any more than SunEditor does. We can fix that, though, but adjusting the "previewTemplate'
property to include the same JavaScript code that we use when we display the HTML on the View tab.
Kinda
tricky, but it works. Note that we're adding a "preview" function to a "WYSIWYG" editor - not ideal, obviously. This is also done in the same section of WebFormCreate where we adjusted the formats. This is exactly the kind of HTML you do NOT want users adding to their documents.
      previewTemplate: '<div id="suneditorPreview" class="sun-editor sun-editor-editable" style="width:auto; max-width:1080px; background:white; margin:auto;">{{contents}}</div>'+
        '<script src="https://cdn.jsdelivr.net/gh/highlightjs/cdn-release@11.7.0/build/highlight.min.js"></script>'+
        '<script src="https://cdn.jsdelivr.net/gh/highlightjs/cdn-release@11.7.0/build/languages/delphi.min.js"></script>'+
        '<script>'+
           'hljs.configure({ ignoreUnescapedHTML: true });'+
           'document.querySelectorAll(".HLJS").forEach((el) => {'+
             'el.classList.replace("l-delphi","language-delphi");'+
             'el.classList.replace("l-js","language-js");'+
             'el.classList.replace("l-html","language-html");'+
             'el.classList.replace("l-css","language-css");'+
             'el.classList.replace("l-json","language-json");'+
             'el.textContent = el.innerText;'+
             'hljs.highlightElement(el);'+
           '});'+
        '</script>'
And with that, we've got the HighlightJS syntax highlighting working well. Note that the above doesn't work quite as well for SunEditor's print function, but you can print from the preview page, so that will suffice for the moment. We'll add a proper print function before we're done.
PrismJS.
As we indicated earlier, the main difference that comes up first between these two libraries is that PrismJS doesn't do automatic language detection. So we added languages explicitly to handle this. Getting PrismJS into our TMS WEB Core project involves the same sorts of things as we had to deal with for HighlightJS. A JavaScript library loaded from a CDN, a CSS link for a theme, and then additional JavaScript libraries for languages, with a few more lines than usual because not as many languages are loaded automatically. Here's what we've got to start with.
    <!-- PrimsJS -->
    <script src="https://cdn.jsdelivr.net/npm/prismjs@1.29.0/prism.min.js" data-manual></script>
    <script src="https://cdn.jsdelivr.net/npm/prismjs@1.29.0/components/prism-css.min.js"></script>
    <script src="https://cdn.jsdelivr.net/npm/prismjs@1.29.0/components/prism-json.min.js"></script>
    <script src="https://cdn.jsdelivr.net/npm/prismjs@1.29.0/components/prism-markup.min.js"></script>
    <script src="https://cdn.jsdelivr.net/npm/prismjs@1.29.0/components/prism-pascal.min.js"></script>
    <link rel="stylesheet" href="https://cdn.jsdelivr.net/npm/prismjs@1.29.0/themes/prism-coy.min.css">
The theme is "coy" in this case. Note also that the first line includes an extra "data-manual" attribute which is intended to ensure that PrismJS doesn't automatically apply its syntax highlighting everywhere. We've got a bunch of languages loaded up here, enough to cover the five we care about most (Delphi/Pascal, JavaScript, HTML, CSS, and JSON). HighlightJS uses "delphi", PrismJS uses "pascal". And PrismJS uses "markup" as a grouping for HTML and other languages.
From here, we've got the same CSS issue to deal with, where we need to ensure PrismJS specificity with respect to its CSS and that of SunEditor's CSS. It fares a bit better though, so all we need is the following.
/* This is needed by PrismJS to preserve line breaks in <pre> blocks */
#divViewer > pre.PRISM {
  white-space: pre !important;
  overflow: visible;
}
button > pre.PRISM {
  color: blue !important;
  background: white !important;
  border-radius: var(--bs-border-radius) !important;
}
And again, we've got a bit of CSS to style the format menu items. Nothing too fancy. Then, the only thing left is the code to call PrismJS on our HTML when it is added to the View tab. This is a little more involved than we had with HighlightJS as PrismJS seemingly requires this <pre><code> pairing, and also requires that the language-xxx is included in both tags. Seems to work that way anyway, and removing either causes problems, but this may be more related to the chosen theme and might not be so troublesome with other themes.
As our original document HTML only has a <pre> tag and no corresponding <code> tag, and as we'd like to not modify that original HTML other than by adding
<pre> classes, we've got a bit more work to do - essentially just creating the <pre><code>
structure on the fly. There are many ways to do this, and no doubt some that are less painful than this, but what
we've got seems to be working, so not something to be overly concerned about. Here's what we've got.
      // Apply PrimsJS styling if any are found
      divViewer.querySelectorAll('.PRISM').forEach((el) => {

        var elpre = document.createElement('pre');
        var elcode = document.createElement('code');

        // Prism doesn't do automatic language detection :(
        if (el.classList.contains('l-delphi')) {
          elpre.classList.add('language-pascal', 'PRISM');
          elcode.classList.add('language-pascal');
        }
        else if (el.classList.contains('l-js')) {
          elpre.classList.add('language-js', 'PRISM');
          elcode.classList.add('language-js');
        }
        else if (el.classList.contains('l-html')) {
          elpre.classList.add('language-html', 'PRISM');
          elcode.classList.add('language-html');
        }
        else if (el.classList.contains('l-css')) {
          elpre.classList.add('language-css', 'PRISM');
          elcode.classList.add('language-css');
        }
        else if (el.classList.contains('l-json')) {
          elpre.classList.add('language-json', 'PRISM');
          elcode.classList.add('language-json');
        }

        elcode.innerHTML = el.innerHTML;
        elpre.innerHTML = elcode.outerHTML;
        el.outerHTML = elpre.outerHTML;

        Prism.hooks.add("before-highlight", function (env) {
          env.element.innerHTML = env.element.innerHTML.replace(/<br>/g, '\n');
          env.code = env.element.innerText;
        });
      });

      divViewer.querySelectorAll('.PRISM').forEach((el) => {
        Prism.highlightElement(el.firstElementChild);
      });
So what is all this about then? Here's a bit of a breakdown of what it is doing.
- First, we find all the classes tagged with 'PRISM'. These should all be <pre> tags.
- For each of these, we create a new <pre><code>content</code></pre> block.
- Check for one of the expected languages and then add that class and the PRISM class to the new <pre> tag.
- Add the same language class to the <code> tag as well.
- Build the new HTML using the contents of the original block.
- Assign the new HTML to replace the existing HTML
- Deal with the same issues with <br> inside of <pre> tags.
- Call PrismJS highlightElement() function to do its thing.
The end result is that, as before, we go from unformatted code like this:
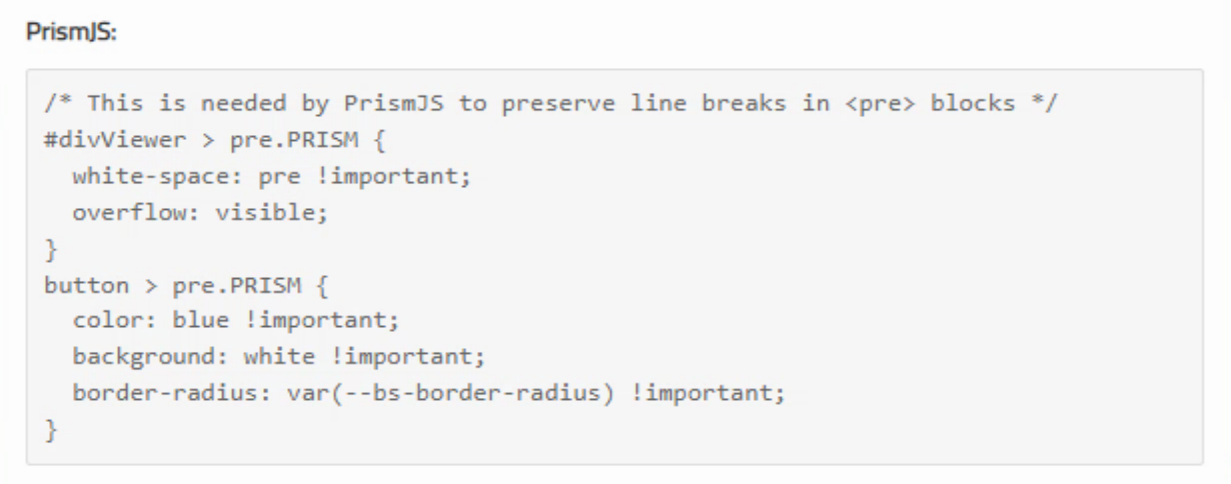
CSS Code Without Syntax Highlighting.
To nicely formatted and themed code like this:
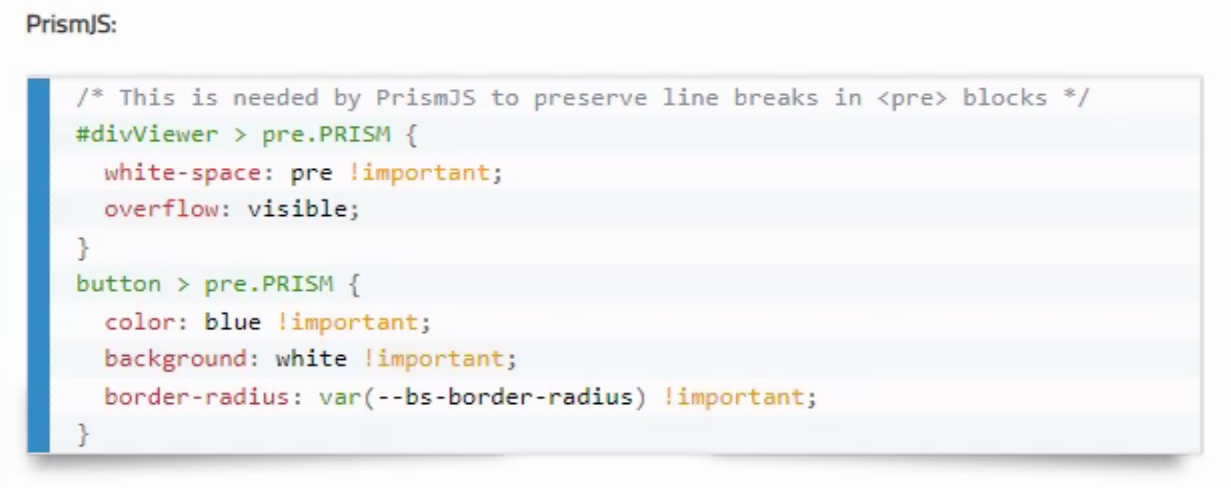
CSS Code with PrismJS/Coy Theme.
Pretty fancy! The shadows at the bottom are created using ::before and ::after CSS pseudo-elements linked to the <code> element, which is part of the reason it is required. It is also a rule based on the presence of a language-xxx class, so we had to add something to the HighlightJS CSS to suppress this in that scenario. But this means that we can use both HighlightJS and PrismJS at the same time.
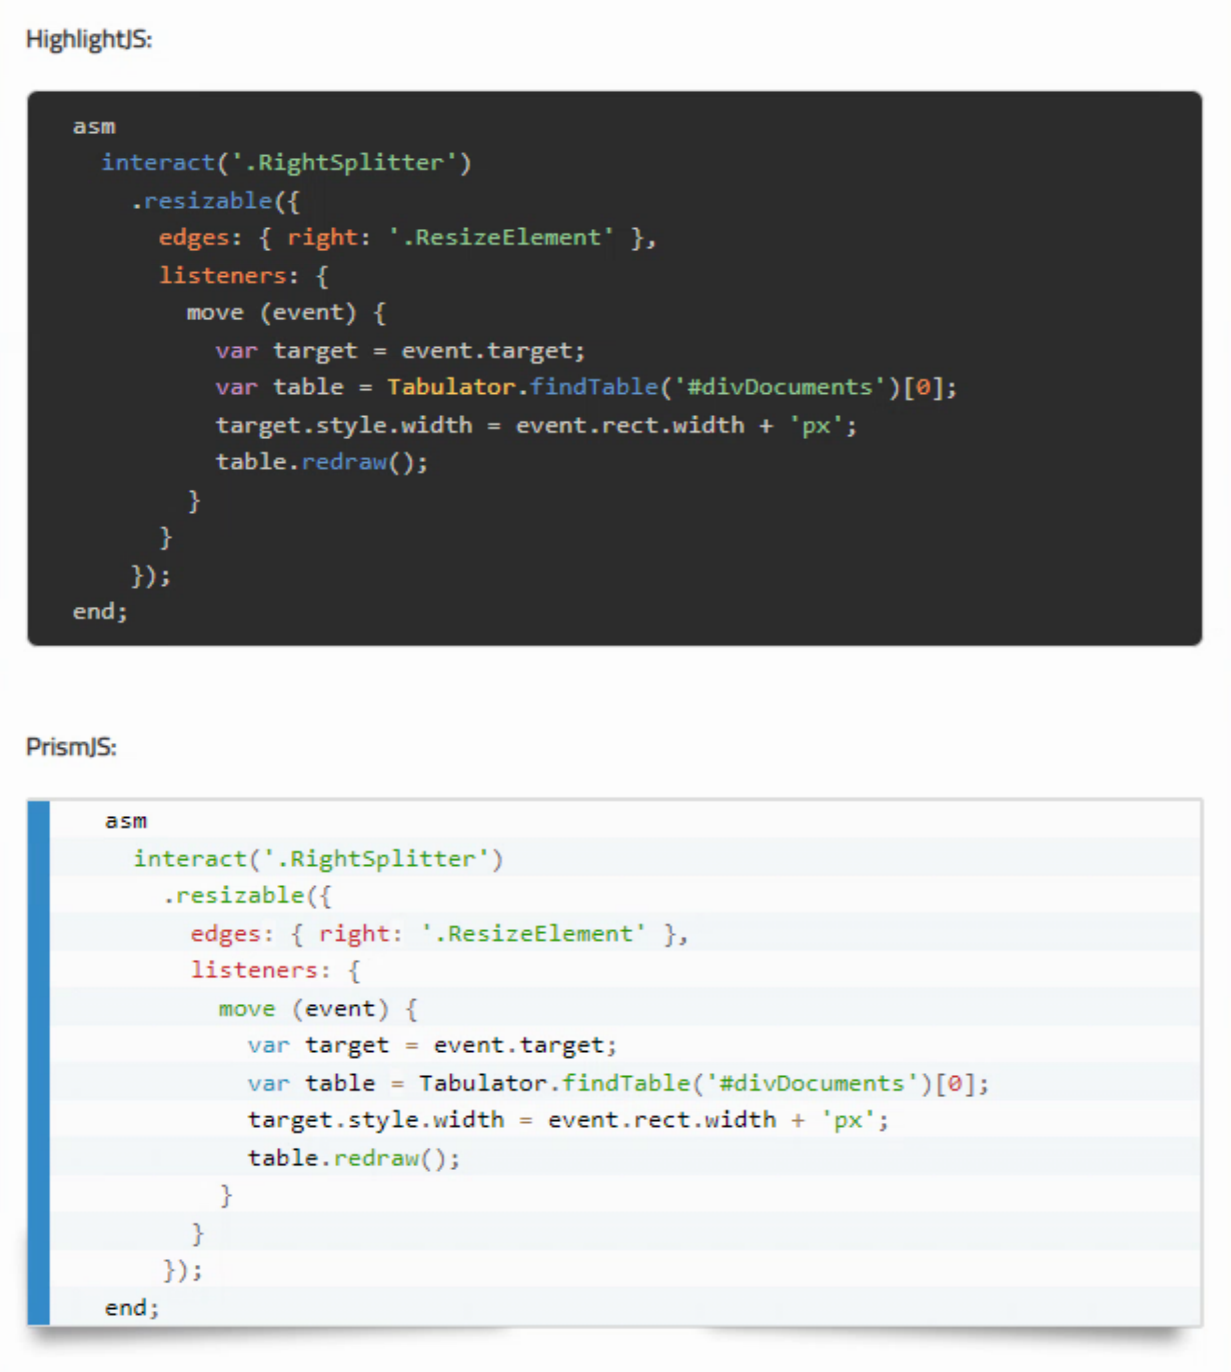
JavaScript Code Using HighlightJS and PrismJS In One Document.
We also have to update the previewTemplate we were working with previously to use the same code again for rendering PrismJS syntax highlighting, just as we did for HighlightJS. Kind of a mess, but here we are.
      previewTemplate: '<div id="suneditorPreview" class="sun-editor sun-editor-editable" style="width:auto; max-width:1080px; background:white; margin:auto;">{{contents}}</div>'+
        '<script src="https://cdn.jsdelivr.net/gh/highlightjs/cdn-release@11.7.0/build/highlight.min.js"></script>'+
        '<script src="https://cdn.jsdelivr.net/gh/highlightjs/cdn-release@11.7.0/build/languages/delphi.min.js"></script>'+
        '<script src="https://cdn.jsdelivr.net/npm/prismjs@1.29.0/prism.min.js" data-manual></script>'+
        '<script src="https://cdn.jsdelivr.net/npm/prismjs@1.29.0/components/prism-css.min.js"></script>'+
        '<script src="https://cdn.jsdelivr.net/npm/prismjs@1.29.0/components/prism-json.min.js"></script>'+
        '<script src="https://cdn.jsdelivr.net/npm/prismjs@1.29.0/components/prism-markup.min.js"></script>'+
        '<script src="https://cdn.jsdelivr.net/npm/prismjs@1.29.0/components/prism-pascal.min.js"></script>'+
        '<link rel="stylesheet" href="https://cdn.jsdelivr.net/npm/prismjs@1.29.0/themes/prism-coy.min.css">'+
        '<script>'+
           'hljs.configure({ ignoreUnescapedHTML: true });'+
           'document.querySelectorAll(".HLJS").forEach((el) => {'+
             'el.classList.replace("l-delphi","language-delphi");'+
             'el.classList.replace("l-js","language-js");'+
             'el.classList.replace("l-html","language-html");'+
             'el.classList.replace("l-css","language-css");'+
             'el.classList.replace("l-json","language-json");'+
             'el.textContent = el.innerText;'+
             'hljs.highlightElement(el);'+
           '});'+
           'document.querySelectorAll(".PRISM").forEach((el) => {'+
              'var elpre = document.createElement("pre");'+
              'var elcode = document.createElement("code");'+
              'if (el.classList.contains("l-delphi")) {'+
                'elpre.classList.add("language-pascal", "PRISM");'+
                'elcode.classList.add("language-pascal");'+
              '}'+
              'else if (el.classList.contains("l-js")) {'+
                'elpre.classList.add("language-js", "PRISM");'+
                'elcode.classList.add("language-js");'+
              '}'+
              'else if (el.classList.contains("l-html")) {'+
                'elpre.classList.add("language-html", "PRISM");'+
                'elcode.classList.add("language-html");'+
              '}'+
              'else if (el.classList.contains("l-css")) {'+
                'elpre.classList.add("language-css", "PRISM");'+
                'elcode.classList.add("language-css");'+
              '}'+
              'else if (el.classList.contains("l-json")) {'+
                'elpre.classList.add("language-json", "PRISM");'+
                'elcode.classList.add("language-json");'+
              '}'+
              'elcode.innerHTML = el.innerHTML;'+
              'elpre.innerHTML = elcode.outerHTML;'+
              'el.outerHTML = elpre.outerHTML;'+
              'Prism.hooks.add("before-highlight", function (env) {'+
                'env.element.innerHTML = env.element.innerHTML.replace(/<br>/g, "\\n");'+
                'env.code = env.element.innerText;'+
              '});'+
            '});'+
            'document.querySelectorAll(".PRISM").forEach((el) => {'+
              'Prism.highlightElement(el.firstElementChild);'+
            '});'+
        '</script>'
Not winning any awards for that kind of arrangement, but it works just fine. Note that there were a few minor
tweaks from the code. Specifically, we need to add the JavaScript libraries explicitly here again, as the
SunEditor preview mechanism leaves them out. And instead of limiting our search to the divViewer component, it is
instead searching 'document' but as this is the only thing in the document, it works the same way. Also, fun with
quotation marks and character escaping. Particularly that new line character near the end.
But Wait, There's More!
While PrismJS doesn't do automatic language detection, it more than makes up for it with something else - a plugin system that adds dozens of features. You can view the list of plugins here. Just for fun, we're going to add several.
- Line Numbers - Add CSS+JS, then add 'line-numbers' class to <pre> tags.
- Match Braces - Add CSS+JS, then add 'match-braces' and 'rainbow-braces' classes to <pre> tags.
- Toolbar - Add CSS+JS, needed to display the buttons defined below.
- Copy to Clipboard Button - Add JS, set the attribute for button text.
- Autolinker - Add CSS+JS, then see below.
And just because this is so much fun, we can even define our own custom button. This is used as an example on
the PrismJS website for the Toolbar plugin - a 'Select Code' button. Added to the end of WebFormCreate.
  // Custom PrismJS Button!
  asm
    Prism.plugins.toolbar.registerButton('select-code', function(env) {
      var button = document.createElement('button');
      button.innerHTML = 'Select All';
      button.addEventListener('click', function () {
        // Source: http://stackoverflow.com/a/11128179/2757940
        if (document.body.createTextRange) { // ms
          var range = document.body.createTextRange();
          range.moveToElementText(env.element);
          range.select();
        } else if (window.getSelection) { // moz, opera, webkit
          var selection = window.getSelection();
          var range = document.createRange();
          range.selectNodeContents(env.element);
          selection.removeAllRanges();
          selection.addRange(range);
        }
      });
      return button;
    });
  end;
And because we're particular about this kind of thing, we can even change the order of the buttons by adding an
attribute to the <pre> tag. Note that HTML attributes are not the same thing as CSS classes. And while we're at it, we can add
other attributes, one to change the label on the Copy to Clipboard button to include the language, and one to
ensure that if someone clicks on a link, it opens in a new tab. Here it is in its final form.
      // Apply PrimsJS styling if any are found
      divViewer.querySelectorAll('.PRISM').forEach((el) => {

        var elpre = document.createElement('pre');
        var elcode = document.createElement('code');
        var language = '';
        var fileext = '';

        // Prism doesn't do automatic language detection :(
        if (el.classList.contains('l-delphi')) {
          language = 'language-pascal';
          fileext = 'pas';
        }
        else if (el.classList.contains('l-js')) {
          language = 'language-js';
          fileext = 'js';
        }
        else if (el.classList.contains('l-html')) {
          language = 'language-html';
          fileext = 'html';
        }
        else if (el.classList.contains('l-css')) {
          language = 'language-css';
          fileext = 'css';
        }
        else if (el.classList.contains('l-json')) {
          language = 'language-json';
          fileext = 'json';
        }

        elpre.classList.add(language, 'PRISM', 'line-numbers', 'match-braces', 'rainbow-braces');
        elpre.setAttribute('data-toolbar-order', 'select-code,copy-to-clipboard');
        elpre.setAttribute('data-prismjs-copy','Copy '+fileext.toUpperCase()+' to Clipboard');
        elcode.classList.add(language);

        elcode.innerHTML = el.innerHTML;
        elpre.innerHTML = elcode.outerHTML;
        el.outerHTML = elpre.outerHTML;

        Prism.hooks.add("before-highlight", function (env) {
          env.element.innerHTML = env.element.innerHTML.replace(/<br>/g, '\n');
          env.code = env.element.innerText;
        });
      });

      divViewer.querySelectorAll('.PRISM').forEach((el) => {
        Prism.highlightElement(el.firstElementChild);
      });

      divViewer.querySelectorAll('.url-link').forEach((el) => {
        el.setAttribute('target','_blank');
      });
And here's what it looks like. Note that the buttons and the links are only highlighted during mouse hover.
Probably something that could be changed for the benefit of those editing documents without a mouse (aka
mobile). Line numbering and matching brackets (specifically rainbow brackets) could also be added to the
previewTemplate if desired, using the same approach we used previously.
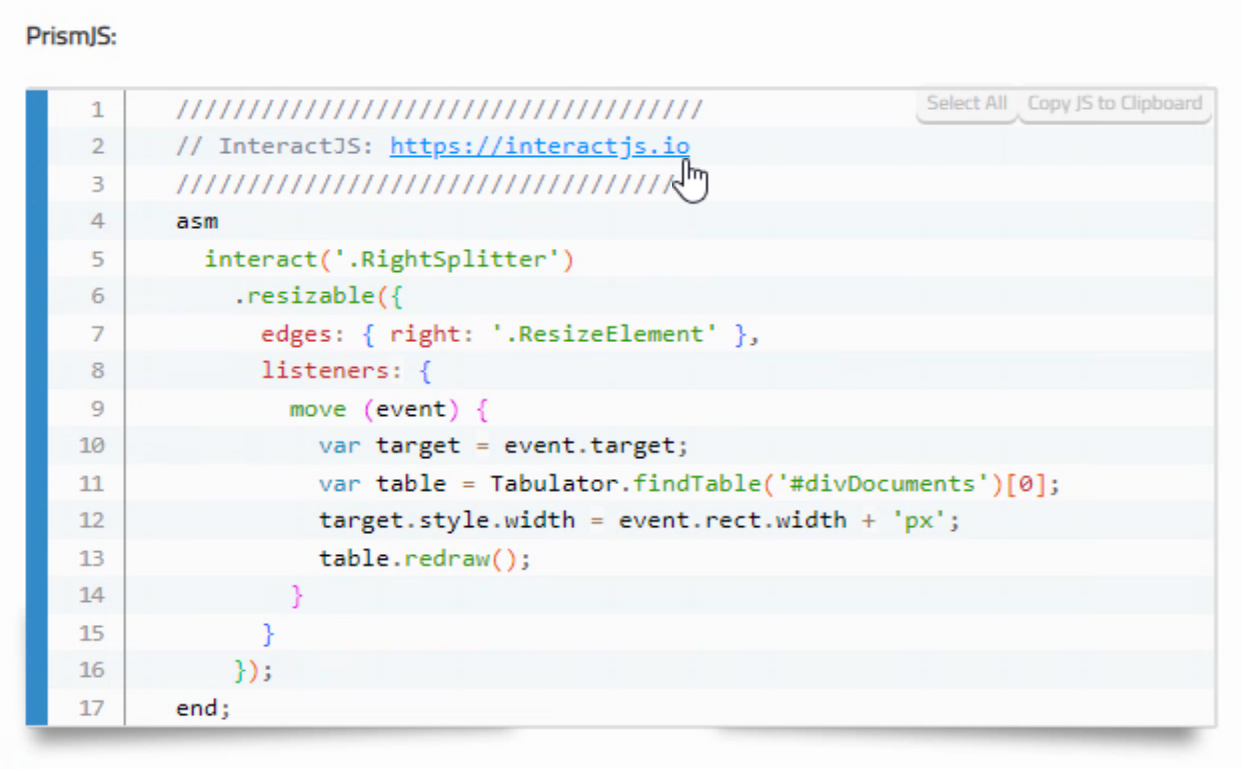
PrismJS with Assorted Plugins Loaded.
Additional CSS could also be used to further customize the buttons or anything else beyond what is handled with
the theme.
JSON Syntax Highlighting + Pretty Print.
While JSON syntax highlighting is supported by both HighlightJS and PrismJS, we've got to do a bit more work if
we also want it to be pretty printed, meaning not just a stream of (syntax-highlighted) characters. Fortunately, JavaScript itself has the means to do this, using JSON.Stringify. We'll have to strip out the
<br> tags, and have a bit of fault tolerance, displaying the JSON as-entered if the attempt to run it
through JSON.parse/JSON.stringify fails. Here's the HighlightJS code. All we're really doing is stripping out
<br> tags, converting the string to JSON, and then back to a string again, just with more spaces and line feeds.
        if (el.classList.contains('language-json')) {
          try {
            el.innerHTML = JSON.stringify(JSON.parse(el.innerHTML.replace(/(<br\s*\/?\s*>\s*)+$/,'')),null,2);
          }
          catch {
          }
        }
The 2 at the end of the line indicates how many spaces to use for indentation. The regex mess is intended to seek out and eliminate any variation of <br> or <br /> or close relatives. Here's an example of some
JSON:
[{"id":"1","type":"country","name":"Canada","provinces":["British Columbia","Alberta"]}]
When passed through the above code and then handed over to HighlightJS and PrismJS, we get the following.
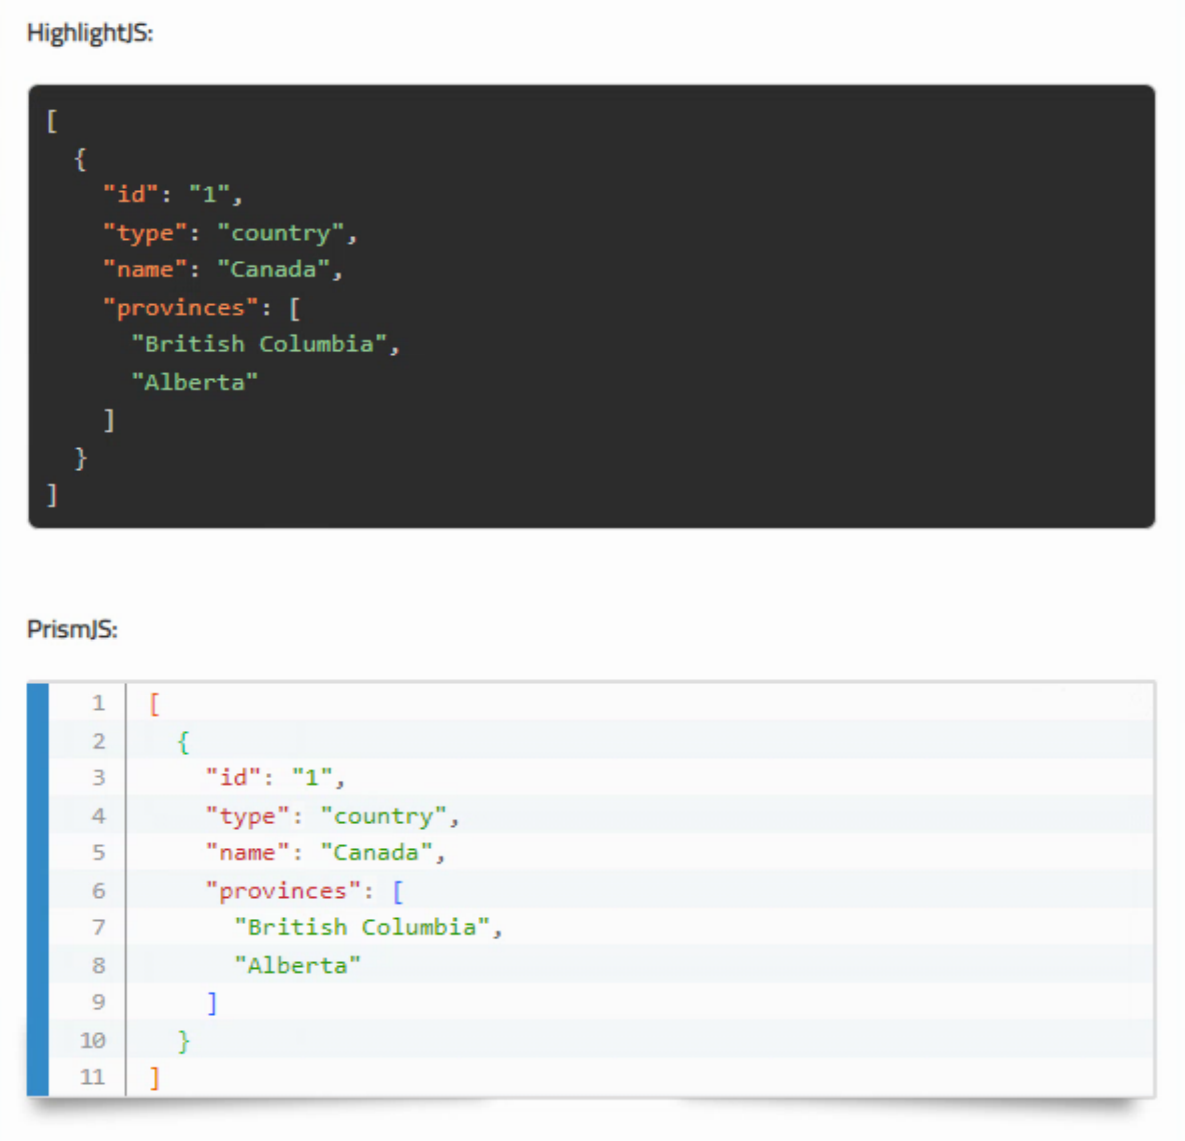
JSON Code with Syntax Highlighting and Prettified.
This same JSON conversion code also again needs to be added to the previewTemplate. Note that in the JSON case, we need to
explicitly set the language for HighlightJS as we're doing this processing before it has had a chance to do its
automatic language detection, and we're using the language to check if it is JSON.
Another format menu item
could be added for this specific language/syntax highlighter pairing to help make this a little easier. Also, as we're just passing the
contents of the <pre> tag directly to JSON.parse, there shouldn't be anything other than <br> tags
(inserted by SunEditor, not really avoidable) in the JSON, and it must be valid JSON or that step will
simply be skipped and you'll end up with a potentially syntax-highlighted JSON without linebreaks or indentation. Note that extraneous white space in JSON is technically not valid JSON.
Printing.
One would think that by 2022, handling something like printing a web page, or part of a web page, wouldn't be
such a troublesome thing. Yet here we are. There are a few ways to tackle the problem. Google will lead you
to some methods that are hilariously out of touch with modern web applications. For example, make a copy
of the current document's body.innerHTML and then replace it with whatever you want to print. When you're done,
put the original contents back. Sounds pretty simple, but there are a lot of things going on in a modern web
page that this completely breaks. Funny, though! If you try it with a TMS WEB Core application, you end up with a bit of a zombie application where everything looks fine, but nothing actually works.
Ultimately, we've already got a bit of a peek into what is needed when we looked at the SunEditor
previewTemplate issue. The general gist of printing a specific <div> on a page is to create a new window (essentially a new HTML page), populate it with the contents of the <div> you want to print, and print that page. Sounds easy
enough, but as you're creating a new page, it will need to load up all of the CSS and JavaScript needed to
render that <div> on the page in the same way that it was on the original page. Kind of ugly, but here we have it.
procedure TForm1.btnPrintClick(Sender: TObject);
begin
asm
var PageTitle = 'Document';
var table = this.tabDocuments;
var rows = table.getSelectedRows();
var divContents = '';;
if (rows.length > 0) {
PageTitle = rows[0].getCell('doc_collection').getValue()+' / '+rows[0].getCell('doc_group').getValue()+' / '+rows[0].getCell('doc_name').getValue();
divContents = rows[0].getCell('doc').getValue();
}
var a = window.open(' ', '', '');
a.document.write('<html>');
a.document.write('<title>'+PageTitle+'</title>');
a.document.write('<link crossorigin="anonymous" href="https://cdn.jsdelivr.net/npm/bootstrap@5.2.1/dist/css/bootstrap.min.css" integrity="sha384-iYQeCzEYFbKjA/T2uDLTpkwGzCiq6soy8tYaI1GyVh/UjpbCx/TYkiZhlZB6+fzT" rel="stylesheet"/>');
a.document.write('<link href="https://cdn.jsdelivr.net/npm/@fortawesome/fontawesome-free@6/css/all.min.css" rel="stylesheet"/>');
a.document.write('<link href="https://fonts.googleapis.com" rel="preconnect"/>');
a.document.write('<link crossorigin href="https://fonts.gstatic.com" rel="preconnect"/>');
a.document.write('<link href="https://fonts.googleapis.com/css2?family=Roboto&family=Cairo&family=Roboto+Condensed&display=swap" rel="stylesheet"/>');
a.document.write('<link href="https://cdn.jsdelivr.net/npm/tabulator-tables@5/dist/css/tabulator.min.css" rel="stylesheet"/>');
a.document.write('<link href="https://cdn.jsdelivr.net/npm/codemirror@5.49.0/lib/codemirror.min.css" rel="stylesheet"/>');
a.document.write('<link href="https://cdn.jsdelivr.net/npm/katex@0.11.1/dist/katex.min.css" rel="stylesheet"/>');
a.document.write('<link href="https://cdn.jsdelivr.net/npm/suneditor@latest/dist/css/suneditor.min.css" rel="stylesheet"/>');
a.document.write('<link rel="stylesheet" href="https://cdn.jsdelivr.net/gh/highlightjs/cdn-release@11.7.0/build/styles/base16/eighties.min.css">');
a.document.write('<script src="https://cdn.jsdelivr.net/gh/highlightjs/cdn-release@11.7.0/build/highlight.min.js"></script>');
a.document.write('<script src="https://cdn.jsdelivr.net/gh/highlightjs/cdn-release@11.7.0/build/languages/delphi.min.js"></script>');
a.document.write('<script src="https://cdn.jsdelivr.net/npm/prismjs@1.29.0/prism.min.js" data-manual></script>');
a.document.write('<script src="https://cdn.jsdelivr.net/npm/prismjs@1.29.0/components/prism-css.min.js"></script>');
a.document.write('<script src="https://cdn.jsdelivr.net/npm/prismjs@1.29.0/components/prism-json.min.js"></script>');
a.document.write('<script src="https://cdn.jsdelivr.net/npm/prismjs@1.29.0/components/prism-markup.min.js"></script>');
a.document.write('<script src="https://cdn.jsdelivr.net/npm/prismjs@1.29.0/components/prism-pascal.min.js"></script>');
a.document.write('<link rel="stylesheet" href="https://cdn.jsdelivr.net/npm/prismjs@1.29.0/themes/prism-coy.min.css">');
a.document.write('<script src="https://cdn.jsdelivr.net/npm/prismjs@1.29.0/plugins/line-numbers/prism-line-numbers.min.js"></script>');
a.document.write('<script src="https://cdn.jsdelivr.net/npm/prismjs@1.29.0/plugins/match-braces/prism-match-braces.min.js"></script>');
a.document.write('<link rel="stylesheet" href="https://cdn.jsdelivr.net/npm/prismjs@1.29.0/plugins/line-numbers/prism-line-numbers.min.css">');
a.document.write('<link rel="stylesheet" href="https://cdn.jsdelivr.net/npm/prismjs@1.29.0/plugins/match-braces/prism-match-braces.min.css">');
a.document.write('<link href="editor.css" rel="stylesheet"/>');
a.document.write('<body>');
a.document.write(
'<div id="suneditorPrint" class="sun-editor line-numbers sun-editor-editable" style="width:auto; max-width:720px; background:white; margin:auto;">'+divContents+'</div>'+
'<script>'+
'hljs.configure({ ignoreUnescapedHTML: true });'+
'document.querySelectorAll(".HLJS").forEach((el) => {'+
'el.classList.replace("l-delphi","language-delphi");'+
'el.classList.replace("l-js","language-js");'+
'el.classList.replace("l-html","language-html");'+
'el.classList.replace("l-css","language-css");'+
'el.classList.replace("l-json","language-json");'+
'if (el.classList.contains("language-json")) {'+
'try {'+
'el.innerHTML = JSON.stringify(JSON.parse(el.innerHTML.replace(/(<br\s*\\/?\\s*>\\s*)+$/,"")),null,2);'+
'} catch {}}'+
'el.textContent = el.innerText;'+
'hljs.highlightElement(el);'+
'});'+
'document.querySelectorAll(".PRISM").forEach((el) => {'+
'var elpre = document.createElement("pre");'+
'var elcode = document.createElement("code");'+
'if (el.classList.contains("l-delphi")) {'+
'elpre.classList.add("language-pascal", "PRISM");'+
'elcode.classList.add("language-pascal");'+
'}'+
'else if (el.classList.contains("l-js")) {'+
'elpre.classList.add("language-js", "PRISM");'+
'elcode.classList.add("language-js");'+
'}'+
'else if (el.classList.contains("l-html")) {'+
'elpre.classList.add("language-html", "PRISM");'+
'elcode.classList.add("language-html");'+
'}'+
'else if (el.classList.contains("l-css")) {'+
'elpre.classList.add("language-css", "PRISM");'+
'elcode.classList.add("language-css");'+
'}'+
'else if (el.classList.contains("l-json")) {'+
'elpre.classList.add("language-json", "PRISM");'+
'elcode.classList.add("language-json");'+
'}'+
'if (elcode.classList.contains("language-json")) {'+
'try {'+
'elcode.innerHTML = JSON.stringify(JSON.parse(el.innerHTML.replace(/(<br\\s*\\/?\\s*>\\s*)+$/,"")),null,2);'+
'}'+
'catch {'+
'elcode.innerHTML = el.innerHTML;'+
'}'+
'}'+
'else {'+
'elcode.innerHTML = el.innerHTML;'+
'}'+
'elpre.innerHTML = elcode.outerHTML;'+
'el.outerHTML = elpre.outerHTML;'+
'Prism.hooks.add("before-highlight", function (env) {'+
'env.element.innerHTML = env.element.innerHTML.replace(/<br>/g, "\\n");'+
'env.code = env.element.innerText;'+
'});'+
'});'+
'document.querySelectorAll(".PRISM").forEach((el) => {'+
'Prism.highlightElement(el.firstElementChild);'+
'});'+
'print();'+
'window.close();'+
'</script>');
a.document.write('</body>');
a.document.write('</html>');
a.document.close();
end;
end;And just like that, a fully operational print function.
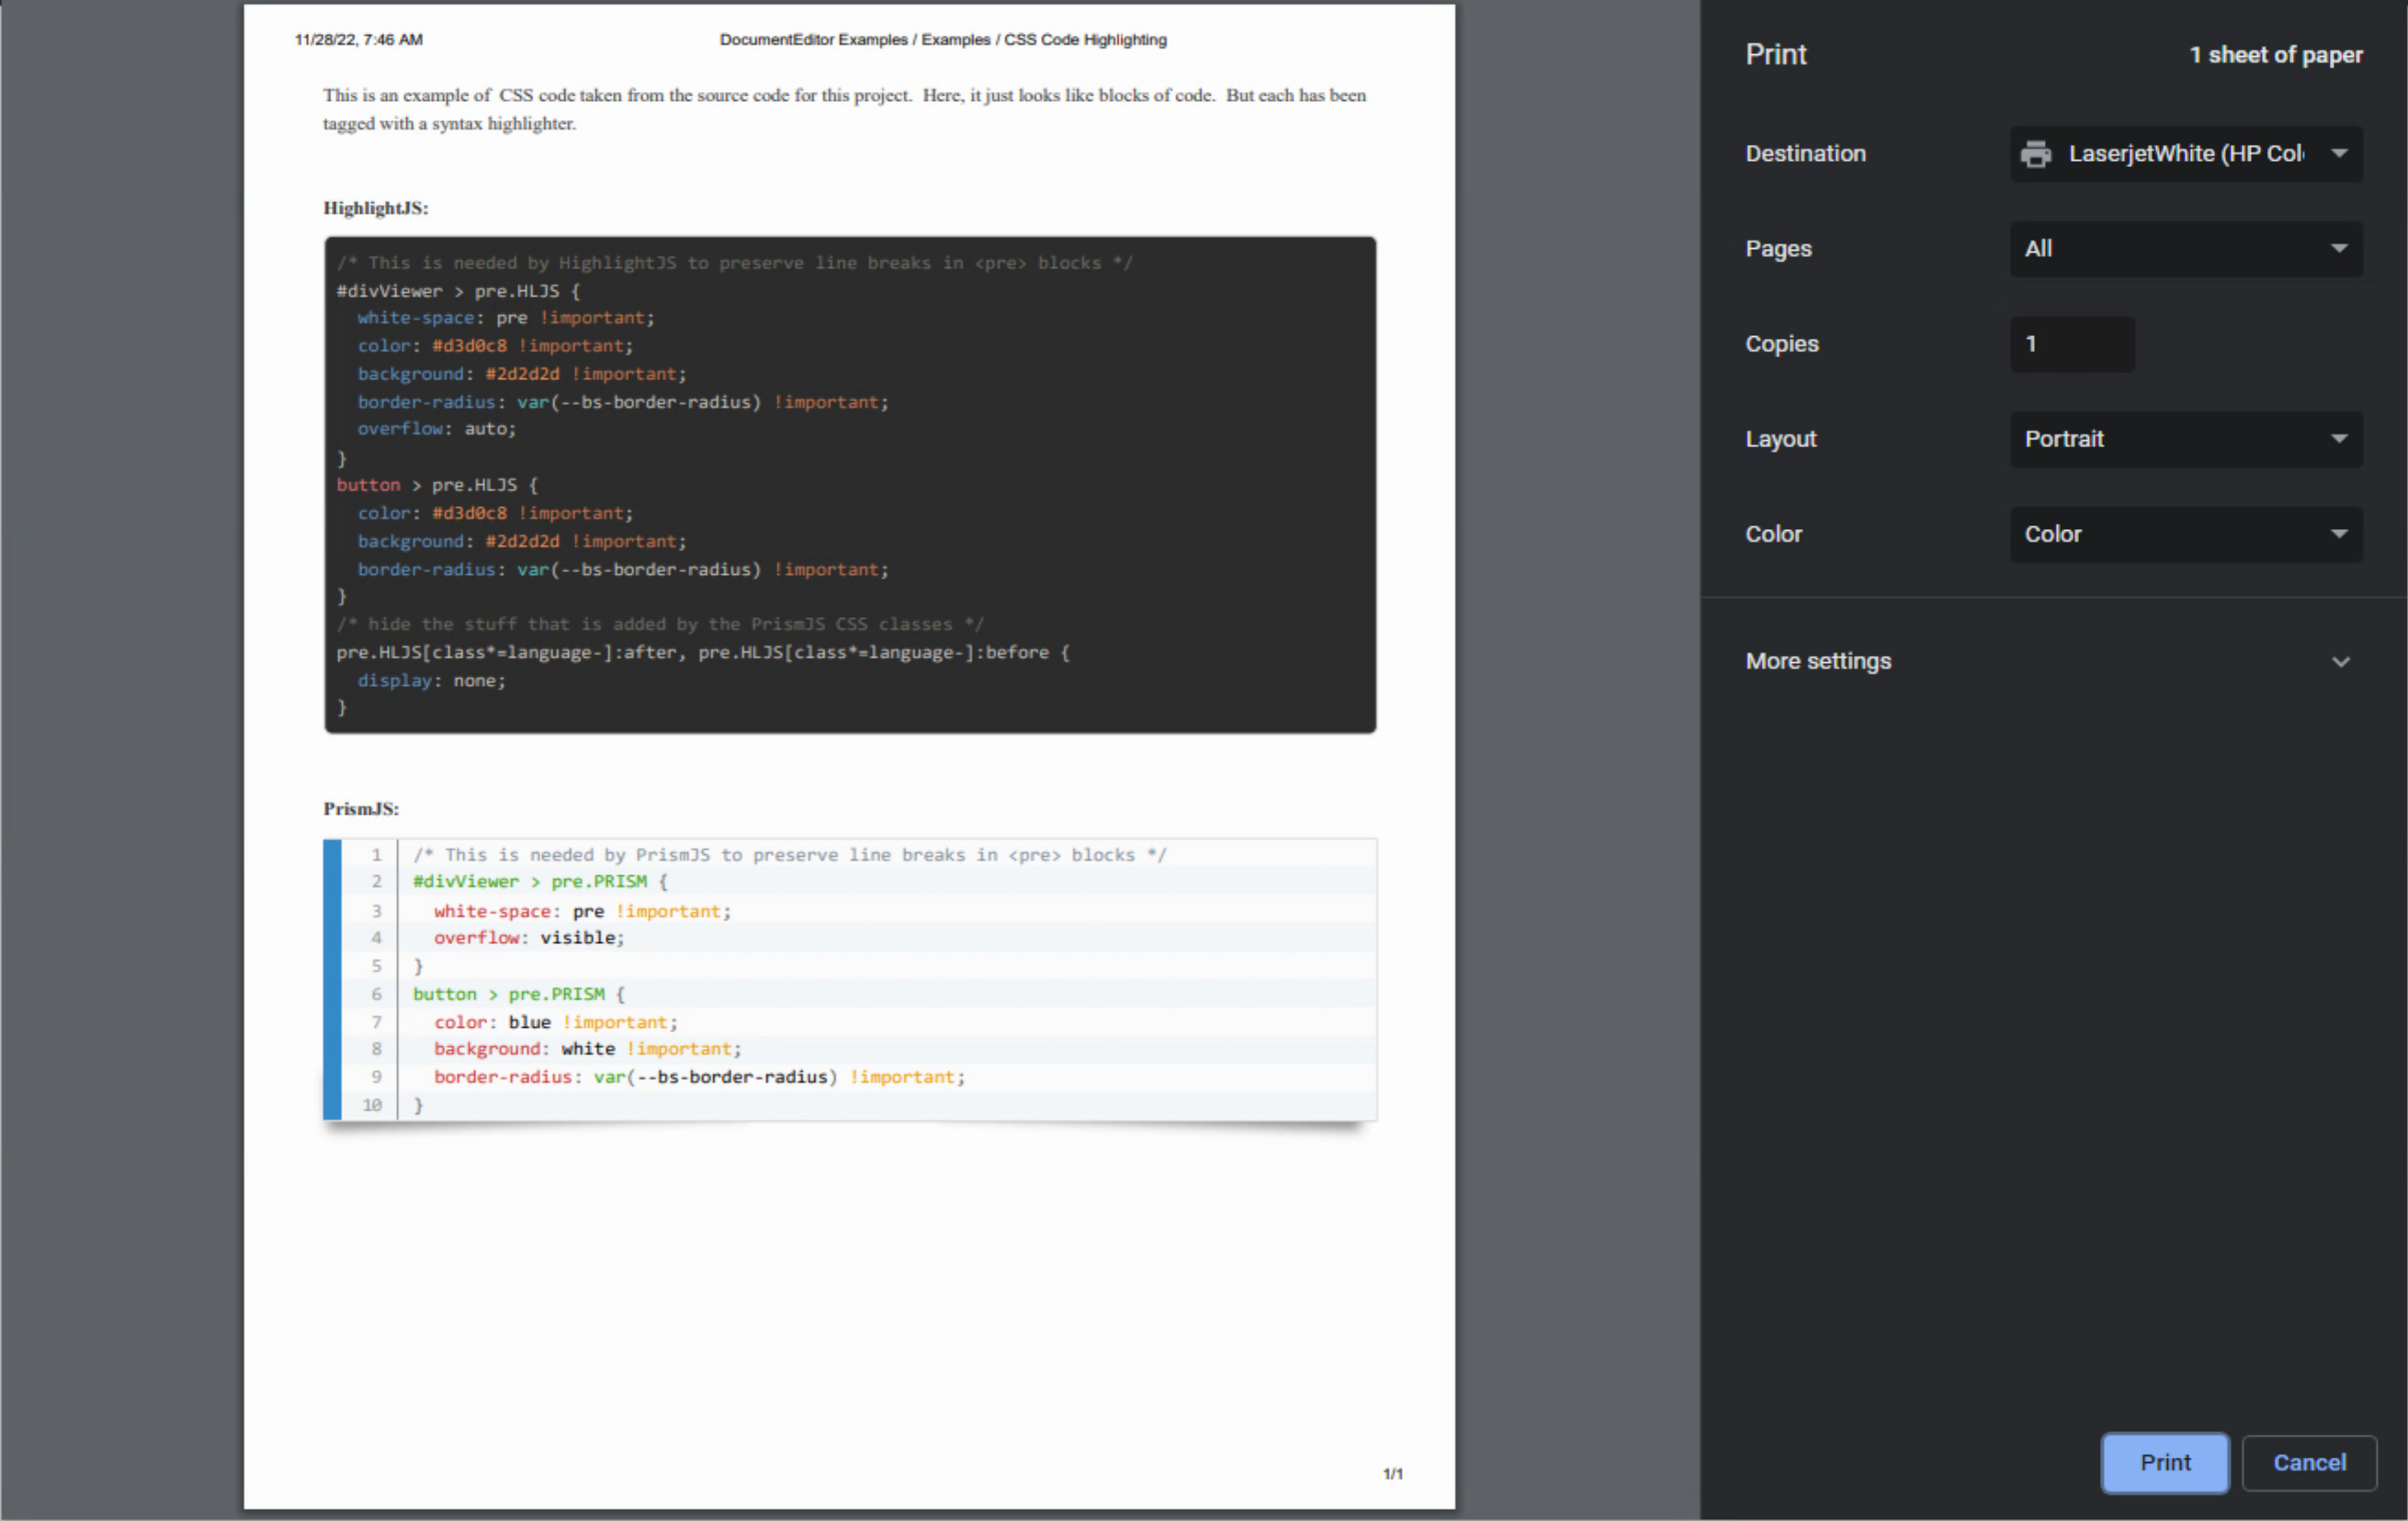
Printing Documents with Syntax Highlighting.
HighlightJS vs. PrismJS.
So which do you choose? Well, it depends, naturally. I particularly like the language auto-detection feature of HighlightJS, as well as the huge number of supported languages. But honestly, it isn't any more work to select the language, and the vast majority of the time the language isn't normally hard to determine. And for many use cases, it is going to be the same language, or a small subset, most of the time. If you were going to be adding syntax highlighting to a batch of documents where this wasn't the case, HighlightJS might be the lead contender. Note that the automatic language detection feature isn't perfect, as we've seen already.
On the PrismJS side, I really like the plugins that are available. Been decades since line numbers were a useful thing in coding (early iterations of Basic and Fortran for example) but they do provide a handy reference, naturally, when talking about code, which is why the code is on the page in the first place, after all. Also, the extra buttons for selection and copying to the clipboard are nice. The themes, while far fewer in number, tend to be more visually appealing. And while the language support is a little less extensive than HighlightJS, it is still quite substantial.
If you still can't decide, well, you can use both! Here's a link to a discussion lamenting the lack of language auto-detection in PrismJS, along with some code to use HighlightJS to determine the language and then PrismJS to do the syntax highlighting. Kind of like having the best and worst of both worlds. Our TMS WEB Core project has already sorted out having both libraries play a little more nicely together, so this isn't much of a stretch at all.
Future Ideas.
With that all taken care of, here are some ideas about where our example project could be extended.- XData
could be used as an alternative to importing/exporting data. Setting up an account with a login, any changes
could be sent to XData directly without any additional user interaction at all, even saving changes as you're typing so you never have to worry about losing your work.
- More information about each document could be tracked. Author, creation date, last modified date, document keywords, and that kind of thing. Trivial to just add them to the table and to the Settings tab.
- A tag system, maybe even with a tag
cloud somewhere in the mix. Along with tag sorting and searching, maybe some tag colors or even a select set of Font Awesome icons to go with the tags.
- A separate "blog view" of the documents, maybe with an RSS feed to go with it, perhaps as a separate form or
maybe even the default form. Or maybe multiple blogs with a URL parameter used to switch between them, and a
"Blog" field on the settings page to determine which blog(s) a given document might appear on. And the required "published" flag, maybe a "best before" or "best after" date for content that is time-sensitive.
- Tracking change history, allowing for reverting to older versions, showing differences. If multiple users were given access to the same documents, this could be the start of a co-writing sort of environment where users' changes are tracked and transmitted to other users using the same kind of mechanism.
- Upgrade SunEditor or replace it with another HTML editor if you like, with the goal of adding more features, like an image gallery, maybe a Font Awesome icon picker, document templates, or perhaps a dictionary, thesaurus, and grammar tools (Grammarly will happily work right now - so aggressive!).
- A higher-level grouping, sort of where the Collections level is, that can be managed separately, perhaps with elements like book covers, a bookshelf-style UI, or some other way of managing sets of documents.
- Access controls for sharing documents via XData - maybe at the collections level, for example, like if you were writing a book and wanted to share with an editor or another author. Perhaps with the ability to create a marked-up version of the document without overwriting the original.
- A combined/customized PDF export. Say if each document is a chapter of a book, you would want to get a PDF of the
book as a whole. We've seen how to print a document, but creating a PDF would allow for considerably greater customization.
- Page formatting options - headers/footers, table of contents perhaps, continuing on the idea of a book
management system. Maybe some themes (book sizes or styles for example)
Lots of ideas to explore! Did I miss any? Post a comment below if there are other ideas or even one of the above that you think might
be worth taking a run at in a future blog post.
All Done.
Part of the rationale in building complete projects for these kinds of examples is to be certain that we've covered everything needed to be immediately productive when building our TMS WEB Core projects. Sometimes (ummm.... always?) it's the little details that end up taking several hours or even several days to sort out, upending whatever else might be on the schedule.This project was no exception, taking a lot longer than anticipated due to unforeseen issues with the two libraries interfering with one another and with SunEditor. The complete examples provided here will hopefully help reduce these kinds of time-consuming occurrences to a minimum!
If you find this to be
the case, and that a post has indeed saved you a great deal of time or money or both, please consider supporting
this work directly via Buy
Me a Coffee.
DocumentEditor Example Download
DocumentEditor Example on GitHub
Follow Andrew on 𝕏 at @WebCoreAndMore or join our 𝕏 Web Core and More Community.
Andrew Simard

This blog post has not received any comments yet.
All Blog Posts | Next Post | Previous Post