Blog
All Blog Posts | Next Post | Previous Post

 Extend TMS WEB Core with JS Libraries with Andrew:
Labels and Barcodes - Part 1 of 3
Thursday, October 13, 2022

Last time in this blog series, we created a fully functional TrackEditor web application using TMS WEB Core and the Web Audio API. This time out, we're going to create another fully functional web application, focused on creating labels.
In this first part, we'll be focused on the UI generally, starting with laying out the
application and wiring up basic functionality. Then we'll build an interface for adding multiple barcodes and other
elements to a label. We'll add in some components from the TMS
FNC WX Pack, specifically TTMSFNCWXBarcode and TTMSFNCWXQRCode for creating regular 1D barcodes and 2D
barcodes (including QR codes), respectively, and we'll also make use of FNC Core's PDF-generation capabilities, combined with FNC WX Pack's PDF-viewer.
Part 2 will extend the app to incorporate TMS XData for storing, securing, and accessing information remotely. And finally, in Part 3 we'll look at how to use all of this to create a kiosk-style label printing station using a Raspberry Pi (or any other platform!) using the Miletus framework.
Motivation.
Businesses of all shapes and sizes routinely find themselves needing to print labels with barcodes and other information. Anyone that produces a tangible product will most likely need to create shipping labels of some kind, and potentially UPC codes or other machine-readable markings that are specific to their industry.
North American commercial producers of fresh tomatoes, for example, might need to print little PLU stickers that are applied to beefsteak tomatoes individually, as well as 2"x4" complex labels containing GS1-style barcodes that are applied to the cartons that the tomatoes are shipped in, which might also contain the PLU codes, in addition to 4"x6" shipping labels that are then applied to pallets typically containing 80 cases of tomatoes.
Each of these labels contains one or more barcodes, each of a different format, with different barcodes and labeling conventions for each label, and even potentially for each customer. Walmart might expect labels in one format, whereas a different distributor might require another. As the saying goes, the great thing about standards is that there are so many to choose from.
For our purposes, the idea then is to build a comprehensive web application using TMS WEB Core, very quickly, that can be used to manage virtually any kind of labeling scenario. Barcodes themselves aren't particularly problematic on their own, for example, but rather it is the layout of the label, and then linking that label to a dataset that becomes the challenge.
To get there, we're going to use many of the JavaScript libraries we've already covered, including Tabulator (introduced here), InteractJS (introduced here), and perhaps too many Bootstrap classes strewn about everywhere (introduced here). Maybe even a few others as well.
Getting Started.
As has become our custom, we'll first add all of these third-party JavaScript libraries to our Project.html file, either directly or by using the Manage JavaScript Libraries within the Delphi IDE. We'll also add our own custom CSS stylesheet where we can sneak in adjustments to all kinds of things when needed.
    <!-- Bootstrap 5.2.1-->
    <script src="https://cdn.jsdelivr.net/npm/bootstrap@5.2.1/dist/js/bootstrap.bundle.min.js" integrity="sha384-u1OknCvxWvY5kfmNBILK2hRnQC3Pr17a+RTT6rIHI7NnikvbZlHgTPOOmMi466C8" crossorigin="anonymous"></script>
    <link href="https://cdn.jsdelivr.net/npm/bootstrap@5.2.1/dist/css/bootstrap.min.css" rel="stylesheet" integrity="sha384-iYQeCzEYFbKjA/T2uDLTpkwGzCiq6soy8tYaI1GyVh/UjpbCx/TYkiZhlZB6+fzT" crossorigin="anonymous">

    <!-- FontAwesome v6 Free -->
    <link rel="stylesheet" href="https://cdn.jsdelivr.net/npm/@fortawesome/fontawesome-free@6/css/all.min.css">

    <!-- Google Fonts: Cairo -->
    <link rel="preconnect" href="https://fonts.googleapis.com">
    <link rel="preconnect" href="https://fonts.gstatic.com" crossorigin>
    <link href="https://fonts.googleapis.com/css2?family=Cairo&display=swap" rel="stylesheet">

    <!-- Tabulator -->
    <script src="https://cdn.jsdelivr.net/npm/tabulator-tables@5/dist/js/tabulator.min.js"></script>
    <link rel="stylesheet" href="https://cdn.jsdelivr.net/npm/tabulator-tables@5/dist/css/tabulator_midnight.min.css">

    <!-- Interact.js -->
    <script src="https://cdn.jsdelivr.net/npm/interactjs/dist/interact.min.js"></script>

    <!-- Labels custom CSS -->
    <link rel="stylesheet" href="labels.css">
Next up, we'll need to create the basic scaffolding for our labeling application. We'll need a list of labels on the left. There might be a lot, so we'll set it up with a grouping system. And we'll also want to include some example labels, so we'll plan for that at the outset here as well.
The rest of the page will be taken up with various key functions, like printing labels, editing labels, and managing the underlying data used to generate the labels. To deal with those, we'll use a TWebPageControl component, so we can customize the page for each major function. To get started, one of the more basic functions is to be able to add or remove labels from the main list, as well as to rename them or duplicate (clone) them.
Styling-wise, I tend to be a creature of habit, but also rather particular about how everything looks. While it may be more work, creating customized versions of certain elements can potentially lead to a more consistent UI overall, and may even provide the opportunity to add little tweaks here and there that might not be readily available otherwise. For this stage of the project, there are two areas I'll focus on a little bit before moving on.
First, the TWebPageControl component is perfectly functional, but I find that I prefer using Bootstrap's button-group components for the tabs rather than the built-in tabs. The extra work is relatively small, so long as the list of tabs doesn't change (and is also relatively small).
In essence, clicking a button in the button group selects the new page in the TWebPageControl, and then updates the list of buttons to show the current page as the active page. This is done by swapping the "btn-primary" and "btn-secondary" classes that are applied to the buttons.
Here's an example of what this might look like when we're dealing with three different TWebPageControl pages. Note that there are Bootstrap-provided functions to handle the button classes, but here we'll just do it ourselves, as we need to include the TWebPageControl logic anyway. Note that this could easily be generalized in any number of ways if there were to be many such pages.
procedure TForm1.btnPagePrintClick(Sender: TObject);
begin
  btnPagePrint.ElementHandle.classList.replace('btn-secondary','btn-primary');
  btnPageEdit.ElementHandle.classList.replace('btn-primary','btn-secondary');
  btnPageData.ElementHandle.classList.replace('btn-primary','btn-secondary');
  pageControl.TabIndex := 0;
end;

procedure TForm1.btnPageEditClick(Sender: TObject);
begin
  btnPagePrint.ElementHandle.classList.replace('btn-primary','btn-secondary');
  btnPageEdit.ElementHandle.classList.replace('btn-secondary','btn-primary');
  btnPageData.ElementHandle.classList.replace('btn-primary','btn-secondary');
  pageControl.TabIndex := 1;
end;

procedure TForm1.btnPageDataClick(Sender: TObject);
begin
  btnPagePrint.ElementHandle.classList.replace('btn-primary','btn-secondary');
  btnPageEdit.ElementHandle.classList.replace('btn-primary','btn-secondary');
  btnPageData.ElementHandle.classList.replace('btn-secondary','btn-primary');
  pageControl.TabIndex := 2;
end;
Second, having a popup form works pretty well using the regular mechanism that produces a captioned and movable popup "window", but this is an area where having complete control over the UI allows for a more bespoke interface. Being the fan of rounded corners that I am, naturally, we'll want the popup to have rounded corners. And because we're not using the built-in "border := fbDialog" option, we'll use InteractJS to make our popup form draggable all the same.
The form itself can then be designed however we like. For this first popup, what we're after is the ability to change both the label name and the group it is associated with. We get the list of group names from the Tabulator table. The values that appear on the popup form are adjusted slightly based on whether we're cloning a label or renaming a label. And we don't want anyone making changes to the "Samples" group, so we explicitly exclude that from the list of groups, even if entered manually. Here's what the "rename" function looks like. The "clone" function is largely the same.
procedure TForm1.btnPrintRenameClick(Sender: TObject);
var
  NewLabelID: String;
  NewLabelName :String;
  NewGroupName: String;
  NewLabel: TLabelNameForm;
  NewEntry: TModalResult;
  GroupList: Array of String;
  GroupStringList: TStringList;
  i: Integer;
begin
  NewLabelID := CurrentLabelID;
  NewLabelName := CurrentLabelName;
  NewGroupName := CurrentGroupName;

  // Get list of unique Group Names from table
  asm
    var groups = [];
    var rows = this.tabLabelsList.getRows();
    for (var i = 0;  i < rows.length; i++) {
      groups.push(rows[i].getCell('GROUP').getValue());
    }
    GroupList = [... new Set(groups)];
  end;

  // Bulid a new list that is case-senstive, without duplicates and
  // without the "Samples" entry, ready to pass to a TWebComboBox
  GroupStringList := TStringList.Create;
  GroupStringList.Duplicates := System.Types.dupIgnore;
  GroupStringList.CaseSensitive := True;
  GroupStringList.Sorted := True;
  for i := 0 to Length(GroupList) - 1 do
    if (Uppercase(Trim(GroupList[i]))) <> 'SAMPLES'
    then GroupStringList.Add(Trim(GroupList[i]));

  // Create the Popup Form
  NewLabel := TLabelNameForm.Create(Self);
  NewLabel.Popup := True;
  NewLabel.PopupOpacity := 0.7;

  // Pass in the variables we want to use as defaults
  await( TLabelNameForm, NewLabel.Load );
  NewLabel.Title.Caption := 'Rename Label';
  NewLabel.edtLabelName.Text := CurrentLabelName;
  NewLabel.cmbGroupName.Items := GroupStringList;
  NewLabel.cmbGroupName.Text := CurrentGroupName;
  NewLabel.edtLabelNameChange(nil);
  NewLabel.edtLabelName.SetFocus;

  // Wait for the form to be closed, and then act accordingly
  try
    NewEntry := await( TModalResult, NewLabel.Execute );

    if NewEntry = mrOk then
    begin
      NewGroupName := Trim(NewLabel.cmbGroupName.Text);
      NewLabelName := Trim(NewLabel.edtLabelName.Text);
      asm
        this.tabLabelsList.updateRow(NewLabelID, {
          GROUP: NewGroupName,
          LABEL: NewLabelName,
        })
        .then(function(row){
          row.getTable().deselectRow();
          row.select();
          row.getTable().setGroupBy('');
          row.getTable().setSort([
            {column:"LABEL", dir:"asc"},
            {column:"GROUP", dir:"asc"}
          ]);
          row.getTable().setGroupBy('GROUP');
          var labelID = row.getCell("ID").getValue();
          var labelName = row.getCell("LABEL").getValue();
          var groupName = row.getCell("GROUP").getValue();
          var locked = row.getCell("LOCK").getValue();
          pas.Unit1.Form1.NewLabelSelected(labelID, labelName, groupName, locked);
        });
      end;
    end;
  finally
    NewLabel.Free;
  end;

end;
There's a lot going on in there. The first part involves getting a list of all the groups found anywhere in the table, excluding "Samples". Then there is the code that creates and populates the new popup form. Nothing particularly special going on there, but if you're not familiar with how await works, here's a solid example.
The only troublesome bit after that had to do with how Tabulator gets updated. After a row is updated, it seems it needs a little poking to ensure the updated values appear in the table, sorted appropriately, whenever the group names change. This involved removing the grouping, sorting the table, and then adding the grouping back in again. Works pretty well, but something to take up with the Tabulator team at some point, perhaps.
The last little bit involves calling the NewLabelSelected function with the newly renamed (or cloned) label definition. The UI also deals with preventing "Samples" from being renamed or deleted. They can be cloned of course, into a new group. Here then is our interface so far.
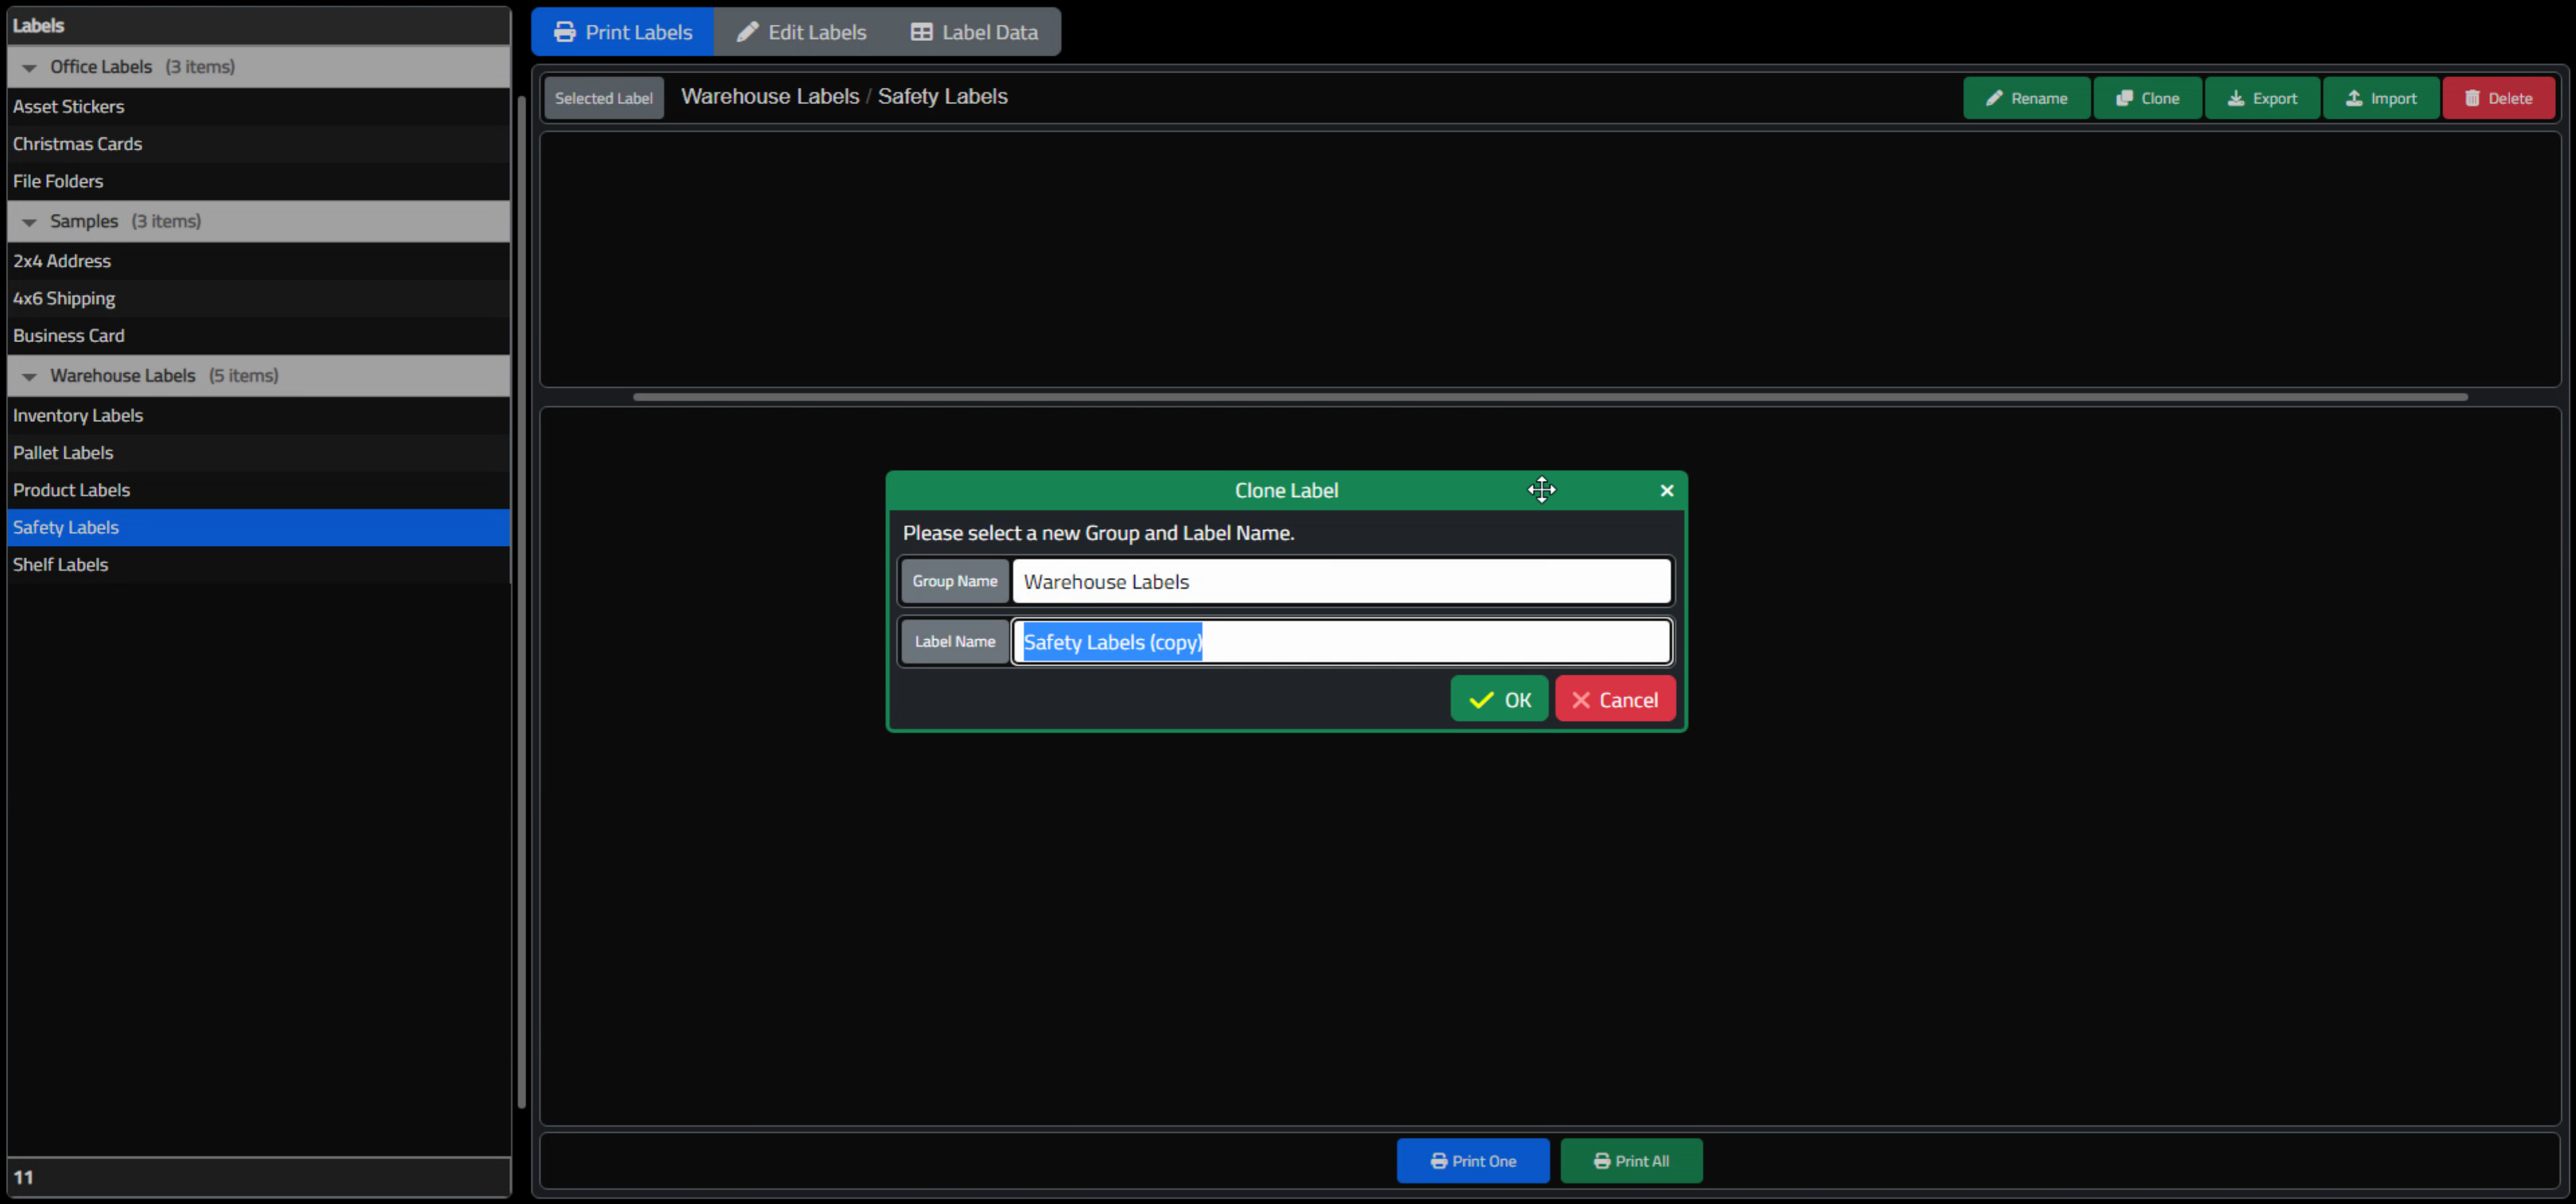
Basic LabelExample Interface with Popup.
We'll skip over some of the other functions that aren't particularly interesting at this stage - there are other areas that will need more of our attention. The source code for this project is included later in this post, as well as on GitHub. By all means, check out the project, post a comment, or ask a question if there's anything you feel needs a little more explanation.
Much of this part of the interface is similar to what we've implemented in other projects already. But at this stage, we already have a working interface. We can switch tabs, and add and remove labels from the list (their names and groups, at the very least). There are TWebSliders for adjusting the width of the list of labels on the left, as well as the size of the preview label (bottom section) relative to the label parameters (top section). And a few buttons were added as placeholders for functionality we'll get to later, such as the print buttons at the bottom. These might very well change as we get further along.
An... Object Inspector?
The next part of the UI is a bit more involved. Essentially, what we're after is a generic list of properties associated with a label. Initially, this will include things like width and height. But later, it will include elements present on the label itself, such as individual barcodes, static text, generated text, shapes, images, and so on.
In order to manage this kind of information, we're going to have to dig a little deeper into Tabulator, and its dataTree mechanism. This is rather like adding a subtable to each row, which can then be expanded or collapsed. The overall idea, then, is to create a list of "properties" and then within those, have a subset of "options" that are potentially unique to each property. This is not quite the same as the Delphi Object Inspector, but very similar. The difference is that we can add multiple properties, not just edit the property options.
Let's start with the Edit tab for this section, as we'll need to set up some labels first before we can test the interface for printing. For each label, then, we'll need a set of data that defines all these properties. In fact, we'll store all the data needed for this new EditProperites Tabulator in a column of the main LabelsList Tabulator.
This is similar to what we did in the early stages of the Actorious example in Tabulator Part 2: Getting Data Into Tabulator. Sort of like a header/detail relationship where the detail is actually stored entirely in a field in the header, more or less. The difference here is that, largely, the content and structure of this detail table are going to be created by the user, using all kinds of choices we'll have to supply for them.
The first one we'll need will be a "Layout" property. There are likely other options we could imagine being useful here, but let's start with "Units", "Width", "Height", "Rounding", and "Pixels Per Inch". These will help us determine the physical size of the label, which we can then display. We'll add a few more shortly, but this should get us started.
In the interface, we'll need the ability to add "Layout" as a property, and it should then present the list of options related to that property, with editors specific to each option. For example, Units should be a list we can select from, whereas the rest are just numbers we can enter. To help make this a bit easier code-wise, we'll actually create another Tabulator - PropertiesLIst, and fill it with the data we'll need to manage this interface. We'll then use this Tabulator when displaying the list of properties that can be added to the label, and use the other data within it to create the options at the appropriate time. Here's what the definition of the PropertiesList looks like.
    var PropertiesList = [
      {  "GROUP":"Basic", "PROPERTY":"Layout", "ID":"{755EFB09-7EA8-44CD-8AD6-8C560F3B9D3D}",
           "OPTIONS": [
            { "PROPERTY":"Units",  "EDITOR":"list",   "VALUE":"in", LIST:["px","cm","in","mm","em"] },
            { "PROPERTY":"Width",  "EDITOR":"number", "VALUE":"2"   },
            { "PROPERTY":"Height", "EDITOR":"number", "VALUE":"4"   },
            { "PROPERTY":"DPI",    "EDITOR":"number", "VALUE":"600" }
      ]},
      {  "GROUP":"Shapes", "PROPERTY":"Rectangle", "ID":"{1F5BF4A9-A5B1-48F3-BCAB-42E9CF16D871}",
           "OPTIONS": [
            { "PROPERTY":"Top",      "EDITOR":"number",  "VALUE":"10px"  },
            { "PROPERTY":"Left",     "EDITOR":"number",  "VALUE":"10px"  },
            { "PROPERTY":"Width",    "EDITOR":"number",  "VALUE":"200px" },
            { "PROPERTY":"Height",   "EDITOR":"number",  "VALUE":"50px"  },
            { "PROPERTY":"Rotation", "EDITOR":"number",  "VALUE":"0deg"  },
            { "PROPERTY":"Stroke",   "EDITOR":"text",    "VALUE":"2px solid black" },
            { "PROPERTY":"Fill",     "EDITOR":"text",    "VALUE":"gray"  }
      ]},
      {  "GROUP":"Shapes", "PROPERTY":"Rounded Rectangle", "ID":"{92F8EC44-3A07-4F70-8EAC-B1256E6E1788}",
           "OPTIONS": [
            { "PROPERTY":"Top",                   "EDITOR":"number", "VALUE":"10px"  },
            { "PROPERTY":"Left",                  "EDITOR":"number", "VALUE":"10px"  },
            { "PROPERTY":"Width",                 "EDITOR":"number", "VALUE":"200px" },
            { "PROPERTY":"Height",                "EDITOR":"number", "VALUE":"50px"  },
            { "PROPERTY":"Rotation",              "EDITOR":"number", "VALUE":"0deg"  },
            { "PROPERTY":"Stroke",                "EDITOR":"text",   "VALUE":"2px solid black" },
            { "PROPERTY":"Fill",                  "EDITOR":"text",   "VALUE":"gray"  },
            { "PROPERTY":"Top-Left Rounding",     "EDITOR":"number", "VALUE":"20px"  },
            { "PROPERTY":"Top-Right Rounding",    "EDITOR":"number", "VALUE":"20px"  },
            { "PROPERTY":"Bottom-Left Rounding",  "EDITOR":"number", "VALUE":"20px"  },
            { "PROPERTY":"Bottom-Right Rounding", "EDITOR":"number", "VALUE":"20px"  }
      ]}
    ]

    // PropertiesLIst Tabulator - Used to provide dropdown to pick properties
    this.tabPropertiesList = new Tabulator("#panelPropertiesList", {
      data: PropertiesList,
      index: "ID",
      layout: "fitColumns",
      selectable: 1,
      groupBy: "GROUP",
      headerVisible: false,
      columns: [
        { title: "ID", field: "ID", width: 50, visible: false },
        { title: "Group", field: "GROUP", visible: false },
        { title: "Property", field: "PROPERTY", visible: true },
        { title: "Options", field: "OPTIONS", visible: false }
      ]
    });

    // Do this whenever we click on a row
    this.tabPropertiesList.on("rowClick", function(e,row){
      row.select();
      var ID = row.getCell("ID").getValue();
      var GroupName = row.getCell('GROUP').getValue();
      var PropertyName = row.getCell("PROPERTY").getValue();
      var Options = row.getCell("OPTIONS").getValue();
      pas.Unit1.Form1.NewPropertySelected(ID, GroupName, PropertyName, Options);
    });
Thus it should be relatively easy to extend to as many options as we like (thousands!). On the UI side, this is implemented using a TWebDropDownControl, where the "control" is a TWebPanel that is populated with the PropertiesList Tabulator table. In effect, we're making a fancy combo box, where the list is just a Tabulator table.
Clicking on an element in this list then passes the details to the Delphi "NewPropertySelected" method. We can then format this Tabulator any way we like, such as what we've done here, with a grouped field and just the properties showing. Behind the scenes, the list of options for each property is also being passed around for when we're ready for it. Here's what the UI looks like using the PropertiesList Tabulator as a combo box.
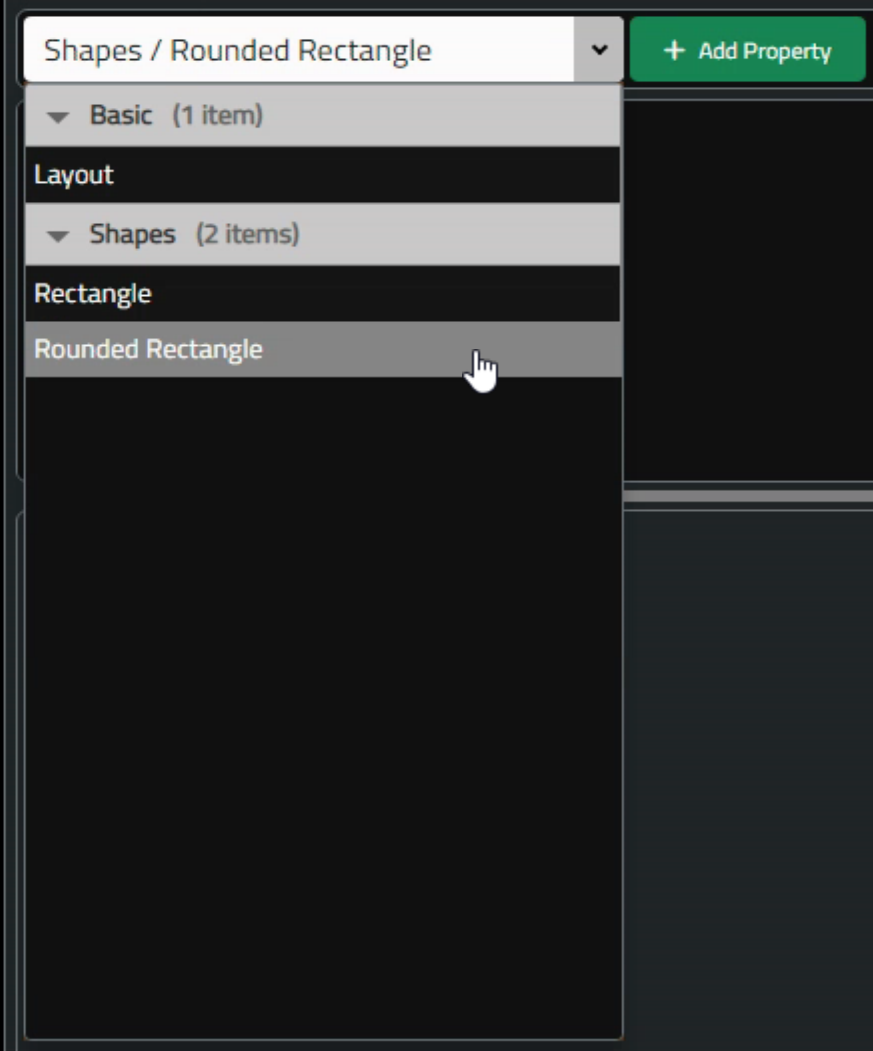
PropertiesList - Tabulator as ComboBox
The last bit then is to add the property and all of its options to the list of properties of the currently selected label, which in turn is then displayed in the EditProperties Tabulator, where the values can be adjusted. This is a bit of work to sort through, but the end result is worth the extra trouble.
Apologies for the terse JavaScript - there are some pretty nifty little array processing functions that make quick work of really annoying tasks. For example, generating a list of options for an HTML <select> element used to be a long drawn-out affair, but now it's a one-liner like so many other things. Not necessarily a pretty one-liner, but still.
The most interesting bit is perhaps setting up Tabulator to present a different editor for each field type. At the moment, we've just got a couple of different types, and we've not gone all-out to really tailor these. Just a text <input> and an HTML <select> but it isn't hard to see how this could be extended to other edit types like colors, calendars, and so on.
We're also not doing much in terms of validation here, but it wouldn't be much trouble to do that. We'll revisit this in the next Labels and Barcodes blog post. Here's the code for actually adding a new property with its options to the EditProperties Tabulator. Not too scary.
procedure TForm1.btnEditPropertiesAddClick(Sender: TObject);
var
  NewID: String;
begin
  NewID := TGUID.NewGUID.ToString;

  if ddPropertiesListHolder.Text <> '' then
  begin
    asm
      this.tabEditProperties.addRow({
        ID:NewID,
        GROUP:this.CurrentPropertyGroup,
        PROPERTY:this.CurrentPropertyName,
        OPTIONS:this.CurrentPropertyOptions
      });
      this.tabEditProperties.redraw(true);
    end;

  end;
end;
Here's the code for handling the property editing. Not as friendly.
  asm
    // This is the super-fancy custom column editor that is trying to do what
    // Delphi Object Inspector does - each row in the table can potentially
    // have a different editor.  Crappy part is that Tabulator has all these
    // editors built-in, but no way to select one of them to use.
    var EditProperties = function(cell, onRendered, success, cancel, editorParams) {

      var edit = cell.getRow().getCell('EDITOR').getValue();

      if (edit == 'number') {
        var editor = document.createElement("input");
        editor.setAttribute("type", "TEXT");
        editor.classList.add("bg-white","w-100","h-100","border-0","px-2");
        editor.value = cell.getValue();
      } else if (edit == 'text') {
        var editor = document.createElement("input");
        editor.setAttribute("type", "TEXT");
        editor.classList.add("bg-white","w-100","h-100","border-0","px-2");
        editor.value = cell.getValue();
      } else if (edit == 'list') {
        var editor = document.createElement("select");
        editor.classList.add("bg-white","w-100","h-100","border-0","px-2");
        editor.innerHTML = cell.getRow().getCell('LIST').getValue().map(e=>{return `<option value="${e}">${e}</option>`})
        editor.value = cell.getValue();
      }

      onRendered(function(){
        editor.focus();
      });
      function successFunc(){
        success(editor.value);
      }
      editor.addEventListener("change", successFunc);
      editor.addEventListener("blur", successFunc);
      return editor;
    };
  end;
And here's what it looks like. Pretty reasonable.
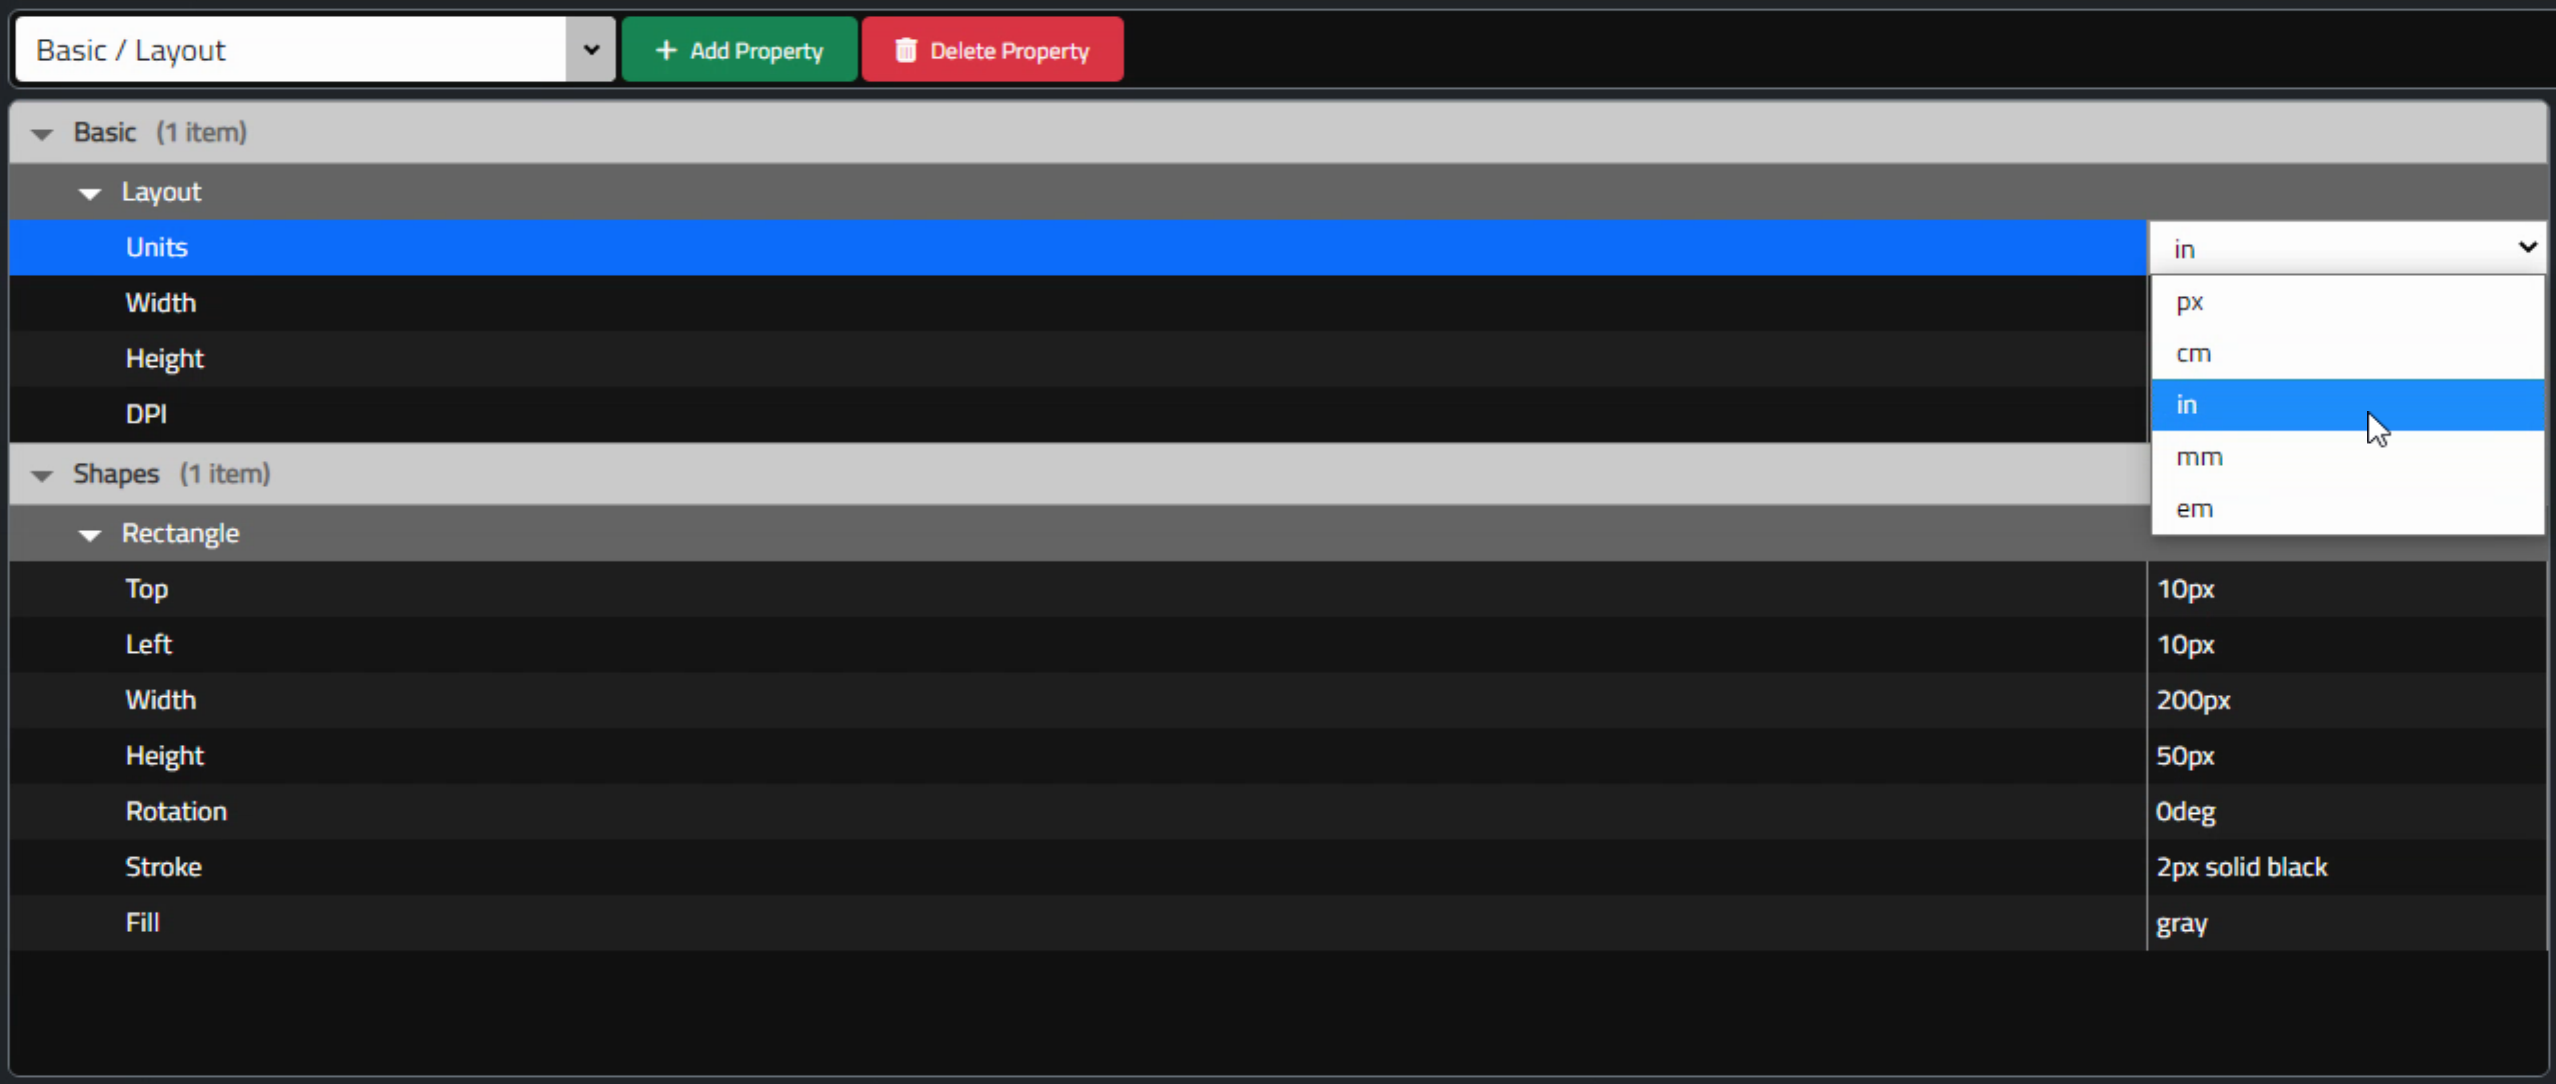
Editing Label Properties.
With that in place, we're now able to add any kind of property we'd like, with all the grouping and hierarchical stuff more or less taken care of. There are naturally dozens, if not hundreds, of different properties we might want to add in this fashion, all with the goal of making it super-easy to create labels of any kind.
Every conceivable barcode, shape, image source, and block of text is pretty much fair game here. We're not going to focus much on that at the moment, but by the time the next blog post rolls around, we'll have a more substantial set. We'll add a couple more here in a little bit, but this part of the interface is completed enough that we can move on.
Drawing Labels.
So what's the plan here? Well, the basic approach is that we're going to create a plain old HTML <div> and then add stuff to it. We could use a <canvas> or an <svg> as a starting point I suppose, but a <div> element will work. This <div> will then contain all of the things that we've added via the property setup we've got. This <div> will be displayed as its native self in the preview (bottom) section of the Edit tab.
Once we've got the <div> all filled out, we'll convert it to an image, and then plunk it onto a freshly generated PDF, which is what we'll be seeing when we look at the preview (bottom) section of the Print tab. Fingers crossed that they'll be the same!
So to get started with the display, we'll use the values from the Layout property to create the <div> and then scale it to fit in the space that we've got available. This is a bit of a nuisance as we'll have to take whatever values we've got to work with and convert everything to pixels, as that's going to be our working unit at this stage. We can scale a <div> using the CSS transform attribute, and with a bit of math, we can figure out how to position the label in the middle of the preview area, with padding of 10px just to make it look a little nicer.
  // Get the scale we'll need to display it in the space available
  LabelScaleX := (divEditPreviewHolder.Width - 20) / LabelWidth;
  LabelScaleY := (divEditPreviewHolder.Height - 20) / LabelHeight;
  if LabelScaleX > LabelScaleY
  then LabelScaleX := LabelScaleY;
  LabelTop := -(LabelHeight - (divEditPreviewHolder.Height - 20))/2;
  LabelLeft := -(LabelWidth - (divEditPreviewHolder.Width - 20))/2;
Once that's in place, it is just a matter of iterating through all of the properties and placing them inside the <div>. Rectangles, for example, can be drawn by just adding another <div> and setting the dimensions, border, and background. As a small bonus, the browser developer tools can be used for troubleshooting, just by looking at the composition of the label as a hierarchy of HTML elements. Adding a few rectangles to the mix, we can easily get something workable. Here's an example of just randomly placing a few and setting some of the options.
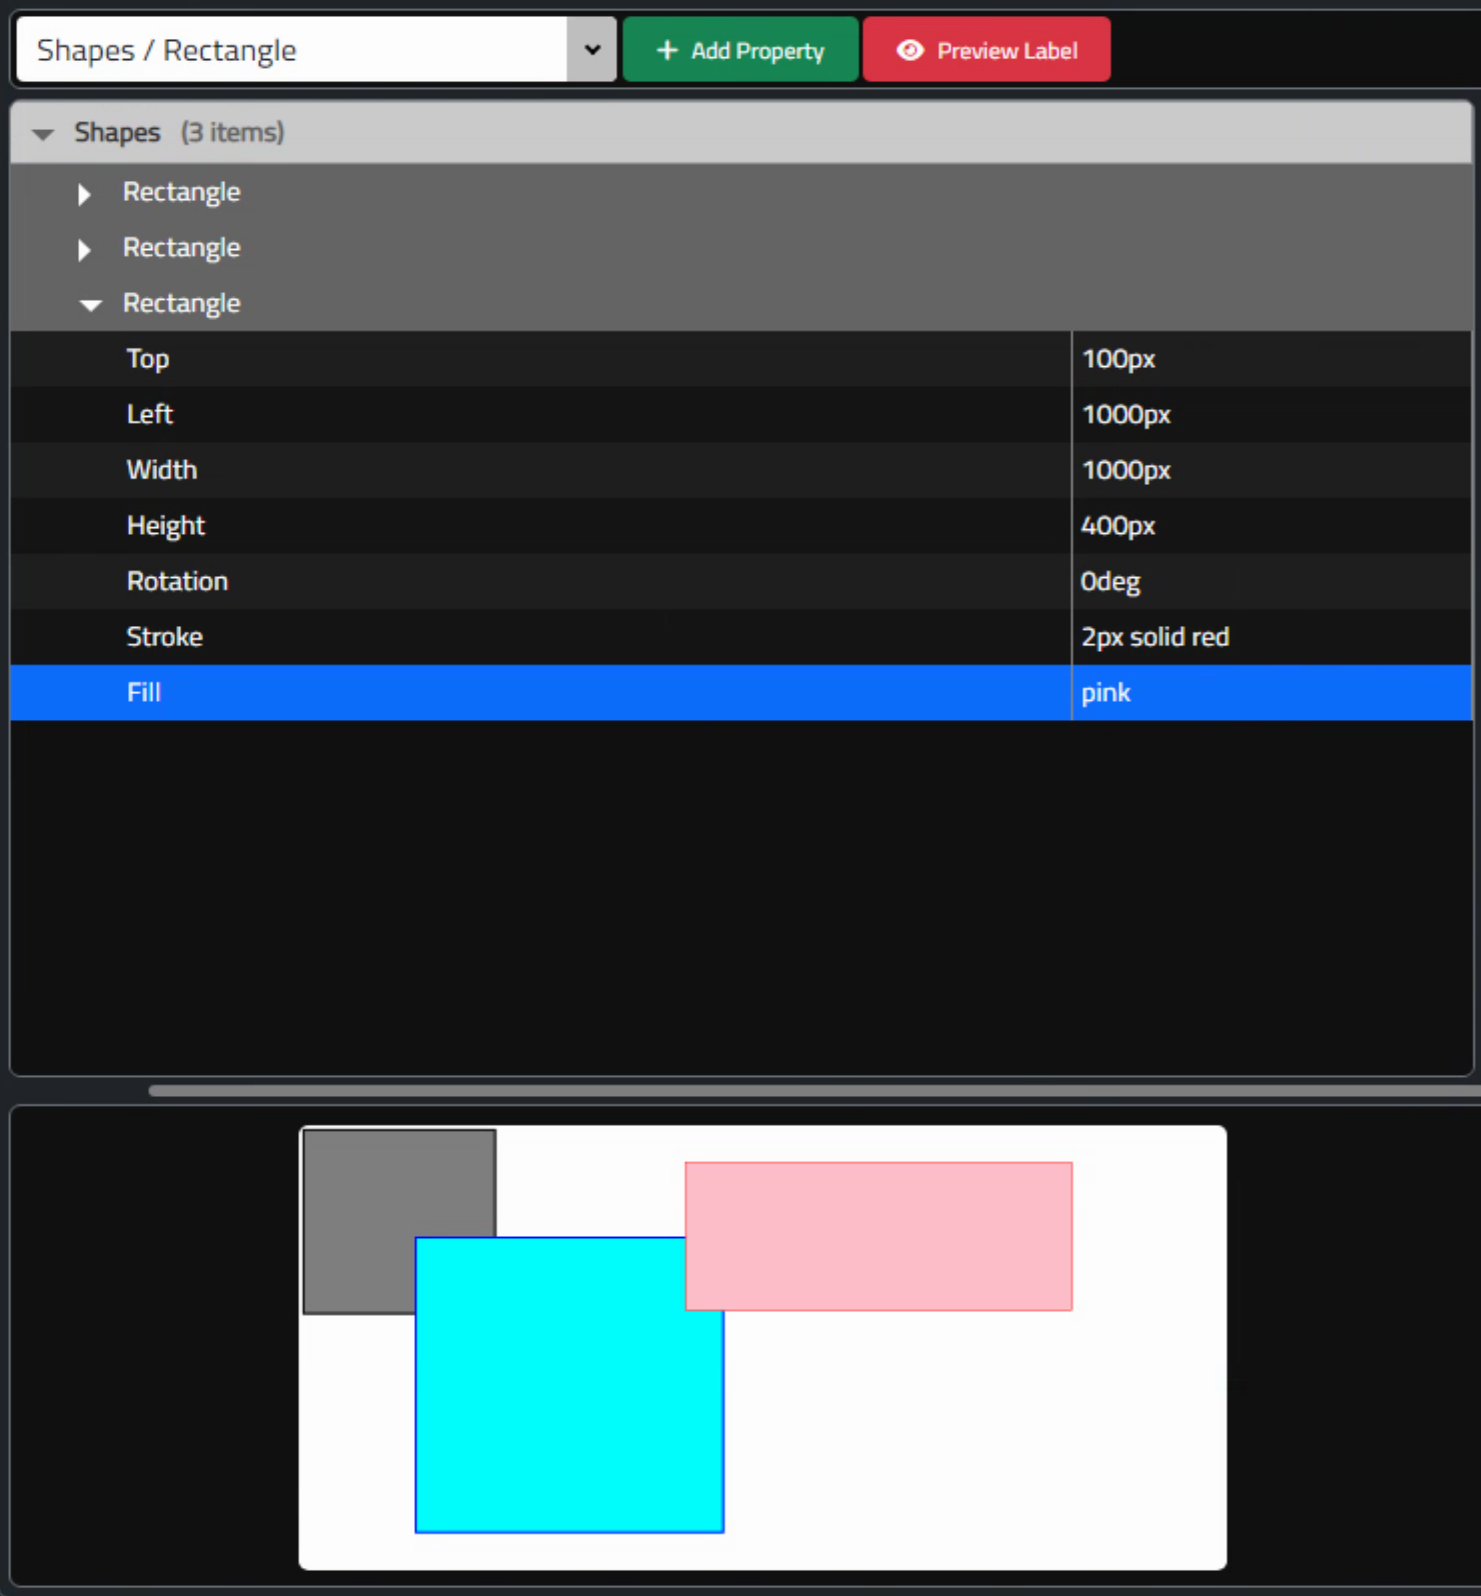
Labels with Rectangles.
From here, it is just a matter of adding more properties with their options and then mapping those to the same
<div>. The user can then mix and match as much as they like. We'll also have to refine things a little bit
further. Add in some z-index options, and be sure to implement all the options that are readily available.
Barcodes.
Naturally, one of the elements we're going to want to add is a barcode. Ideally, we'd like the barcode to be an image of some kind, so we can then pass it around and store it in the table, that sort of thing. First, we'll need to add a new property for a specific barcode, and we can create a grouping just for barcodes, or barcodes of a certain type, etc.
Let's try something simple like a Code39 barcode. The only interesting parameter is a data value that is to be encoded in the barcode, but we can also include options similar to a rectangle (width, height, stroke, fill, etc.) and also a scale parameter. We'll use a TTMSFNXWXBarcode component to do the work of creating the actual barcode as an image, and then place that image on the <div> the same way we did with the rectangles. First, we'll need to define the options we'd like to offer.
      {  "GROUP":"Simple Barcodes", "PROPERTY":"Code39", "ID":"{738A0CF6-3254-4CE1-A3AE-EC025BA910C0}",
           "OPTIONS": [
            { "ID":"", "PROPERTY":"Top",      "EDITOR":"number",  "VALUE":"200px"  },
            { "ID":"", "PROPERTY":"Left",     "EDITOR":"number",  "VALUE":"0px"    },
            { "ID":"", "PROPERTY":"Width",    "EDITOR":"number",  "VALUE":"2400px" },
            { "ID":"", "PROPERTY":"Height",   "EDITOR":"number",  "VALUE":"800px"  },
            { "ID":"", "PROPERTY":"Stroke",   "EDITOR":"text",    "VALUE":"none"   },
            { "ID":"", "PROPERTY":"Fill",     "EDITOR":"text",    "VALUE":"none"   },
            { "ID":"", "PROPERTY":"Rotation", "EDITOR":"number",  "VALUE":"0deg"   },
            { "ID":"", "PROPERTY":"Color",    "EDITOR":"text",    "VALUE":"black"  },
            { "ID":"", "PROPERTY":"Data",     "EDITOR":"text",    "VALUE":"CODE-39-ONLY-UPPERCASE" },
            { "ID":"", "PROPERTY":"Scale",    "EDITOR":"number",  "VALUE":"5"  },
      ]},
This could likely benefit from a few more properties, but for just getting it up and running, this is more than enough. There are more than 100 barcode formats supported (that's just the 1D barcodes!) and many have their own little peculiarities. So not so easy to work out what options are needed. Of course, if you leave off an option thinking it isn't important, you're almost guaranteed to end up with a client that depends on it heavily!
By grouping barcodes in different categories, it should be possible to add in many formats without bogging everything down by having to scroll through huge lists to find something. When drawing the label, we do the same thing as we did with the rectangle to get these options into play.
  // Process all of the barcodes
  asm
    var BarTop = '0px';
    var BarLeft = '0px';
    var BarWidth = '0px';
    var BarHeight = '0px';
    var BarStroke = 'none';
    var BarFill = 'none';
    var BarValue = '';
    var BarData = '';
    var BarImage = '';
    var BarScale = '1';
    var BarRotation = '0deg';

    var rows = this.tabEditProperties.getRows();
    for (var i = 0; i < rows.length; i++) {
      if (rows[i].getCell('PROPERTY').getValue() == 'Code39') {
        var BarOptions = rows[i].getCell('OPTIONS').getValue();
        for (var j = 0; j < BarOptions.length; j++) {
          if (BarOptions[j].PROPERTY == 'Top') {
            BarTop = BarOptions[j].VALUE;
          } else if (BarOptions[j].PROPERTY == 'Left') {
            BarLeft = BarOptions[j].VALUE;
          } else if (BarOptions[j].PROPERTY == 'Width') {
            BarWidth = BarOptions[j].VALUE;
          } else if (BarOptions[j].PROPERTY == 'Height') {
            BarHeight = BarOptions[j].VALUE;
          } else if (BarOptions[j].PROPERTY == 'Stroke') {
            BarStroke = BarOptions[j].VALUE;
          } else if (BarOptions[j].PROPERTY == 'Fill') {
            BarFill = BarOptions[j].VALUE;
          } else if (BarOptions[j].PROPERTY == 'Data') {
            BarValue = BarOptions[j].VALUE;
          } else if (BarOptions[j].PROPERTY == 'Scale') {
            BarScale = BarOptions[j].VALUE;
          } else if (BarOptions[j].PROPERTY == 'Rotation') {
            BarRotation = BarOptions[j].VALUE;
          }
        }
        BarImage = pas.Unit1.Form1.GenerateBarcode('Code39', BarValue, parseInt(BarWidth), parseInt(BarHeight), BarScale);
        BarData += '<div style="position:absolute; '+
                               'display:flex; '+
                               'justify-content:center; '+
                               'align-items:middle; '+
                               'top:'+BarTop+'; '+
                               'left:'+BarLeft+'; '+
                               'width:'+BarWidth+'; '+
                               'height:'+BarHeight+'; '+
                               'border:'+BarStroke+'; '+
                               'transform: rotate('+BarRotation+'); '+
                               'background:'+BarFill+';">'+
                      '<img height=100% width=auto src='+BarImage+'>';
                    '</div>';
      }
    }
    LabelData += BarData;
  end;
Kind of tedious, and doesn't seem to be looking like much fun to expand, but after doing this a few times, some refactoring ideas come to mind about how to get this done a little more easily. We will worry about that another time. The main idea with this block is to just get the option values out of the table and into play.
The barcode ultimately is going to end up as an image, so here we're explicitly placing an image, centered in its bounding rectangle. Where is the image coming from? We've got a little GenerateBarcode function, where we pass the type of barcode, the data to encode, and some other values to help adjust the size of the barcode as best we can. There are many more options that could come into play, but for now, this will get us something to look at. The code for that function is as follows.
function TForm1.GenerateBarcode(Barcode, Data: String; BarWidth:Integer; BarHeight: Integer; BarScale: Integer): String;
var
  img: TTMSFNCBitmap;
begin

  if (Barcode = 'Code39') then
  begin
    wxBarcode.BarcodeType := bciCode39;
    wxBarCode.Text := UpperCase(Data);
  end;

  wxBarCode.Scale := BarScale;
  wxBarCode.Width := BarWidth;
  wxBarCode.Height := BarHeight;

  img := wxBarcode.GetBarcode(Data);
  asm
    Result = img.FData;
  end;

end;
On our main form, there's a TTMSFNXWXBarcode component (referred to here as wxBarcode). Its visibility property
is set to false, but it is always just kind of sitting there. We pass it things like the type of barcode (Code39)
and the data to encode, and then we call GetBarcode to actually get the barcode as an image. This is the
synchronous method. There's also an asynchronous method. We'll have to switch to that if the performance is too
slow, but at the moment there don't seem to be any hiccups. Limited testing, though.
Note that the image we're ultimately dealing with is actually a data URI - essentially a Base64-encoded image that can be passed around as easily as a string. We had a more in-depth look at these in the Draw.io post (see here). We'll be looking at them again more closely when it comes time to deal with user-supplied image data. But for now, all we need to do is connect that image string up to the "src" attribute of an <img> element. The <img> element is also centered in the main label <div> and its height is set to 100% and width to "auto" so that it maintains its proportions. And with that, we've got barcode labels. Here's what it looks like.
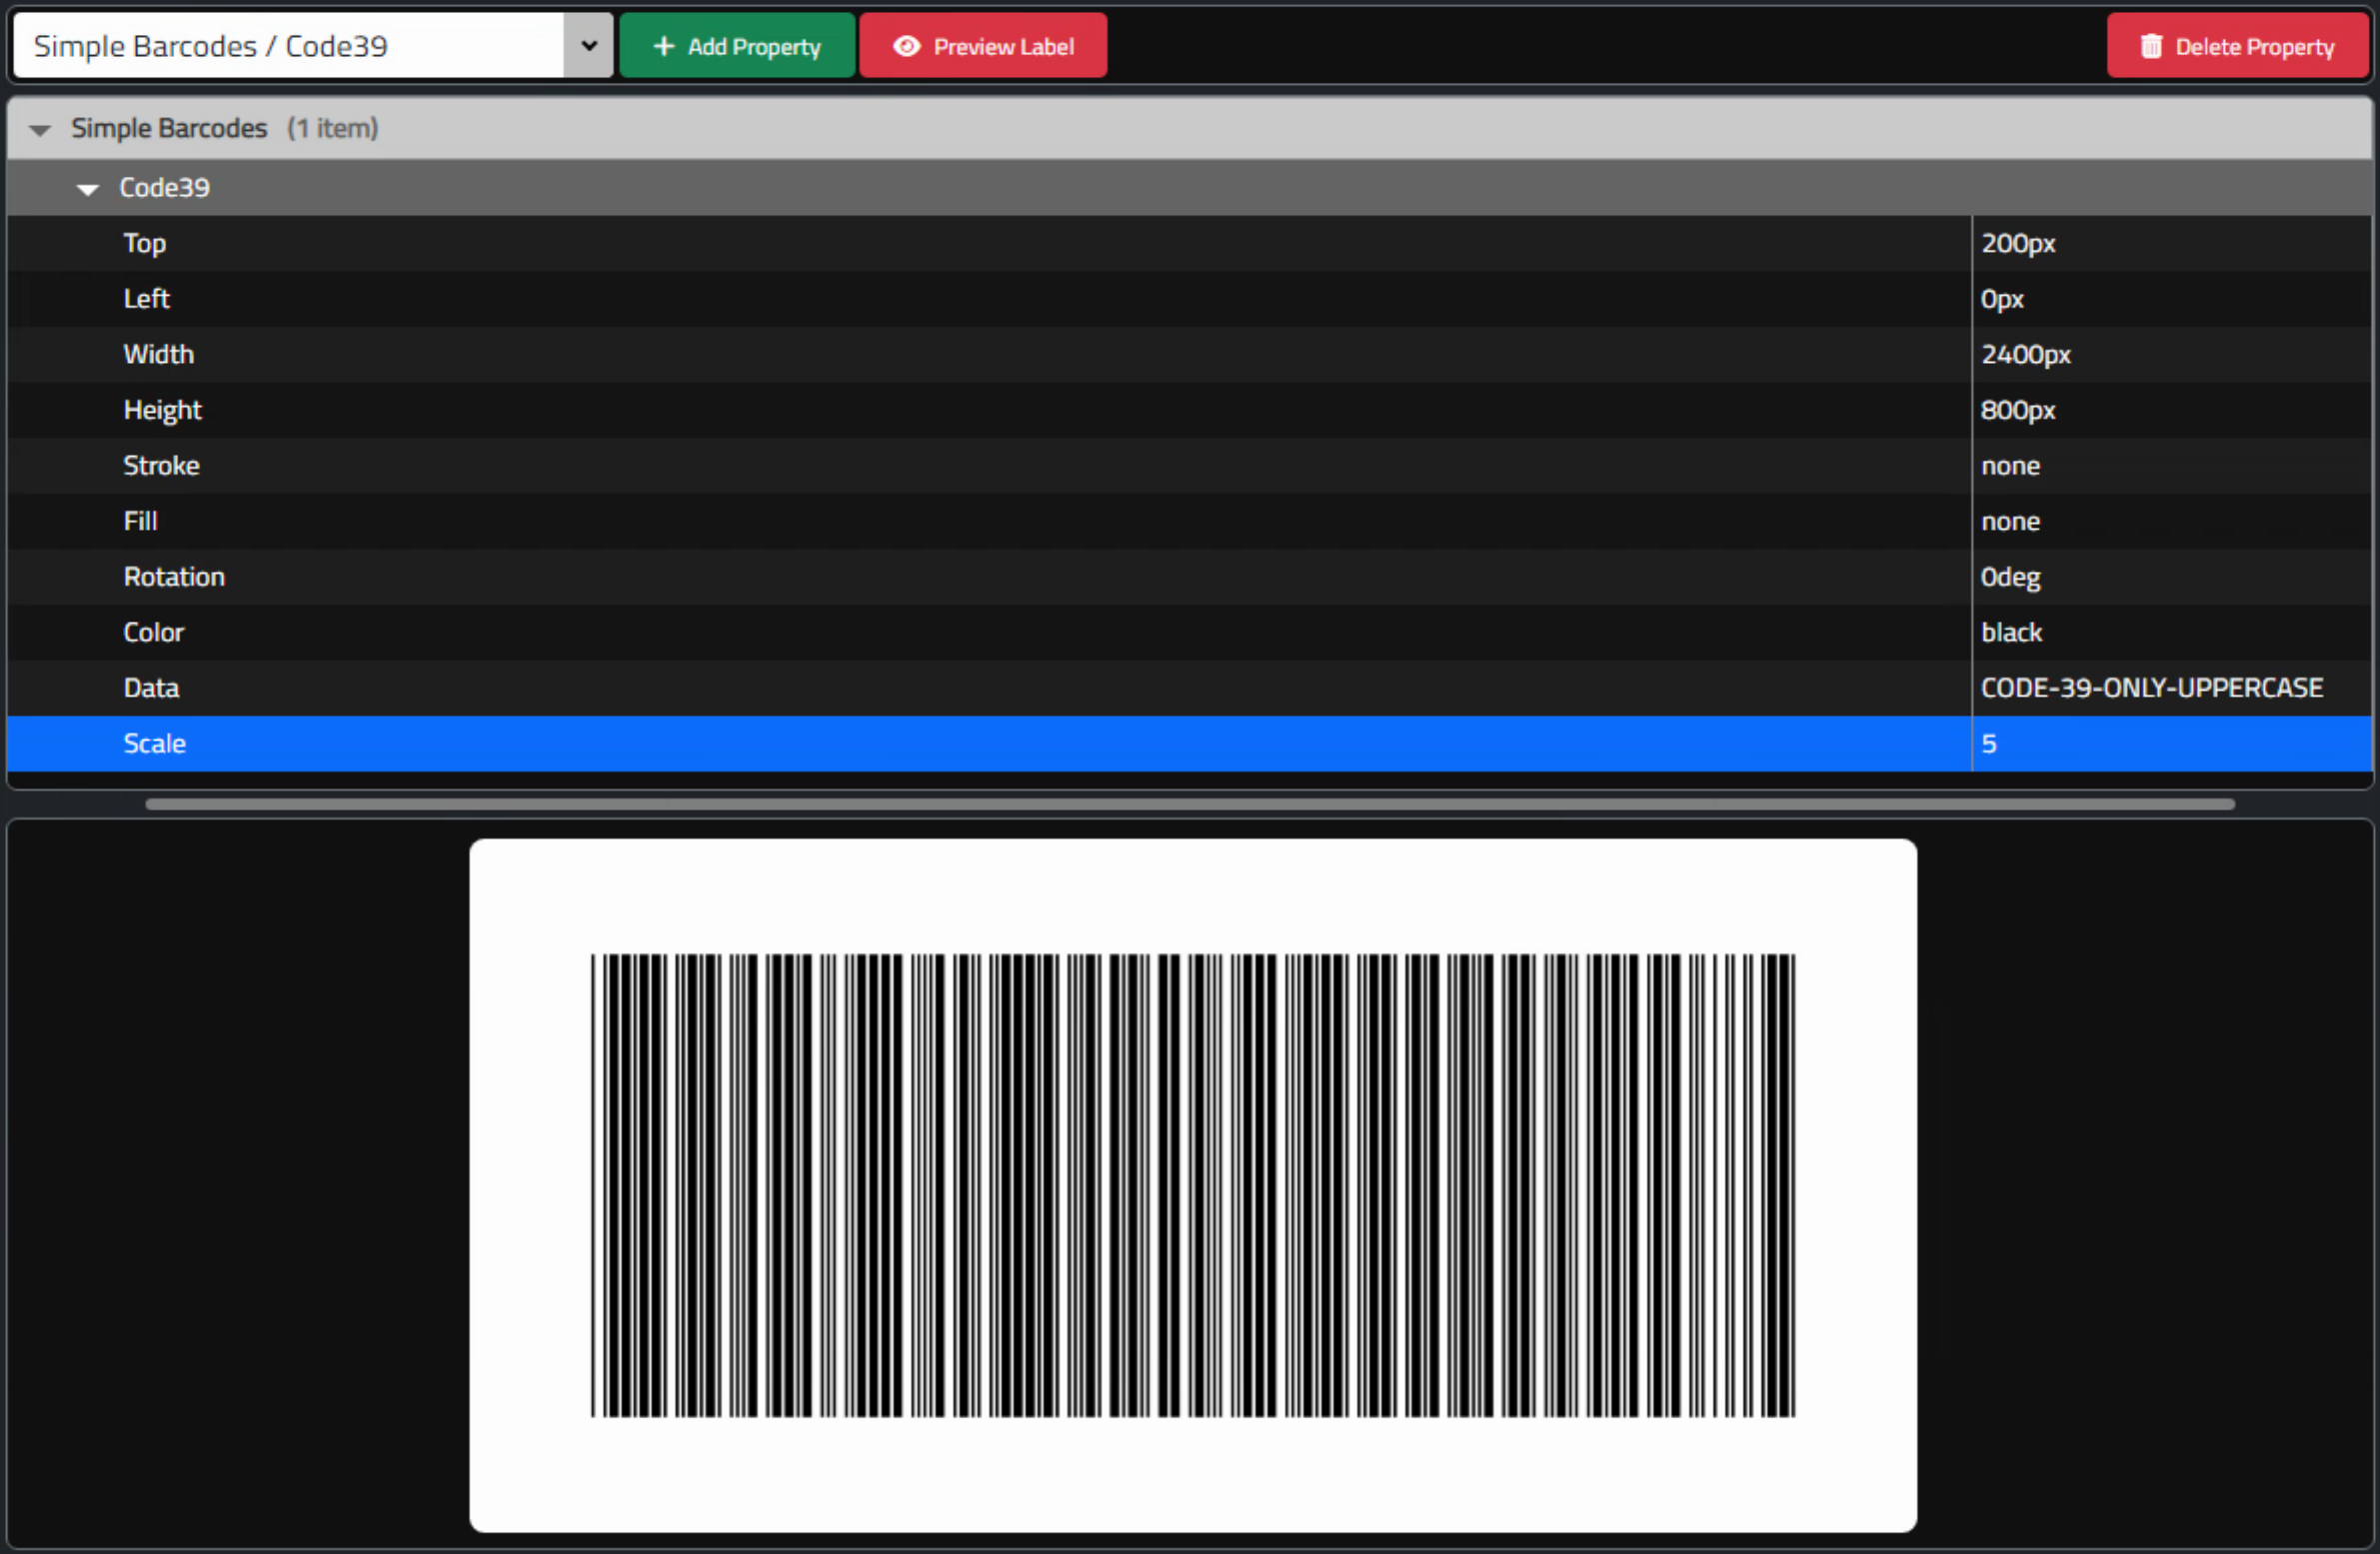
Code39 Barcode.
Code39 is not something you'd really use in a production environment today, but even it has a few options about
whether to show the text representation, whether the text is enclosed in asterisks, check digits, and so on. Other
barcode types have even more options. And that's before we get to 2D barcodes like QR codes! So we'll set this
aside for now and get back to it in the next post, where we'll have more meaningful data to play with.
Label Text.
You might have thought that text would be the first type of property that we'd be using. Tragically, text is riddled with all kinds of issues that require additional time and attention. The basics are easy enough. We could just take one of our rectangle formats and add some text to it, with a few extra options to deal with the font size, font family, any number of styling options, and then some positioning options to dictate how it is aligned within the bounding rectangle. We're trying to take things slow here, but there could easily be several dozen options for a basic bit of text. For static text, that's not so bad. Getting it all wired up and tested almost reaches a level one might call fun. Have a look.
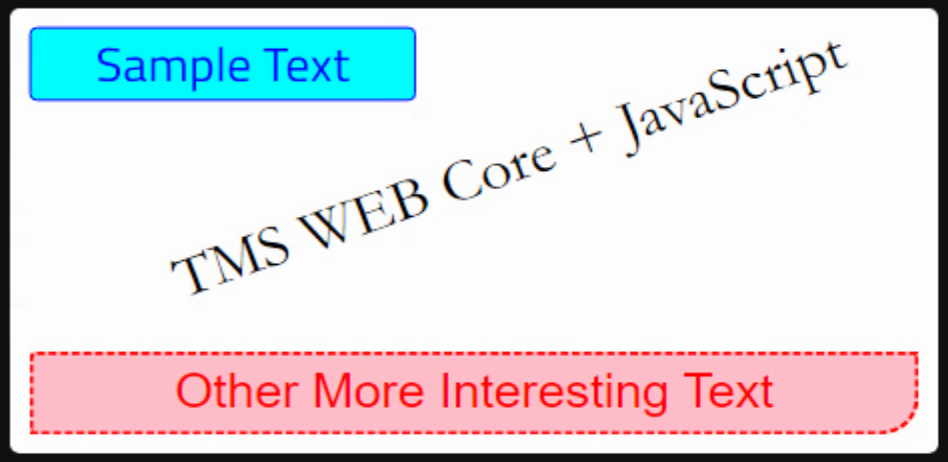
Playing With Text.
For static text, this works reasonably well. But why would text not be static? Most of the time, I'd imagine,
labels are printed with various bits of information that change either continuously or over time. Pricing labels
get updated with new prices. If you're selling fresh produce, there are a bunch of date-related things that need
to be there, like when the produce was packed, or in some cases a "best before" date.
Many industries have stringent standards about the layout and content of the text that appears on the label, down to specific fonts and font sizes, whitespace, and so on, but more importantly, codes that are specific to a particular vendor, product, lot number or any combination of those, or other bits of data. Let's consider a few examples.
First, a generic product label, something that might go on the outside of a large box that contains many smaller items. This product label might indicate the date of manufacture, the location, the number of units in the box, some kind of inspector designation, perhaps a reference to the individual or team that produced the contents, and so on.
When someone is ready to print one of these labels, the workflow might involve them walking up to some kind of label kiosk where they select a product number (maybe by scanning a barcode on one of the smaller items) and push a button to have the label printed, with the rest of the information filled in automatically based on things like the location of the kiosk, the workers that are on-hand at the moment, and perhaps whatever information was carried over from the last time the label was printed.
The main item of interest here is that there is a source of data - the product list - that is used to populate key elements in the label. This might also be the situation if there is an automated production line. Perhaps a scanner of some sort is positioned at a certain point to capture some bit of data, and based on that data arriving, a particular label could be automatically printed, and perhaps automatically applied as well.
Second, let's say you're in charge of managing tours of your work facility. Tours might have 50 people. Each of them needs a visitor badge. The visitors have all signed up and been pre-vetted, including sending along current photos, emergency contact information, and so on. Ideally, you'd like to have all this data organized somewhere, and then push a button and have all 50 labels printed out just before their arrival. You can then use their badge photos to identify them when they arrive.
Again, we have another source of data to contend with, but in this case, we're going to print as many labels as there are in that particular dataset (or perhaps a subset). This might also be similar to managing any kind of list, like an employee address book or Christmas card mailing list. Or perhaps a list of locations that are setup with barcodes for simplifying data entry by giving people something to scan when they are at that location, like a QA station or other production area.
Third, perhaps simpler labels are used where the labels contain some kind of calculated value. Maybe it is a sequence of numbers where the sequence can be determined in advance. Or maybe it is some kind of calculated value that doesn't need an external data source. Dates are notoriously bad for this - many food distributors like to have a date encoded on their labels that the general public won't be able to casually decipher, but which they can use to quickly determine whether a product is past its sell-by date.
I say notorious because it seems every distributor has their own little calculation, typically involving the day of the year, and two arbitrary letters representing the current month and the current year, displayed in some random order. Next time out we'll have a look at whether those calculations can be actually written by the user (or at runtime rather than compile time) to give a little more flexibility in this area.
Sequences (lot codes, for example) may fall in this category as well, using some combination of local data and remote data. For example, consider the last lot number + 1. If lot numbers are only "consumed" by one location, then we don't really need to get too worked up. But if the sequence needs to contemplate different locations working together, things get more interesting.
All of that suggests that any labeling application worth its salt is going to need to be really good at handling these kinds of datasets. Well, basically anything that someone drags in from the mud and throws at it. On the other hand, it also means that we don't need to worry much about applying any structure or enforcing too many rules - it's the wild, wild, west! We just have to provide a nice home for these datasets and let the user sort out what they want to do with them. Easy, right?
Label Datasets.
The first tab in our application (Print) is one we've not really touched yet. The second tab (Edit) is what we've been obsessing over so far. But the third tab (Data) is where we're going to deal with this. And it should be relatively quick and painless, as far as these kinds of things go. What we're after is a way to manage an arbitrary list of datasets. Each dataset can have whatever structure it likes (let's just worry about a table with a number of columns, not nesting or anything like that for the moment). And we're going to make the assumption that the data has enough "smarts" to be able to identify itself. For example, CSV files have a header row.
All we really have to do then is sit back and let Tabulator chew through the data all by itself. We'll need one Tabulator to manage the list (much like the main LabelsList Tabulator). And whenever an item is selected from this list, that data will be passed to Tabulator to figure out. We'll then be able to make use of both - by specifying the dataset and whatever column is in the data - and use that elsewhere to do our iterations or populations or calculations or whatever it is that we need the data for.
To help out, we can even have some sample datasets on hand, so we don't have to work too hard to test all this out. There's a Tabulator option called "automaticColumns" that makes this all rather simple.
    var samplePeople = [
      { "FIRST":"Sneezy",  "LAST":"Dwarf", "ROLE":"Minion" },
      { "FIRST":"Dopey",   "LAST":"Dwarf", "ROLE":"Minion" },
      { "FIRST":"Happy",   "LAST":"Dwarf", "ROLE":"Minion" },
      { "FIRST":"Bashful", "LAST":"Dwarf", "ROLE":"Minion" },
      { "FIRST":"Doc",     "LAST":"Dwarf", "ROLE":"Minion" },
      { "FIRST":"Grumpy",  "LAST":"Dwarf", "ROLE":"Minion" },
      { "FIRST":"Sleepy",  "LAST":"Dwarf", "ROLE":"Minion" }
    ];

    // DatasetList Tabulator - the list of datsets
    this.tabDataset = new Tabulator("#divDataset", {
      data:samplePeople,
      layout: "fitColumns",
      autoColumns: true
    });

    // Do this whenever we click on a row
    this.tabDataset.on("rowClick", function(e,row){
      row.select();
    });
The Label Data UI therefore needs two Tabulators and a few buttons to handle adding, removing, or duplicating datasets, something we've already done elsewhere in this project. So largely copy & paste, with some editing along the way. It isn't all wired up yet, but the basics are in place. Here's what we've got.
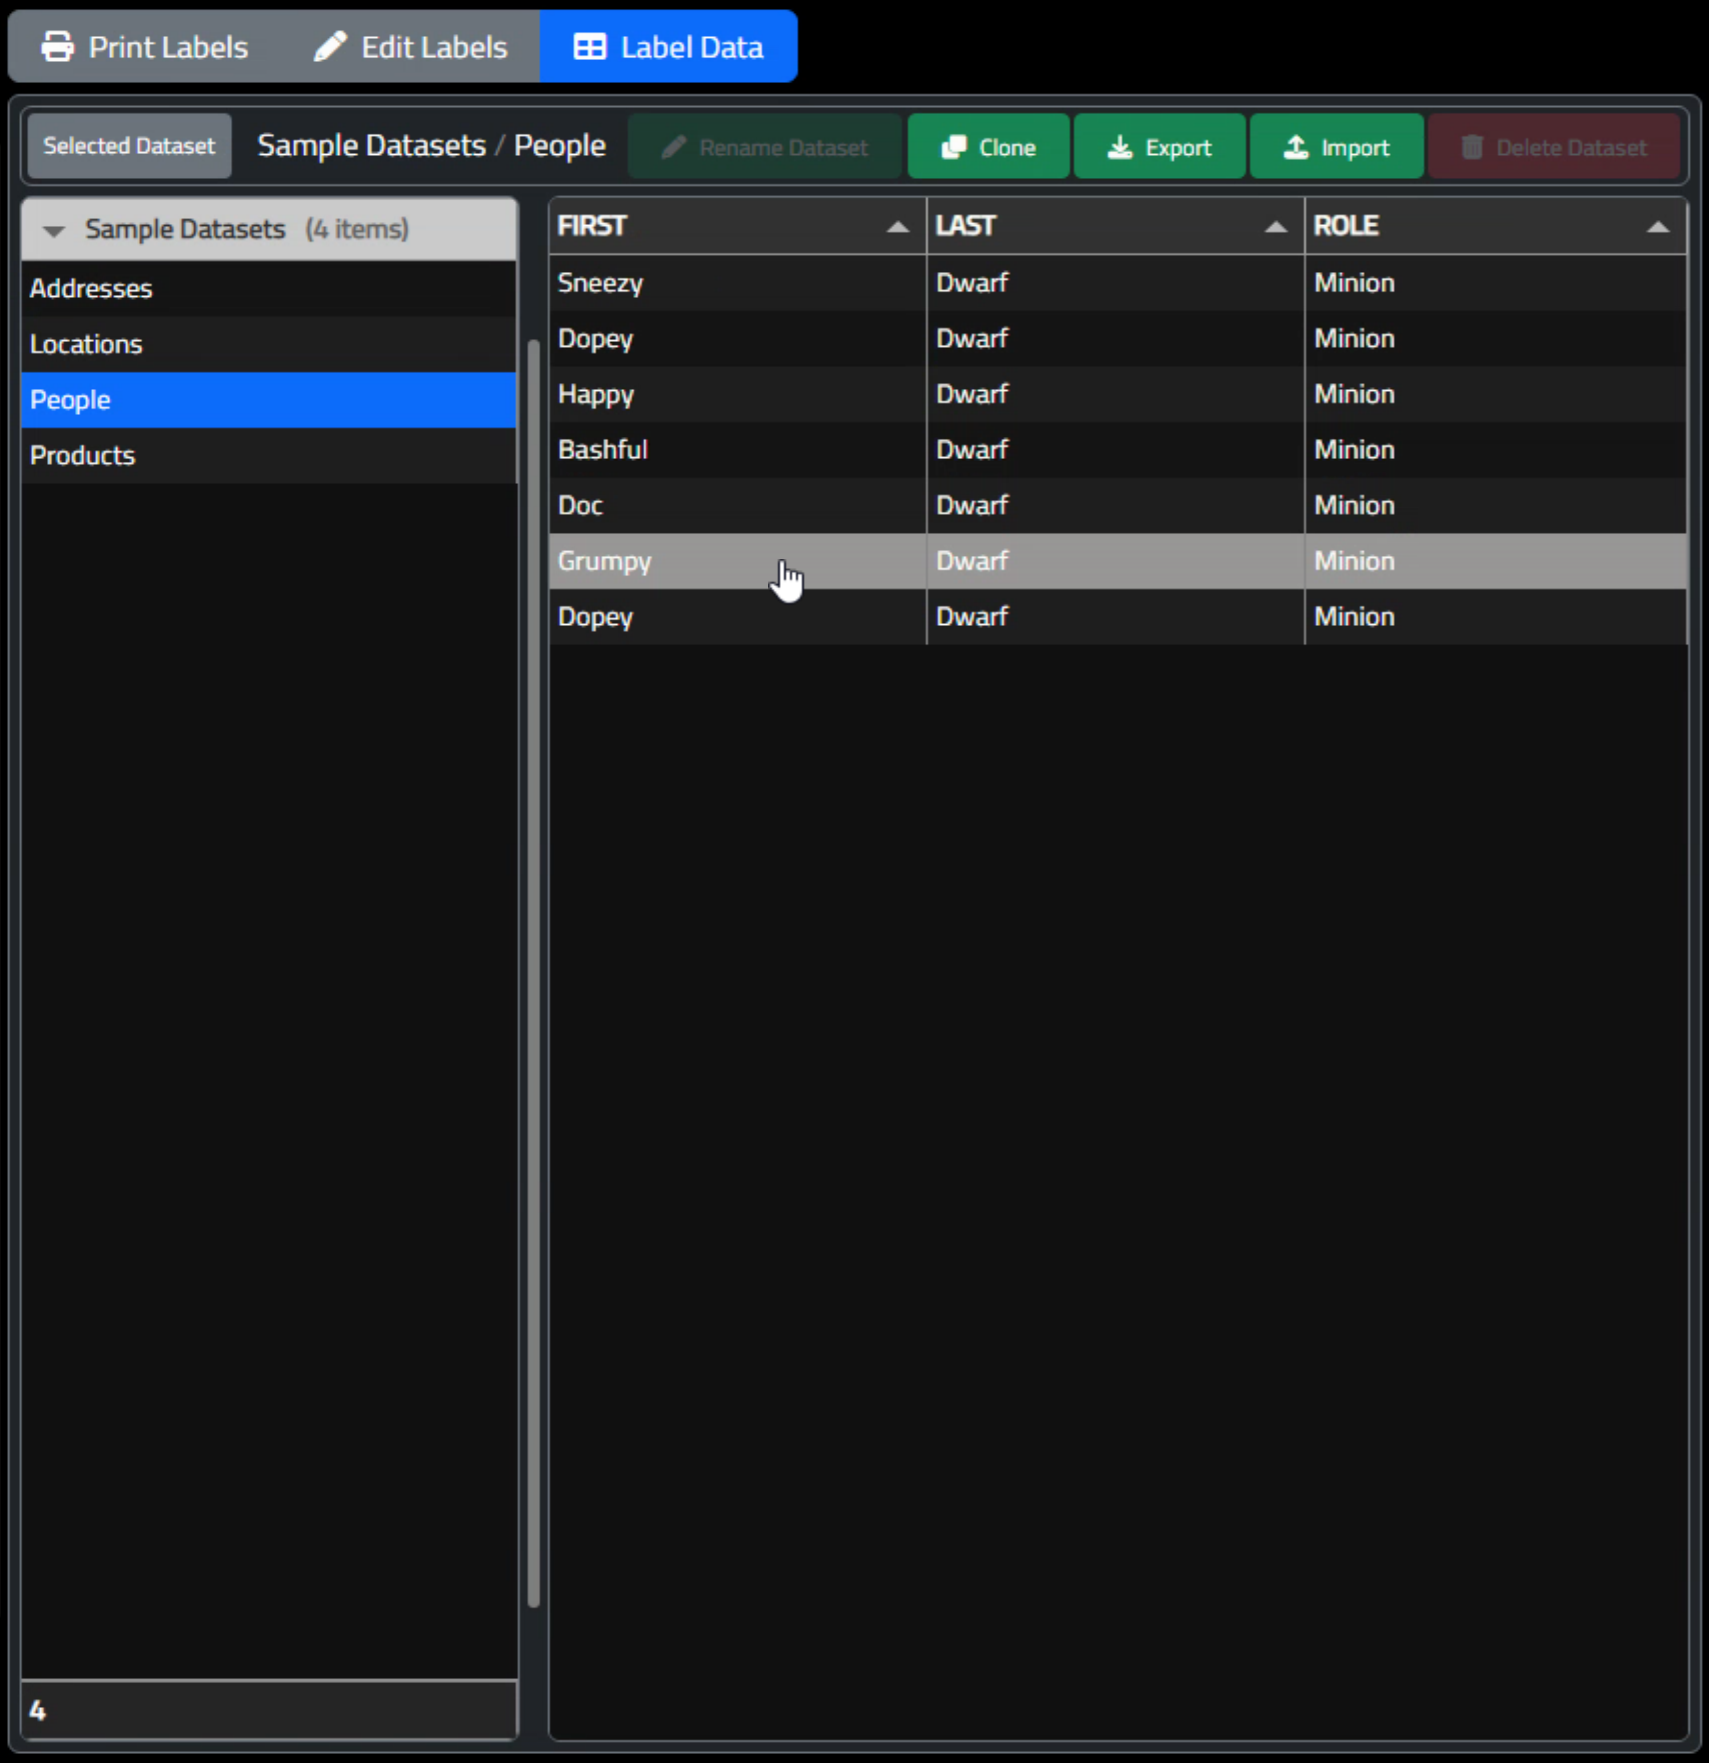
Label Datasets.
Clicking on each dataset will in turn load up a set of sample data for each. In the next post, we'll be focusing
almost entirely on data, so we won't spend any more time on it here, other than to use it as a source for our
print example. We'll just iterate through whatever dataset is selected, and pull data from the first column for
testing purposes. And worry about the rest of the wiring another day.
Printing Labels.
Alright, we've at long last arrived at our last topic - actually generating labels that can be printed. The general plan here is to create a PDF containing pages that are the size of the label, with each page containing an image of whatever layout has been created in our <div>. While generating the <div> as we've been doing, we'll replace any markers in the text with the value from a dataset column, and use the dataset as the source for determining how many pages are needed in the PDF.
For the moment, let's just get a PDF up and working, and worry about the rest of it in a little bit. Generating a PDF can be done directly within a TMS WEB Core application using functionality supplied by TMS FNC Core's TTMSFNCPDFLib component, and then subsequently displayed using TMS FNC WX Pack's TTMSFNCWXPDFViewer component.
To just create a generic PDF is very straightforward. There's a TMS Blog post here that gives solid examples of this kind of thing. What we're ultimately after is a PDF file, encoded in Base64. We'll get to why we want that in a little bit. But for a quick test, let's try something like this.
One curiosity is that there are very few examples showing how to create a PDF and not display it in the web browser. If you call p.BeginDocument with a filename, it will create a file output. If you don't call it with a filename, it will create a TMemoryStream output. Which is what we want. Here's a simple example. The output in this case is sent to a PDF viewer in our app (see below).
procedure TForm1.btnGenerateLabelPDFClick(Sender: TObject);
var
  p: TTMSFNCPDFLib;
  m: TMemoryStream;
  t: TStream;
begin
  p := TTMSFNCPDFLib.Create;
  try
    p.BeginDocument;
    p.Header := '';
    p.HeaderSize := 0;
    p.Footer := '';
    p.FooterSize := 0;
    p.PageSize := psLetter;
    p.PageOrientation := poPortrait;
    p.NewPage;

    p.Graphics.Fill.Color := gcYellowgreen;
    p.Graphics.Stroke.Color := gcGreen;
    p.Graphics.Stroke.Width := 4;
    p.Graphics.DrawRectangle(RectF(100, 100, 300, 300));

    m := p.EndDocument;
    CurrentPDFData := TTMSFNCUtils.SaveStreamToBase64(m);
    TMSFNCWXPDFViewer1.LoadFromBase64(CurrentPDFData);

  finally
    p.Free;
    m.Free;
  end;
end;
The content of the PDF can be set very explicitly with plenty of options for directly drawing on the page, and in some cases even rendering FNC controls directly into the PDF. SVGs and other images can be drawn there as well. One approach we might take is to re-do our label drawing to use these drawing tools instead of the HTML output that we have implemented.
Another approach is to take the HTML that we've generated and convert it into an image of some kind and paste that into the PDF. We'll also have to adjust the page size to match the label size. We'll address the matter of creating pages with sheets of labels for another day, but it could work in a very similar way.
Let's try out the HTML -> image approach and see how well it works. To convert an HTML element to an SVG or PNG file, we can use another JavaScript library - dom-to-image-more. This will take any node on the page and convert it to an image. We can get started by adding it to our Project.html file.
    <!-- Dom-To-Image-More -->
    <script src="https://cdn.jsdelivr.net/npm/dom-to-image-more@2.12.0/dist/dom-to-image-more.min.js"></script>
To generate the image, it is just a simple call to the library. One thing to be aware of is that font handling is going to be a problem, and it doesn't really matter how you end up with a label in a PDF. Using this method of creating an image from an HTML element means that it is this component that needs to be aware of fonts when creating the bitmap (PNG) image. If you were to create an SVG instead, then the font specifications need to be added to the SVG file. Or if you do neither and just create elements on the PDF page directly, then it is the PDF that will need to know how to handle fonts.
The idea behind converting the HTML element to a PNG and using that for
the label is rooted somewhat in the idea that we want the absolute best fidelity when it comes to drawing the
final label. The counter-argument here is that you're sending images to the printer (or to the PDF), vastly
increasing the size of the image and making the printer do more work. Tradeoffs. There are even some label
printers where you can send them a set of canvas-style drawing commands and they'll use their own fonts
and barcode systems. Lots and lots of tradeoffs. For now, let's just get a reasonable representation of the label
as a PNG file and continue on.
  asm
    domtoimage
      .toPng(document.getElementById("divEditPreviewLabel"), {width:2400, height:1200})
      .then(function (dataURI) {
        pas.Unit1.Form1.CurrentLabel = dataURI;
      });
  end;
Then, when we want to create the PDF, we can load up that image and place it wherever we like on the page. Here's an example of what that code might look like.
procedure TForm1.btnGenerateLabelPDFClick(Sender: TObject);
var
  p: TTMSFNCPDFLib;
  g: TTMSFNCGraphicsPDFEngine;
  m: TMemoryStream;
  b: TTMSFNCBitmap;
begin
  p := TTMSFNCPDFLib.Create;
  g := TTMSFNCGraphicsPDFEngine.Create(p);
  try
    p.BitmapContainer := TMSFNCBitmapContainer1;
    p.BeginDocument;
    p.Header := '';
    p.HeaderSize := 0;
    p.Footer := '';
    p.FooterSize := 0;
    p.PageSize := psLetter;
    p.PageOrientation := poPortrait;
    p.NewPage;

    b := TTMSFNCUtils.CreateBitmapFromBase64(CurrentLabel);
    p.graphics.DrawImage(b, gcWhite, RectF(50,350,550,600), true, true, itOriginal, 1.0, true);

    m := p.EndDocument;
    CurrentPDFData := TTMSFNCUtils.SaveStreamToBase64(m);
    TMSFNCWXPDFViewer1.LoadFromBase64(CurrentPDFData);

  finally
    p.Free;
    m.Free;
    b.Free;
  end;
end;
To display the PDF, we can use the TMS FNC WX Pack components. There's a toolbar, a thumbnail viewer, and of course the main preview component. For now, we can just plunk them at the bottom of the Print tab and connect them to one another.
The toolbar includes a handy "file open" option, which would be handy if we wanted to have the ability to save and load PDFs containing labels. Which we do, of course. This could also be used for any old PDF file.
The viewer component doesn't really offer anything handy in the way of printing or downloading though. No criticism of the component, but rather a harsh criticism of the underlying JS library - PDF.js. But we're going to do something sneaky here, to work around that.
To help with this, we've got two more JS libraries to round things out: Print-JS and FileSaver. There's a post in the TMS Support Center here where I first suggested using these for solving other problems, but they'll work just as well here.
    <!--Pirint-JS -->
    <script src="https://cdn.jsdelivr.net/npm/print-js@latest/dist/print.min.js"></script>
    <!-- File-Saver -->
    <script src="https://cdn.jsdelivr.net/npm/file-saver@latest/dist/FileSaver.min.js"></script>
The sneaky part is that when passing data to the PDF viewer, we keep a copy on-hand. Ideally in Base64 format. We can then download or print that file, and not pay any attention to the PDF viewer. When generating our PDF labels, we of course have the original PDF already. When loading a PDF, we can just keep the latest file loaded. CurrentPDFData is declared as a Form variable.
procedure TForm1.btnUploadPDFClick(Sender: TObject);
var
  success: boolean;
begin
  success := await(Boolean, WebOpenDialog1.Perform);
  if success then
  begin
    CurrentPDFData := await(string, WebOpenDialog1.Files[0].FileAsBase64);
    TMSFNCWXPDFViewer1.LoadFromBase64(CurrentPDFData);
  end;
end;
Later, if we want to download the PDF file, we can use something like this.
procedure TForm1.btnDownloadPDFClick(Sender: TObject);
var
  FileData: WideString;
  FileSize: Integer;
  FileSend: TJSArrayBuffer;
  FileName: String;
  JSError: String;
begin
  FileData := CurrentPDFData;
  FileSize := Length(CurrentPDFData);
  FileName := 'labels.pdf';

  if (FileSize = 0 ) then
  begin
    // got nothing for you
    exit;
  end;

  // Ok, We've got a file
  JSError := '';
  try
    FileSend := BinaryStringToAB(window.atob(FileData));
    {$IFNDEF WIN32}
    asm
      try {
        function SaveAsFile(t,f,m) {
          try {
            var b = new Blob([t],{type:m});
            saveAs(b, f);
          } catch (e) {
            window.open("data:"+m+"," + encodeURIComponent(t), '_blank','');
          }
        }
        SaveAsFile(FileSend, FileName, "application/pdf");
      }
      catch(e) {
        JSError = e.message;
      }
    end;
    {$ENDIF}
  except on E: Exception do
    begin
      // something happened
    end;
  end;
  if (JSError <> '') then // something else happened
end;
And if we want to print the PDF, we can try something like this.
procedure TForm1.btnPrintPDFClick(Sender: TObject);
begin
  if (length(CurrentPDFData) = 0) then
  begin
    // got nothing for you
    exit;
  end;

  asm
    printJS({printable: this.CurrentPDFData, type: 'pdf', base64: true})
  end;

end;
Next Time.
We've covered a lot of ground here. Starting from nothing all the way to having a functional app for creating and printing labels that are linked to other datasets. But in its current state, this web app still has a lot of administrative work left to be done, wiring up more buttons and just generally addressing the various UI elements. Next time out, though, we'll be increasing exponentially the data-handling capabilities by connecting it to an XData server. This will allow us to save our label formats so they can potentially be shared with others, and also provide a mechanism to get more useful data into our application from remote databases. Like company product databases, that sort of thing.
In the mean time, I'd love to get some feedback. Was there anything here that you found to be particularly
useful? Anything that you'd like to see added to the app that might help broaden its appeal? Let me know in the
comments below.
Sample Project Download
GitHub Repository
Follow Andrew on 𝕏 at @WebCoreAndMore or join our 𝕏 Web Core and More Community.
Andrew Simard

This blog post has received 2 comments.
 2. Wednesday, October 19, 2022 at 1:54:58 AM
I think you are going to be thrilled with the next few posts, then! I very much appreciate the feedback as well.
2. Wednesday, October 19, 2022 at 1:54:58 AM
I think you are going to be thrilled with the next few posts, then! I very much appreciate the feedback as well.
Andrew Simard
All Blog Posts | Next Post | Previous Post
Winstanley Tim