Frequently Asked Component Specific Questions
Options |
|
Display all FAQ items |
Displaying items 631 to 645 of 888, page 43 of 60
<< previous next >>

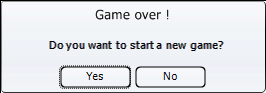
 TAdvSmoothMessageDialog
Creating a TAdvSmoothMessageDialog
Example:
var
  md: TAdvSmoothMessagedialog;
begin
  md := TAdvSmoothMessageDialog.Create(Self);
  md.Caption := 'Game over !';
  with md.Buttons.Add do
begin
  Caption := 'Yes';
  ButtonResult := mrYes;
end;
with md.Buttons.Add do
begin
  Caption := 'No';
  ButtonResult := mrNo;
end;
md.HTMLText.Text := 'Do you want to start a new game?';
md.HTMLText.Location := hlCenterCenter;
md.SetComponentStyle(tsOffice2007Silver);
md.Execute;
TAdvSmoothTimeLineChanging the divisions and subdivisions
By default the timeline has a FixedNumber division type. This division type can be changed to hours, minutes, seconds, months, years, days and milliseconds. When choosing the FixedNumber division type the timeline will always be divided in the amount of divisions and/or subdivisions. When the division type is based on a different type the values and tickmarks will be calculated based on the divisioncount and the division type.
Sample:
RangeFrom := 1/1/2000
RangeTo := 1/1/2100
DivisionType := dtYear
Divisions := 10
SubDivisions := 1
Result:

TAdvSmoothTimeLineAdding a section
An indicator is limited to one position property while the Section can be stretched over a timezone between a starttime and endtime.
Example:
with AdvSmoothTimeLine1.TimeLineSections.Add do
begin
  StartTime := AdvSmoothTimeLine1.Range.RangeFrom + ((AdvSmoothTimeLine1.Range.RangeTo - AdvSmoothTimeLine1.Range.RangeFrom) / AdvSmoothTimeLine1.Range.SubDivisions) * 3;
  EndTime := AdvSmoothTimeLine1.Range.RangeFrom + ((AdvSmoothTimeLine1.Range.RangeTo - AdvSmoothTimeLine1.Range.RangeFrom) / AdvSmoothTimeLine1.Range.SubDivisions) * 5;
  Hint := 'This is a new Section between March and June';
end;

The Section hints can be customized with the HintFill property on Section level. There are also DefaultHintfill, DefaultIndicator and DefaultSectionFill to apply when a new indicator or section is added.
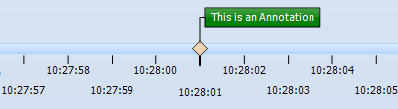
TAdvSmoothTimeLineAdding an annotation
The annotations are added in the same collection as the indicators, but setting the Annotation string property, adds an text to the annotation that can be positioned on top of the timeline or at the bottom of the timeline. When multiple annotations are added the timeline automatically calculates the best possible position to make sure the annotation does not intersect with another annotation.
Example:
AdvSmoothTimeLine1.TimeLineBar.AnnotationFont.Color := clWhite;
with AdvSmoothTimeLine1.TimeLineIndicators.Add do
begin
  Annotation := 'This is an Annotation';
  Position := IncSecond(AdvSmoothTimeLine1.Range.RangeFrom, 5);
  AnnotationColor := clGreen;
end;
An annotation can also contain an image. Add an ImageList container and set the ImageListIndex property to the correct image.
TAdvSmoothTimeLineAdding an indicator
The TAdvSmoothTimeLine can display indicators with different shapes to mark special points on the timeline or to give extra information.
Example:
with AdvSmoothTimeLine1.TimeLineIndicators.Add do
begin
  Position :=AdvSmoothTimeLine1.Range.RangeFrom + ((AdvSmoothTimeLine1.Range.RangeTo - AdvSmoothTimeLine1.Range.RangeFrom) / AdvSmoothTimeLine1.Range.SubDivisions);
  Shape := isDiamond;
  Color := clWhite;
  ColorTo := clGreen;
  Hint := 'This is a new Indicator on February';
end;

The indicator is limited to a single position and can be dragged along the timeline to change the position. With the OnIndicatorPositionChanged and OnIndicatorPositionChanging event you can see the current position of the indicator. The indicator dragging can be disabled by setting the Fixed property to true.
TAdvSmoothTimeLineChanging the start & end time of the timeline
To change the start and end time of the timeline, change the Range.RangeFrom and Range.RangeTo properties.
In combination with RangeAppearance.DivisionFormat and RangeAppearance.SubDivisionFormat these properties give full access to every possible time range. The Range.Divisions and Range.SubDivisions properties allow you to specify to number of steps from RangeFrom to RangeTo. For each step a tickmark is drawn.
Example: Years / Months
Settings to display a range from January 2009 to December 2009 with a subdivision for each month:
AdvSmoothTimeLine1.BeginUpdate;
AdvSmoothTimeLine1.SetTimeLineRange(EncodeDate(2009, 1, 1), EncodeDate(2009, 12, 31));
AdvSmoothTimeLine1.Range.Divisions := 1;
AdvSmoothTimeLine1.Range.SubDivisions := 11;
AdvSmoothTimeLine1.RangeAppearance.DivisionFormat := 'mmmm yyyy';
AdvSmoothTimeLine1.RangeAppearance.SubDivisionFormat := 'mmmm';
AdvSmoothTimeLine1.RangeAppearance.DivisionFont.Size := 10;
AdvSmoothTimeLine1.RangeAppearance.SubDivisionFont.Size := 7;
AdvSmoothTimeLine1.RangeAppearance.DivisionTickMarkSize := 15;
AdvSmoothTimeLine1.RangeAppearance.SubDivisionTickMarkSize := 5;
AdvSmoothTimeLine1.HorizontalMargin := 50;
AdvSmoothTimeLine1.Width := 700;
AdvSmoothTimeLine1.EndUpdate;
TAdvSmoothSlideShowAdding items
Items can be added at designtime or at runtime. The slideshow has a built-in function to quickly add images from a folder.
AdvSmoothSlideShow1.AddItemsFromFolder(‘\Sample photos\*.jpg', ikImage);
with AdvSmoothSlideShow1.Items.Add do
begin
  Image.LoadFromFile('image1.jpg');
  Location := 'image1.jpg';
  Kind := ikImage;
  Control := Button1;
  ...
end;
TMS Advanced Poly ListReordering items
Reordering items is as simple as setting a new index property on the item:
AdvPolyList1.Items[0].Index := 1;
The item will automatically be moved to the new position in the collection. Typecasting is not necessary for properties that are common and available on the base class.
This is also explained at page 12 of the PDF Developers Guide
TMS Advanced Poly ListAccessing items
Items can be accessed with the “Items” property of the poly list and must be typecasted to the correct class type:
TTextItem(AdvPolyList1.Items[0])
TMS Advanced Poly ListAdding / removing items
The poly list has a polymorph collection of TCustomItem classes. Each descending class inherits all properties and can also be added to the collection. To access the properties specifically for a descending item, the item must be added to the list and typecasted to the correct class to gain access to the properties.
Adding an item:
with TTextItem(AdvPolyList1.AddItem(TTextItem)) do
begin
  Caption := 'This is a sample';
end;
Inserting an item at a specific position in the collection:
with TTextItem(AdvPolyList1.InsertItem(0, TTextItem)) do
begin
  Caption := 'This is a sample';
end;
Removing an item at a specific position:
AdvPolyList1.RemoveItem(0);
To compile the project, the unit must manually be added to the uses list. In this case the unit is GDIPTextItem which contains the TTextItem class.
The rule for adding the correct unit is:
(T)CustomItem -> (GDIP)CustomItem
Class -> Unit
When you are not sure what unit you must add to compile the project, you can always add the item of choice at designtime, so the unit is automatically added to the uses list.
This is also explained at page 12 of the PDF Developers Guide
TMS Advanced Poly ListAdding pictures to the TGDIPPictureContainer at runtime
Below is a code snippet that shows how an image is loaded from file and added to the TGDIPPictureContainer:
with GDIPPictureContainer.Items.Add do
begin
  Picture.LoadFromFile('myimage.png’);
  Name := 'NEW';
end;with GDIPPictureContainer.Items.Items[0].Free;
TMS IntraWeb Component Pack ProHow to upload files with TTIWFilePicker.
The TTIWFilePicker is only included in the TMS IntraWeb Component Pack for compatibility with older versions. Please use the default IntraWeb TIWFile control instead.
TMS IntraWeb Component Pack Pro Script EditionHow to upload files with TTIWFilePicker.
The TTIWFilePicker is only included in the TMS IntraWeb Component Pack for compatibility with older versions. Please use the default IntraWeb TIWFile control instead.
TMS Advanced Poly ListUsing the fill editor at runtime
It is easy to use the fill editor at runtime. To do this, add the unit AdvSmoothFillEditor to the uses list and add following code:
var
  filldlg :TAdvSmoothFillEditorDialog;
begin
  filldlg := TAdvSmoothFillEditorDialog.Create(self);
  filldlg.Fill := AdvPolyList1.Fill;
  filldlg.Execute;
end;
This is also explained at page 67 of the PDF Developers Guide
TMS Unicode Component PackExtend the max. size of text size that can be entered in TntRichEdit
Just like with a regular TRichEdit control, there is a default limitation on the size of text that can be entered in the rich edit control. To make this size larger, following code can be used:
const
  EM_EXLIMITTEXT = $0435;
  TEXTSIZE = 256000;

begin
  SendMessage(TNTRichEdit.Handle, EM_EXLIMITTEXT, 0, TEXTSIZE);
end;