Frequently Asked Component Specific Questions
Options |
|
Display all FAQ items |
Displaying items 196 to 210 of 888, page 14 of 60
<< previous next >>

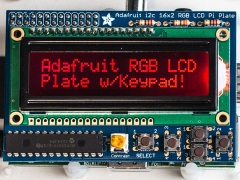
 TMS LCL Cloud Pack
Using TMS LCL Components for Raspberry Pi
With the recently introduced TMS LCL Cloud Pack and the open-source TMS LCL HW Pack, building small Raspberry Pi based projects is easier than ever. In this example, the code for an appliance is presented that displays the number of visitors on a website on a Raspberry Pi 16x2 LCD backpanel.
This code fetches the page statistics from Google Analytics with the TMS LCL Cloud Pack TMSLCLCloudGAnalytics component
function TForm1.GetRTVisitors: string;
var
  RT: TRealtimeMetricsArray;
  StartDate, EndDate: string;
  i: integer;
  error: string;
  Res: TGStringArray;
begin
  Result := ‘’;
 StartDate := ''today'';
  EndDate := ''today'';
  SetLength(RT,1);
  RT[0] := rtActiveUsers;
  TMSLCLCloudGAnalytics1.RequestData.RealtimeMetrics := RT;
  // fetches data for the page coupled with Google Analytics ID set via ViewID
  Error := TMSLCLCloudGAnalytics1.GetData(TMSLCLCloudGAnalytics1.App.ViewID);
  If Error = ‘’ then
  begin
     Res  := TMSLCLCloudGAnalytics1.Data.Data[0];
     Result := Res[0];
 end;
end;
procedure TForm1.ButtonClick1 (Sender: TObject);
begin
  TMSLCLAdaDispl16x2.Init;
  TMSLCLCloudGAnalytics1.Connect;
end;
procedure TForm1.TMSLCLCloudGAnalytics1Connected(Sender: TObject);
var
  s: string;
begin
  s := GetRTVisitors;
  TMSLCLAdaDispl16x2.DrawText(‘Visitors:’ +s);
end;
 TMS FMX UI Pack
TTMSFMXTableView: How to hide the header & footer
To hide the header / footer you can use the following code:
procedure TForm1.FormCreate(Sender: TObject);
begin
  TMSFMXTableView1.NeedStyleLookup;
  TMSFMXTableView1.ApplyStyleLookup;
  TMSFMXTableView1.GetHeaderRectangle.Visible := False;
  TMSFMXTableView1.GetFooterRectangle.Visible := False;
end;
To make sure the header and footer rectangle elements are created, call NeedStyleLookup and ApplyStyleLookup once. An alternative way of hiding the those elements is in the OnApplyStyleLookup event:
procedure TForm1.TMSFMXTableView1ApplyStyleLookup(Sender: TObject);
begin
  TMSFMXTableView1.GetHeaderRectangle.Visible := False;
  TMSFMXTableView1.GetFooterRectangle.Visible := False;
end;
TMS SparkleUsing client-certificates with Sparkle in Windows
You can send client-certificates when performing HTTP requests using Sparkle, from Windows. The following code snippet shows how to do it. Two comments about the code:
a) You have to declare TInternalHTTPClient in the same unit you use the code below, preferable in the implementation section
b) This code snippet shows also how to retrieve the certificate from Windows store. It’s there as an example but you can and should replace with your own code to retrieve the certificate. That part of the code is not Sparkle-related and you should be familiar with the Windows API that handles certificates. The relevant Sparkle code is highlighted in bold.
TInternalHTTPClient = class(THttpClient)
end;

var
  httpClient: THttpClient;
  httpEngine: TWinHttpEngine;
  httpRequest: THttpRequest;
  httpResponse: THttpResponse;
  Store: HCERTSTORE;
  Cert: PCERT_CONTEXT;
begin
  httpClient := THttpClient.Create;

  // Open the ''Personal'' SSL certificate store for the local machine and locate the required client-side certificate
  Cert := nil;
  Store := CertOpenStore(CERT_STORE_PROV_SYSTEM, 0, 0, CERT_SYSTEM_STORE_LOCAL_MACHINE, PChar(''MY''));
  if (Store <> nil) then
    Cert := CertFindCertificateInStore(Store, X509_ASN_ENCODING, 0, CERT_FIND_SUBJECT_STR, PChar(''mycertsubject''), nil);

  // If a valid certificate was found then OK to create and send the HTTP request
  if (Cert <> nil) then
  begin
    // Setup HTTP request properties
    httpRequest := httpClient.CreateRequest;
    ...

    // Use ''BeforeWinHttpSendRequest'' event to set any HTTP request properties such as client-side SSL certificate
    httpEngine := TWinHttpEngine(TInternalHTTPClient(httpClient).Engine);
    httpEngine.BeforeWinHttpSendRequest :=
      procedure (Req: HINTERNET)
      begin
        WinHttpCheck(WinHttpSetOption(Req, WINHTTP_OPTION_CLIENT_CERT_CONTEXT, Cert, SizeOf(CERT_CONTEXT)));
      end;

    // Execute HTTP request
    httpResponse := httpClient.Send(httpRequest);
  end;
TMS VCL WebGMapsWorking with Polygons
Adding a polygon:
var
  PolygonItem: TPolygonItem;
begin
  PolygonItem := WebGMaps1.Polygons.Add;
  PolygonItem.Polygon.BackgroundOpacity := 50;
  PolygonItem.Polygon.BorderWidth := 2;

  //Settings for a Polygon of type Circle
  PolygonItem.Polygon.PolygonType := ptCircle;
  PolygonItem.Polygon.Radius := 10000;
  PolygonItem.Polygon.Center.Latitude := 50;
  PolygonItem.Polygon.Center.Longitude := 2;

  //Settings for a Polygon of type Rectangle
  PolygonItem.Polygon.PolygonType := ptRectangle;
  PolygonItem.Polygon.Bounds.NorthEast.Latitude := 52;
  PolygonItem.Polygon.Bounds.NorthEast.Longitude := 4;
  PolygonItem.Polygon.Bounds.SouthWest.Latitude := 50;
  PolygonItem.Polygon.Bounds.SouthWest.Longitude := 3;

  //Settings for a Polygon of type Path
  PolygonItem.Polygon.PolygonType := ptPath;
  PolygonItem.Polygon.Path.Add(50, 2);
  PolygonItem.Polygon.Path.Add(52, 4);
  PolygonItem.Polygon.Path.Add(50, 4);

  WebGMaps1.CreateMapPolygon(PolygonItem.Polygon);
end;
PolygonItem.Polygon.Visible := not PolygonItem.Polygon.Visible;

WebGMaps1.UpdateMapPolygon(PolygonItem.Polygon);
//Removes the Polygon from the map
WebGMaps1.DeleteMapPolygon(PolygonItem.Index);

//Removes the Polygon from the collection
WebGMaps1.Polygons.Delete(PolygonItem.Index);
TMS VCL WebGMapsWorking with Polylines
Adding a polyline:
var
  PolylineItem: TPolylineItem;
begin
  PolylineItem := WebGMaps1.Polygons.Add;
  PolylineItem.Polyline.Width := 2;
  PolylineItem.Polyline.Path.Add(50, 2);
  PolylineItem.Polyline.Path.Add(52, 4);
  PolylineItem.Polyline.Path.Add(50, 4);

  WebGMaps1.CreateMapPolyline(PolylineItem.Polyline);
end;
PolylineItem.Polyline.Visible := not PolylineItem.Polyline.Visible;

WebGMaps1.UpdateMapPolyline(PolylineItem.Polyline);
//Removes the Polyline from the map
WebGMaps1.DeleteMapPolyline(PolylineItem.Index);

//Removes the Polyline from the collection
WebGMaps1.Polylines.Delete(PolylineItem.Index);
TAdvMultiInputQueryDialogSample code
TAdvMultiInputQueryDialog is capable of displaying a dialog with multiple queries. After clicking OK, the values property can retrieve the value that has been entered, as demonstrated in the following sample.
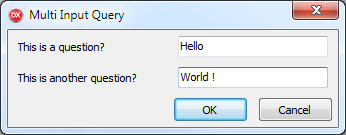
var
  qv, qv2: TAdvMultiInputQueryValue;
  v, v2: String;
begin
  AdvMultiInputQueryDialog1.LabelWidth := 150;
  qv := AdvMultiInputQueryDialog1.QueryValues.Add;
  qv.&Label := ''This is a question?'';
  qv.Name := ''value1'';
  qv := AdvMultiInputQueryDialog1.QueryValues.Add;
  qv.&Label := ''This is another question?'';
  qv.Name := ''value2'';
  AdvMultiInputQueryDialog1.Execute(True);
  v := AdvMultiInputQueryDialog1.Values[''value1''].ResultValue;
  v2 := AdvMultiInputQueryDialog1.Values[''value2''].ResultValue;
end;
After clicking OK, v and v2 string values contain "Hello" & "World!"
TMS LoggingSupported Delphi versions
TMS Logging requires Delphi XE7 or newer due to technical Delphi language feature compatibility issues.
TCalcEditSupported functions
TCalcEdit uses the same formula parsing engine as TAdvSpreadGrid. You can find information on the supported functions in the TAdvSpreadGrid doc, revelant information starts on page 175.
TDBAdvGridMulti-column sorting in TDBAdvGrid
When:
DBAdvGrid.PageMode := False;
DBAdvGrid.SortSettings.Show := True;
DBAdvGrid.SortSettings.IndexShow := True;
TMS VCL WebGMapsGoogle discontinued Panoramio
Unfortunately Google discontinued Panoramio: http://googlegeodevelopers.blogspot.com.au/2014/06/sunsetting-javascript-api-weather-panoramio.html Therefore, this feature can unfortunately no longer be used from TMS WebGMaps.
TMS AureliusExecuting SQL statements directly with IDBConnection
You might have some situations where you want to execute an SQL statement directly in the database, bypassing the object manager. Of course you could use the database access component directly (FireDac, dbExpress, ADO, etc.). But in case you want to keep the code abstract when it comes to the database access layer, and benefit from existing Aurelius connection, you can use IDBConnection to do so.
Here is how you would do it:
uses {...}, Aurelius.Drivers.Interfaces;

var
  Statement: IDBStatement;

Statement := Manager.Connection.CreateStatement;
Statement.SetSQLCommand(TheSQLStatement);
Statement.Execute;
If the statement is queryable, you can retrieve results using ExecuteQuery method which returns an IDBResultSet interface:
var
  Statement: IDBStatement;
  ResultSet: IDBResultSet;

Statement := Manager.Connection.CreateStatement;
Statement.SetSQLCommand(TheSQLStatement);
ResultSet := Statement.ExecuteQuery;

while ResultSet.Next do
  Value := ResultSet.GetFieldValue(SomeFieldName);

Finally, for both types of commands you can set parameter values:

{...}
Params := TObjectList<TDBParam>.Create;
try
  Statement := Manager.Connection.CreateStatement;
  Params.Add(TDBParam.Create('id', ftInteger, 15));
  Statement.SetSQLCommand('Delete from Customer Where Id = :id');
  Statement.SetParams(Params);
  Statement.Execute;
finally
  Params.Free;
end;
TMS iCLAdding an UIToolBarItem to the toolbar of an UITableView in iCL
The TTMSFMXNativeUITableView has a toolbar property that can be set to True. When adding an item, you can then add it to the TableViewController instead of the NavigationController. Below is the source code that demonstrates this.
unit UDemo;

interface

uses
  System.SysUtils, System.Types, System.UITypes, System.Classes, System.Variants,
  FMX.Types, FMX.Controls, FMX.Forms, FMX.Graphics, FMX.Dialogs, iOSApi.Foundation,
  FMX.TMSNativeUIBaseControl, FMX.TMSNativeUIView, FMX.TMSNativeUICore,
  FMX.TMSNativeUIViewController, FMX.TMSNativeUINavigationController, FMX.TMSNativeUIToolBar,
  MacApi.ObjectiveC, TypInfo, MacApi.ObjcRuntime, FMX.TMSNativeUITableView;

type
  IUIToolBarButtonEventHandler = interface(NSObject)
  ['{1ACF3DFA-A90B-4F06-ACF1-8A40076BC9ED}']
    procedure Click(Sender: Pointer); cdecl;
  end;

  TUIToolBarButtonEventHandler = class(TOCLocal)
  protected
    function GetObjectiveCClass: PTypeInfo; override;
  public
    procedure Click(Sender: Pointer); cdecl;
  end;

  TDemoForm = class(TForm)
    TMSFMXNativeUITableView1: TTMSFMXNativeUITableView;
    procedure FormCreate(Sender: TObject);
  private
    { Private declarations }
    FEventHandler: TUIToolBarButtonEventHandler;
    FHideButton: UIBarButtonItem;
  public
    { Public declarations }
  end;

var
  DemoForm: TDemoForm;

implementation

{$R *.fmx}

procedure TDemoForm.FormCreate(Sender: TObject);
begin
  FEventHandler := TUIToolBarButtonEventHandler.Create;
  FHideButton := TUIBarButtonItem.Wrap(TUIBarButtonItem.Wrap(TUIBarButtonItem.OCClass.alloc).initWithBarButtonSystemItem(integer(siBarButtonSystemItemAdd),
    FEventHandler.GetObjectID, sel_getUid('Click:')));

  TMSFMXNativeUITableView1.Options.ToolBar := True;
  TMSFMXNativeUITableView1.TableViewController.navigationItem.setRightBarButtonItem(FHideButton);
end;

{ TUIToolBarButtonEventHandler }

procedure TUIToolBarButtonEventHandler.Click(Sender: Pointer);
begin
  ShowMessage('clicked');
end;

function TUIToolBarButtonEventHandler.GetObjectiveCClass: PTypeInfo;
begin
  Result := TypeInfo(IUIToolBarButtonEventHandler);
end;

end.
 TMS FMX UI Pack
TMSFMXSpeedButton: How to change the Pressed Color
You can use the following code to to change the Pressed Color in TMSFMXSpeedButton:
procedure TForm1.TMSFMXSpeedButton1ApplyStyleLookup(Sender: TObject);
var
  I: Integer;
  c: TFMXObject;
  txt: TText;
  ca: TColorAnimation;
begin
  txt := TMSFMXSpeedButton1.GetText;
  txt.Color := claWhite;

  c := TMSFMXSpeedButton1.GetBackGround;
  for I := 0 to c.ChildrenCount - 1 do
  begin
    if c.Children[I] is TColorAnimation then
    begin
      ca := (c.Children[I] as TColorAnimation);
      if ca.Trigger = 'IsMouseOver=true;IsPressed=true' then
      begin
        ca.StartValue := claBlue;
        ca.StopValue := claGreen;
      end;
      if ca.Trigger = 'IsMouseOver=true;IsPressed=false' then
      begin
        ca.StartValue := claNull;
        ca.StopValue := claRed;
      end;
    end;
  end;
end;
 TMS FMX UI Pack
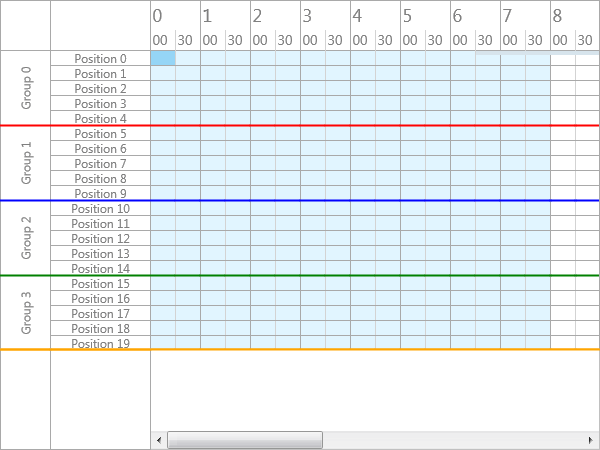
TTMSFMXPlanner: How to have different colored lines between groups
The TTMSFMXPlanner supports custom drawing in various areas such as the group, timeline and grid area. The code below demonstrates how to draw lines to separate groups which cover multiple positions.
procedure TForm1.TMSFMXPlanner1AfterDrawCellVerticalLine(Sender: TObject;
  ACanvas: TCanvas; ARect: TRectF; ACol, ARow: Integer; AStartTime,
  AEndTime: TDateTime; APosition: Integer; AKind: TTMSFMXPlannerCacheItemKind);
begin
  ACanvas.StrokeThickness := 2;
  if ARow = 5 then
  begin
    ACanvas.Stroke.Color := claRed;
    ACanvas.DrawLine(PointF(ARect.Left, ARect.Top), PointF(ARect.Right, ARect.Top), 1);
  end;

  if ARow = 10 then
  begin
    ACanvas.Stroke.Color := claBlue;
    ACanvas.DrawLine(PointF(ARect.Left, ARect.Top), PointF(ARect.Right, ARect.Top), 1);
  end;

  if ARow = 15 then
  begin
    ACanvas.Stroke.Color := claGreen;
    ACanvas.DrawLine(PointF(ARect.Left, ARect.Top), PointF(ARect.Right, ARect.Top), 1);
  end;

  if ARow = 19 then
  begin
    ACanvas.Stroke.Color := claOrange;
    ACanvas.DrawLine(PointF(ARect.Left, ARect.Bottom - 1), PointF(ARect.Right, ARect.Bottom - 1), 1);
  end;
end;

procedure TForm1.TMSFMXPlanner1AfterDrawGroup(Sender: TObject;
  ACanvas: TCanvas; ARect: TRectF; AGroup, AStartPosition,
  AEndPosition: Integer; AKind: TTMSFMXPlannerCacheItemKind);
begin
  ACanvas.StrokeThickness := 2;
  if AGroup in [1, 2, 3] then
  begin
    case AGroup of
      1: ACanvas.Stroke.Color := claRed;
      2: ACanvas.Stroke.Color := claBlue;
      3: ACanvas.Stroke.Color := claGreen;
    end;

    ACanvas.DrawLine(PointF(ARect.Left, ARect.Top), PointF(ARect.Right, ARect.Top), 1);
  end;
end;

procedure TForm1.TMSFMXPlanner1AfterDrawGroupEmptySpace(Sender: TObject;
  ACanvas: TCanvas; ARect: TRectF; ASpace: TTMSFMXPlannerGroupEmptySpace);
begin
  ACanvas.StrokeThickness := 2;
  if ASpace = pgesTopRight then
  begin
    ACanvas.Stroke.Color := claOrange;
    ACanvas.DrawLine(PointF(ARect.Left, ARect.Top), PointF(ARect.Right, ARect.Top), 1);
  end;
end;

procedure TForm1.TMSFMXPlanner1AfterDrawPosition(Sender: TObject;
  ACanvas: TCanvas; ARect: TRectF; APosition: Integer;
  AKind: TTMSFMXPlannerCacheItemKind);
begin
  ACanvas.StrokeThickness := 2;
  if APosition = 5 then
  begin
    ACanvas.Stroke.Color := claRed;
    ACanvas.DrawLine(PointF(ARect.Left, ARect.Top), PointF(ARect.Right, ARect.Top), 1);
  end;

  if APosition = 10 then
  begin
    ACanvas.Stroke.Color := claBlue;
    ACanvas.DrawLine(PointF(ARect.Left, ARect.Top), PointF(ARect.Right, ARect.Top), 1);
  end;

  if APosition = 15 then
  begin
    ACanvas.Stroke.Color := claGreen;
    ACanvas.DrawLine(PointF(ARect.Left, ARect.Top), PointF(ARect.Right, ARect.Top), 1);
  end;
end;

procedure TForm1.TMSFMXPlanner1AfterDrawPositionEmptySpace(Sender: TObject;
  ACanvas: TCanvas; ARect: TRectF; ASpace: TTMSFMXPlannerPositionEmptySpace);
begin
  ACanvas.StrokeThickness := 2;
  if ASpace = ppesTopRight then
  begin
    ACanvas.Stroke.Color := claOrange;
    ACanvas.DrawLine(PointF(ARect.Left, ARect.Top), PointF(ARect.Right, ARect.Top), 1);
  end;
end;

procedure TForm1.TMSFMXPlanner1Paint(Sender: TObject; Canvas: TCanvas;=const ARect: TRectF);
var
  r: TRectF;
begin
  Canvas.StrokeThickness := 2;
  r := TMSFMXPlanner1.GetContentClipRect;
  Canvas.Stroke.Color := claOrange;
  Canvas.DrawLine(PointF(0, r.Bottom - 0.5), PointF(r.Right, r.Bottom - 0.5), 1);
end;
 TMS VCL WebGMaps
How to add a custom JavaScript function with the OnInitHTML event
Below is an example of how you can add a custom JavaScript function with the OnInitHTML event. You can then call the function by using the ExecJScript call.
procedure TForm1.WebGMaps1InitHTML(Sender: TObject; var HTML: string);
begin
  HTML := HTML + '<script>function sampleFunction(msg){alert(msg);}</script>';
end;

procedure TForm1.Button1Click(Sender: TObject);
begin
  WebGMaps1.ExecJScript('sampleFunction("Hello World");');

end;