Frequently Asked Component Specific Questions
Options |
|
Display all FAQ items |
Displaying items 151 to 165 of 888, page 11 of 60
<< previous next >>

 TMS FMX UI Pack
TTMSFMXRichEditor: How to copy content from one RichEdit to another RichEdit
It is very easy to copy the contents of a TTMSFMXRichEditor 1:1 matching to another TTMSFMXRichEditor instance with following code snippet:
var
  ms: TMemoryStream;
begin
  ms := TMemoryStream.Create;
  try
    TMSFMXRichEditor1.SaveToStream(ms);
    ms.Position := 0;
    TMSFMXRichEditor2.LoadFromStream(ms);
  finally
    ms.Free;
  end;
end;
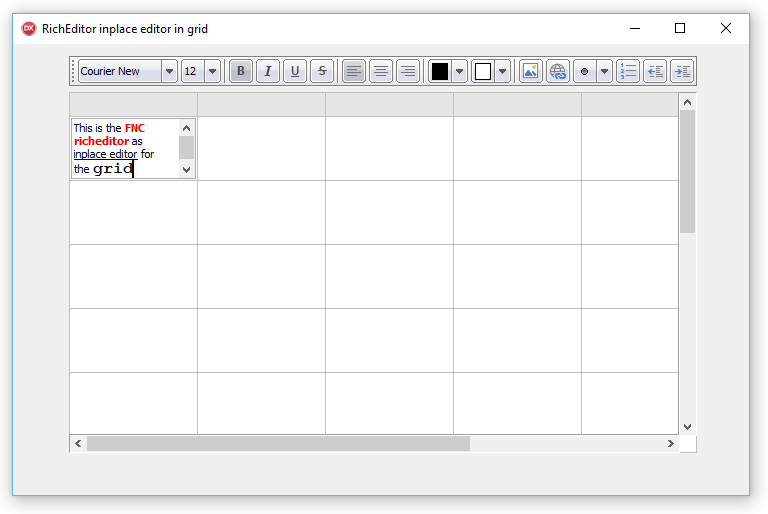
TMS FNC UI PackTTMSFNCGrid: Using a TTMSFNCRichEditor as inplace editor for the TTMSFNCGrid
It’s quite straightforward to use the TTMSFNCRichEditor as inplace editor for the grid. In the grid cell, you can display HTML formatted text and this can then be wysiwyg edited with TTMSFNCRichEditor.
All that is needed is to implement a few event handlers. Via OnGetCellEditorType, it is defined that a custom inplace editor should be used:
procedure TForm5.TMSFNCGrid1GetCellEditorType(Sender: TObject; ACol,
  ARow: Integer; var CellEditorType: TTMSFNCGridEditorType);
begin
  CellEditorType:= etCustom;
end;
procedure TForm5.TMSFNCGrid1GetCellEditorCustomClassType(Sender: TObject; ACol,
  ARow: Integer; var CellEditorCustomClassType: TTMSFNCGridEditorClass);
begin
  CellEditorCustomClassType := TTMSFNCRichEditor;
end;
procedure TForm5.TMSFNCGrid1GetCellEditorProperties(Sender: TObject; ACol,
  ARow: Integer; CellEditor: TWinControl);
begin
  TMSFNCRichEditorFormatToolBar1.RichEditor := (CellEditor as TTMSFNCRichEditor);
end;
procedure TForm5.TMSFNCGrid1CellEditGetData(Sender: TObject; ACol,
  ARow: Integer; CellEditor: TWinControl; var CellString: string);
begin
  TMSFNCRichEditorHTMLIO1.RichEditor := (CellEditor as TTMSFNCRichEditor);
  TMSFNCRichEditorHTMLIO1.LoadHTML(CellString);
end;

procedure TForm5.TMSFNCGrid1CellEditSetData(Sender: TObject; ACol,
  ARow: Integer; CellEditor: TWinControl; var CellString: string);
begin
  CellString := (CellEditor as TTMSFNCRichEditor).ContentAsHTML('''');
end;
 TAdvStringGrid
Set a different XY offset for different cells in the grid
You can change the X,Y offset dynamically for each cell via the OnGetCellColor event and call from there grid.UpdateXYOffset.
Example to set an XY offset different from the floating footer configured to display the last row of the grid:
procedure TForm1.AdvStringGrid1GetCellColor(Sender: TObject; ARow,
  ACol: Integer; AState: TGridDrawState; ABrush: TBrush; AFont: TFont);
begin
  if arow = advstringgrid1.RowCount - 1 then
    advstringgrid1.UpdateXYOffset(0,-2)
  else
    advstringgrid1.UpdateXYOffset(2,2);
end;
TAdvStringGridUsing NarrowDown but perform narrow down only for cells matching the search text from first character.
To do this, set grid.NarrowDownFromStart = true.
Example:
  grid.NarrowDownFromStart := true;
  grid.NarrowDown(‘M’);
  grid.NarrowDownFromStart := false;
  grid.NarrowDown(‘M’);
TDBAdvGridDynamically filtering lookup datasets in a TDBAdvGrid
It is easy to dynamically set a filter for a lookup dataset depending on other values for a lookup editor in the TDBAdvGrid. DB fields with a lookup relatoinship are automatically edited via a combobox. To filter the values to select from, filter the lookup dataset from the OnGetEditorProp event that is triggered just before the inplace editor becomes active. Following example filter can be applied in the ADOLookup demo for TDBAdvGrid that filters the lookup dataset for countries starting with ‘S’ when there is editing on an odd row.
procedure TForm1.DBAdvGrid1GetEditorProp(Sender: TObject; ACol, ARow: Integer;
  AEditLink: TEditLink);
begin
  if odd(arow)  then
  begin
    adotable2.Filtered := false;
    adotable2.Filter := ''COUNTRY LIKE "S%"'';
    adotable2.Filtered := true;
  end
  else
  begin
    adotable2.Filtered := false;
  end;
end;
TMS IntraWeb Component Pack ProTTIWAdvWebGrid: How to display buttons in specific cells
You can use the OnGetCellType event to specify the column type for a specific row, column or cell.
Example:
procedure TIWForm1.TIWAdvWebGrid1GetCellType(Sender: TObject; RowIndex,
  ColumnIndex: Integer; var AColumnType: TTIWColumnType;
  var Editor: TTIWColumnEditor; var DynEditor: TTIWDynEditType);
begin
  if (ColumnIndex = 1) and (RowIndex = 1) then
    AColumnType := ctButton;
end;
TMS VCL WebGMapsHow to get the address at right click on the map and put a marker on this address
You can use the OnMapClick event to catch a mouse click on the map. Then use the TWebGMapsReverseGeocoding component to retrieve the address based on the Latitude and Longitude coordinates and add a marker with the Markers.Add() call.
Example:
procedure TForm8.WebGMaps1MapClick(Sender: TObject; Latitude, Longitude: Double;
  X, Y: Integer; Button: TMouseButton);
begin
  WebGMapsReverseGeocoding1.Latitude := Latitude;
  WebGMapsReverseGeocoding1.Longitude := Longitude;

  if WebGMapsReverseGeocoding1.LaunchReverseGeocoding = erOk then
    WebGMaps1.Markers.Add(Latitude, Longitude, WebGMapsReverseGeocoding1.ResultAddress.FormattedAddress);
end;
TAdvOfficePagerHow to automatically redock the tab if the user clicks the undocked tab's 'Close' button
You’d need to attach an event handler for the closing of the page when it is floating. You can do this from the OnTabUnDock event where you attach an event handler to the floating form OnClose event.
Example:
TForm1 = class(TForm)
public
    { Public declarations }
    procedure CloseHandler(Sender: TObject; var Action: TCloseAction);
end;

procedure TForm1.AdvOfficePager1TabUnDock(Sender: TObject;
  APage: TAdvOfficePage);
begin
  APage.GetFloatingWindow.OnClose := CloseHandler;
end;

procedure TForm1.CloseHandler(Sender: TObject; var Action: TCloseAction);
begin
  // floating form closing here
end;
TMS Advanced Poly ListDrag and Drop over TCustomItem
Drag & Drop needs to be implemented manually, below is code that inserts or adds an item based on TCustomItem. The item also be a custom class that inherits from TCustomItem. The code below is drag & drop code based on 2 TAdvPolyList instances, where the item to be dropped is obtained from the DropItem function. But the Source can come from another component as well.
procedure TForm1.AdvPolyList1DragDrop(Sender, Source: TObject; X, Y: Integer);
var
  it, itdrop: TCustomItem;
begin
  it := (Source as TAdvPolyList).DropItem;
  itdrop := AdvPolyList1.List.ItemAtXY(X, Y);
  if Assigned(itdrop) then
    AdvPolyList1.InsertItem(itdrop.Index, TCustomItemClass(it.ClassType)).Assign(it)
  else
    AdvPolyList1.AddItem(TCustomItemClass(it.ClassType)).Assign(it);
end;

procedure TForm1.AdvPolyList1DragOver(Sender, Source: TObject; X, Y: Integer;
  State: TDragState; var Accept: Boolean);
begin
  Accept := Source is TAdvPolyList;
end;
TAdvStringGridCustomizing the inplace editor for fixed cells in TAdvStringGrid
In fixed cells, it is possible to define an inplace editor for fixed cells with grid.MouseActions.FixedColsEdit / grid.MouseActions.FixedColsEditor. It is possible to further customize this inplace editor or assign extra event handlers to it via grid.FixedEdit and grid.FixedComboBox that provide access to these control instances.
Example:
This sets the background color for the fixed cell regular editor:
TEdit(AdvStringgrid1.FixedEdit).Color := clRed;
TComboBox(AdvStringGrid.FixedComboBox).OnClick := MyHandler;
TAdvTreeViewHow to change the images for the check boxes and radio buttons
You can change the default drawing by implementing the OnBeforeDrawNodeCheck and then set the allow parameter to False. The default checkbox drawing will be disable, and then you can manually draw a different image, or graphic with the ACanvas parameter, as demonstrated in the sample below:
procedure TForm1.AdvCheckedTreeView1BeforeDrawNodeCheck(Sender: TObject;
  ACanvas: TCanvas; ARect: TRectF; AColumn: Integer;
  ANode: TAdvTreeViewVirtualNode; var AAllow: Boolean);
begin
  AAllow := False;
  if ANode.Node.Checked[0] then
    // draw checked checkbox
  else
    // draw unchecked checkbox
end;
TAdvAlertWindowHow to set the position of the TAdvAlertwindow
You can do this by using AdvAlertwindow.PopupLeft, AdvAlertwindow.PopupTop and set AdvAlertWindow.WindowPosition := wpPreset;
Sample code:
procedure TForm4.Button1Click(Sender: TObject);
begin
  advalertwindow1.PopupLeft := 20;
  advalertwindow1.PopupTop := 20;
  AdvAlertWindow1.AlertMessages.Add.Text.Text := ''Hello world'';
  AdvAlertWindow1.WindowPosition := wpPreset;
  AdvAlertWindow1.Show;
end;
TMS VCL Cloud PackHow to store OAuth token in a database table instead of an ini file
Make a dataset with following string fields:
ACCESS_TOKEN
AUTH_TOKEN
ACCESS_TOKEN_SECRET
AUTH_TOKEN_SECRET
REFRESH_TOKEN
EXTRA_DATA
And set
CloudService.PersistTokens.DataSource  = yourdatasource;
CloudService.PersistTokens.Location = plDatabase;
Then call:
CloudService.LoadTokens
CloudService.SaveTokens
to read and write to the dataset.
TAdvRichEditorCustomizing the popup menu
From the OnContextPopup event that is triggered before the popup menu is displayed, it is easy to customize it, for example to dynamically translate or add items.
This example performs a dynamic translation:
procedure TForm4.AdvRichEditor1ContextPopup(Sender: TObject; MousePos: TPoint;
  var Handled: Boolean);
begin
  if AppLanguage = alGerman then
  begin
    AdvRichEditor1.PopupMenu.Items[0].Caption := ''Löschen'';
    AdvRichEditor1.PopupMenu.Items[2].Caption := ''Ausschneiden'';
    AdvRichEditor1.PopupMenu.Items[3].Caption := ''Kopieren'';
    AdvRichEditor1.PopupMenu.Items[4].Caption := ''Einfügen'';
    AdvRichEditor1.PopupMenu.Items[6].Caption := ''Ausrichten'';
    AdvRichEditor1.PopupMenu.Items[6].Items[0].Caption := ''Links'';
    AdvRichEditor1.PopupMenu.Items[6].Items[1].Caption := ''Zentrum'';
    AdvRichEditor1.PopupMenu.Items[6].Items[2].Caption := ''Rechts'';
  end;
end;
When trying to install the registered version of the TMS TAdvStringGrid filters I get an error similar to: TMS FlexCel Studio...is not installed
Make sure you run the TMS Grid Filters installers from the same Windows user account as the one with which you installed TMS Component Pack & TMS Flexcel. The TMS Grid Filters installer searches for TMS Component Pack & TMS Flexcel installs in the registry for the current Windows user.