Frequently Asked Component Specific Questions
Options |
|
Display all FAQ items |
Displaying items 106 to 120 of 508, page 8 of 34
<< previous next >>

 TAdvStringGrid
How to use TAdvGridReplaceDialog
Drop a TAdvGridReplaceDialog on the form and a TAdvStringGrid.
Add the code:
begin
  AdvGridReplaceDialog1.Grid := AdvStringGrid1;
  AdvGridReplaceDialog1.Execute;
end;
TAdvGridReplaceDialog is not applicable for TDBAdvGrid, only for TAdvStringGrid. This is because, to change values in the TDBAdvGrid, values should be changed on dataset level, via DBField, not just with grid.Cells[].
TAdvStringGridAllowing multiline text & using the Enter key to start a new line
To allow to enter multiline text in a cell, set grid.MultiLineCells := true.
By default the key to start a new line in the inplace editor is Ctrl-Enter ('Enter' stops editing).
If you want to use the Enter key to start a new line instead, set grid.Navigation.LineFeedOnEnter = true
TPlannerUsing TPlannerItem alarms
Through the Alarm property in a TPlannerItem and alarm handlers, all types of alarms can be triggered by the TPlannerItem. Note that alarms are enabled in the TPlanner by the property TPlanner.EnableAlarms. Different alarm handlers that play sound, send email, show a message, run a script, execute a program can be downloaded from https://www.tmssoftware.com/planaddon.htm
Example:
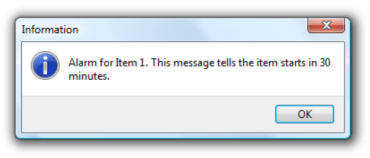
Following example creates a TPlannerItem in a day mode TPlanner that starts at 2AM and triggers an alarm message 30 minutes before the TPlannerItem starts :
with Planner1.CreateItem do
begin
  ItemStartTime := EncodeTime(2,0,0,0); // 02:00 AM
  ItemEndTime := EncodeTime(3,0,0,0); // 03:00 AM
  CaptionText := 'Item 1';
  Text.Text := 'This message tells the item starts in 30 minutes';
  CaptionType := ctText;
  Alarm.Active := True;
  Alarm.Handler := AlarmMessage1;
  Alarm.TimeBefore := EncodeTime(0,30,0,0); // 30 minutes
  Alarm.NotifyType := anNotes;
end;
Alarm handlers are easy to write. An alarm handler descends for the TPlannerAlarmHandler class which is defined as:
TPlannerAlarmHandler = class(TComponent)
public
  function HandleAlarm(Address,Message:string; Tag, ID: Integer; Item: TPlannerItem): Boolean; virtual;
end;
The TAlarmMessage alarm handler defines this function in the following way:
{ TAlarmMessage }
function TAlarmMessage.HandleAlarm(Address, Message: string; Tag, ID: Integer; Item: TPlannerItem): Boolean;
begin
  MessageDlg('Alarm for' +Item.CaptionText+#13+ HTMLStrip(Item.Text.Text),mtInformation,[mbok],0); Result := True;
end;
TPlannerUsing a custom TPlannerItem class
For maintaining custom data with each planner item you can assign any TObject descendent class to the PlannerItem's public Object property. However there is a more convenient way to create a descendent class from TPlanner that has a TPlannerItem with new custom properties which can be used at design time and at run time to hold any additional values with each planner item. The code involved comes down to:
1. Write your descendent class of TPlannerItem and add the additional properties. Override the assign procedure to copy the extra properties added.
2. Write your descendent class of the TPlannerItems collection and override the GetItemClass method to instruct the collection to create collection items from your descendent TPlannerItem class.
3. Write your descendent class of TPlanner and override the protected CreateItems method to let the planner use your descendent TPlannerItems collection.
Following code where a new property MyProperty was added to the TPlannerItem, makes this clear:
Example:
unit MyPlanner;
interface

uses Windows, Messages, SysUtils, Classes, Graphics, Controls, Forms, Dialogs, Planner;
type
  TMyPlannerItem = class(TPlannerItem)
  private
    FMyProperty: string;
  public
    procedure Assign(Source: TPersistent); override;
  published
    property MyProperty: string read FMyProperty write FMyProperty;
  end;

  TMyPlannerItems = class(TPlannerItems)
  public
    function GetItemClass: TCollectionItemClass; override;
  end;

  TMyPlanner = class(TPlanner)
  private
    { Private declarations }
  protected
    { Protected declarations }
    function CreateItems: TPlannerItems; override;
  public
    { Public declarations }
  published
    { Published declarations }
  end;

procedure Register;

implementation

procedure Register;
begin
  RegisterComponents('TMS', [TMyPlanner]);
end;

{ TMyPlannerItems }

function TMyPlannerItems.GetItemClass: TCollectionItemClass;
begin
  Result := TMyPlannerItem;
end;

{ TMyPlanner }

function TMyPlanner.CreateItems: TPlannerItems;
begin
  Result := TMyPlannerItems.Create(Self);
end;

{ TMyPlannerItem }

procedure TMyPlannerItem.Assign(Source: TPersistent);
begin
  inherited Assign(Source);
  if Assigned(Source) then
    FMyProperty := TMyPlannerItem(source).MyProperty;
end;
end.TPlannerSearching items in the planner
This code fragment searches all items in the TPlanner for the word 'Meeting':
var
  plIt: TPlannerItem;
begin
  plIt := nil;
  repeat
    plIt :=
      Planner1.Items.FindText(plIt,'Meeting',[fnAutoGoto,fnText]);
    if Assigned(plIt) then
      ShowMessage('Found appointment');
  until plIt = nil;
  ShowMessage('No more items found');
end;Important note:
When making changes that affect a lot of items in the planner or when adding or removing a lot of items, performance will vastly improve when enclosing the operations with
TPlanner.Items.BeginUpdate;
// do update, adding, removing of items here
TPlanner.Items.EndUpdate;
TPlannerProgrammatically selecting & copying an item to the next position in the planner
Example:
Planner1.Items.Select(APlannerItem);
Planner1.Items.CopyToClipboard;
Planner1.SelectCells(Planner1.SelItemBegin,Planner1.SelItemEnd, Planner1.SelPosition + 1);
Planner1.Items.PasteFromClipboardAtPos;
TPlannerCopying all TPlannerItem objects from Planner1 to Planner2 by a memory stream
If there are 2 TPlanner components on a form, the method below makes a copy of all TPlannerItem objects from Planner1 to Planner2 by a memory stream:
procedure TForm1.Save(Sender: TObject);
var
  ms: TMemoryStream;
begin
  ms := TMemoryStream.Create;
  Planner1.SaveToStream(ms);
  ms.Position := 0;
  Planner2.LoadFromStream(ms);
  ms.Free;
end;
TPlannerSaving the TPlanner to HTML
The SaveToHTML method generates a HTML file of the TPlanner with all its TPlannerItem objects. This is done with:
procedure SaveToHTML(FileName: string);
This example outputs the TPlanner in HTML in a table that has 80% width, centered on the page with bold header and sidebar font. It shows the output in a browser:
uses
  ShellAPI;

Planner1.HTMLOptions.Width := 80;
Planner1.HTMLOptions.SidebarFontStyle := [fsBold];
Planner1.HTMLOptions.HeaderFontStyle := [fsBold];
Planner1.HTMLOptions.PrefixTag := '<CENTER>';
Planner1.HTMLOptions.SuffixTag := '';
Planner1.SaveToHTML('myHTML.htm');
ShellExecute(0,'open','myHTML.htm',nil,nil,SW_NORMAL);TPlannerLinking TPlannerItems
A TPlannerItem can be linked in various ways to another TPlannerItem. Linking two items means that if the user will move or size one item, the linked item will also move or size. Linking is achieved through 2 TPlannerItem properties :
TPlannerItem.LinkedItem: TPlannerItem; defines to which the item is linked
TPlannerItem.LinkType: TPlannerLinkType; defines the type of the link
ltLinkFull: both ItemBegin and ItemEnd are linked. This means that item duration is always synchronised between the items. When the item moves or sizes, both begin and end of the linked item will do the same move or size.
ltLinkBeginEnd: ItemBegin of the item is linked to the ItemEnd of the linked item. This means that if the ItemBegin of the item changes, the ItemEnd of the linked item will change with the same delta
ltLinkEndBegin: ItemEnd of the item is linked to the ItemBegin of the linked item
ltLinkEndEnd: ItemEnd of the item is linked to the ItemEnd of the linked item
ltLinkBeginBegin: ItemBegin of the item is linked to the ItemBegin of the linked item
Example:
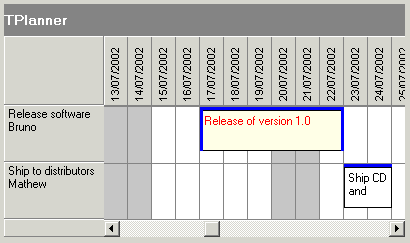
In this example, two events need to be planned: a release of the software and the shipping of software to distributors. It is clear that shipping to distributors can only happen after the software release and that if the software release is delayed, the shipping will be delayed as well. Therefore, the two events are added in the planner with a link between the ItemEnd of the software release to the ItemBegin of the software shipping.
var
  plIt1,plIt2: TPlannerItem;
begin
  plIt1 := planner1.CreateItem;
  with plIt1 do
  begin
    ItemStartTime := EncodeDate(2002,7,15);
    ItemEndTime := EncodeDate(2002,7,20);
    ItemPos := 0;
    Text.Text := 'Release of version 1.0';
  end;
  plIt2 := planner1.CreateItem;
  with plIt2 do
  begin
    ItemStartTime := EncodeDate(2002,7,21);
    ItemEndTime := EncodeDate(2002,7,22);
    ItemPos := 1;
    Text.Text := 'Ship CD and manuals';
  end;

  plIt1.LinkedItem := plIt2;
  plIt1.LinkType := ltLinkBeginEnd;
end;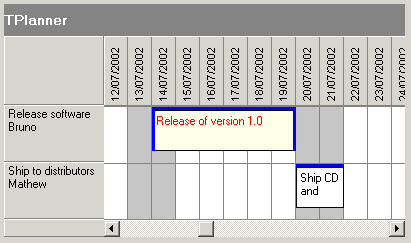
delaying the software release by 3 days automatically moves and delays the shipping:
TPlannerSetting background color for individual grid cells
If there is an additional need to set colors of planner grid cells other than through the Display settings of PositionProps, this can be done with the property :
TPlanner.BackGroundColor[ACol, ARow: Integer]: TColor;
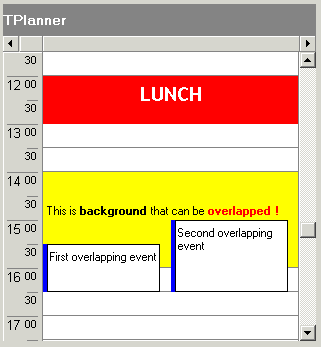
TPlannerCreating overlappable background items
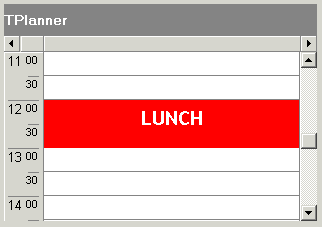
Normally, when adding a background item, this is by default a non overlappable item. Setting the Background property to true automatically also sets the AllowOverlap property to false. A background item cannot be selected, moved or sized. Background items are normally used to indicate fixed time allocations, such as a time for lunch:
It can be convenient though to override this behaviour and create background items that only give a visual hint, cannot be selected or edited and over which other items can be positioned. To create such items, it is sufficient to reset the AllowOverlap property back to true after settting the Background property to true. (Note that this is not possible at design time) The code for this is:
with Planner1.CreateItemAtSelection do
begin
  Background := True;
  // reset AllowOverlap to create overlapable background item
  AllowOverlap := True;
  Text.Text := '

This is background that can be ' +
    'overlapped !';
  Alignment := taCenter;
  Color := clYellow;
end;
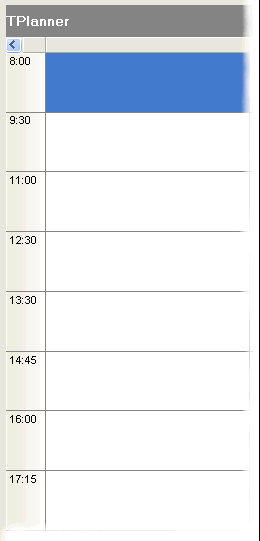
TPlannerUsing a non-linear time axis
In some situations, it is not desirable that the time axis is divided in equal units. With the TPlanner put in plCustomList mode, the possible times for scheduling an event can be defined to avoid this. To handle the plCustomList mode, the TPlanner has a property TPlanner.DateTimeList. Following methods are defined:
TPlanner.DateTimeList.Clear;  //clears all datetime info from the list.
TPlanner.DateTimeList.Add(dt: TDateTime);  //adds a datetime value to the list
TPlanner.DateTimeList.Insert(Index: Integer; dt: TDateTime); // inserts a datetime value to the list
TPlanner.DateTimeList.Delete(Index: Integer);  //deletes the datetime at position Index from the list
TPlanner.DateTimeList.Items[Index]:  //TDateTime; returns the datetime values in the list
// setup of the DateTimeList
with Planner.DateTimeList do
begin
  Add(encodetime(8,0,0,0));
  Add(encodetime(9,30,0,0));
  Add(encodetime(11,00,0,0));
  Add(encodetime(12,30,0,0));
  Add(encodetime(13,30,0,0));
  Add(encodetime(14,45,0,0));
  Add(encodetime(16,00,0,0));
  Add(encodetime(17,15,0,0));
end;

// setup of the number of cells to display and cellheight
with Planner.Display do
begin
  DisplayStart := 0;
  DisplayEnd := 7;
  DisplayScale := 60;
end;
When programmatically inserting an item, this can be done with:
with Planner.CreateItem do
begin
  itemstarttime := encodetime(11,0,0,0);
  itemendtime := encodetime(12,30,0,0);
end;
TPlannerCreating planner items for each disjunct selected time zone in the planner
It is possible to allow the user to select multiple disjunct cells in the planner. This enables the user to insert multiple events in one go on different places in the planner.
Disjunct selection is enabled by setting Planner.DisjunctSelect to true and disjunct selected cells are created by Ctrl & mouse click and drag in the planner. The disjunct selected cells can be marked in a different color by setting the property DisjunctSelectColor.
After disjunct selection, the selected time spans in the planner can be retrieved with Planner.Selections
This is a collection of TPlannerSelection objects. The TPlannerSelection object holds:
property SelBegin: Integer;
property SelEnd: Integer;
property SelPos: Integer;
Example:
This example code creates planner items for each disjunct selected time zone in the planner
procedure TForm1.Button1Click(Sender: TObject);
var
  i: integer;
begin
  for i := 1 to planner1.Selections.Count do
    with planner1.CreateItem, planner1.Selections[i - 1] do
    begin
      ItemBegin := selbegin;
      ItemEnd := selend;
      ItemPos := selpos;
    end;
end;TWebUpdateTWebUpdate Debugging
In case something is not working as desired, it is often convenient to check what steps TWebUpdate has executed. This can be traced by setting TWebUpdate.Logging = true.
During execution, TWebUpdate will create a log file of all steps performed in the file WUPDATE.LOG (default filename or can be changed with TWebUpdate.LogFileName) If no path is specified, the log file will by default be created in the “My documents” folder.
When something doesn't work, you can always contact our support team. To have more insight in what exactly you're doing, send your INF file and the generated log file as well. With this information, we should be able to see what exactly is missing.
TWebUpdateUsing TWebUpdateWizard
Using TWebUpdate with the TWebUpdateWizard is straightforward. Drop the TWebUpdate and TWebUpdateWizard on the form, setup TWebUpdate and assign TWebUpdate to the TWebUpdateWizard.WebUpdate property. The wizard can be started by calling TWebUpdateWizard.Execute.
Additional options for the TWebUpdateWizard are:
AutoRun: when true, does not require the user to step through each step
AutoStart: when true, the user does not have to start the update process, it starts automatically
Billboard: sets the left image for the update wizard dialog
BillboardCenter: Boolean: When true, the image is centered
BillboardStretch: Boolean: When true, the billboard image is stretched
BillboardTop: integer: sets the top position of the billboard image
BillboardLeft: integer: sets the left position of the billboard image
BillboardWidth: integer: sets the width of the billboard image
BillboardHeight: integer: sets the height of the billboard image
BorderStyle: sets the border style for the update wizard dialog
Caption: sets the caption text for the update wizard dialog
Font: sets the font for the update wizard dialog
Language: sets the language for the update wizard dialog. By default, the language is English.
Position: sets the screen position of the update wizard dialog