Blog
All Blog Posts | Next Post | Previous Post

 Access Bluetooth devices from your TMS WEB Core v1.4 Ravenna web apps
Thursday, June 4, 2020

TMS WEB Core v1.4 is released and one of the many exciting new components added is the TWebBluetooth component to make it seamless to access Bluetooth devices from your web applications. At this moment, all modern web browsers except Safari, offer the web Bluetooth API for this. We can only hope that Apple will soon follow this trend.
With more than 4 billion Bluetooth devices produced in 2019, including all current smartphones, tablets, laptops, TV’s, and speakers on the market, Bluetooth has truly started a revolution. By 2023, up to 90% of all Bluetooth devices will have Bluetooth Low Energy (BLE) capability. With that in mind TMS Software is providing you with the tools to embrace this exciting technology and run with it.
The TWebBluetooth component and supporting classes allows for quick and easy development of all your Bluetooth Low Energy applications, bringing device functionality straight to the browser. To get up and running, just add the WEBLib.Bluetooth library to your TMS Webcore project under uses and you will gain access to the following features:
TBluetooth component: Used to create an instance of a Bluetooth Device. It contains methods for filtering which devices you wish to connect to.
Device class: It contains methods for establishing and maintaining a connection to, or disconnecting from the GATT server. It also contains methods allowing access to and discovery of services on a device.
Service class: It can be seen as a container for characteristics. The service class contains methods allowing access to and discovery of its characteristics.
Characteristic class: This is the main component of any BLE device. Reading and writing to these characteristics gives you control over a device. Our Characteristic class contains options for reading, writing and notifying data of all different data types/data streams to and from a Characteristic. Characteristics also contain methods for accessing and discovering its descriptors.
Descriptor class: Descriptors contain information about their characteristics. The Descriptor class has methods for reading and writing to descriptors.
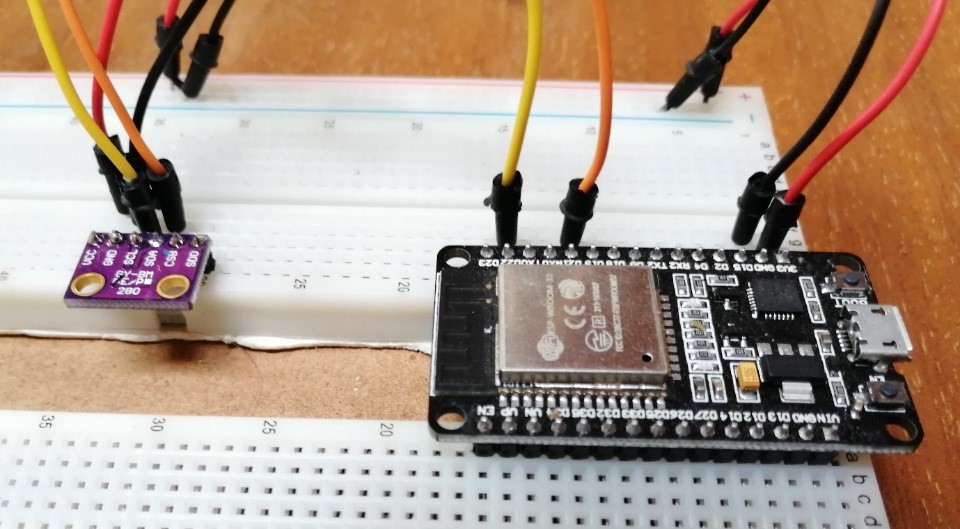
To demonstrate how easy our tools are to use, I have configured an ESP-32 with a BME-280 temperature, humidity and pressure sensor. The ESP-32 is a microcontroller with onboard Bluetooth functionality. Using the BLE Server library with the Arduino IDE, I created a service with 4 characteristics. The first characteristic will be used to store and retrieve an integer value. The second is configured to control the onboard LED, allowing us to turn it on and off. The final two characteristics are set to retrieve temperature and humidity readings.

Getting started
In our TMS WebCore project we must first declare the components we will be using: Public
{ Public declarations }
bt: TBluetooth;
MyDevice: TBluetoothDevice;
MyService: TBluetoothService;
IntCharacteristic: TBluetoothCharacteristic;
LedCharacteristic: TBluetoothCharacteristic;
TemperatureCharacteristic: TBluetoothCharacteristic;
HumidityCharacteristic: TBluetoothCharacteristic;
Each Bluetooth service, characteristic or descriptor has an UUID, this is the address used to access it.
const
  MyServiceUuid = '4c652180-1201-4fdf-b853-36bac4cced0a';
  IntUuid = 'fa67024c-78d6-11ea-bc55-0242ac130003';
  LedUuid = 'fa66fffe-78d6-11ea-bc55-0242ac130003';
  TemperatureUuid = '14f3ff86-95b8-11ea-bb37-0242ac130002';
  HumidityUuid = '14f4038c-95b8-11ea-bb37-0242ac130002';
  UserDescUuid = '0x2901';
  DeviceName = 'Custom_ESP32';
Setting up BLE
I used anonymous methods when retrieving my device, service and characteristics. Anonymous methods are useful in this scenario as they allow us to chain up all our procedures needed during setup. This makes getting a device up and running much more efficient.An instance of TBluetooth called bt is created. We must now add our intended services to the bt.FilterService list. This is a built-in security feature within Web Bluetooth. Failing to do so will deny us access to them. The name of the device we want to access specifically can also be configured with bt.DeviceName.
The rest of the code below connects us to the GATT server, creates our device, creates the service we will be using and finally creates our characteristics. The characteristics we created receive ‘On’ methods, these will be used to control our device - more on this later.
procedure TForm7.WebButton1Click(Sender: TObject);
begin
  bt := TBluetooth.Create;
  bt.FilterService.Add(MyServiceUuid);
  bt.DeviceName := 'Custom_ESP32';
  bt.GetDevice(
    procedure
    begin
      bt.Device.Connect(
      procedure
      begin
        bt.Device.GetService(myServiceUuid,
        procedure(AService: TBluetoothService)
        begin
          AService.GetCharacteristic(IntUuid,
          procedure(AChar: TBluetoothCharacteristic)
          begin
            IntCharacteristic := AChar;
          end);

          AService.GetCharacteristic(LedUuid,
          procedure(AChar: TBluetoothCharacteristic)
          begin
            LedCharacteristic := AChar;
            LedCharacteristic.Read(
            procedure(AValue: integer)
            begin
              ReadLedCharacteristic(Self, AValue);
            end);
          end);

          AService.GetCharacteristic(TemperatureUuid,
          procedure(AChar: TBluetoothCharacteristic)
          begin
            TempCharacteristic := AChar;
            TempCharacteristic.OnNotifyDouble:= NotifyTempCharacteristic;
          end);

          AService.GetCharacteristic(HumidityUuid,
          procedure(AChar: TBluetoothCharacteristic)
          begin
            HumCharacteristic := AChar;
            HumCharacteristic.OnNotifyDouble:= NotifyHumCharacteristic;
          end);

          EnableButtons;
        end);
      end);
    end);
end;Pairing the Device
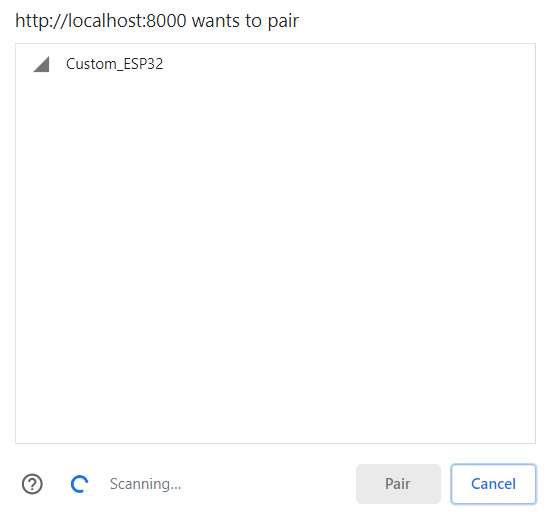
Once these steps have been taken, pressing the “Start BLE” button will display a pop up with a list of connectable devices. In our case the Custom_ESP32 has shown up. Selecting it and clicking pair will form a connection with our device.
Reading data
We can read the data stored within our intCharacteristic by using the Read method. When we press the ReadValue button, intCharacteristic.Read is called. This retrieves the integer stored within our intCharacteristic as AValue. We can then cast AValue to a string and display this in our WebLabel on the form.procedure TForm7.WebButton4Click(Sender: TObject);
begin
intCharacteristic.Read(
procedure(AValue: integer)
begin
WebLabelReadValue.Caption:= IntToStr(AValue);
end);
end;
Writing data
We can change the data stored within our characteristics by writing to them. This is as simple as calling a Write method on our characteristic. In this case I am using WriteInt to write an integer value into IntCharcateristic.procedure TForm7.WebButton5Click(Sender: TObject);
begin
IntCharacteristic.WriteInt(StrtoInt(WebEdit1.Text));
ShowMessage('Wrote value of ' + WebEdit1.Text + ' to device');
end;Expanding this concept to real world devices
Reading and writing numbers to and from a device probably isn’t the most exciting thing you’ve ever witnessed. But doing so provides us with the functionality we need to interact with real world devices. The write function we just applied to our IntCharacteristic can also be used for turning on and off a LED.- LedCharacteristic.WriteInt(1); to turn on the LED.
- LedCharacteristic.WriteInt(0); to turn off the LED.
But don’t think of the LED as just a LED, this could be lights, heating, a fan, a water pump or any other device you wish to control, once again, straight from any device with browser capability.
Realtime sensor readings
Since the TemperatureCharacteristic and HumidityCharacteristic were given the notify option when I programmed them on the ESP-32, we can now use the notify methods in our Webcore project. First, we bind one of the ‘OnNotify’ procedures to the characteristic we wish to use. In this case, we will be retrieving a double, so we opt for the OnNotifyDouble method.AService.GetCharacteristic(TemperatureUuid, procedure(AChar: TBluetoothCharacteristic) begin TemperatureChar:= AChar; TempCharacteristic.OnNotifyDouble:= NotifyTempCharacteristic; end);
By adding the StartNotify method to the temperature characteristic we can start the readings. TemperatureCharacteristic.StartNotify;
To stop the readings, we just need to call the StopNotify method, it really is that simple! TemperatureCharacteristic.StopNotify;
Summary
This concludes our overview of the TMS WEB Core v1.4 new Bluetooth support.- Code once, run everywhere for wireless interaction with real world devices in the browser.
- Effortless implementation, allowing you to turn on/off devices, change their settings or enable communication between different devices using the Read, Write and Notify methods.
- Quick and easy development of Web Bluetooth projects, all within the Object Pascal language.
Included in the TMS WEB Core v1.4 distribution is a demo that uses the Texas Instruments Sensor tag.

This way you can easily start experimenting with Bluetooth from web applications without getting your hands dirty assembling an ESP32 with I2C sensors on a breadboard and dabbling in C code (for now) with Arduino to program the ESP32.
TMS WEB Core v1.4 for Delphi/Lazarus is available standalone now and is also part of TMS ALL-ACCESS. The Bluetooth support will also be available in the upcoming TMS WEB Core for Visual Studio Code!
Do you have already one or more TMS product licenses and are interested to get on board for TMS ALL-ACCESS, our no-nonsense formula for access to our full current and future toolset, priority support and access to betas, contact our sales: sales@tmssoftware.com for a best possible upgrade offer.
Article written by Luc Levez
Bruno Fierens

This blog post has not received any comments yet.
All Blog Posts | Next Post | Previous Post