Blog
All Blog Posts | Next Post | Previous Post

 TMS WEB Core and More with Andrew:
OpenAI's ChatGPT and Friends - Part 1 of 2
Tuesday, April 18, 2023

Motivation.
As with any new technology, there is a general FOMO (fear of missing out) - the latest trend, whatever it may be, may actually be a game-changer - and nobody wants to be left behind. We've seen examples of this happening before, so it isn't something to take lightly. Many of us might remember just how very long it took for Bill Gates to realize that "the internet" was a thing. Or how the CEOs of Microsoft (again!) or Motorola scoffed very publicly at Steve Jobs' introduction of the iPhone. There are many examples where something new was not given its due. Only to have it come around and upend the status quo. Ignoring ChatGPT might risk doing exactly that.
On the other hand, AI as a topic has been around for a good long time. I personally recall a period in the late 80s when I first learned of the CYC Project, which was already well on its way. Some 40 years after it was first founded, it has made great progress but isn't really getting the same level of attention anymore. The idea then was that AI was always 20 years away from whatever point we were currently at, in no small part because we didn't really know enough about the topic to make a claim any bolder than that.
More recently, say in the past ten years, something changed. First, nearly everything with an algorithm, and now, anything with a transistor in it, was tagged with an AI label and pushed as the next big thing. Most recently, folks are now talking about "AGI" as the lofty next goal that we're about to overcome, as the now-old-news "AI" has been accomplished. Makes you wonder what is really going on.
ChatGPT and its friends are certainly interesting and potentially a lot of fun to play with. And maybe even useful in some instances. But it isn't the AI that we were thinking about long ago, and it certainly isn't the AGI that people are talking about today. Less generous reviewers tend to categorize current developments as "expert text predictors" which is probably right in the middle, between accurate and unfair. These new systems are certainly worthy of attention. But, like any tool, whether they are of any value largely depends on how they are used.
And it is still early days to make any declaration as to whether Microsoft's investment of
additional billions of dollars into OpenAI (the creators of ChatGPT) will generate the out-sized returns they
are after, whether it is the latest play in their "embrace, extend, and extinguish" business model, or perhaps
whether it is just another in a long series of missteps. No doubt, there are supporters and detractors of every
scenario.
The Basics.
A little bit of terminology to help get us up to speed on a few things. This is a large topic. Just a bit of lingo so we're not tripping over ourselves later.
- GPT. Stands for generative pre-trained transformer. Catchy, no? Perhaps a fancy AI can come up with a more interesting name. In the meantime, the idea here is that a GPT of any kind is one that is capable of producing proper language output, free from grammatical and spelling errors. This is where the "expert text predictor" categorization comes from - it really is an advanced version of what is used to predict text as you write a text message or an email.
- Models. There are several GPT-related projects that have been created. The technology within them
is generally referred to as a "model" and given a name. ChatGPT-3, ChatGPT-3.5, ChatGPT-4, and DALL-E (images)
are examples of some of the models produced by OpenAI. Each has specific rules that apply, but they take input
of some kind and produce an output of some kind. We'll cover some of the differences between these as they come
up.
- Training. The process of feeding data into a model that it later uses to do its work is called "training" the model. This is a surprisingly computationally intensive task, often requiring a small army of GPU-laden computers to crunch through the process. In some instances, this is a one-off job, where there is a data file generated that can then be used for all subsequent requests. When new knowledge is to be added, this training step typically needs to be repeated. Not good.
- Fine-Tuning. Some models, specifically ChatGPT-3, have had the ability to add new data to their systems, without having to go through the whole training process. While this might seem like a good solution to the next problem, and to the problem of having to run the training process on a huge amount of hardware, this fine-tuning option hasn't been added to the later ChatGPT variants, and they no longer learn from any of the data passing through them. Also not good.
- Knowledge Cut-Off. Perhaps the most telling attribute that suggests we're not quite "there" in terms
of AI is that thus far they only know about "stuff" up until a certain point - typically in the vicinity of September 2021 in
the case of ChatGPT and its closest relatives. This means that if we ask about anything that occurred after
that, the model will happily report that it doesn't know about current events. Or worse, it won't report that
and will instead happily present us with demonstrably false information. This is an enormous
problem that needs to be addressed before any of this stuff can be taken too seriously.
- Tokens. When exchanging data with a model, it may seem as if we're working entirely in the natural
language world. And from the perspective of the user, we certainly are. Look at one level lower, however, and all of
that text is represented as tokens. And we probably wouldn't care about that very much. However, ChatGPT services are not free. Instead, fees are levied based on the number of tokens being exchanged. This is
roughly equivalent to the number of words of text, but not specifically that. OpenAI puts the estimate at
around 1,000 tokens for 750 words. There may also be limits to the number of tokens that can be exchanged in
a conversation - typically 2048 or 4096 tokens, depending on the model. Seems like a lot, right?
- Contextual. This is a term that refers to how the model is able to carry on a conversation based on prior parts of a conversation. If you were to ask a question about a building, and then ask "How tall is it?", the model will look back in the conversation to figure out what "it" is and will realize the conversation was about a specific building, and then it will tell you how tall that building is. But alas, this seemingly clever bit requires that we pass the rest of the preceding conversation back to the model each time. The API, much like a traditional web server, is stateless. Suddenly, those tokens are in very limited supply. And we end up paying for them multiple times over in the same conversation. Not a fan, I must say. More on that later, though.
There is of course a lot more to the story, but this is all we need to get moving. And while there might be a
slightly negative undertone detectable in those descriptions, once we get a little further along we'll be having
so much fun we likely won't care! This is also problematic - our new shiny toy is perhaps so very shiny that
we might forget that it really isn't all that intelligent after all. As a result, we now have lawsuits
related to the spread of AI-generated misinformation, and even places (like Italy) where it has been outright banned.
The Setup.
Getting started with ChatGPT is not difficult conceptually. There is a REST API server provided by OpenAI where we can post requests and get responses. It works like any other REST API, using an API Key that we can get (initially for free) from the OpenAI website. But as with any such API key, we absolutely do not want to embed it directly in our TMS WEB Core client project or make it available to our web client directly, even if it is encoded in some way. Anyone with access to the application could very quickly extract the API Key and then be merrily on their way, running up our bill - or just using up our API token allocation for the month.
To get around this, we'll instead set up an XData server to be a proxy service - it will pass requests between our TMS WEB Core client application and the OpenAI REST API server. It can then insert the API key, securely, protected from the prying eyes of anyone using our client application. And, while we're at it, the XData application can also log the activity and potentially contribute something more along the way.
The first thing we need, then, is our own OpenAI API key. Visit https://openai.com and click on the Developers | Overview link at the top. Then either Login or Sign Up (if this is a first visit). From the Accounts menu (user icon in the top-right corner) there is a "View API Keys" menu option. This leads to a page where new API keys can be generated. As is often the case, any keys generated here are shown initially but are then not available after, so make sure to copy the API key and paste it into a safe place elsewhere. Keys can also be revoked and reissued. The documentation here suggests that they will revoke any keys that they find out in "the wild" (this is a good thing!) but they don't elaborate on this, so be careful where these are stored.
While we're on the OpenAI site, we can also track down our Organization ID, if you've signed up as an organization. This is another key that is passed to the REST API to indicate where the costs for the requests are to be allocated if you happen to be working with several organizations. Also, the "API Reference" link at the top of the page gives plenty of examples of how to pass REST API requests, using curl as a starting point. Here, we can see the typical API Key using a "Bearer" token and the various other bits of data that might need to be included. Worth strolling through to see what's available. We're primarily after the "Chat" and "Images" endpoints, but there are several others available as well.
In this documentation, you will find the same advice about the API Keys again - don't add them to anything at
all in your TMS WEB Core client project. Instead, they recommend creating a back-end service to look after
securely handling API Keys, which is effectively what we're doing with TMS XData.
The TMS XData Template Demo Data Project.
On the XData side, we're going to add a new service to our TMS
XData Template Demo Data project (see this
blog post for more information). This isn't really much different than starting a new XData project, just
that we've already got a lot of the bases covered in terms of our own authentication mechanisms and so on. If
you've got your own XData project that you'd like to use instead, it will likely work just as well -
most of what is of interest here is the code that goes into each service endpoint. And these can (hopefully) be
easily replicated in any other XData application. Here, we're just taking a few shortcuts that we've covered
extensively before to help move things along a little quicker.
One of the ways we're doing that is by adding a bit of information into a configuration JSON file that XData has been set up to load when the application first starts. This is where we can put our API key and other information that our XData server can use to provide this service. These values could be passed directly as parameters, by using INI files, by adding keys to the Windows Registry, or via any other means that you'd like to use to pass data into an XData application. In this case, these values could even be hard-coded as they might not change often, and may very well be the same when moving between development and production environments.
For our example, we'll assume that they might be different, and thus we'll drop them into the JSON file for XData to pick up when it first starts. We can always just use the same values in both cases. Our XData application also has a CONFIG parameter where we can specify the location of this JSON file. Here's what this might look like (the values will be different for your installation, and your API Keys, of course - these are just examples). As we get into some of the more involved aspects, this list of elements may also need to be updated.
{
  "Chat Interface": {
    "Model":"gpt-3.5-turbo",
    "Organization":"org-1234rpR1abcdVuQp1m6qPXYZ",
    "API Key":"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",
    "Chat Endpoint":"https://api.openai.com/v1/chat/completions",
    "Image Endpoint":"https://api.openai.com/v1/images/generations"
  }
}
Now, when our XData server starts, these values will be available. If we can't find them, then our service
endpoints should return a message of some kind indicating as much. For our new service, let's call it
ChatService. We can add it the same way we normally add new services to XData - using the File | New... | TMS
XData | TMS XData Service and then entering "Chat" for the service name. We'll end up with a new ChatService.pas interface unit and
a new ChatServiceImplementation.pas implementation unit in our application. In our Template project, we've been putting these into a "units" folder off the main project folder. If we run our project now, we'll be prompted to save the
new units, so we'll save them there. Doesn't matter particularly where they are stored, however.
Next, we'll have to consider what service endpoints we're interested in. Naturally, we'll want them all to be authorized, as we don't want this open to the public, due to cost concerns. While working on the project on a development system, though, leaving off the [Authorize] attribute makes life a little easier for testing, perhaps using Swagger for example. The first function that comes to mind is "chat" of course - we'll need to pass in whatever the chat question is (potentially the rest of the chat as well) and return the next part of the conversation.
There is also an option to generate an image
based on text input, so we'll want to plan for that. The image service has a couple of parameters - the
number of images and their size (256x256, 512x512, or 1024x1024) so we'll have to factor those in somehow. Regardless, we'll want to return whatever the chat service gives us - potentially an arbitrarily large amount
of JSON. So let's do what we've been doing previously - return a TStream in these cases.
Chat Endpoint.
For our first endpoint, we'll need the text - our initial part of the conversation - which we'll pass using the parameter "conversation". We'll
also need the history of the conversation, potentially, if we want our conversation to include contextual
content, so we'll call that parameter "context". An extra
parameter, ChatID, will be used to help us know when the chat is ongoing. We want to ultimately store the chat in a database but don't want to keep the intermediate parts of the conversation. We can use this value to
overwrite the previous entry as the conversation proceeds. In the
ChatService.pas interface unit, what we're after is this.
unit ChatService;

interface

uses
  System.Classes,
  XData.Security.Attributes,
  XData.Service.Common;

type
  [ServiceContract]
  IChatService = interface(IInvokable)
    ['{F95E651C-DA7A-4997-8630-314587B1857F}']

    [Authorize] [HttpGet] function Chat(Conversation:String; Context: String; ChatID: String):TStream;
  end;

implementation

initialization
  RegisterServiceType(TypeInfo(IChatService));

end.
Over to the implementation. Initially, the process is simple enough. We'll need to check that we have enough
information to process the request (an API Key and so on). We'll set up a request to the OpenAI server using the
credentials that we've loaded from the JSON configuration file. We'll need to add the data from the endpoint parameters. And then we'll
return whatever comes back as the "result" value - JSON returned as a TStream.
Note that in XData, each call to
an endpoint generates a new thread. Here, in this thread, we're contacting OpenAI by opening a new HTTPS
connection, and we'd like to wait here until it responds, if possible, having the endpoint return only when it
has data, or when an error has occurred. Let's give this a try to start with.
function TChatService.Chat(Conversation, Context: String; ChatID: String): TStream;
var
  Client: TNetHTTPClient;
  Response: String;
  Request: TStringStream;
begin

  // Do we have enough information to process this request?
  if (MainForm.AppConfiguration.GetValue('Chat Interface') as TJSONObject) = nil
  then raise EXDataHttpUnauthorized.Create('Chat Service is Unavailable.');

  // Returning JSON, so flag it as such
  TXDataOperationContext.Current.Response.Headers.SetValue('content-type', 'application/json');

  Client := TNetHTTPClient.Create(nil);
  client.Asynchronous := False;
  Client.ConnectionTimeout := 60000; // 1 min
  Client.ResponseTimeout := 60000; // 1 min
  Client.ContentType := 'application/json';
  Client.SecureProtocols := [THTTPSecureProtocol.SSL3, THTTPSecureProtocol.TLS12];
  Client.CustomHeaders['Authorization'] := 'Bearer '+(((MainForm.AppConfiguration.getValue('Chat Interface') as TJSONObject).GetValue('API Key') as TJSONString).Value);
  Client.CustomHeaders['OpenAI-Organization'] := (((MainForm.AppConfiguration.getValue('Chat Interface') as TJSONObject).GetValue('Organization') as TJSONString).Value);

  Request := TStringStream.Create('{'+
    '"model":"'+(((MainForm.AppConfiguration.GetValue('Chat Interface') as TJSONObject).GetValue('Model') as TJSONString).Value)+'",'+
    '"messages":[{"role":"user","content":"'+Conversation+'"}]'+
    '}');
  MainForm.mmInfo.Lines.Add(Request.DataString);
  try
    Response := Client.Post(
      ((MainForm.AppConfiguration.getValue('Chat Interface') as TJSONObject).GetValue('Chat Endpoint') as TJSONString).Value,
      Request
    ).ContentAsString;
   except on E: Exception do
     begin
       MainForm.mmInfo.LInes.Add('[ '+E.ClassName+' ] '+E.Message);
     end;
   end;

  Result := TStringStream.Create(Response);
  Request.Free;
end;
The trickiest part of this is likely to do with how to compose a Post call. In this example, we've gone down the TStream route primarily because the TStrings route didn't seem to work. Regardless of your choices here, the idea is that we're just submitting our request to the OpenAI API as JSON, and getting back a block of JSON with the response.
In fact, we can already test this using Swagger. If we ask the question "Who
is Anna Torv?" we'll get a response. Note that this is a non-deterministic system, meaning that you can ask the
same question over and over and get different responses each time. Hopefully just small variations, but
potentially factually different responses. We're also pretty lax when it comes to checking the input value for
"conversation".
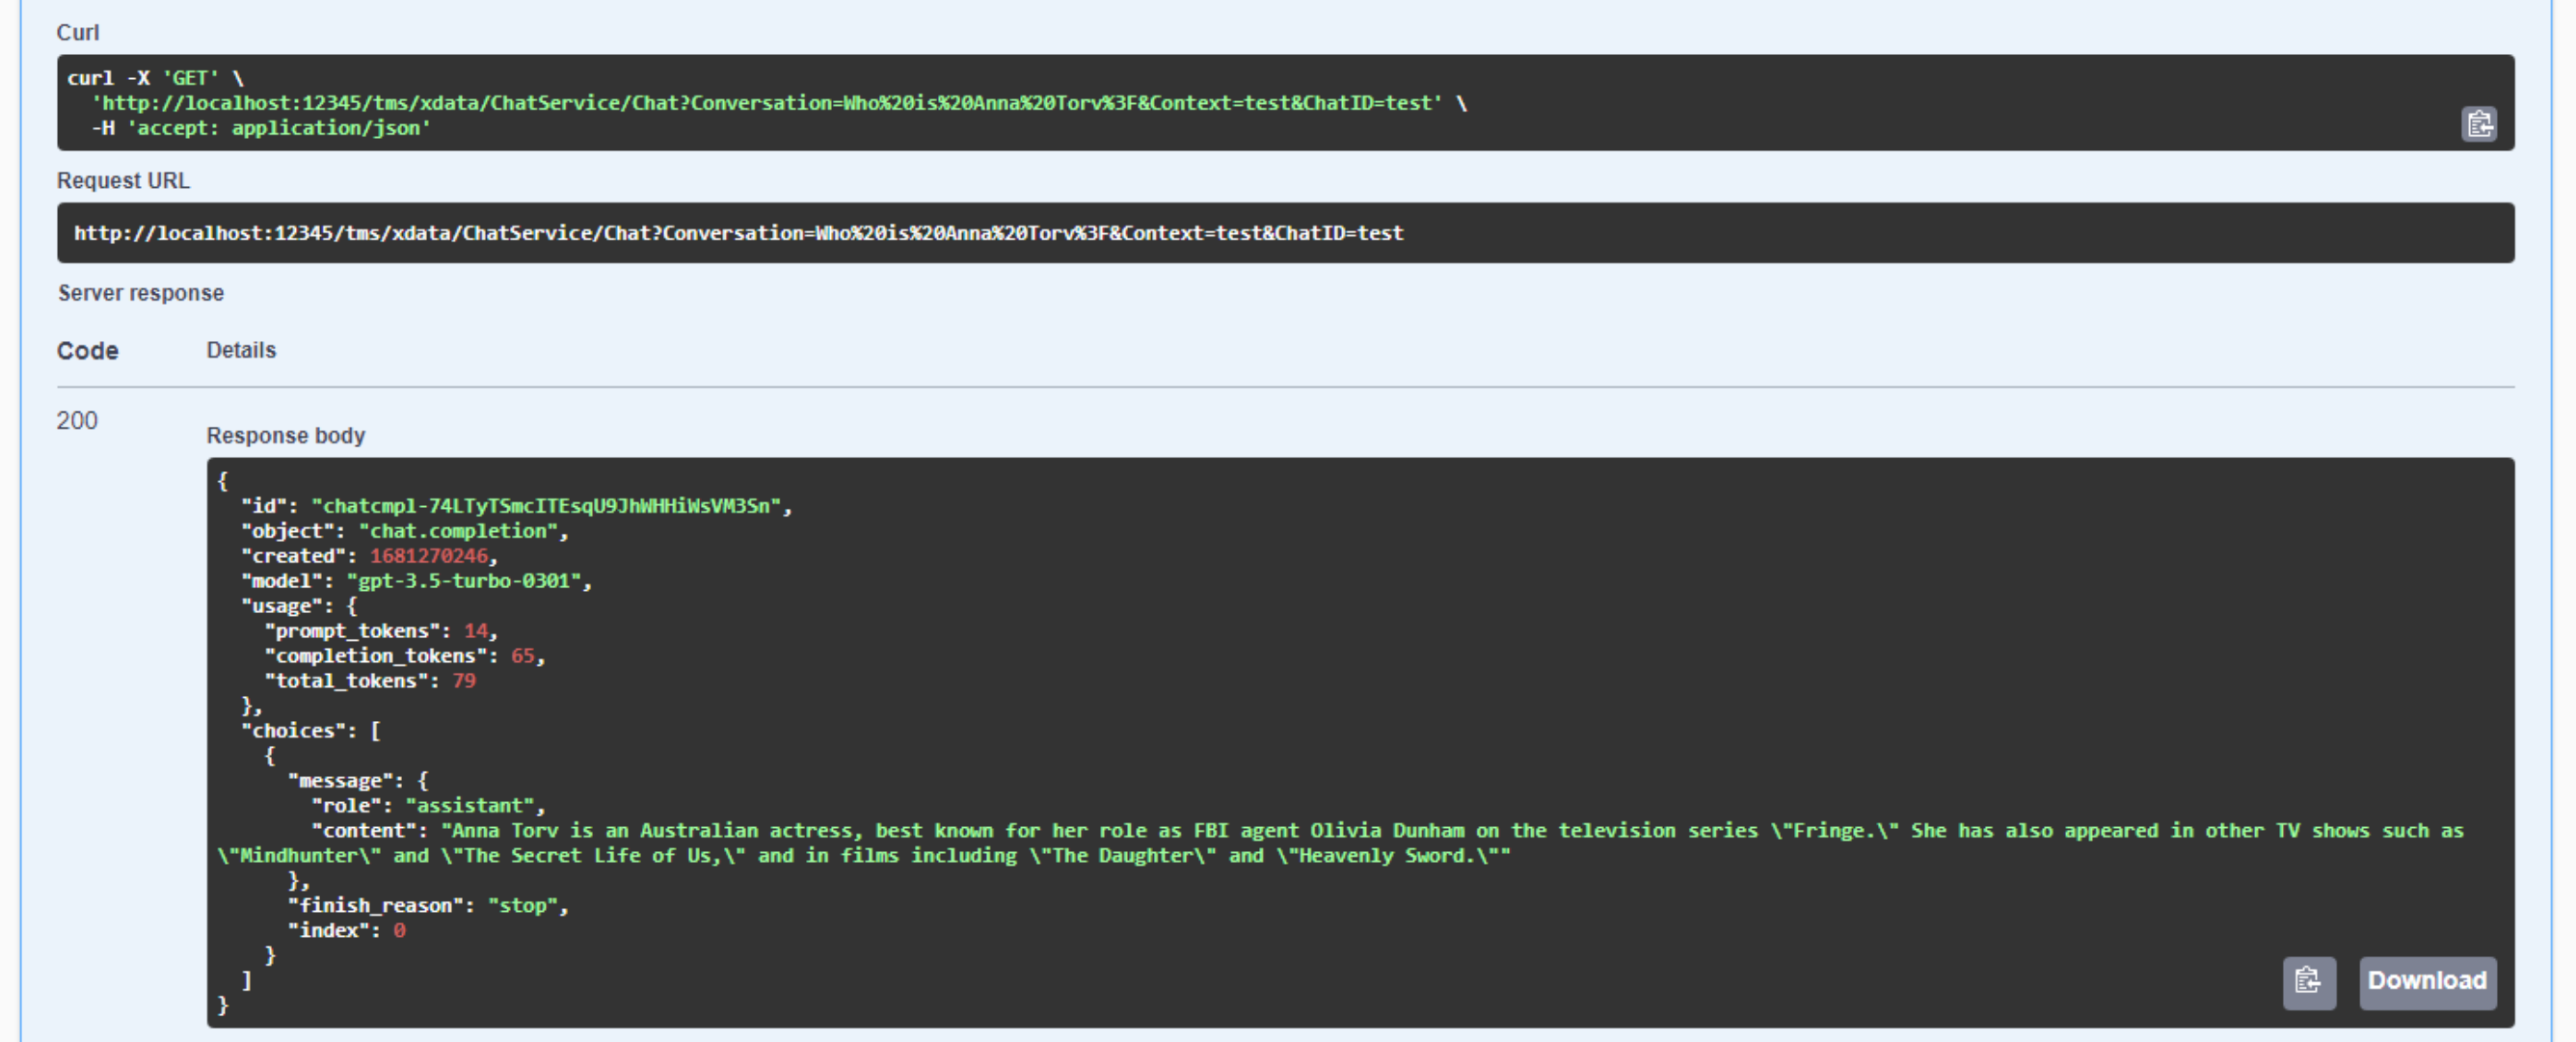
Our First Chat!
Note carefully that the curl command at the top is describing our request being sent to XData, and XData itself issues its own
internal HTTP Post request to OpenAI, returning the response from that call as the response to our XData call. A proxy, in effect. Also, note in the response that we can see those tokens accumulating. At $0.002 USD per 1,000 tokens, this isn't
going to accumulate very quickly for a single developer (I don't think I've even hit $1 yet), but if hundreds of people start asking numerous
questions, with potentially long inputs and long outputs, things can quickly get out of hand. Hence one of the reasons
for all the API Key security considerations.
With the endpoint working, we're off and running, ready to
build something a little more interesting in our TMS WEB Core application. We'll come back to the other two
parameters (Content and ChatID) once we have a better way of populating them.
Chat Interface.
While Swagger is great for testing APIs, it leaves a little to be desired in the UI department. Of course, we'd never expect anyone other than a developer to use Swagger. So we'll need a Chat UI of some kind. As we're already using the TMS XData Template Demo Data project for our example, we might as well create a Chat UI using the TMS WEB Core Template Demo project. There's (at least one) post about this project, which you can find here. And, as luck would have it, the AdminLTE Bootstrap/HTML template that this project is based on already has a chat-style UI as one of its examples.
The design of this project is a little more involved than the XData project, and we'll be relying on more of its existing structure than was the case with XData. Most of the UI is structured around "Dashboards" - separate pages (forms) where we can display a bit of information about a particular application subsystem, and then provide links, buttons, or other UI elements that are specific to a particular feature.
In this case, we want the chat feature to be broadly accessible, so we'll add an icon on the top menu bar. We'd also like some ability to customize this icon, so we'll use our usual icon mechanism to select a "robot" icon. For the name, let's add "ChatBotName" to the optional configuration JSON for this project. Note that this is completely separate from the configuration JSON used for the XData project. If it isn't provided, this will default to "Willard". We covered how to use a configuration JSON file with a TMS WEB Core project in this post.
The AdminLTE template that this project is based on has an example chat interface included in its example pages. This essentially amounts to a collection of classes and <div> elements arranged a certain way so as to have chat bubbles, avatars, names, and timestamps arranged into something that looks like a chat window. There's even a bit of styling for the text input field and button. Note that this is just a template, however - there isn't any code provided to add chat messages or clear the window or anything like that.
The next step, then, is to fix up the text input field a little bit. We'd like it to be a multi-line input field, as there may well be more text that can easily fit on one line. And, naturally, the button needs an icon. We can pair up the HTML elements in the template to components on our form by assigning id values to the HTML template elements and adding corresponding components to our form with these same id values assigned to the ElementID property of the components. This time, we're using a TWebMemo paired with a <textarea> element and a TWebButton paired with a <button> element.
To get the memo to
grow with the text input, we'll need to have it resize explicitly. But we'll also want to apply a bit of CSS
to ensure that things don't get out of hand. In our WebFormCreate method, we can set some of these values like this.
  // Adjustments to the chat input memo field
  memoChat.ElementHandle.setAttribute('rows','1');
  memoChat.ElementHandle.style.setProperty('min-height','38px');
  memoChat.ElementHandle.style.setProperty('max-height','250px');
  btnChatSend.Caption := DMIcons.icon('Send')+'Send';

  // Chat Window adjustments
  asm
    ChatWindow.style.setProperty('height','auto');
    ChatWindow.style.setProperty('min-height','300px');
    ChatWindow.style.setProperty('max-height','500px');
  end;
For the memo field itself, we can string together a series of Bootstrap classes to get it just right. This is what is in the ElementClassName property.
fs-6 flex-fill px-2 me-2 border border-1 border-secondary rounded
And then in the template HTML we can make a few more adjustments for spacing and consistency. And this is
where the extra resizing bit comes in.
                      <!-- Chat Footer-->
                      <div class="card-footer p-2">
                        <div class="input-group d-flex">
                          <textarea id="memoChat" oninput="this.style.height = ''; this.style.height = this.scrollHeight+2 +'px'"></textarea>
                          <div class="input-group-append">
                            <button id="btnChatSend"></button>
                          </div>
                        </div>
                      </div>
For the rest of the Chat Window, we can of course get rid of the sample conversation from the AdminLTE template. We
could add a TWebHTMLDiv component to give us a Delphi component to work with, but we don't really need to set
anything in it, so there's not much point in doing that. Instead, we can just make a few tweaks to the HTML
template directly, like setting an ID value that we can reference directly later via JavaScript.
                      <div class="card-body p-1">
                        <!-- Conversations are loaded here -->
                        <div id="ChatWindow" class="direct-chat-messages">
                        </div>
                      </div>
There are three different kinds of messages we want to appear in the chat window. First, we want to display static "system" messages, like the welcome message or the waiting indicator message. These aren't tracked or used in any way - just little UI touches to make things run a little more smoothly. For these messages, we'll use this method.
procedure TChatStatisticsSubForm.AddStaticChatResponse(ChatMessage: String);
var
  ChatBlock: String;
begin
  ChatBlock := '<div class="direct-chat-msg">'+
               '  <div class="direct-chat-infos clearfix">'+
               '    <span class="direct-chat-name float-start">'+MainForm.App_ChatBotName+'</span>'+
               '    <span class="direct-chat-timestamp float-end">'+FormatDateTime('yyyy-MMM-dd hh:nn:ss',Now)+'</span>'+
               '  </div>'+
               DMIcons.Icon('Robot_Avatar')+
               '  <div class="direct-chat-text fs-6">'+
                    ChatMessage+
               '  </div>'+
               '</div>';
  asm
    ChatWindow.innerHTML += ChatBlock;
    ChatWindow.scrollTo({left: 0, top: 1000000, behaviour: "smooth"});
  end;
end;
All we're really doing is fabricating a block of HTML and appending it to the ChatWindow <div> from our template. We're using the same name and icon as our avatar for the chatbot that we're using elsewhere in our UI. Whenever we add something to this chat window, we want to scroll the contents to the bottom. We will use this when the chat form is first created, to display an opening message of some kind. Just for fun, it randomly chooses from a set of options.
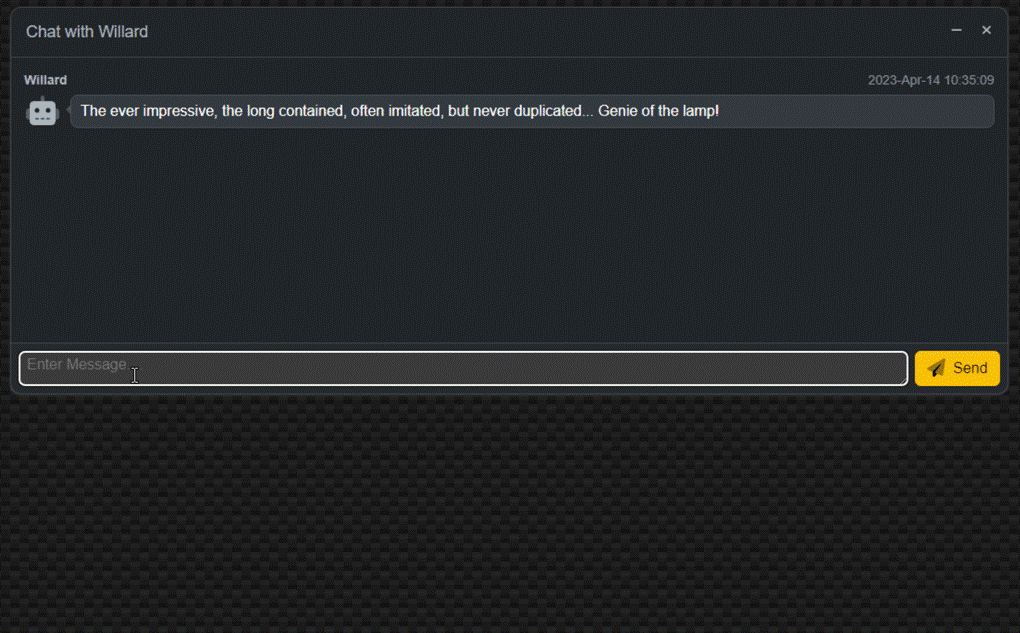
  // Initialize with a canned response of some kind.
  Openers[0] := 'Hello!  My name is '+Mainform.App_ChatBotName+'.  Please ask me anything you like.';
  Openers[1] := 'Greetings and salutations.  It is I, '+Mainform.App_ChatBotName+'.  How may I be of assistance?';
  Openers[2] :=  Mainform.App_ChatBotName+' here. How can I help you?';
  Openers[3] := 'I come in peace. Hahaha. Just kidding. What do you want to know?';
  Openers[4] := 'Bleep. Bleep. Bloop. Bleep.';
  // Bicentennial Man
  Openers[5] := 'One is glad to be of service.';
  // Aladdin
  Openers[6] := 'The ever impressive, the long contained, often imitated, but never duplicated... Genie of the lamp!';
  // Terminator 2
  Openers[7] := 'I have detailed files.';
  // The Matrix
  Openers[8] := 'I am the Architect. I created the matrix. I''ve been waiting for you. You have many questions, and although the process has altered your consciousness, you remain irrevocably human. Ergo, some of my answers you will understand, and some of them you will not. Concordantly, while your first question may be the most pertinent, you may or may not realize it is also irrelevant.';
  // Aliens
  Openers[9] := 'Well, that explains it then. The A2s always were a bit twitchy. That could never happen now with our behavioral inhibitors. It is impossible for me to harm or by omission of action, allow to be harmed, a human being.';

  AddStaticChatResponse(Openers[System.Random(10)]);
When we submit a request, it may take some time to complete. For a progress indicator, it would be nice to show a little animation. When someone at the other end of the chat is typing in iMessage on an iPhone, for example, three dots appear in a little animation at your end to let you know that they're working on a reply (maybe). There are a number of CSS-only animations that could be used for this. Here's a link to a few of them: https://codepen.io/nzbin/pen/GGrXbp. We've gone with the "dot-collision" option. This involves primarily just adding a bunch of CSS into our "template.css" file and then adding a <div> element that includes a class referring to that CSS. Like this.
    // Add a "typing" indicator
    AddStaticChatResponse('<div class="dot-collision"></div>');
Later, when the response comes back, we can remove this progress indicator from the ChatWindow <div> like this.
    // Remove the "typing" indicator
    asm ChatWindow.lastElementChild.remove(); end;
As for the CSS, it looks like this. We covered CSS animation in another blog post, which you can find here, if you're curious about the specifics and are not familiar with CSS animation already.
/* Fancy animation for a chat- waiting indicator */
/* https://codepen.io/nzbin/pen/GGrXbp */

.dot-collision {
  position: relative;
  width: 10px;
  height: 10px;
  border-radius: 5px;
  background-color: #9880ff;
  color: #9880ff;
  margin: 7px 0px 7px 20px;
}
.dot-collision::before, .dot-collision::after {
  content: "";
  display: inline-block;
  position: absolute;
  top: 0;
}
.dot-collision::before {
  left: -10px;
  width: 10px;
  height: 10px;
  border-radius: 5px;
  background-color: #9880ff;
  color: #9880ff;
  animation: dot-collision-before 2s infinite ease-in;
}
.dot-collision::after {
  left: 10px;
  width: 10px;
  height: 10px;
  border-radius: 5px;
  background-color: #9880ff;
  color: #9880ff;
  animation: dot-collision-after 2s infinite ease-in;
  animation-delay: 1s;
}

@keyframes dot-collision-before {
  0%, 50%, 75%, 100% {
    transform: translateX(0);
  }
  25% {
    transform: translateX(-15px);
  }
}
@keyframes dot-collision-after {
  0%, 50%, 75%, 100% {
    transform: translateX(0);
  }
  25% {
    transform: translateX(15px);
  }
}
Whenever we send a request, we'll need to add it to the ChatWindow <div>, as this makes up our half of the history of the chat. A similar approach is taken here, but we're using the name and image of the person currently logged in for the avatar. Also, when we add the message, we also set up an "addEventListener" function so that if the message is clicked, it is copied into the TWebMemo field again. For example, if you make a typo or want to change something, this saves having to retype it again. We'll also change the pointer to the "hand" pointer to make it a little more obvious that this is an available option.
procedure TChatStatisticsSubForm.AddChatMessage(ChatMessage: String);
var
  ChatBlock: String;
begin
  ChatBlock := '<div class="direct-chat-msg end">'+
               '  <div class="direct-chat-infos clearfix">'+
               '    <span class="direct-chat-name float-end">'+MainForm.User_FirstName+' '+MainForm.User_LastName+'</span>'+
               '    <span class="direct-chat-timestamp float-start">'+FormatDateTime('yyyy-MMM-dd hh:nn:ss',Now)+'</span>'+
               '  </div>'+
               '  <img class="direct-chat-img" '+Copy(MainForm.User_Photo,5,length(MainForm.User_Photo))+'</img>'+
               '  <div class="direct-chat-text fs-6 cursor-pointer chatmessage">'+
                    ChatMessage+
               '  </div>'+
               '</div>';
  asm
    ChatWindow.innerHTML += ChatBlock;
    ChatWindow.addEventListener('click', (e) => {
      if (e.target.classList.contains('chatmessage')) {
        e.stopImmediatePropagation();
        memoChat.value = e.target.innerHTML;
        memoChat.style.height = '';
        memoChat.style.height = memoChat.scrollHeight+2 +'px';
      }
    });
    ChatWindow.scrollTo({left: 0, top: 1000000, behaviour: "smooth"});
  end;
end;
When we get a response back, we're going to do something similar again. Except for this time, we'll also include a value indicating how long it took to process the request. We're also doing a little bit of formatting here. If you make a request where a code block is returned (for example, "Write a JavaScript function to do X"), the response may include code surrounded with backticks (```). If this happens, we replace them with <p><pre></pre></p>. Likewise for single backticks. To help out a little more, the <pre> tag was added to our template.css, changing the color and adjusting the display property to look a little nicer. An example of that can be seen in one of the screenshots below.
procedure TChatStatisticsSubForm.AddChatResponse(ChatMessage: String; QueryTime:TDateTime);
var
  ChatBlock: String;
  FormattedMessage: String;
  PreReplace: String;
begin
  FormattedMessage := ChatMessage;

  // Replace ``` with <p><pre> and </pre></p>
  PreReplace := '<p><pre>';
  while pos('```',FormattedMessage) > 0 do
  begin
    FormattedMessage := StringReplace(FormattedMessage,'```',PreReplace,[]);
    if PreReplace = '<p><pre>'
    then PreReplace := '</pre></p>'
    else PreReplace := '<p><pre>';
  end;

  // Replace ` with <pre> and </pre>
  PreReplace := '<pre>';
  while pos('`',FormattedMessage) > 0 do
  begin
    FormattedMessage := StringReplace(FormattedMessage,'`',PreReplace,[]);
    if PreReplace = '<pre>'
    then PreReplace := '</pre>'
    else PreReplace := '<pre>';
  end;

  ChatBlock := '<div class="direct-chat-msg">'+
               '  <div class="direct-chat-infos clearfix">'+
               '    <span class="direct-chat-name float-start">'+MainForm.App_ChatBotName+'</span>'+
               '    <span class="direct-chat-timestamp float-end">'+'('+FloatToStrF(MillisecondsBetween(QueryTime,Now)/1000,ffNumber,5,2)+'s) '+FormatDateTime('yyyy-MMM-dd hh:nn:ss',Now)+'</span>'+
               '  </div>'+
                  DMIcons.Icon('Robot_Avatar')+
               '  <div class="direct-chat-text fs-6">'+
               '  </div>'+
               '</div>';
  asm
    ChatWindow.innerHTML += ChatBlock;
    var ChatMessageWords = FormattedMessage.split(' ');
    for (var i = 1; i <= ChatMessageWords.length; i++) {
      ChatWindow.lastElementChild.lastElementChild.innerHTML = ChatMessageWords.slice(0,i).join(' ');
      ChatWindow.scrollTo({left: 0, top: 1000000, behaviour: "smooth"});
      await new Promise(r => setTimeout(r, Math.random() * 200));
    }
  end;
end;
For many chat user interfaces, there seems to be a bit of a common theme where the text is displayed slowly - as if the chatbot was typing out the response. This is a bit silly, as the response comes back as a complete block from the REST API call. But we don't want to be left out of the fun. In the last part of the above, the message is broken up into an array of words. Then, the words are revealed by a loop - replacing the text with an additional word added each time, along with a random very short delay. Not quite the same as a typewriter effect. More like a dictation effect perhaps.
That about covers the UI portion for our first test. But what do we do when we click the "Send" button? All
we're doing to start with is submitting the memoChat text to our XData server and waiting for a response. When
it comes in, we'll post it as a new message. The work involved in calling the XData function is handled by a common "JSONRequest" function that we have in MainForm already. Here's what that looks like.
function TMainForm.JSONRequest(Endpoint: String; Params: array of JSValue): String;
var
  ClientConn: TXDataWebClient;
  Response: TXDataClientResponse;
  Blob: JSValue;
  ErrorCode: String;
  ErrorMessage: String;
  Elapsed: TDateTime;
begin
  Elapsed := Now;
  Result := '';
  LogAction('Requested: '+Endpoint, False);

  await(XDataConnect);
  if (XdataConn.Connected) then
  begin
    try
      ClientConn := TXDataWebClient.Create(nil);
      ClientConn.Connection := XDataConn;
      Response := await(ClientConn.RawInvokeAsync(Endpoint, Params));

      Blob := Response.Result;
      asm Result = await Blob.text(); end;

    except on E: Exception do
      begin
        // Get the error message we created in XData
        asm {
          var ErrorDetail = JSON.parse( await E.FErrorResult.FResponse.$o.FXhr.response.text() );
          ErrorCode = ErrorDetail.error.code;
          ErrorMessage = ErrorDetail.error.message;
        } end;

        // Log the error, but leave out the URI (because it includes the password)
        LogAction('ERROR Request Exception Received From'+Endpoint, False);
        LogAction(' --> ['+E.ClassName+']', False);
        LogAction(' --> '+Copy(E.Message,1,Pos('Uri:',E.Message)-2), False);
        LogAction(' --> '+Copy(E.Message,Pos('Status code:',E.Message),16), False);
        LogAction(' --> '+ErrorCode, False);
        LogAction(' --> '+ErrorMessage, False);

        // Will tamp these down a bit once we get a better feel for the kinds of errors
        // that come up regularly.
        Toast(DMIcons.Icon('Bug_Menu')+'Unexpected Error',
          '[ '+E.ClassName+' ] '+Endpoint+'<br />'+
          Copy(E.Message,1,Pos('Uri:',E.Message)-2)+'<br />'+
          Copy(E.Message,Pos('Status code:',E.Message),16)+'<br />'+
          ErrorCode+'<br />'+
          ErrorMessage
        ,45000);

      end;
    end;
  end;

  LogAction('Responded: '+Endpoint+' ('+IntToStr(MillisecondsBetween(Now, Elapsed))+'ms)', False);
  PreventCompilerHint(Blob);
end;
Most of that is actually related to error handling. The gist of it, though, is that we're calling an endpoint and passing it parameters. Here's what it looks like when we call it from our button click event.
procedure TChatStatisticsSubForm.btnChatSendClick(Sender: TObject);
var
  i: Integer;
  MessageString: String;
  ResponseString: String;
  ResponseJSON: TJSONObject;
  QueryTime: TDateTime;
begin

  // Get a string that has \n for line endings
  MessageString := '';
  for i := 0 to memoChat.Lines.Count -1 do
  begin
    if Trim(memoChat.lines[i]) <> ''
    then MessageString := MessageString + Trim(memoChat.lines[i])+ ' \n';
  end;
  if RightStr(MessageString,3) = ' \n'
  then MessageString := Copy(MessageString,1,length(MessageString) - 3);

  // If we've got something to send, then let's send it
  if (Length(MessageString)) >= 5 then
  begin

    // Add new request to chat window
    AddChatMessage(memoChat.Lines.Text);

    // Clear out text and get ready for next message entry
    memoChat.Lines.Text := '';
    memoChat.SetFocus;
    memoChat.ElementHandle.style.setProperty('height','38px');
    asm
      setTimeout(function() {
        memoChat.value = '';
        memoChat.style.height = '38px';
      },100);
    end;

    // Add a "typing" indicator
    AddStaticChatResponse('<div class="dot-collision"></div>');

    // Submit request
    QueryTime := Now;
    ResponseString := await(MainForm.JSONRequest('IChatService.Chat',[
      MessageString, // Conversation
      '', // Context
      ''  // ChatID
    ]));

    // Remove the "typing" indicator
    asm ChatWindow.lastElementChild.remove(); end;

    // Check that we've got something we can use
    if ResponseString <> '' then
    begin
      ResponseJSON := TJSONObject.ParseJSONValue(ResponseString) as TJSONObject;
      // Long way to check that we've got JSON in an expected structure
      if (ResponseJSON <> nil) and
         ((ResponseJSON.GetValue('choices')) <> nil) and
         ((ResponseJSON.GetValue('choices') as TJSONArray)[0] <> nil) and
         (((ResponseJSON.GetValue('choices') as TJSONArray)[0] as TJSONObject).GetValue('message') <> nil) and
         ((((ResponseJSON.GetValue('choices') as TJSONArray)[0] as TJSONObject).GetValue('message') as TJSONObject).GetValue('content')  <> nil) then
      begin
        // Add response to the ChatWindow
        AddChatResponse(((((ResponseJSON.GetValue('choices') as TJSONArray)[0] as TJSONObject).GetValue('message') as TJSONObject).GetValue('content') as TJSONString).value, QueryTime);
      end;
    end;

  end;
end;
Lots going on. We're taking our message, applying a bit of light formatting, sending it off,
and then posting the response. All the JSON messiness is just checking that the structure exists in the format
that we expect. If anything goes amiss, nothing will be posted (at this stage) but, hopefully, no errors will be
generated either. Lots of things can go wrong (too many tokens, invalid requests, server down, XData down,
etc.), so a little extra caution isn't a bad idea. But all of our work has paid off. Here's what we've got for
an interface.
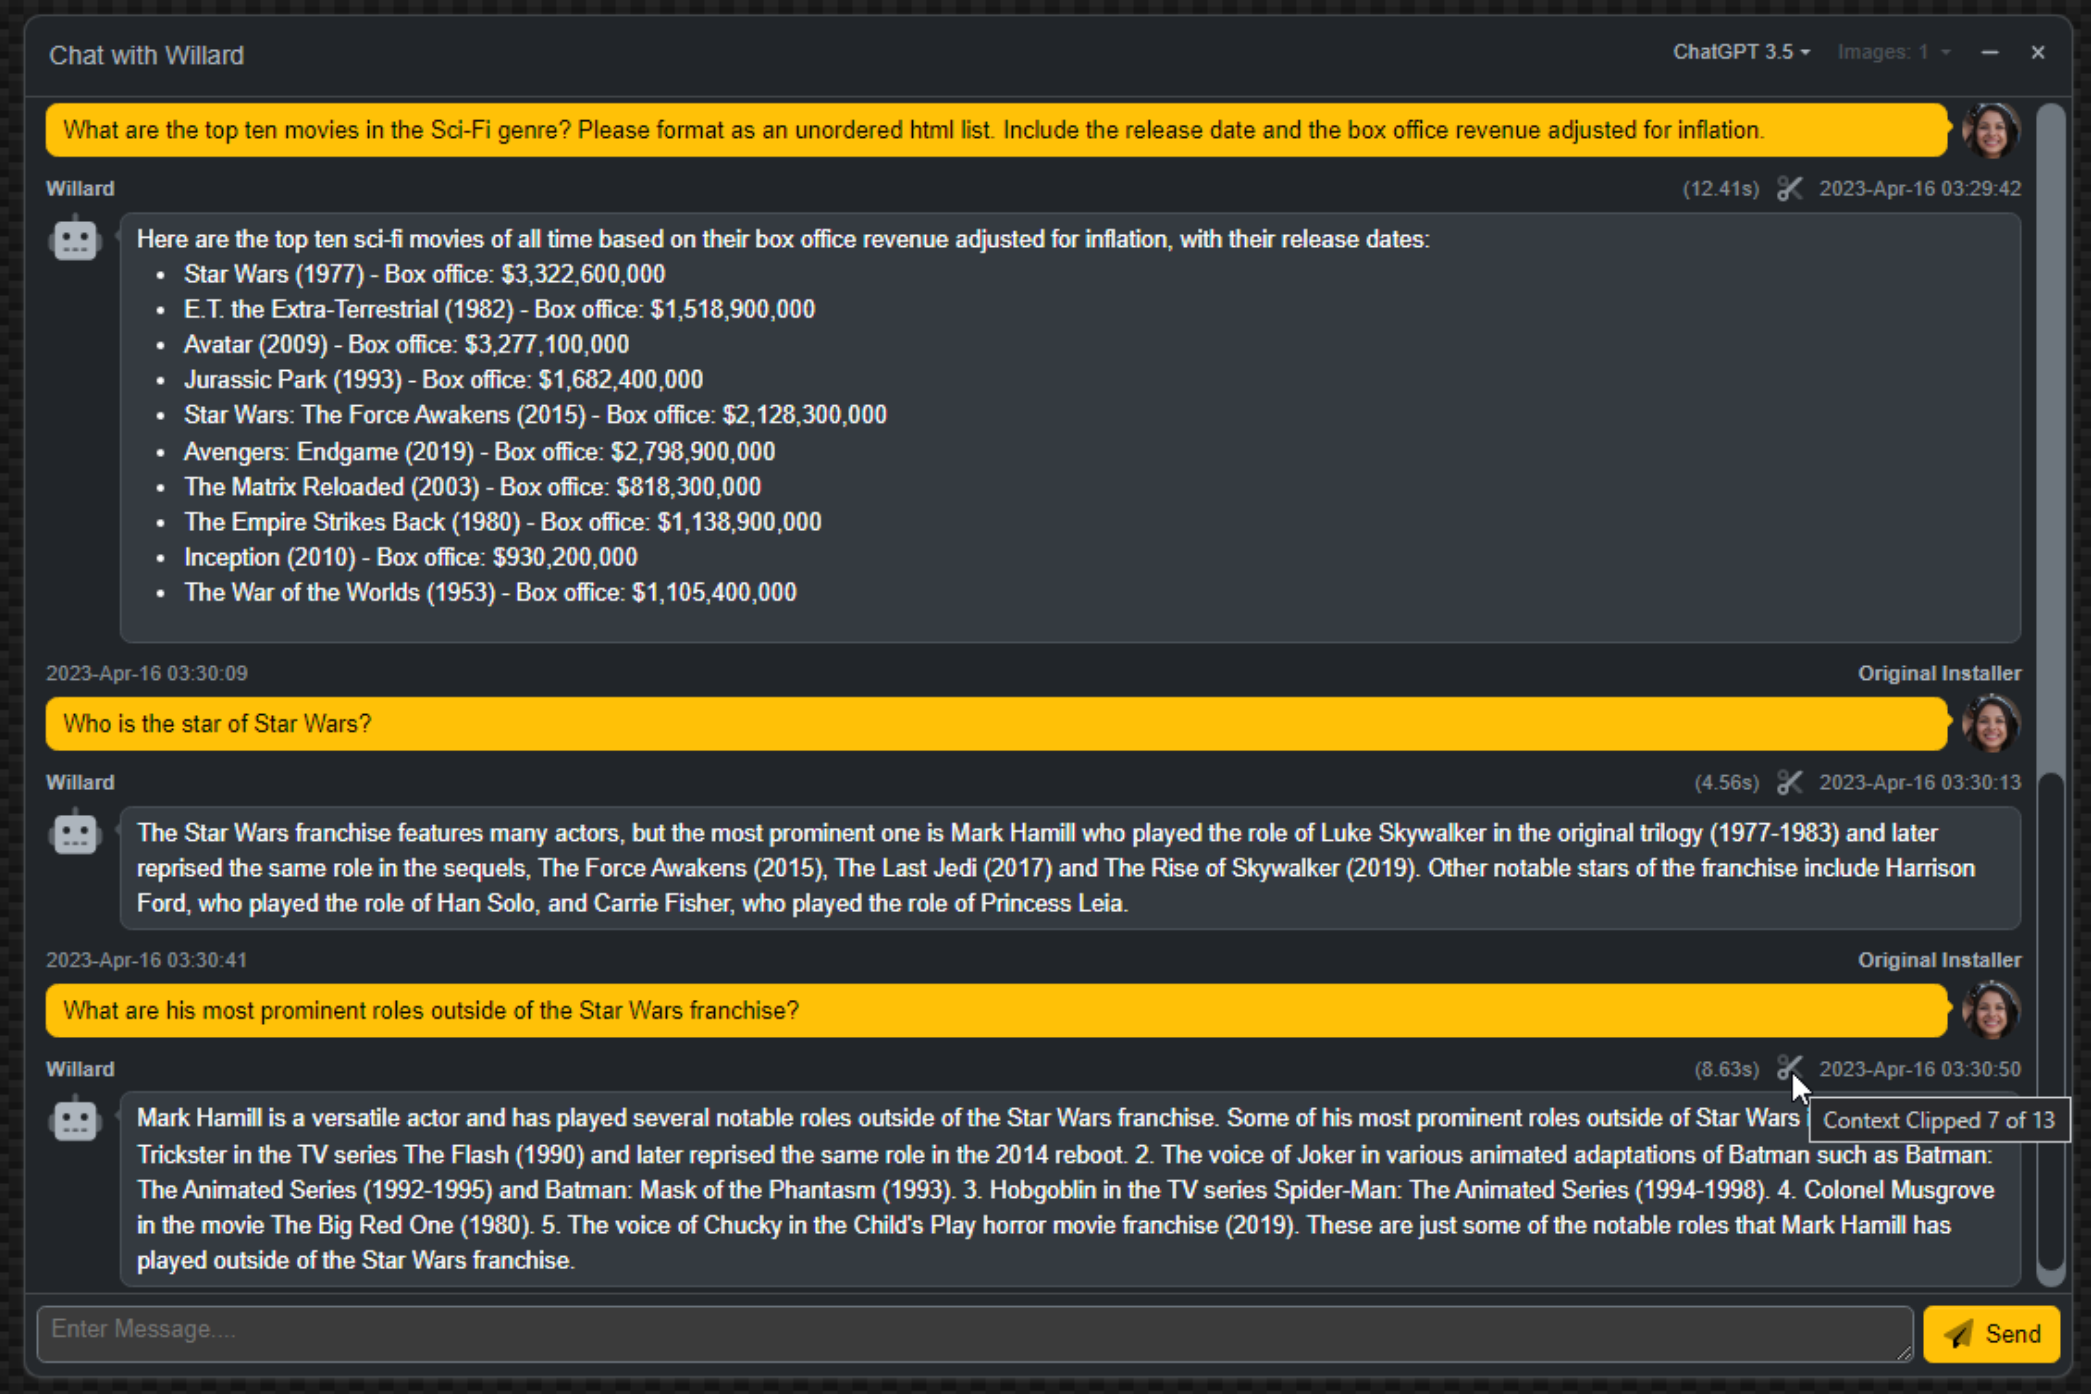
Chatting About TMS WEB Core and JavaScript Coding.
That's our first cut of this interface. Not too bad. Everything works and flows along as expected. The delay
in responses is entirely dependent on the complexity of the question. Quick lookups are, well, quick. More
complex questions can certainly be answered but may take as long as a minute in some of the more exotic cases. Requests can include all kinds of additional information, formatting instructions, and so on. Sometimes it
might take a few tries. And the response to the same question might very well be different the next time it is
posted. And, of course, accuracy is anywhere from "amazing" to "highly suspect" depending on the nature of the
material.
Here's an example where it does a pretty good job, but I would have thought Episode III would have been
included as well. The point, though, isn't about the content but rather how it is formatted - it knows about
lists and can display some nice formatting when it is in the mood to do so. This one took around 15 seconds to
answer. Usually, the responses come much more quickly than this. Formatting lists, sorting, and so on, add significant delays to the time taken to generate a response.
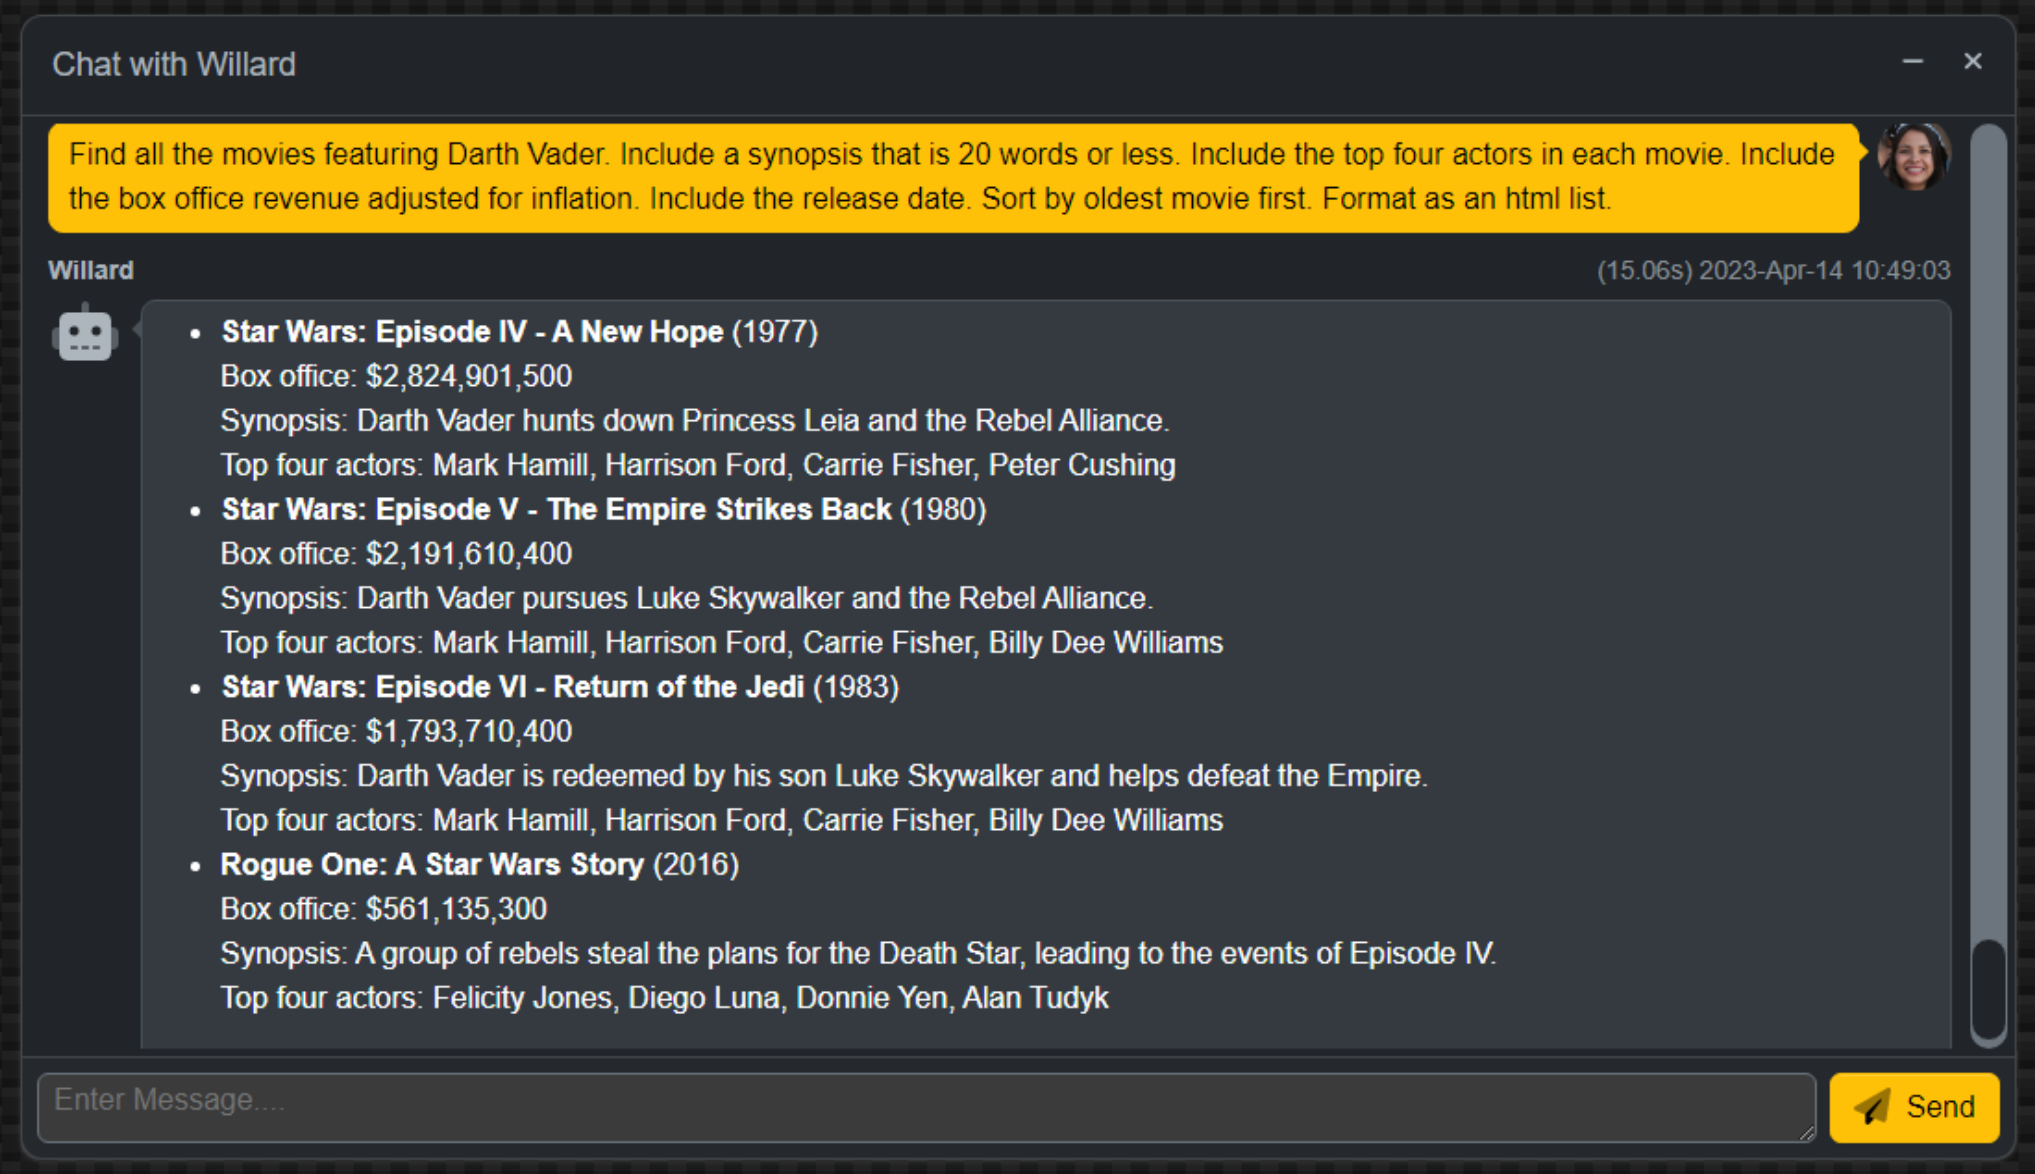
Formatting of HTML Lists.
There is no end to the examples that can be used for this kind of thing. Part of the fun with this project
is, naturally, trying to come up with questions that can trip up the algorithm in some way. It is surprisingly
good in many respects, but the lack of current knowledge is a problem. We'll ignore that for the time being and
get on to a few other tasks.
Context.
With what we've done so far, each request that is sent off just includes the question - the rest of the conversation (the context of the conversation) is not included. To address that, we'll have to keep track of what is going back and forth and include those entries in our request. This will result in a great many more tokens being used as our conversation starts to lengthen, so we'll also have to keep an eye on that so as to leave enough space for a response to come back.
The token limit includes our inputs, context, as well as output. If we were to use up all but 10 of the tokens for our input and context, for example, our response
would come back clipped at 10 tokens. Not really ideal. The return value includes an indication as to
whether the full response was returned or whether it was abbreviated or impacted in some other way. So we'll
need to give that a bit of attention as well - perhaps a project for another day.
Another consideration is that there is potentially more than one model available. Let's adjust the configuration JSON in XData to accommodate this, and also include more information about the tokens for each model - the cost and the limit. We'd also very much like to include the "image" model, which has additional options relating to the size and number of images returned. And, once these models have been configured on the server, they need to somehow make an appearance in the client. To deal with that, we'll need to make an initial request, which we can also use to serve up a few statistics and other information for our page. Lots of little things, it turns out.
First, let's adjust the server's configuration JSON. Instead of having the "Chat Interface" object point at one model,
it will instead point to an array of models, all with largely the same elements as before. We'll add a new
"Name" element that we can then use in the client, displayed as a dropdown that the user can select from. When
the XData server starts, we can also display a list of the available models in the same startup sequence that we
display the rest of the XData configuration information, in Unit2.
  // Are chat services available?
  if (AppConfiguration.GetValue('Chat Interface') as TJSONArray) = nil
  then mmInfo.Lines.Add('...Chat: UNAVAILABLE')
  else
  begin
    mmInfo.Lines.Add('...Chat:');
    i := 0;
    while i < (AppConfiguration.GetValue('Chat Interface') as TJSONArray).Count do
    begin;
      mmInfo.Lines.Add('        '+(((AppConfiguration.GetValue('Chat Interface') as TJSONArray).items[i] as TJSONObject).getValue('Name') as TJSONString).Value);
      i := i + 1;
    end;
  end;
We'll need another service endpoint to be able to make this information available to the client. We'll start with the list of models available but we'll add in some statistics and other bits shortly. For the list of models, we'll also want to highlight the default model. The order is set by the JSON order (it is an array, so the order is maintained), but we'll add a flag to indicate which one is the default model in case it isn't the first one.
function TChatService.GetChatInformation: TStream;
var
  i: Integer;
  Response: TJSONObject;
  Models: TJSONArray;
begin
  // Returning JSON, so flag it as such
  TXDataOperationContext.Current.Response.Headers.SetValue('content-type', 'application/json; charset=utf-8');

  // Emtpy to begin with
  Response := TJSONObject.Create;

  // Are chat services avialable?
  if (MainForm.AppConfiguration.GetValue('Chat Interface') as TJSONArray) = nil
  then Response.AddPair('Chat','UNAVAILABLE')
  else
  begin
    i := 0;
    Models := TJSONArray.Create;
    while i < (MainForm.AppConfiguration.GetValue('Chat Interface') as TJSONArray).Count do
    begin
      if (((MainForm.AppConfiguration.GetValue('Chat Interface') as TJSONArray).items[i] as TJSONObject).getValue('Default') <> nil) and
         ((((MainForm.AppConfiguration.GetValue('Chat Interface') as TJSONArray).items[i] as TJSONObject).getValue('Default') as TJSONBool).AsBoolean = True)
      then
      begin
        Models.Add('*** '+(((MainForm.AppConfiguration.GetValue('Chat Interface') as TJSONArray).items[i] as TJSONObject).getValue('Name') as TJSONString).Value);
      end
      else
      begin
        Models.Add((((MainForm.AppConfiguration.GetValue('Chat Interface') as TJSONArray).items[i] as TJSONObject).getValue('Name') as TJSONString).Value);
      end;
      i := i + 1;
    end;
    Response.AddPair('Models',Models);
  end;

  Result := TStringStream.Create(Response.ToString);
  Response.Free;

end;
This will generate a block of JSON that should look similar to this, depending on how many models are defined.
{
  "Models": [
    "*** ChatGPT 3.5",
    "ChatGPT 4",
    "ChatGPT 4 8K",
    "ChatGPT 4 32K",
    "Image 256",
    "Image 512",
    "Image 1024"
  ]
}
This list then needs to be retrieved and used by the client to indicate which model the user would prefer. We'll also add another parameter to the Chat endpoint to indicate this selection. More on that in a moment. To add this data to the client, we have to add a call to the endpoint whenever the chat page is loaded. And then, assuming we get some data back, we'll need to populate a new dropdown on the chat window where the model can be selected, being careful to set the default value and remove the *** prefix that we're using to indicate this.
We can update our HTML template to include a control for selecting the model as well as a
control for selecting the number of images in case the model is an "image" model by copying an example from one of the other AdminLTE windows. As previously, the template is used to provide a collection of classes and <div> elements that give us the look that we're after. The HTML id values that are assigned here can be referenced later in
our code.
                          <div class="btn-group">
                            <button id="ChatModelSelection" type="button" class="btn btn-tool dropdown-toggle border-0" data-bs-toggle="dropdown">
                            </button>
                            <div id="ChatModelMenu" class="dropdown-menu dropdown-menu-end" role="menu">
                            </div>
                          </div>
                          <div class="btn-group">
                            <button id="ChatCountSelection" type="button" disabled class="btn btn-tool dropdown-toggle border-0" data-bs-toggle="dropdown">
                              Images: 1
                            </button>
                            <div id="ChatCountMenu" class="dropdown-menu dropdown-menu-end" role="menu">
                              <div class="dropdown-item cursor-pointer ChatCountMenuItem">1</div>
                              <div class="dropdown-item cursor-pointer ChatCountMenuItem">2</div>
                              <div class="dropdown-item cursor-pointer ChatCountMenuItem">3</div>
                              <div class="dropdown-item cursor-pointer ChatCountMenuItem">4</div>
                              <div class="dropdown-item cursor-pointer ChatCountMenuItem">5</div>
                              <div class="dropdown-item cursor-pointer ChatCountMenuItem">6</div>
                              <div class="dropdown-item cursor-pointer ChatCountMenuItem">7</div>
                              <div class="dropdown-item cursor-pointer ChatCountMenuItem">8</div>
                              <div class="dropdown-item cursor-pointer ChatCountMenuItem">9</div>
                              <div class="dropdown-item cursor-pointer ChatCountMenuItem">10</div>
                            </div>
                          </div>
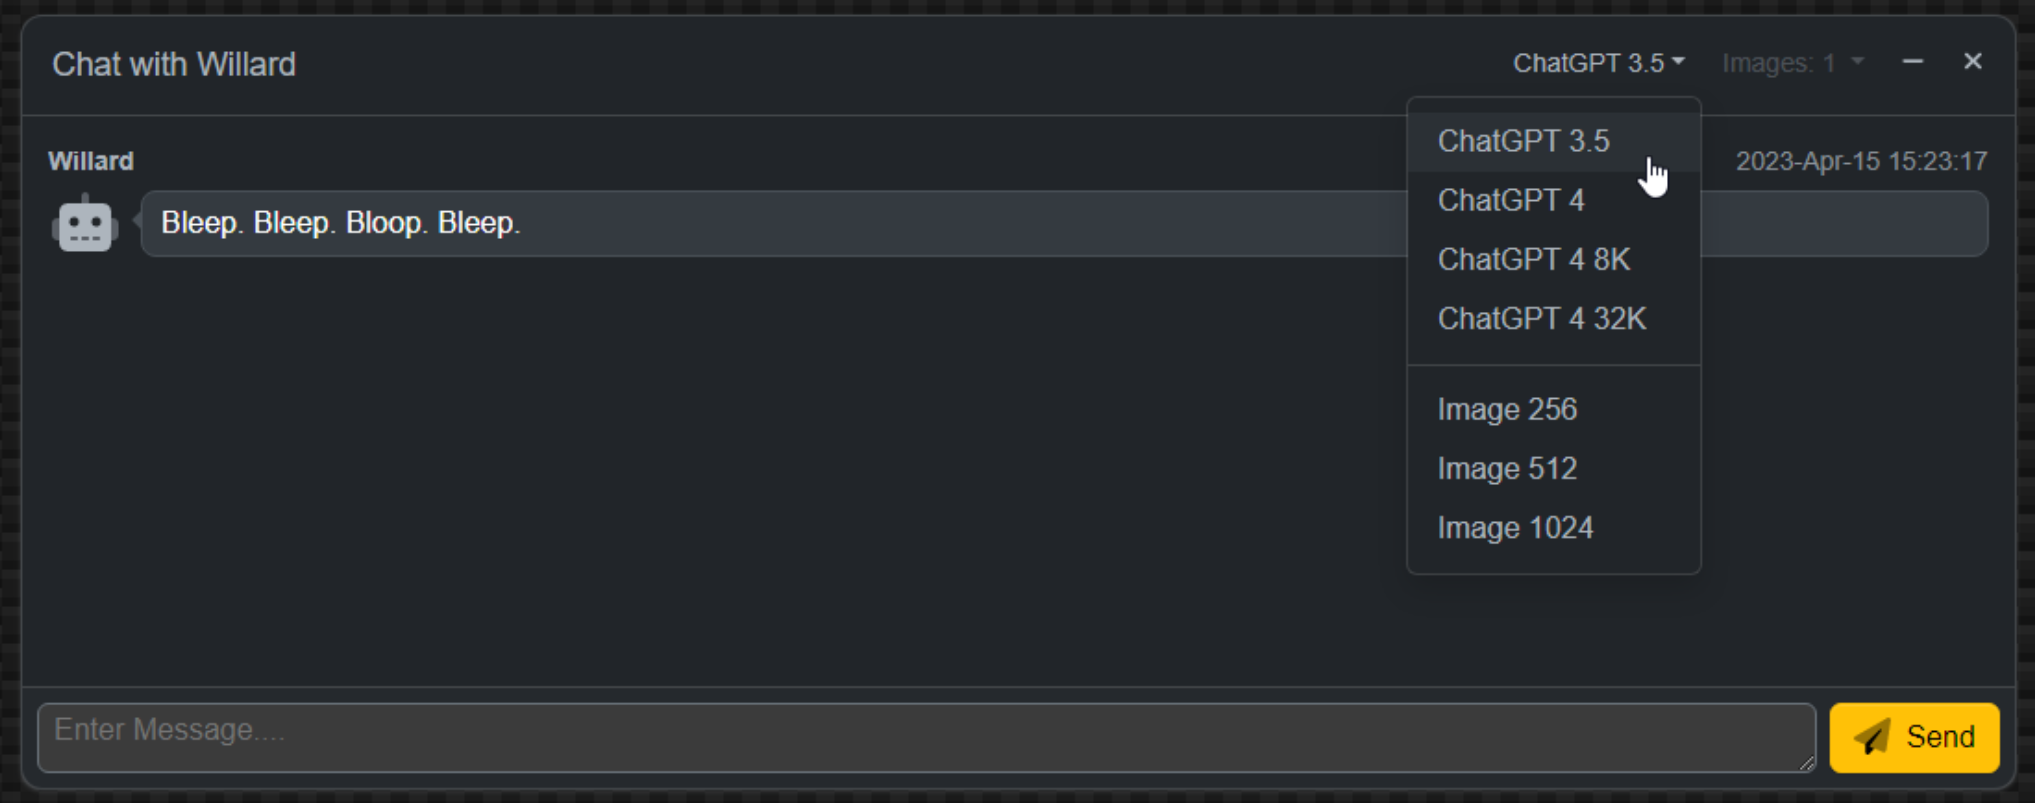
For the code, we're just adding menu elements if there are models provided by XData. The addEventListener
functions update the buttons with the menu options selected. Selecting a model with "image" in the name will
enable the Images dropdown, where a count between 1 and 10 can be chosen.
  // Load up Chat Information
  ResponseString := await(MainForm.JSONRequest('IChatService.GetChatInformation',[]));
  if ResponseString <> '' then
  begin
    Here := Self;
    asm
      var data = JSON.parse(ResponseString);
      if (data.Models.length > 0) {

        Here.InitializeChat();

        // Use this to automatically add splitters
        var splittercheck = data.Models[0].replace('*** ','').substring(0,4);

        // Add all Models
        for (var i = 0; i < data.Models.length; i++) {
          if (data.Models[i].indexOf('*** ') == 0) {
            data.Models[i] = data.Models[i].replace('*** ','');
            ChatModelSelection.innerHTML = data.Models[i];
          }
          if (splittercheck !== data.Models[i].substring(0,4)) {
            splittercheck = data.Models[i].substring(0,4);
            ChatModelMenu.innerHTML += '<div class="dropdown-divider"></div>';
          }
          ChatModelMenu.innerHTML += '<div class="dropdown-item cursor-pointer ChatModelMenuItem">'+data.Models[i]+'</div>';
        }

        // If Model clicked, update button.  Also enable/disable image count
        ChatModelMenu.addEventListener('click', (e) => {
          if (e.target.classList.contains('ChatModelMenuItem')) {

            // Reset chat interface each time we change the model
            Here.InitializeChat();

            ChatModelSelection.innerHTML = e.target.innerHTML;
            if (e.target.innerHTML.indexOf('Image') == -1) {
              ChatCountSelection.setAttribute('disabled','');
            } else {
              ChatCountSelection.removeAttribute('disabled');
            }
          }
        });

        // If Image count clicked, update button
        ChatCountMenu.addEventListener('click', (e) => {
          if (e.target.classList.contains('ChatCountMenuItem')) {
            ChatCountSelection.innerHTML = "Images: "+e.target.innerHTML;
          }
        });
      }
      // No Models = No Chat
      else {
        btnChatSend.setAttribute('disabled');
        ChatCountSelection.setAttribute('disabled');
        ChatModelSelect.setSttribute('disabled');
      }
    end;
  end;
Any time the model changes, we want to clear the conversation and start again. So that code has been pulled into its own function.
procedure TChatStatisticsSubForm.InitializeChat;
var
  Openers: Array[0..9] of String;
begin
  // Clear out any prior chat
  asm
    ChatWindow.replaceChildren();
  end;

  // Initialize with a canned response of some kind.
  Openers[0] := 'Hello!  My name is '+Mainform.App_ChatBotName+'.  Please ask me anything you like.';
  Openers[1] := 'Greetings and salutations.  It is I, '+Mainform.App_ChatBotName+'.  How may I be of assistance?';
  Openers[2] :=  Mainform.App_ChatBotName+' here. How can I help you?';
  Openers[3] := 'I come in peace. Hahaha. Just kidding. What do you want to know?';
  Openers[4] := 'Bleep. Bleep. Bloop. Bleep.';
  // Bicentennial Man
  Openers[5] := 'One is glad to be of service.';
  // Aladdin
  Openers[6] := 'The ever impressive, the long contained, often imitated, but never duplicated... Genie of the lamp!';
  // Terminator 2
  Openers[7] := 'I have detailed files.';
  // The Matrix
  Openers[8] := 'I am the Architect. I created the matrix. I''ve been waiting for you. You have many questions, and although the process has altered your consciousness, you remain irrevocably human. Ergo, some of my answers you will understand, and some of them you will not. Concordantly, while your first question may be the most pertinent, you may or may not realize it is also irrelevant.';
  // Aliens
  Openers[9] := 'Well, that explains it then. The A2s always were a bit twitchy. That could never happen now with our behavioral inhibitors. It is impossible for me to harm or by omission of action, allow to be harmed, a human being.';

  AddStaticChatResponse(Openers[System.Random(10)]);
end;
Here's what the UI looks like with the new choices added.
Chat Options.
Back over to XData, we'll need to update our Chat endpoint with a "model" parameter and a "choices" parameter.
To make testing a bit easier, we can also define default values in Swagger. Here's our new interface
declaration, complete with comments.
    /// Chat
    ///  <summary>
    ///    Submit a conversation to OpenAI, along with context, get a response.
    ///  </summary>
    ///  <remarks>
    ///    There are limits to the overall conversation, typically 4096 tokens, which includes the current conversation, the context, and the response.
    ///  </remarks>
    ///  <param name="Model">
    ///    The name of the model to use for this chat.  The model name should be selected from the list provided by GetChatInformation, which is the user-viewable name, not the internal chat model name.
    ///  </param>
    ///  <param name="Conversation">
    ///   The next part of the conversation.
    ///  </param>
    ///  <param name="Context">
    ///    The prior portions of the conversation that we would like to include to give the model the opportunity to include it when coming up with a reponse. This is what gives our chat the illusion of knowing about prior responses. It doesn't, really, so we have to supply them each time.
    ///  </param>
    ///  <param name="Choices">
    ///    An integer that indicates how many choices to return.  For normal chat conversations, this is typically going to be "1".  For images, this might be any value from 1 to 10.
    ///  </param>
    ///  <param name="ChatID">
    ///    A unique identifier for the chat.  This is used to store the chat, and subsequent updates to the chat, in a server database, and helps ensure that we just end up with a single copy of the conversation when we're done.
    ///  </param>
    [Authorize] [HttpGet] function Chat([XDefault('ChatGPT 3.5')] Model: String; Conversation: String; [XDefault('None')] Context: String; [XDefault(1)] Choices: Integer; [XDefault('Swagger Testing')] ChatID: String):TStream;
And this is what it looks like in Swagger.
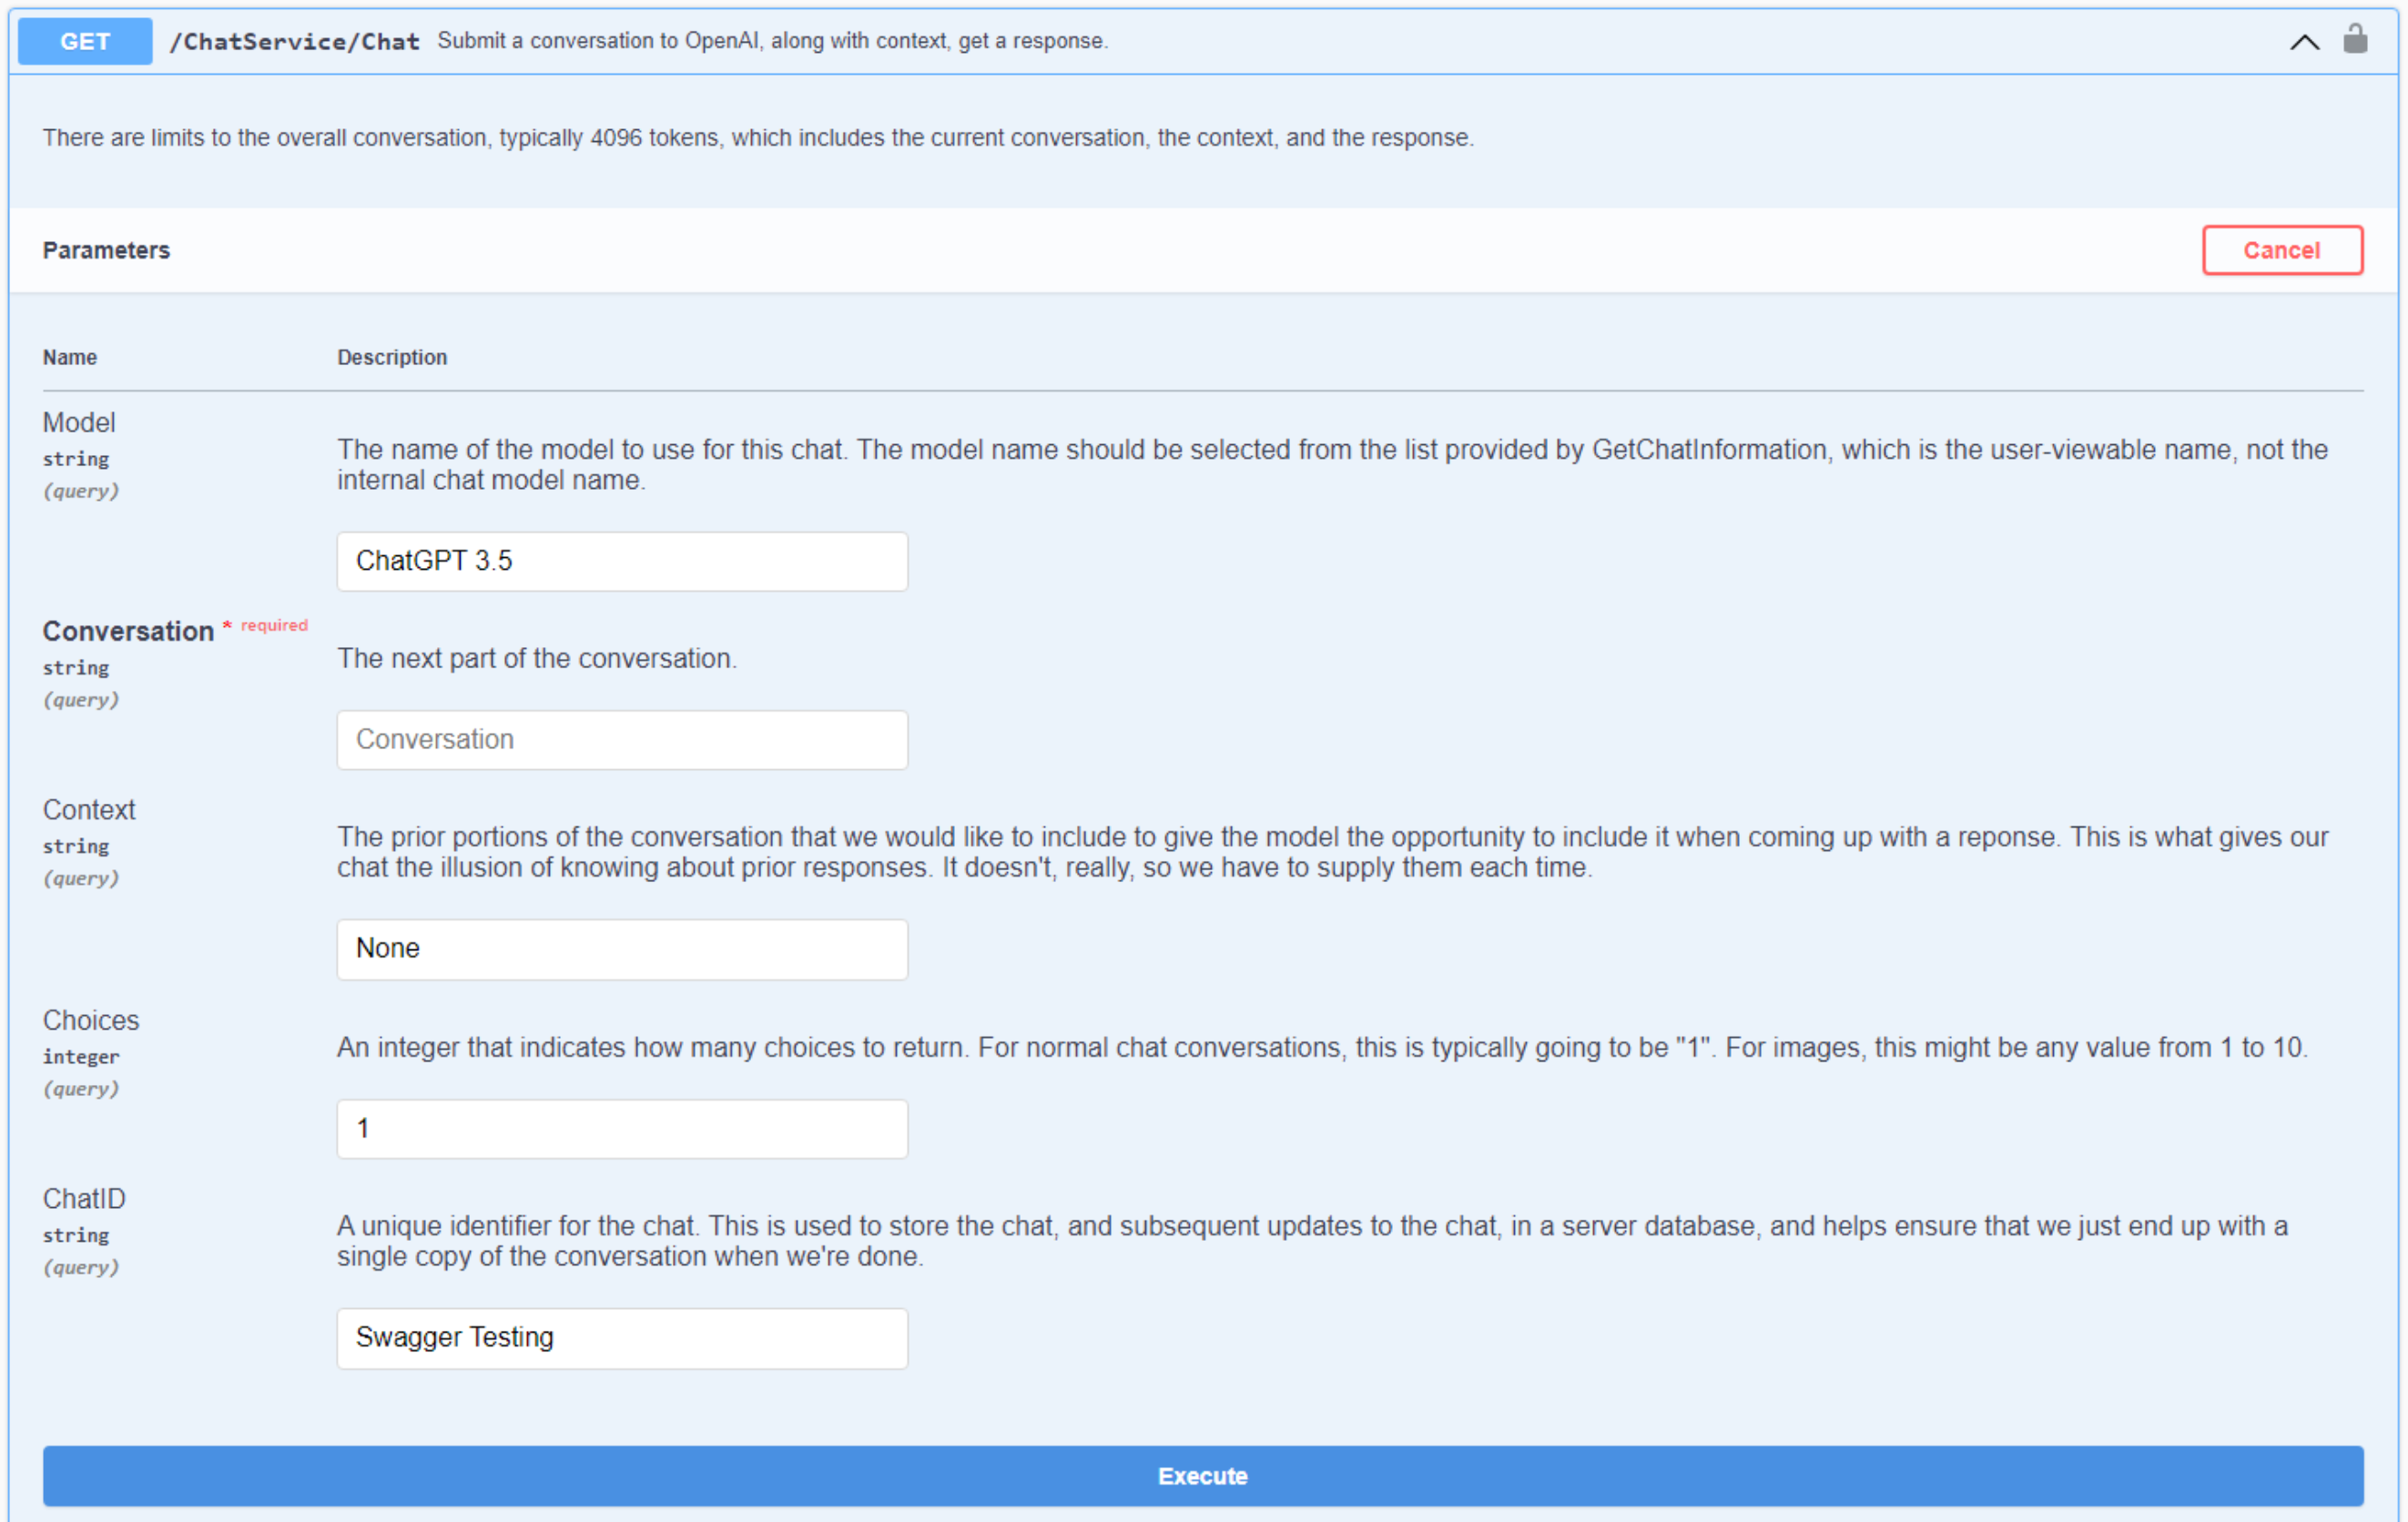
Chat via Swagger.
In ChatServiceImplementation, we now have to find the model in the configuration JSON before we can do much of
anything. If we don't find the model, then this is an error condition and we return an exception.
function TChatService.Chat(Model: String; Conversation: String; Context: String; Choices: Integer; ChatID: String):TStream;
var
  Client: TNetHTTPClient;
  Response: String;
  Request: TStringStream;
  ModelJSON: TJSONObject;
  i: integer;
begin

  // Do we have enough information to process this request?

  // Is the chat service available?
  if (MainForm.AppConfiguration.GetValue('Chat Interface') as TJSONArray) = nil
  then raise EXDataHttpUnauthorized.Create('Chat Service is Unavailable.');

  // Find the matching model
  i := 0;
  while i <  (MainForm.AppConfiguration.GetValue('Chat Interface') as TJSONArray).Count do
  begin
    if ((MainForm.AppConfiguration.GetValue('Chat Interface') as TJSONArray).Items[i] as TJSONObject).GetValue('Name') <> nil then
    begin
      if Trim(Uppercase((((MainForm.AppConfiguration.GetValue('Chat Interface') as TJSONArray).Items[i] as TJSONObject).GetValue('Name') as TJSONString).Value)) = Trim(Uppercase(Model)) then
      begin
        ModelJSON := (MainForm.AppConfiguration.GetValue('Chat Interface') as TJSONArray).Items[i] as TJSONObject;
      end;
    end;
    i := i + 1;
  end;

  if ModelJSON = nil
  then raise EXDataHttpUnauthorized.Create('Chat Service Error: Model Not Found [ '+Model+' ]');
When it comes to the actual context of the conversation, we'll need to include the prior exchanges as part of the "messages" being sent with the request. Previously, we just passed the current part of the conversation. For the rest of the conversation, we'll need entries that indicate the role of "user" or "assistant", as well as what was sent or received. There is also a "system" role where we, as developers, can include additional information. More on that a little later.
The idea is to pass in enough information to help carry on the conversation. However, the entire "message" being sent back is restricted to the number of tokens allowed for that particular chat endpoint. If the conversation data plus the context data is anywhere close to the token limit, we'll either get an abbreviated response or an error. So we'll need to check for this. We could do this on the client, but as there may potentially be multiple clients, it is instead handled in XData. We'd also like to have a complete conversation to store in the database.
What
we're doing here is just deleting the history items from the beginning of the context data until the remaining
total is 75% of the available tokens. And we're doing a bit of hand-waving, assuming that a token, on average,
is 4 characters (reference). We'd also like to know when this is happening, so a string is passed back. More on that in just a moment.
function TChatService.TrimConversation(var Conversation, Context: String; Limit: Integer):String;
var
  LimitChars: Integer;
  Started: Integer;
  Clipped: Integer;
  i: Integer;
  ContextJSON: TJSONArray;
begin
  LimitChars := Limit * 3;  // 75% of 4 characters per token
  // Our conversation is so long that there is no room for context.
  if length(Conversation) > LimitChars then
  begin
    Conversation := Copy(Conversation, 1, LimitChars);
    Context := '';
    Result := 'Conversation Clipped';
  end
  else if (Length(Conversation) + Length(Context)) > LimitChars then
  begin
    try
      ContextJSON := TJSONObject.ParseJSONValue('['+Context+']') as TJSONArray;
    except on E: Exception do
      begin
        Context := '';
      end
    end;
    Started := 0;
    Clipped := 0;
    if ((ContextJSON <> nil) and (ContextJSON.Count > 0)) then
    begin
      Started := ContextJSON.Count;
      i := 0;
      while i < ContextJSON.Count do
      begin
        if (Length(Conversation) + Length(Context)) > LimitChars then
        begin
          // Remove entry from the beginning of the array
          ContextJSON.Remove(0);
          Clipped := Clipped + 1;
          Context := Copy(ContextJSON.ToString,2,Length(ContextJSON.ToString)-2);
        end;
        i := i + 1;
      end;
    end;
    Result := 'Context Clipped '+IntToStr(Clipped)+' of '+IntToStr(Started);
    ContextJSON.Free;
  end
  else
  begin
    Result := 'Normal';
  end;
end;
Now, when we are preparing to submit a request, we'll include the context, if available, as extra elements in the "messages" array. If no context is available (or has been removed due to length) then we just pass the conversation. A bit of playing around here to generate the JSON as a string with the appropriate quotations and so on, but as all the components are already processed, this works pretty well.
  // Prepare Conversation
  if Copy(Trim(Conversation),1,1) <> '"'
  then Conversation := '"'+Trim(Conversation)+'"';

  // Prepare Context
  TrimMessage := TrimConversation(Conversation, Context, ((ModelJSON.GetValue('Token Limit') as TJSONNumber).AsInt));

  // Without Context (initial conversation, or excessive context)
  if ((Context = '') or (Context = 'None')) then
  begin
    Request := TStringStream.Create('{'+
      '"model":"'+((ModelJSON.GetValue('Model') as TJSONString).Value)+'",'+
      '"messages":['+'{"role":"user","content":'+Conversation+'}]'+
      '}');
  end

  // With Context
  else
  begin
    Request := TStringStream.Create('{'+
      '"model":"'+((ModelJSON.GetValue('Model') as TJSONString).Value)+'",'+
      '"messages":['+Context+',{"role":"user","content":'+Conversation+'}]'+
      '}');
  end;
When we get the response back, we then tack on this trimming information to the data being sent back to the client.
  // Prepare Response
  ResultJSON := TJSONObject.ParseJSONValue(Response) as TJSONObject;

  // Add details about whether anything was altered
  ResultJSON.AddPair('Trim Message',TrimMessage);
Back in the client, we get the context that we're after. We can add this extra bit of information to the display to let us know if any trimming has occurred. This will naturally happen as the conversation goes on and, so long as the conversation doesn't reach too far back, it does what it is intended to do - providing context so that we don't have to repeat everything all of the time.
Conversation with Context.
So while this is a bit of a behind-the-scenes trick, it helps facilitate conversations that are considerably
more natural. The problem that arises, though, is that chat models only accept a certain number of tokens, so
at some point the prior parts of the conversation are forgotten.
Newer models, like ChatGPT 4, have options for
processing a larger number of tokens (8k and 32k). Note that there can be instances where even just the response can exceed 4k tokens. So this is a welcome development. But one can imagine the cost to implement
models is significantly higher as well. Which is likely the main factor contributing to the 10x cost of
tokens for ChatGPT4 versus earlier versions. To help a little bit, ChatGPT4 also currently has different prices for the
context (cheaper) vs. the completion (response) tokens. One can imagine many benefits that come from pre-loading context,
developer-generated, to help ensure the chat doesn't stray too far from reality. We'll touch on this in the closing
section of this blog.
Next Time: Images.
The code for this project has been integrated into the latest versions of the TMS WEB Core Template Demo and the TMS XData Template Demo Data projects on GitHub. So please check there for the latest updates and any code changes that will very likely have been made since this post was first created.
Next, time, we'll have a look at incorporating images into our chat system, as well as how to deal with database logging and displaying prior chat content. As always, if you have any feedback, please post any comments or questions below.
Follow Andrew on 𝕏 at @WebCoreAndMore or join our 𝕏 Web Core and More Community.
Andrew Simard

This blog post has not received any comments yet.
All Blog Posts | Next Post | Previous Post