Blog
All Blog Posts | Next Post | Previous Post

 TMS Web Core and More with Andrew:
Templates - Part 2 of 2: AdminLTE 4
Thursday, March 2, 2023

This might be most helpful if you don't have the time or inclination to develop such a UI
yourself. Or perhaps an HTML template has been provided for you to use as part of a suite of applications using
the same design elements. Or maybe you just want to try something a little different.
Contents
- New Project.
- HTML Templates.
- Application Pages.
- Logging In.
- Intro to SCSS.
- Bootstrap 5 Toasts.
- JWT Decoding.
- Administrator Form.
- Dashboard Data.
- Simple Template Elements.
- Less Simple Template Elements.
- Future Template Work.
New Project.
To get started, we'll be creating a new project using the "TMS WEB Bootstrap Application" template that we've used so many times before. In the last post, we covered how to set up a repository on GitHub. The same steps were followed here, with the only difference being that we'd like to exclude more of the project folder from GitHub than we do with a normal Delphi application.Specifically, we'd rather not copy the build folders and their contents. The equivalent elements in a standard Delphi VCL application are excluded from GitHub using the Delphi preset, so we just need to add a bit more to address the differences for our TMS WEB Core project. Before we create the project in Delphi, we can edit the .gitignore file where this is controlled. We could also edit it after we create the project, but if we commit our changes before editing the file, we'll have to delete the files from GitHub manually. Here's what is added to the end of the file.
# Not needed for TMS WEB Core projects
Win32/
Win64/
TMSWeb/
This change can be made in the local project folder or directly on the GitHub website. Either way, be sure to sync up the two versions. If you're using GitHub Desktop, it will tell you if the GitHub version of your repository has been updated, making it easy to keep things in sync.
With that out of the way, we can create a new project in Delphi using the "TMS WEB Bootstrap Application" template in the project folder that we've created. By default, this project template adds a perfectly usable version of Bootstrap that is hosted by our application. I tend to prefer using the very latest version of Bootstrap, and also prefer to have the Bootstrap files served up by a CDN like JSDelivr. To make this change, it is just a few quick steps.
- Replace Bootstrap references in Project.html with CDN versions.
- Remove bootstrap.bundle.min.js and bootstrap.min.css from Delphi Project Manager.
- Remove the same files from the project folder, and from GitHub if you've already committed a version that included them.
The latest version of Bootstrap is always referenced on the Bootstrap
website, which currently shows the following. We can do Step 1 above just by copying & pasting
these values.
<link href="https://cdn.jsdelivr.net/npm/bootstrap@5.3.0-alpha1/dist/css/bootstrap.min.css" rel="stylesheet" integrity="sha384-GLhlTQ8iRABdZLl6O3oVMWSktQOp6b7In1Zl3/Jr59b6EGGoI1aFkw7cmDA6j6gD" crossorigin="anonymous">
<script src="https://cdn.jsdelivr.net/npm/bootstrap@5.3.0-alpha1/dist/js/bootstrap.bundle.min.js" integrity="sha384-w76AqPfDkMBDXo30jS1Sgez6pr3x5MlQ1ZAGC+nuZB+EYdgRZgiwxhTBTkF7CXvN" crossorigin="anonymous"></script>
If you're not sure whether Bootstrap has been properly loaded in your project, just drop a TWebButton on the form and run the project - you should see a styled version of the button when the project is run, with rounded corners and no border. With this particular project template, new buttons are created with the ElementClassName property set to include the Bootstrap classes btn btn-light, which is where this styling comes from.
HTML Templates.
There are numerous sources for HTML templates, going back to the earliest days of web design. Some are best suited for brochure-ware websites, where there are just a small handful of pages, or even just one. These are used to describe a product, service, or whatever the topic of the website happens to be. Some are considerably more advanced, containing multiple pages with more complex elements like menus or tables that can be wired up to other sources of data.
Depending on the overall website experience you're after, there may be
a place for one, both, or perhaps even several of each of these kinds of templates. For our purposes, we're
going to try and cover what might be a common scenario for a typical SMB-sized business, where there are a few
classes of visitors.
- Public Visitors - Simple. This is where the brochure-ware template might be useful. We're not
going to cover that here, as these kinds of websites can be built easily enough and don't generally need
something like a web application backing them. This kind of template can be dropped into a folder and
customized directly, usually served up as static pages by something like an Apache web server, or even created
through other website tools like Wix or something similar. These pages are typically optimized for a broad
array of devices (responsive) and are usually what you want to have indexed by search engines and social
media platforms, where branding might be more important. SEO (search engine optimization) is usually
concerned with targeting these kinds of pages. Depending on how sophisticated you're wanting to be, various landing
pages corresponding to marketing campaigns may also fall into this category.
- Public Visitors - Complex. Sometimes, a TMS WEB Core project may be used, particularly when there
is something more complex being offered. Perhaps there is data that you're publishing without any kind of
access control or other authentication mechanism needed, like blog posts or an online marketplace, or sites
of that nature. Or perhaps the interface is more complex than what might be possible with a simple
template. There's certainly no reason to avoid using TMS WEB Core in these applications, just a matter of
whether there's enough complexity to justify the extra effort.
- Authorized Visitors. When part of your website needs to be protected, generally behind a login
page of some kind, we're moving more comfortably into territory where TMS WEB Core projects and other web
applications come into play. As the complexity of the information presented increases, the need
for consistent and more capable UI elements also increases. Particularly if these visitors are customers, a
certain level of branding may also continue to be important. Tables are more prevalent here, along with
other common components like date/time pickers and basic charting features. There are still many HTML themes
available that can be used with these kinds of components, and these are the focus of this blog post.
- Administrative Users. Similar to the above, these users are typically employees or contractors of the business, where branding in particular isn't the focus. While the HTML templates used here may very well be the same as for other authorized visitors, often they are different - more technical in nature, or specifically designed to be as functional as possible. In some content management systems (CMS), like for example, Drupal, separate front-end and back-end themes are used.
For our example today, we're going to skip over the public (anonymous) pages that might make up a corporate
website and instead focus on the administrative users, meaning that we'll need to start with a login page.
But what template to use? Well, there are plenty out there. And as many are built on top of existing web technologies, it adds an extra wrinkle to the selection process. Do you want to use a template that relies on jQuery? Maybe. Bootstrap 3? Maybe not. For our purposes, as TMS WEB Core developers, we don't really want anything to do with Angular, React, or Vue templates. Just straight-up JS/CSS/HTML, thanks. But even that might complicate things.
Many templates now include very useful additions, particularly SCSS files -
part of Sass, a CSS
pre-processing language - as well as other deployment tools. Some of which we will benefit from, and some
that might be more trouble than they're worth. And depending on your budget, a free template might be the
only sensible option. While others might readily pay $100 or more for something that offers all the plugins
that they might want, already configured.
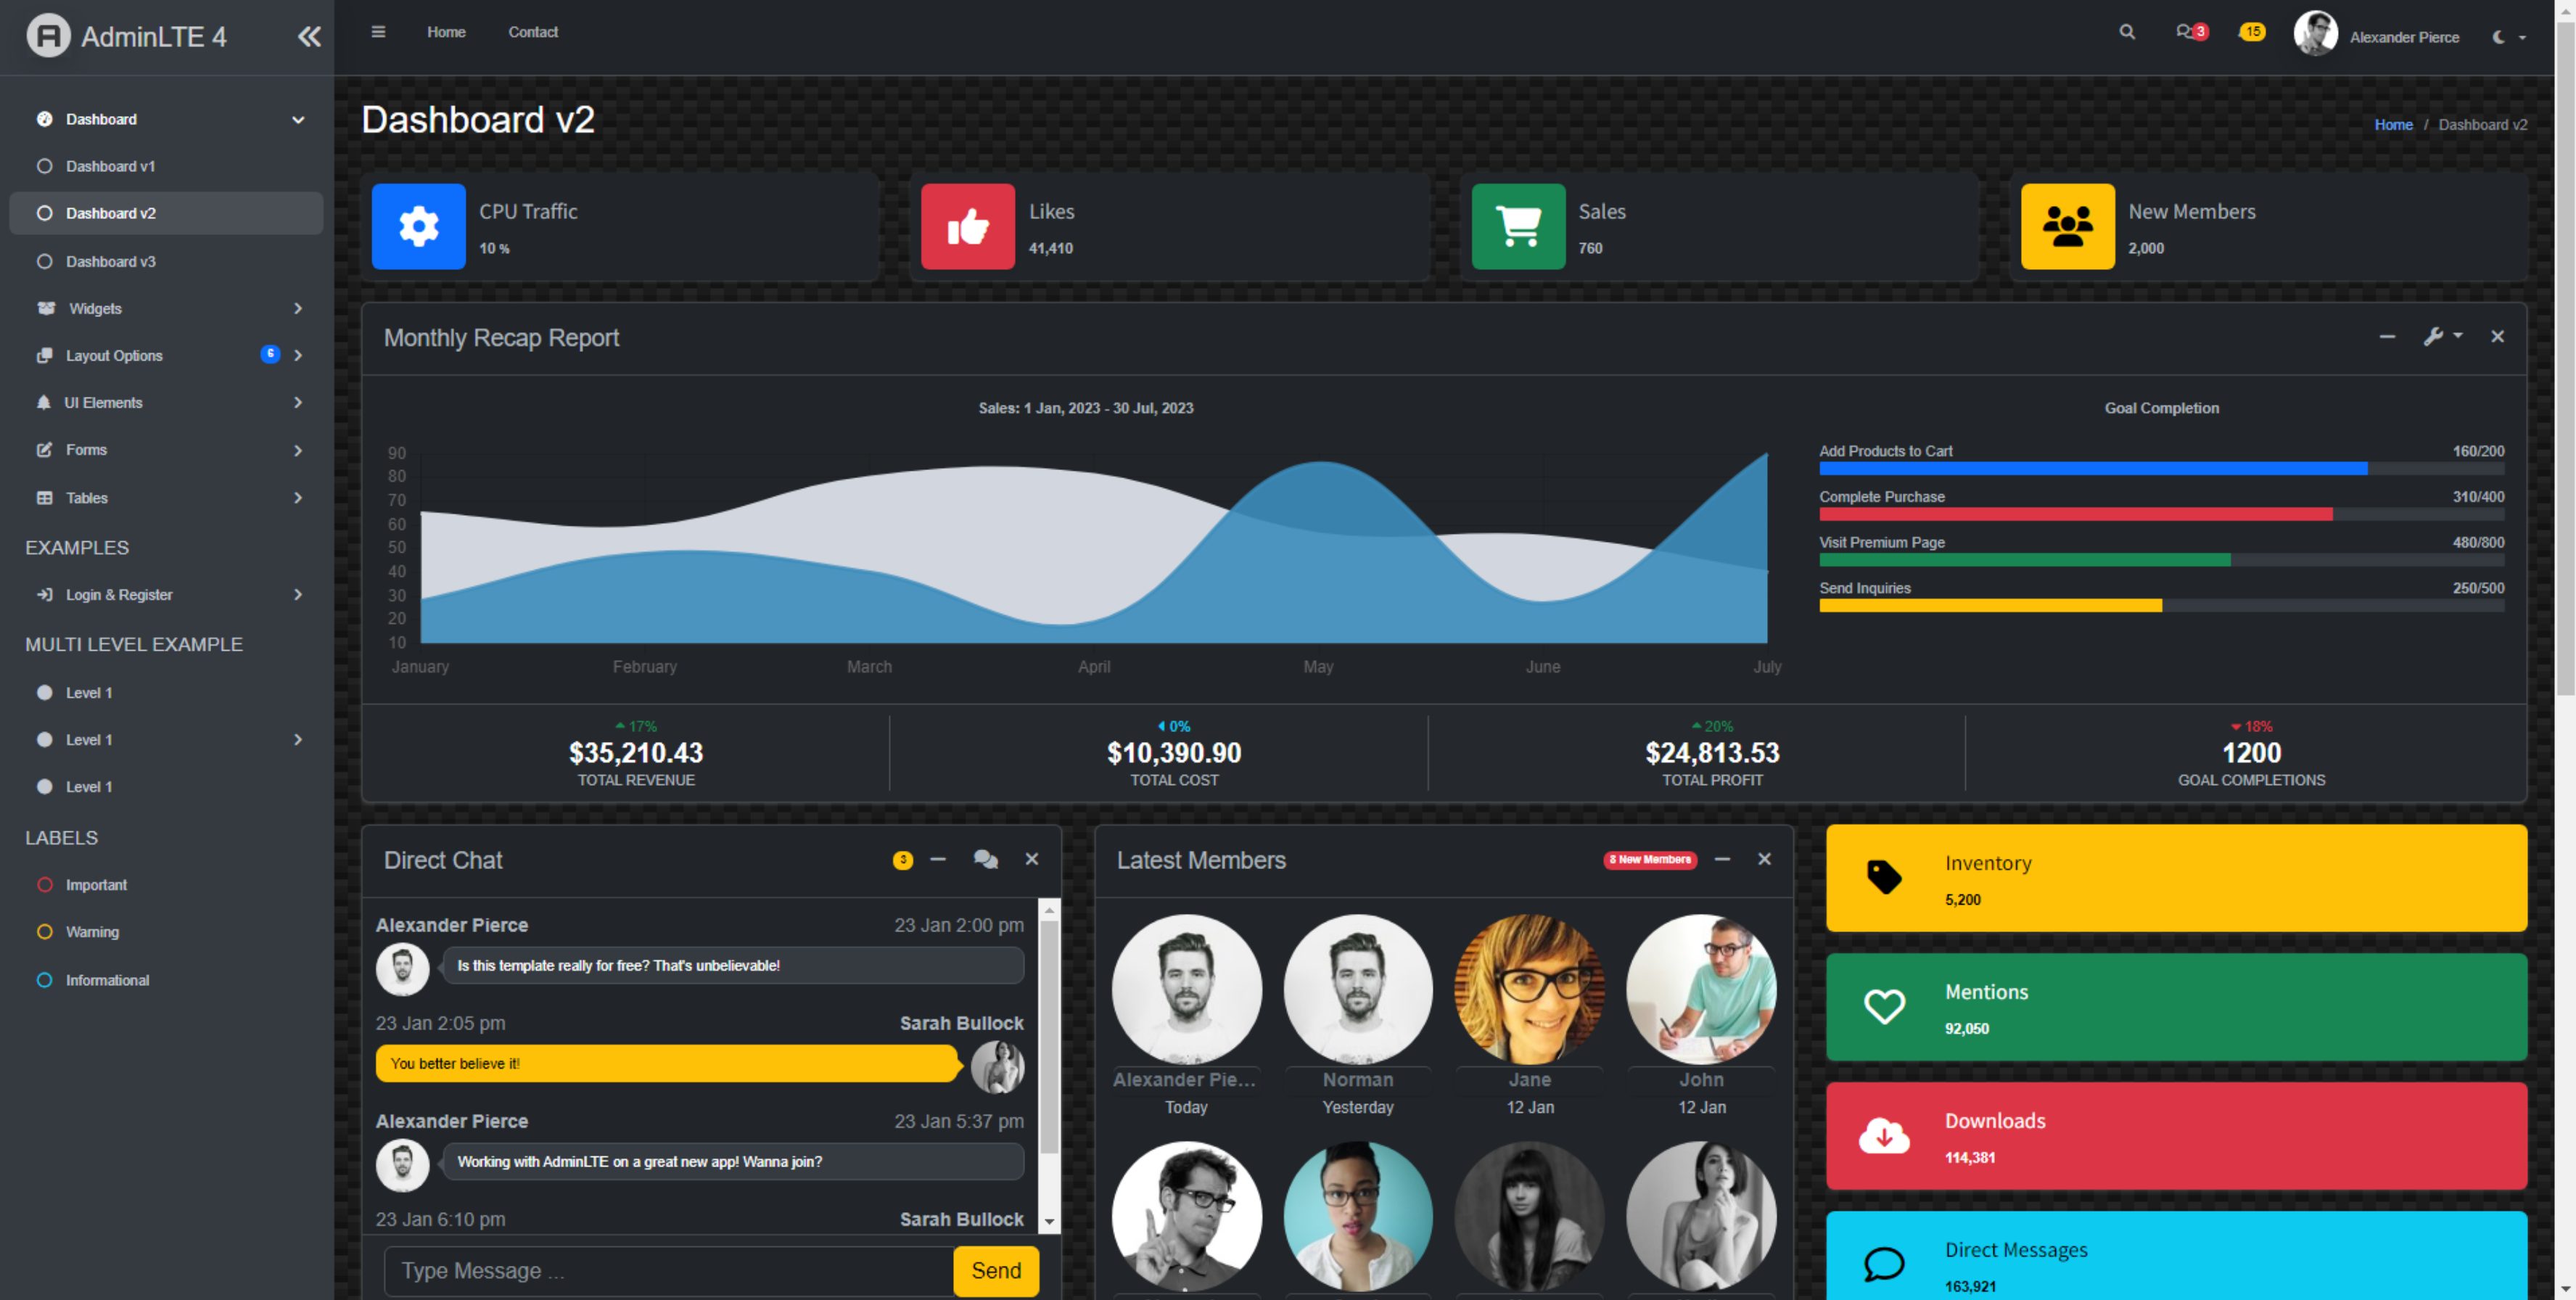
Taking a quick look around, AdminLTE claims to be the most popular Bootstrap Admin template, even going so far as to suggest that they have more contributors than most other templates have users. A bit bold, but also a bit behind the times as the current version, AdminLTE 3.2.0, was written for Bootstrap 4. Fortunately, AdminLTE 4 is being worked on, and it works with Bootstrap 5. It is scheduled for official release alongside Bootstrap 5.3, currently an alpha release, as we saw earlier in this post. But AdminLTE 4 is actively being developed, so let's give that a try.
The latest version of this template can be downloaded via the v4-dev branch. We can unzip this into our project folder, into /AdminLTE-4-dev/ for example, but let's exclude it from our GitHub repository via .gitignore as we did with the build files. We don't want to distribute it inadvertently without permission, after all. Plus, it is quite large. Here's a peek at what it looks like. Ultimately, we'll be copying what we need from the template into other parts of our project, so there's no need to include this directly in the GitHub repository.
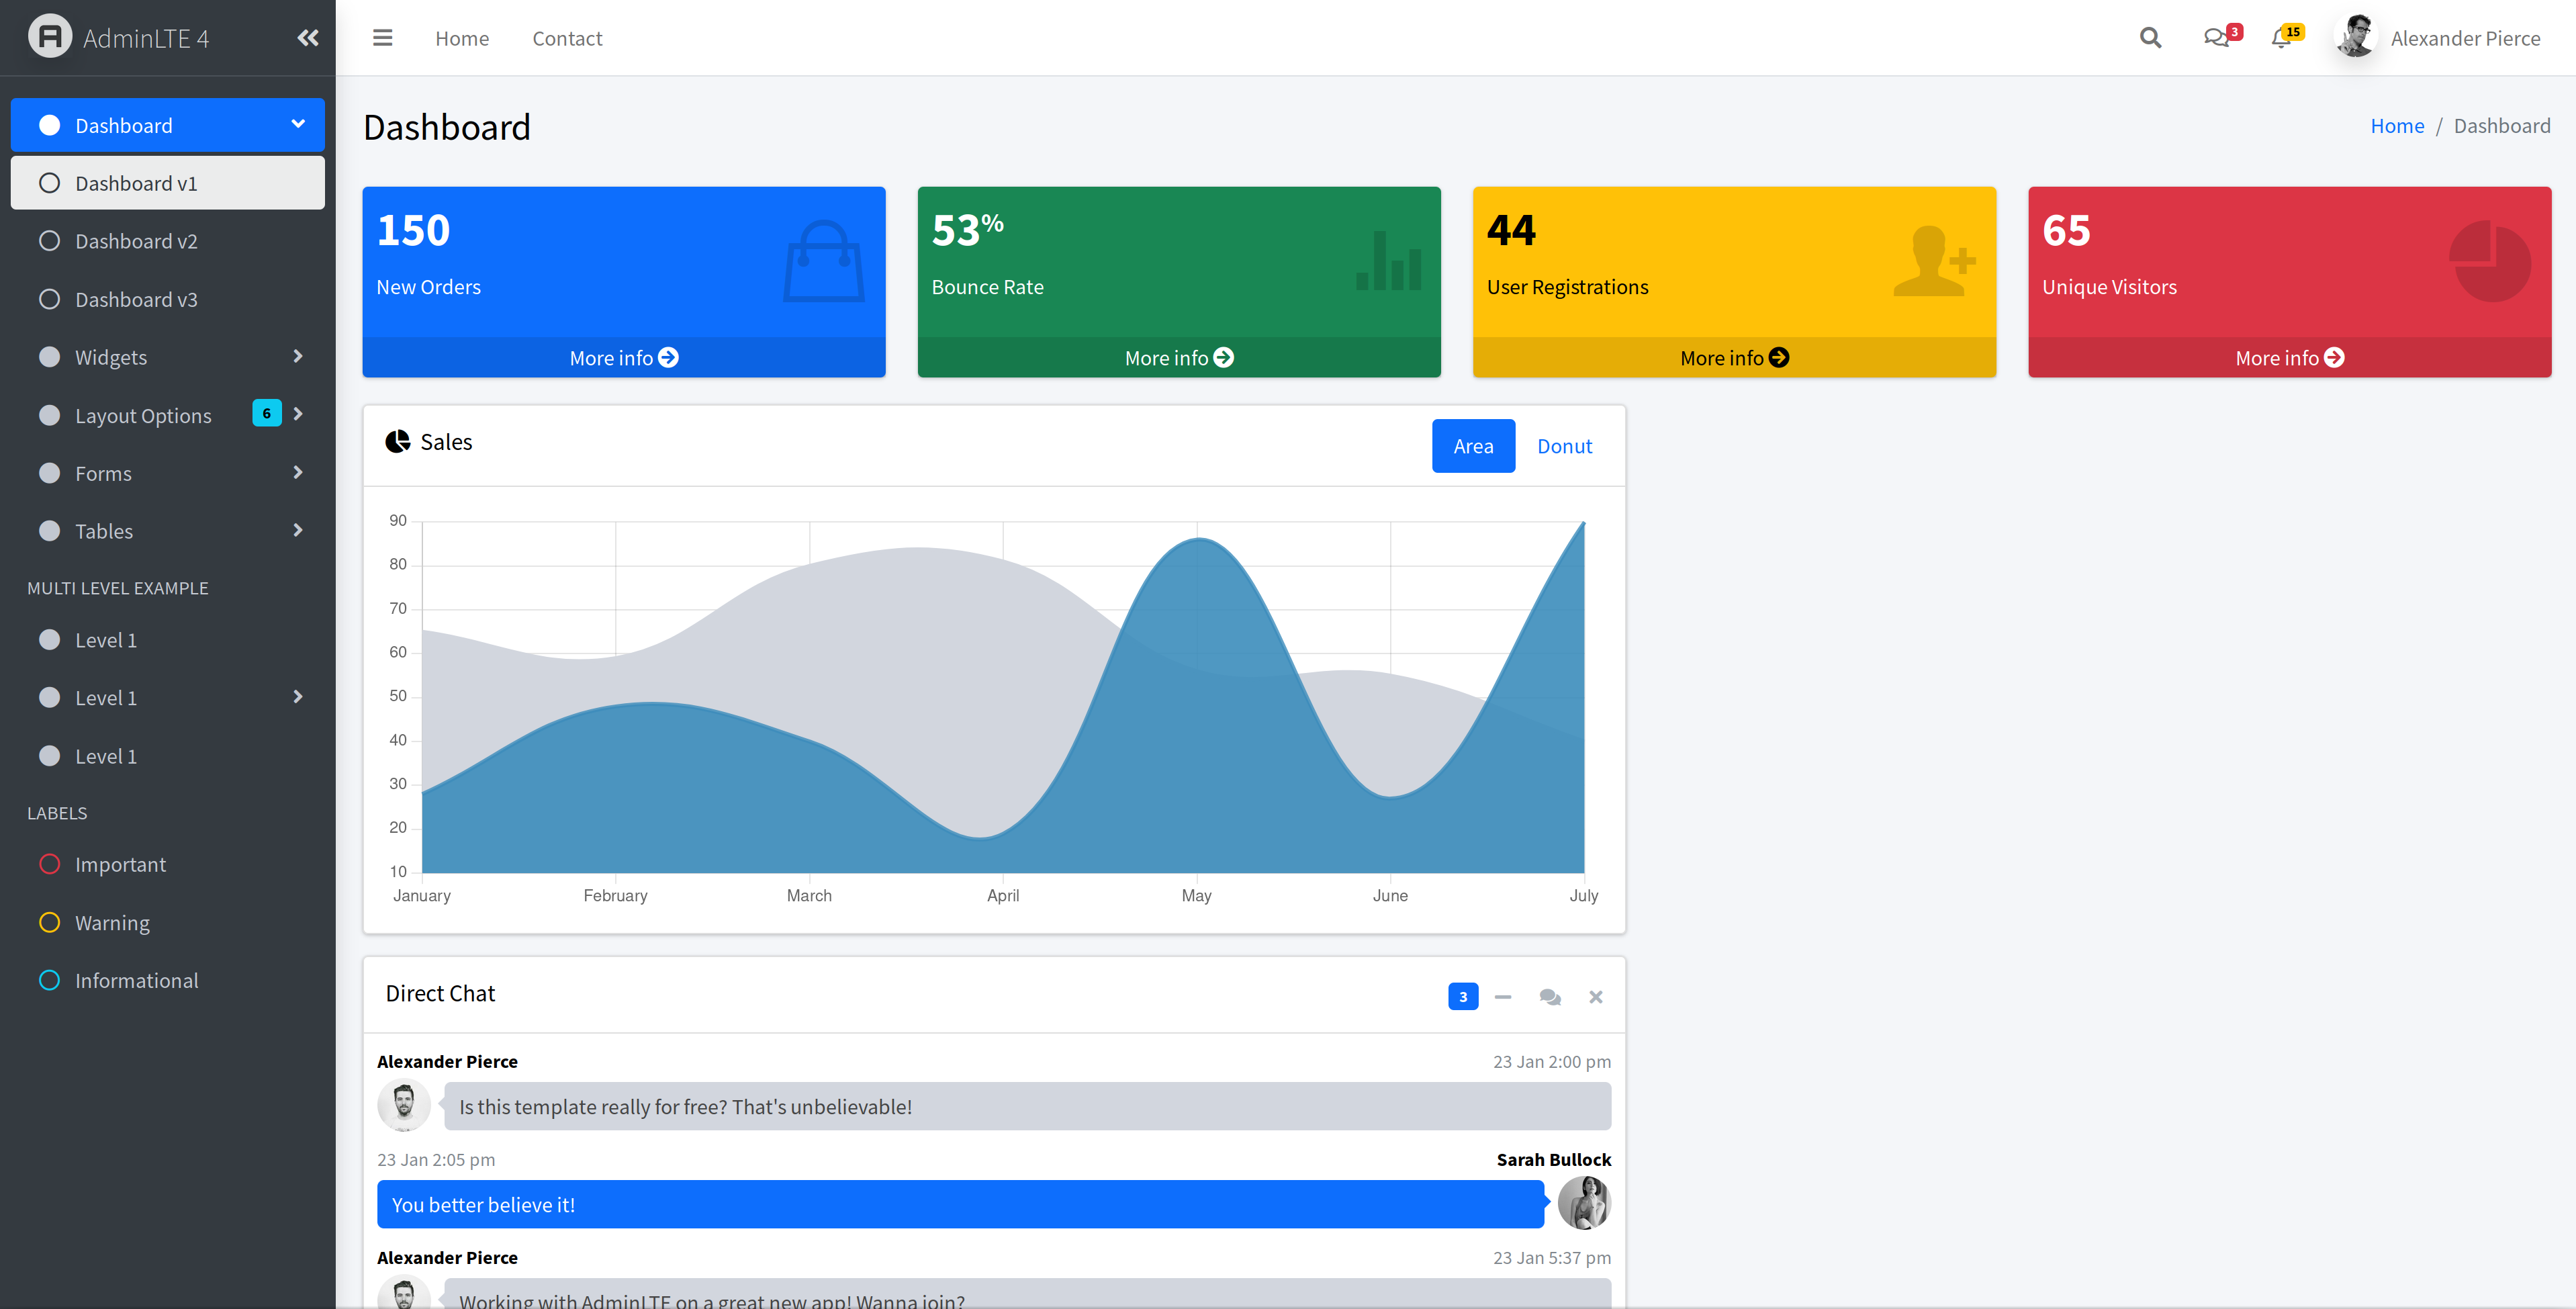
AdminLTE 4 Dashboard Supporting Bootstrap 5.
Application Pages.
When designing our TMS WEB Core project, we're generally developing something that is referred to as an SPA - a "Single Page Application". This means that once our application loads (via a specific URL, normally), the page doesn't change - the URL remains the same. The contents of the page are updated dynamically as needed, showing potentially different forms in the case of TMS WEB Core, or other content as needed.
Contrast this approach with many websites that are historically more page-based. Each link in a menu, for example, might lead you to an entirely separate HTML page. As the speed of the web has increased, this has become hardly noticeable. We're no longer subjected to flashing pages when navigating around, for example.
And there are other scenarios to consider as
well, such as developing an SPA, but also changing the URL to reflect different parts of the application that
might be in use. This could allow for a better user experience when the user inevitably clicks the back
button, or when the user wants to share a link to a specific part of an application.
For our project, then, let's assume we're going with the basic SPA model, to begin with. When our application loads, we'll expect it to load Unit1/Form1 as usual, but we'll rename it to UnitMain/MainForm. On this form, we'll place a TWebHTMLDiv component that we'll use as the host for any other forms that we want to load. How and when we load those forms will be something we'll cover shortly.
For example, if we wanted to, we could preload a handful of forms and then "swap" them into our host TWebHTMLDiv component, increasing the initial load time of our app, but potentially minimizing the form switching time. Here's a link to the TMS Support Center where this specific topic was explored. This scenario works best when the contents of the forms don't change (much).
If you have to do a substantial data refresh to update the forms each time they are displayed, then this is somewhat less beneficial. Also, if you have a lot of forms and don't know which ones you'll be needing, which is likely to be our scenario, this is also not ideal. Ultimately, MainForm will be invisible, as the contents of our host TWebHTMLDiv component will completely fill the page.
To help with potential form loading performance, we'll try to load up any common code or components ahead of
time, using MainForm as an equivalent to our Unit3/DBSupport
arrangement in the XData example project. This is also where we'll manage as much of our application's state
information as we can. To help things along initially, we'll also add some buttons to MainForm. These will be hidden, removed, or relocated elsewhere later once everything is working as we'd like.
We'd also like to have an application "action log" to keep track of what the user is doing. Initially, this might be useful as a debugging tool, much like writing output to a TMemo or logging output to console.log. The goal here, though, is to maintain an actual log of user activity that we can use for other things, like troubleshooting user errors, auditing user activity, or just getting a better idea about how fast or slow the application is performing.
Sometimes, big forms might take a bit of time to load, so it is important to be
able to quantify that when it is happening, particularly if that behavior is not consistent across many different
instances of the application. We'll have a look at this in just a moment.
Logging In.
When the application starts, most likely the first thing we're going to want to do is log in to our XData example server. Most likely. We might instead jump to a particular page in the application if we're given a suitable URL and we already have login credentials that permit us to do so. THis might be a JWT in localStorage that has not yet expired, for example. For now, we'll assume we've got nothing to start with, and therefore we'll need to load a form to kick off the login process.
Let's call our TWebHTMLDiv component in MainForm that will be hosting our forms divHost, and have it fill most of the page. We'll adjust it later to fill all of the page, but for now, we want to tinker a little bit, so we can see what is going on. Then, we'll need a new unit for the login form. Let's call it UnitLogin/LoginForm - not trying to be tricky, after all.
On this form, we'll drop two TWebEdit components and a TWebButton for the moment. Not really any styling needed here. The TWebEdit components will be called editUsername and editPassword, and the button will be called btnLogin. They're just placeholders for the moment.
When our application first starts, we'll initialize a few things and then load our login form. This is
handled in the usual WebFormCreate method in MainForm, and will very likely be expanded with many more
features as we progress through this project. To start with, though, let's go with the following.
procedure TMainForm.WebFormCreate(Sender: TObject);
begin

  // Application State
  LoggedIn := False;
  LogVisible := False;
  CurrentFormName := 'Initializing';

  // Log what we're doing in the application
  ActionLog := TStringList.Create;
  ActionLog.Delimiter := chr(10);
  LogAction('Application Startup');

  // Setup the Log Viewer
  divLog.Top := divHost.Top;
  divLog.Left := divHost.Left;
  divLog.Width := divHost.Width;
  divLog.Height := divHost.Height;
  divLog.Visible := False;

  // Launch Login
  if not(LoggedIn) then
  begin
    LoadForm('Login');
  end;

end;
Here, we are just setting up a few things, initializing a TStringList to serve as our action log, and then
loading the login form. The form is loaded into divHost using this code. The CreateNew method has a callback function, AfterCreate,
that is called once the form is ready.
procedure TMainForm.LoadForm(Form: String);
var
ElapsedTime: TDateTime;
procedure AfterCreate(AForm: TObject);
begin
LogAction('Load Form: '+AForm.ClassName+' Loaded ('+IntToStr(MillisecondsBetween(Now, ElapsedTime))+'ms)');
end;
begin
// Time this action
ElapsedTime := Now;
if Assigned(CurrentForm) then
begin
LogAction('Removing Form: '+CurrentForm.ClassName);
CurrentForm.Close;
CurrentForm.Free;
asm
divHost.replaceChildren();
end;
end;
LogAction('Load Form: '+Form);
CurrentFormName := Form;
// Login FOrm
if Form = 'Login' then
begin
CurrentForm := TLoginForm.CreateNew(divHost.ElementID, @AfterCreate);
end
// Not A Valid Form
else
begin
CurrentFormName := 'Invalid Form';
LogAction('Form Not Found: '+Form);
// Probably display a better error message or redirect to another default
// form if an attempt is made to load an unexpected form.
if Form <> 'Clear'
then divHost.HTML.Text := 'ERROR: Form Not Found ('+Form+')';
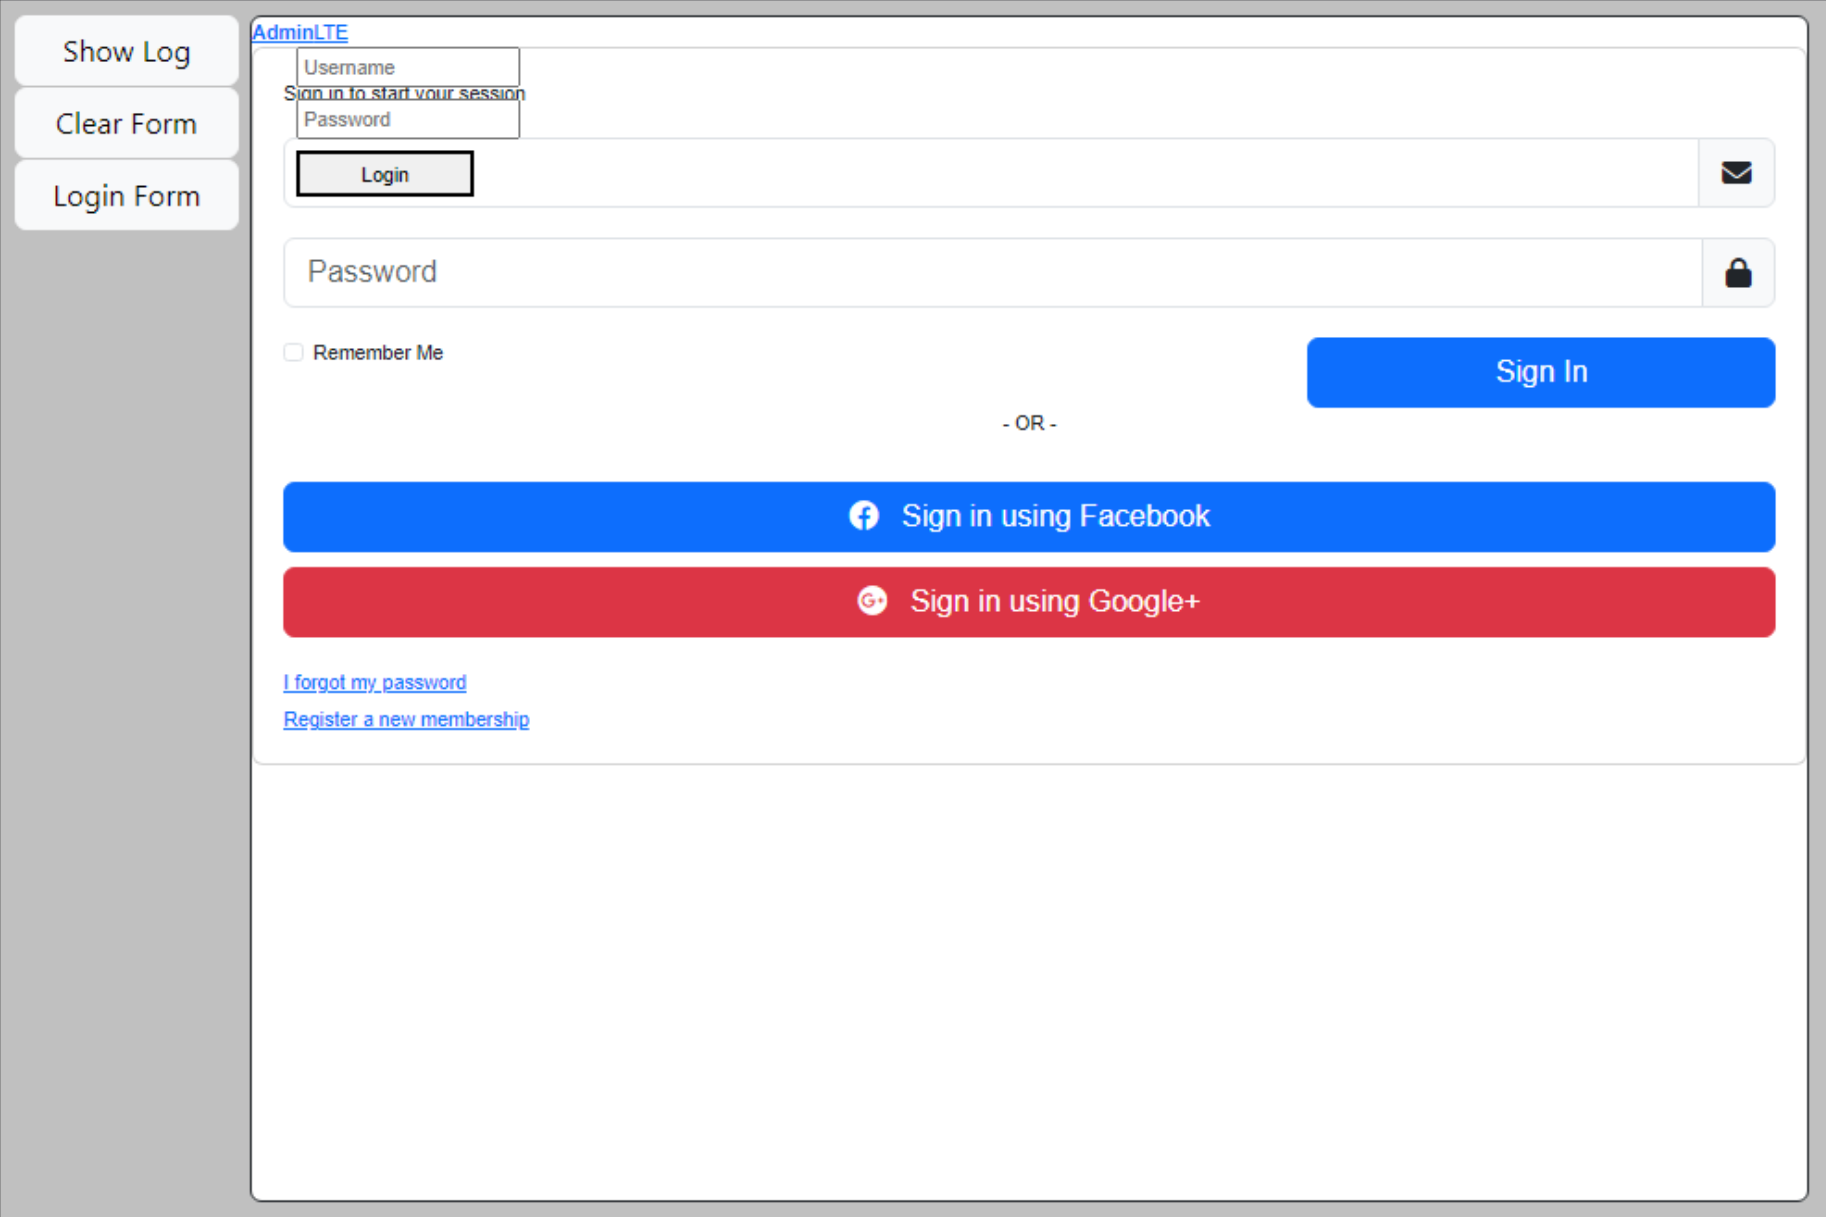
end;Lots going on here aside from the call to CreateNew, but nothing particularly dramatic. If we get a form we don't know about, then an error message is displayed. Form creation is timed as we're interested in anything that might introduce delays in our user experience. This is recorded in the action log. And we're careful to try and close the existing form and clean out anything that might be left behind in divHost if that were to fail in any way, before adding in a new form. Here's what it all looks like when the application starts.
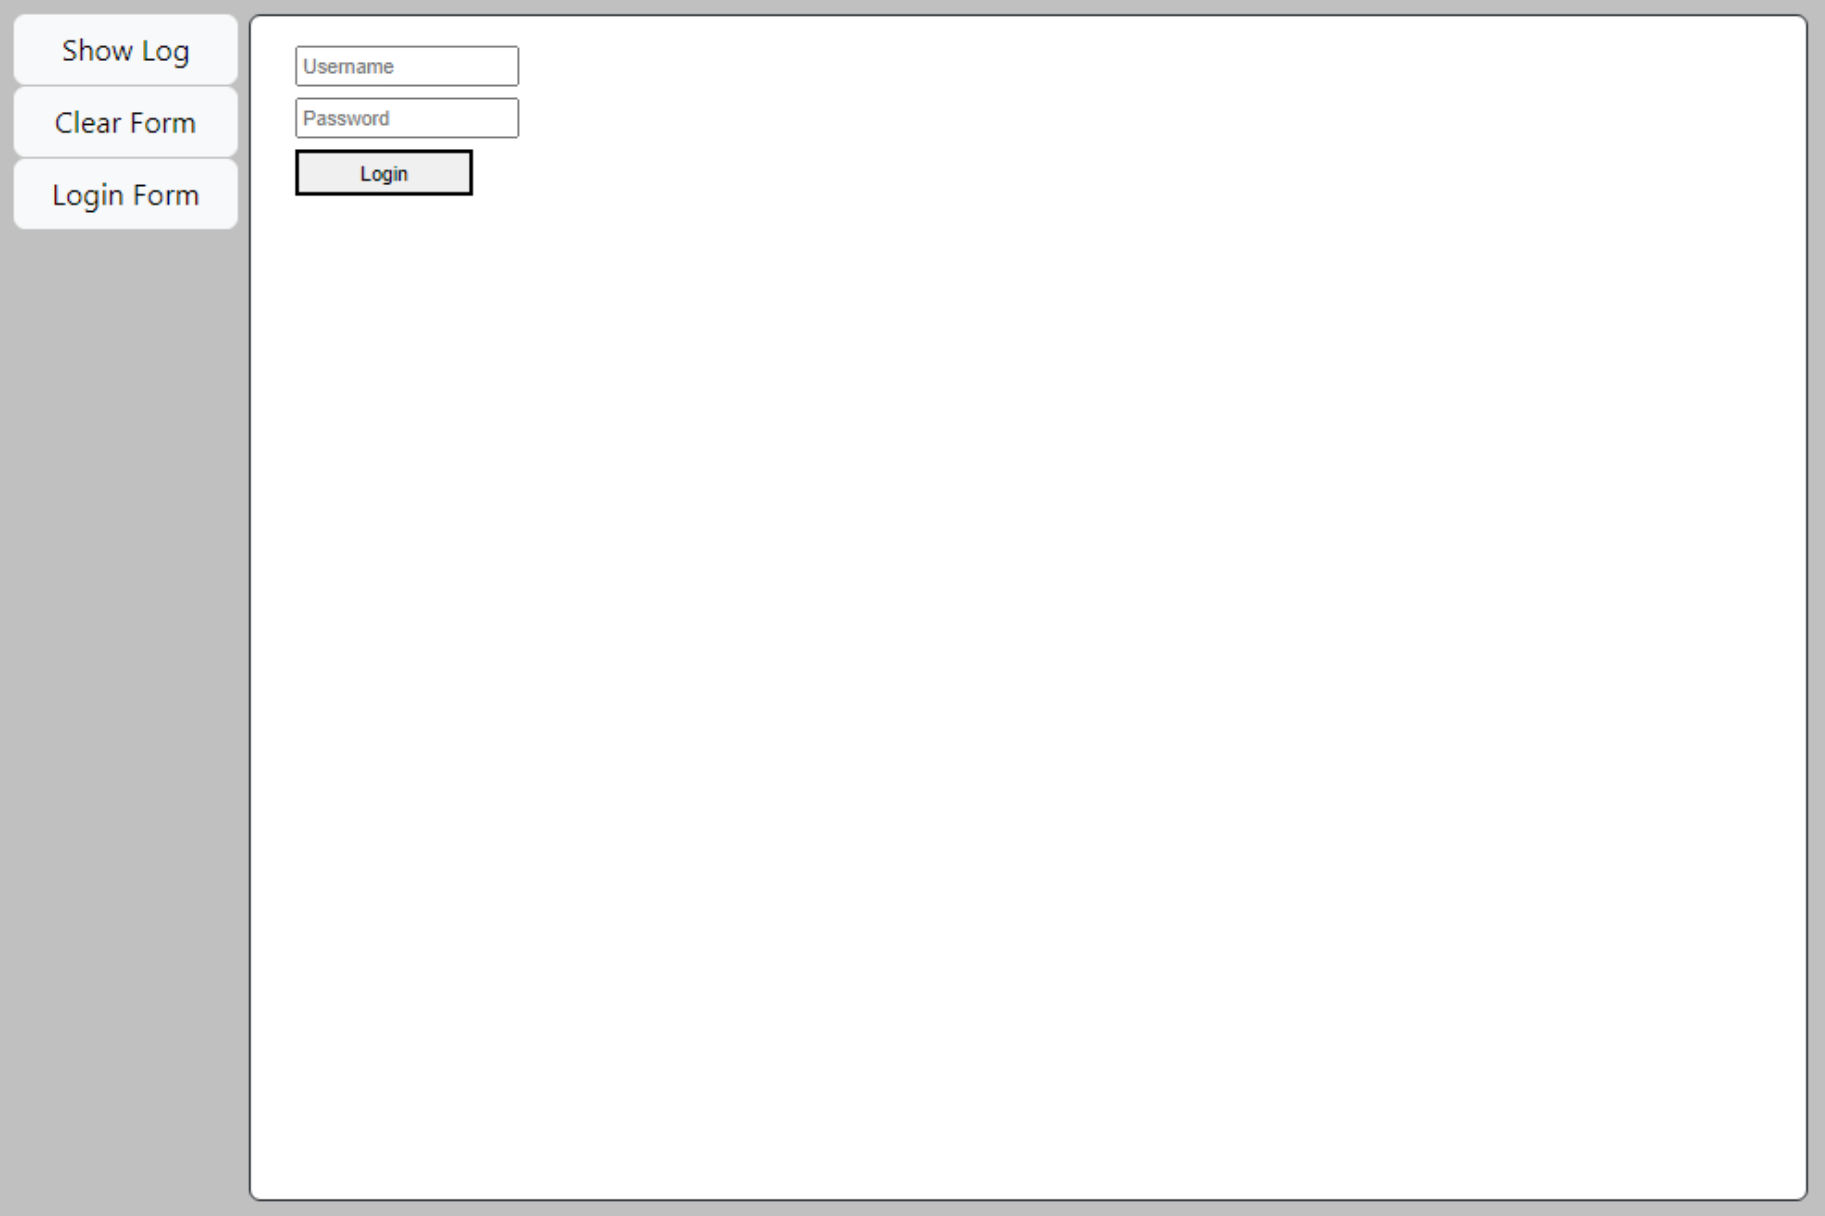
Basic Login Form Loaded.
The buttons on the left, temporarily at least, are implemented using the following code. Note that the log is
recorded using UTC timestamps, in an attempt to ensure that everything potentially landing on the server is
recorded in the same way.
procedure TMainForm.btnShowLogClick(Sender: TObject);
begin
if LogVisible then
begin
LogAction('CLICK: Hide Application Action Log');
LogVisible := False;
btnShowLog.Caption := 'Show Log';
divLog.Visible := False;
divHost.Visible := True;
end
else
begin
LogAction('CLICK: Show Application Action Log');
LogVisible := True;
btnShowLog.Caption := 'Hide Log';
divLog.Visible := True;
divHost.Visible := False;
divLog.HTML.Text := '<pre>'+ActionLog.DelimitedText+'</pre>';
end;
end;
procedure TMainForm.btnLoginFormClick(Sender: TObject);
begin
LogAction('CLICK: Login Form');
LoadForm('Login');
end;
procedure TMainForm.btnClearFormClick(Sender: TObject);
begin
LogAction('CLICK: Clear Form');
LoadForm('Clear');
end;
procedure TMainForm.LogAction(Action: String);
begin
ActionLog.Add(FormatDateTime('yyyy-mm-dd hh:nn:ss.zzz', TTimeZone.Local.ToUniversalTime(Now))+' UTC ['+CurrentFormName.PadRight(15)+'] '+Action);
if LogVisible
then divLog.HTML.Text := '<pre>'+ActionLog.DelimitedText+'</pre>';
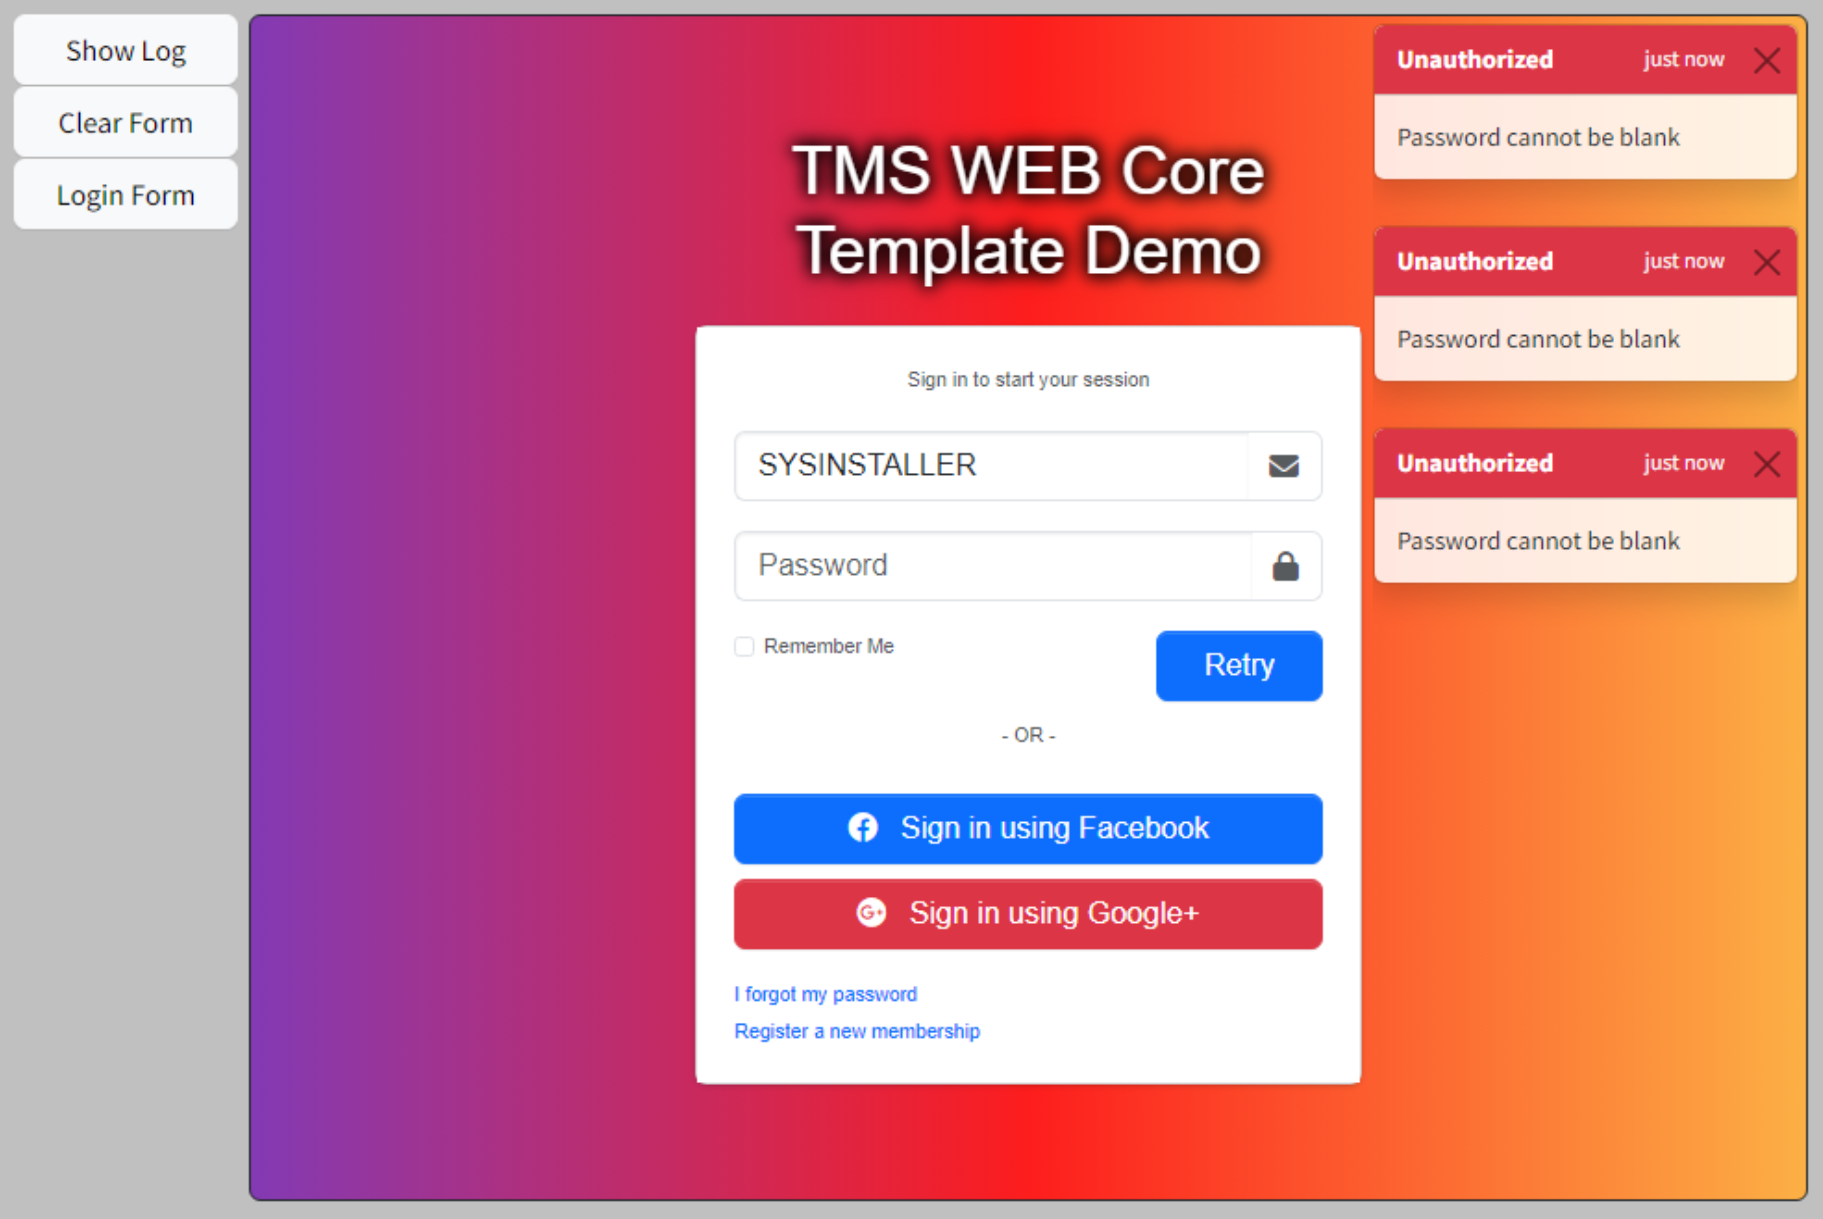
end; The Clear Form button is just used to test that the form is in fact cleared out of the document when loading different forms. If we click on a few buttons, we can see what kind of data flows into the action log.
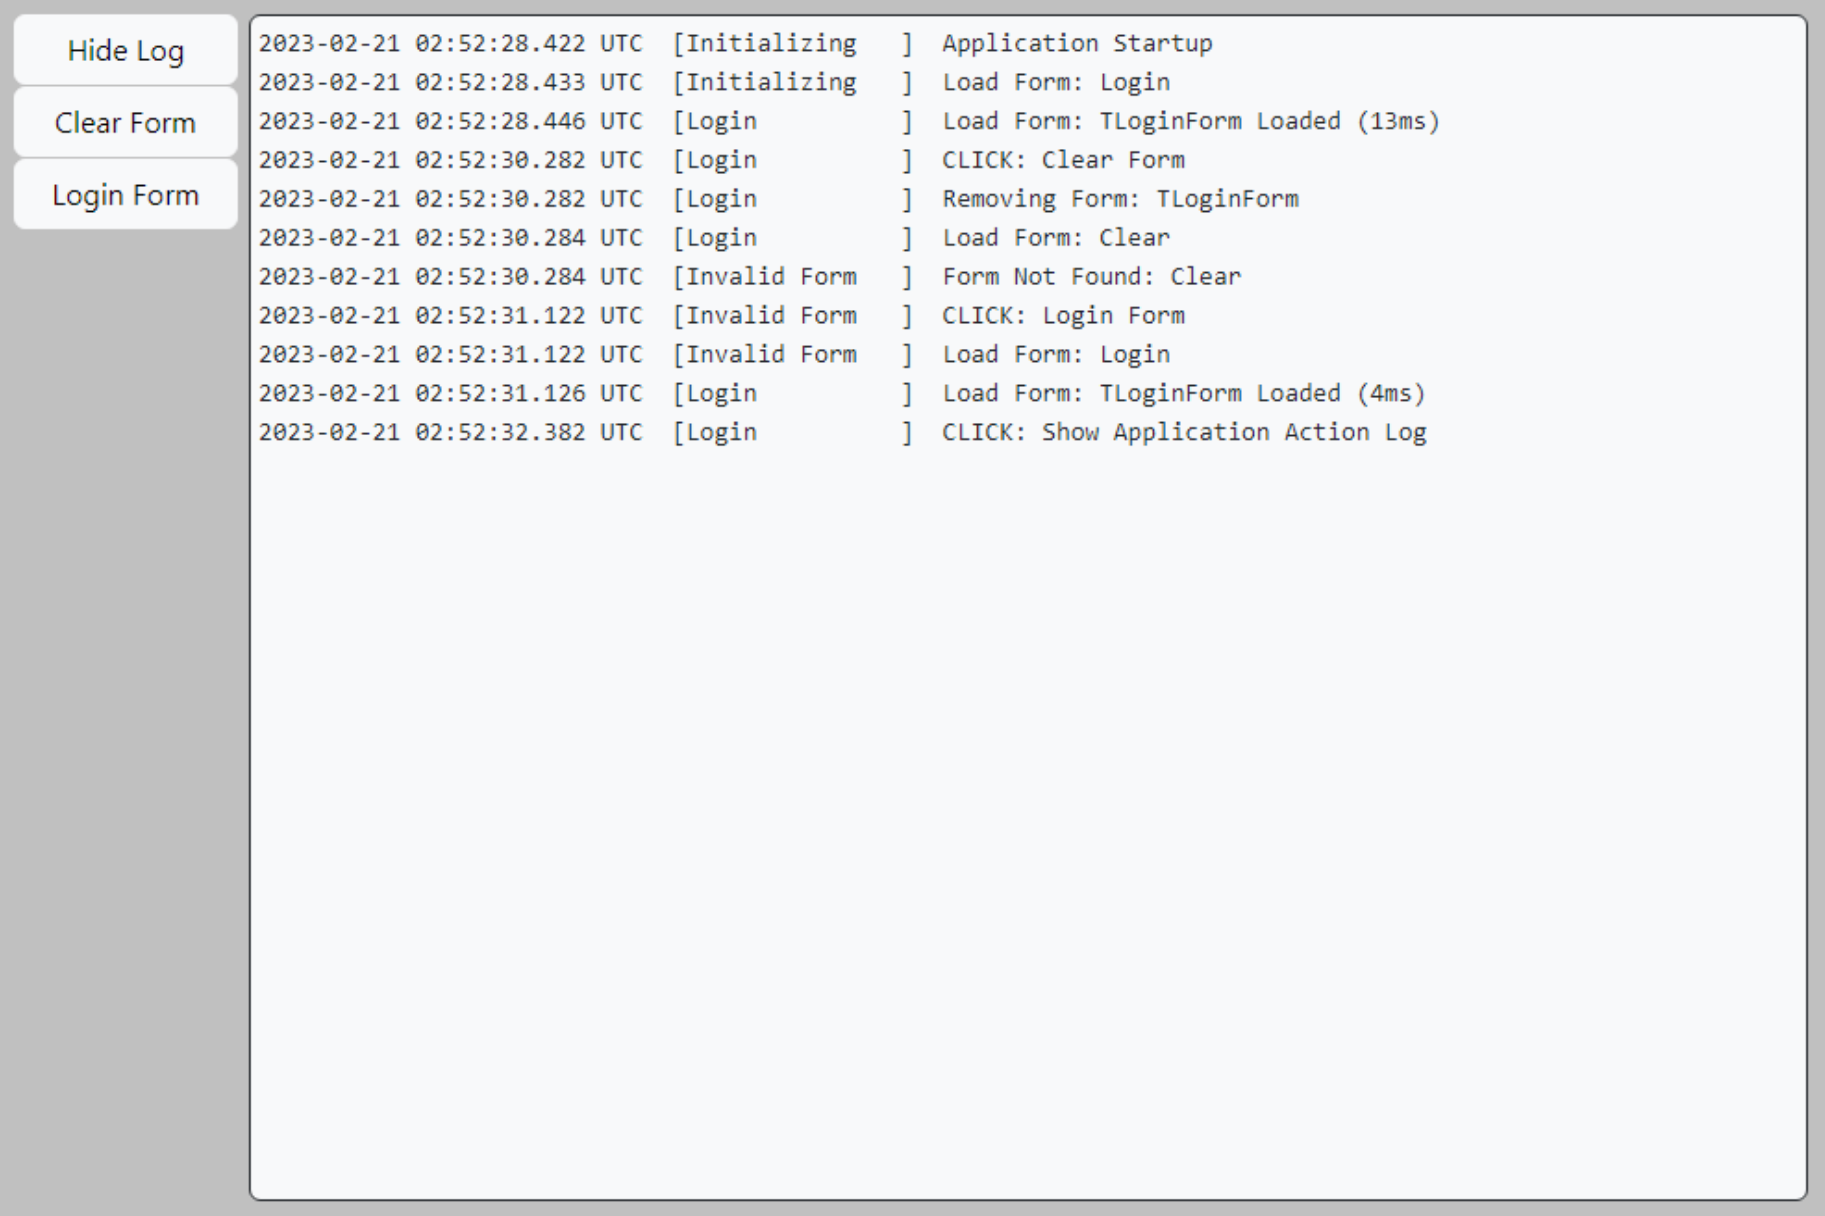
Action Log in Action.
Next, let's actually try to implement a login function. On the XData side, we've got a Login endpoint. It
expects a number of different parameters that we'll have to supply.
function Login(Login_ID: String; Password: String; API_Key: String; TZ: String):TStream;
The first two will naturally be coming from the TWebEdit components that were
added to LoginForm. The API_Key value is
something that we're provided with in order to access our XData server, where the example we're using is "Testing". The TZ value is what we want to pass to indicate the timezone for our
browser. Should be something like "America/Vancouver" or any other valid IANA timezone descriptor. More than
one way to get this but as we're in a browser environment, we can get this from JavaScript easily enough using
the following value, so we'll include that in our endpoint call.
Intl.DateTimeFormat().resolvedOptions().timeZone
In order to call this function, we'll need to establish a connection to XData. There is more than one way to do this, but here we're going to use the TXDataWebConnection component and add an XDataConnect method to MainForm to get this out of the way. This is called in WebFormCreate and as it is set up as an async function, it will complete on its own time. You'll see this in the log where the connection appears after the call to create LoginForm has been made, but before the form is created, even though the call to XDataConnect is made before the call to LoadForm.
procedure TMainForm.XDataConnect;
var
  ElapsedTime: TDateTime;
begin
  ElapsedTime := Now;

  if not(XDataConn.Connected) then
  begin

    // Should be updated to point at our XData server, wherever it may be
    XDataConn.URL := 'http://localhost:12345/tms/xdata';

    // Try and establish a connection to the server
    try
      LogAction('Connecting to: '+XDataConn.URL);
      await(XDataConn.OpenAsync);
      LogAction('Connection Established: ('+IntToStr(MillisecondsBetween(Now, ElapsedTime))+'ms)');
    except on E: Exception do
      begin
        LogAction('Server Connection Failed: '+XDataConn.URL);
        LogAction('Error: ['+E.ClassName+'] '+E.Message);
      end;
    end;
  end;
end;
The Login function in MainForm uses this TXDataWebConnection
component to connect a TWebXDataClient component with the actual request,
getting a response as a TXDataClientResponse value, and using that to return
a value for the function.
It would be handy to see the error values that we carefully specified in XData, but
normally the promise returned by RawAsyncInvoke replaces it with something else. To retrieve the original value, we have to dig a little deeper into that exception. It's there though,
just a bit of shenanigans to get it out. Happy to hear if there's an easier way. The extra {} in the asm
block is to help hide the IDE warning that is generated due to that $o.
function TMainForm.XDataLogin(Username, Password: String):String;
var
  Response: TXDataClientResponse;
  ClientConn: TXDataWebClient;
  Blob: JSValue;
  NewJWT: String;
  ElapsedTime: TDateTime;
  TZ: String;
  ErrorCode: String;
  ErrorMessage: String;

begin

  ElapsedTime := Now;
  NewJWT := '';
  TZ := '';
  ErrorCode := '';
  ErrorMessage := '';

  LogAction('');
  LogAction('Attempting Login');

  asm
    TZ = Intl.DateTimeFormat().resolvedOptions().timeZone;
  end;

  // Call it again in case it has been disconnected
  await(XDataConnect);

  if (XDataConn.Connected) then
  begin
    try
      ClientConn := TXDataWebClient.Create(nil);
      ClientConn.Connection := XDataConn;
      Response := await(ClientConn.RawInvokeAsync('ISystemService.Login', [
        Username,
        Password,
        'Testing', // API_KEY
        TZ
      ]));
      Blob := Response.Result;
      asm
        NewJWT = await Blob.text();
      end;
    except on E: Exception do
      begin
        // Get the error message we created in XData
        asm {
          var ErrorDetail = JSON.parse( await E.FErrorResult.FResponse.$o.FXhr.response.text() );
          ErrorCode = ErrorDetail.error.code;
          ErrorMessage = ErrorDetail.error.message;
        } end;

        // Log the error, but leave out the URI (because it includes the password)
        LogAction('Login Exception:');
        LogAction(' --> ['+E.ClassName+']');
        LogAction(' --> '+Copy(E.Message,1,Pos('Uri:',E.Message)-2));
        LogAction(' --> '+Copy(E.Message,Pos('Status code:',E.Message),16));
        LogAction(' --> '+ErrorCode);
        LogAction(' --> '+ErrorMessage);
      end;
    end;
  end;

  // We've got a JWT
  if Pos('Bearer ',NewJWT) = 1 then
  begin
    LogAction('Login Successful ('+IntToStr(MilliSecondsBetween(Now, ElapsedTime))+'ms)');
    Result := 'Success';
    JWT := NewJWT; // Assign to form variable
  end
  else
  begin
    Result := ErrorCode+' / '+ErrorMessage;
  end;
end;
All we're really doing so far is determining whether we've got a JWT or not. We'll do something with that a bit later. But for now, our login function works. In LoginForm, we just call the MainForm function and update the UI with the result.
procedure TLoginForm.btnLoginClick(Sender: TObject);
var
LoginCheck: String;
begin
btnLogin.Caption := 'Authorizing...';
msgLogin.Caption := 'Please Wait...';
LoginCheck := await(MainForm.XDataLogin(editUSername.Text, editPassword.Text));
if LoginCheck = 'Success' then
begin
btnLogin.Caption := 'Successful';
msgLogin.Caption := '';
MainForm.LogAction('Selecting First Page');
end
else
begin
btnLogin.Caption := 'Please Try Again';
msgLogin.Caption := LoginCheck;
end;
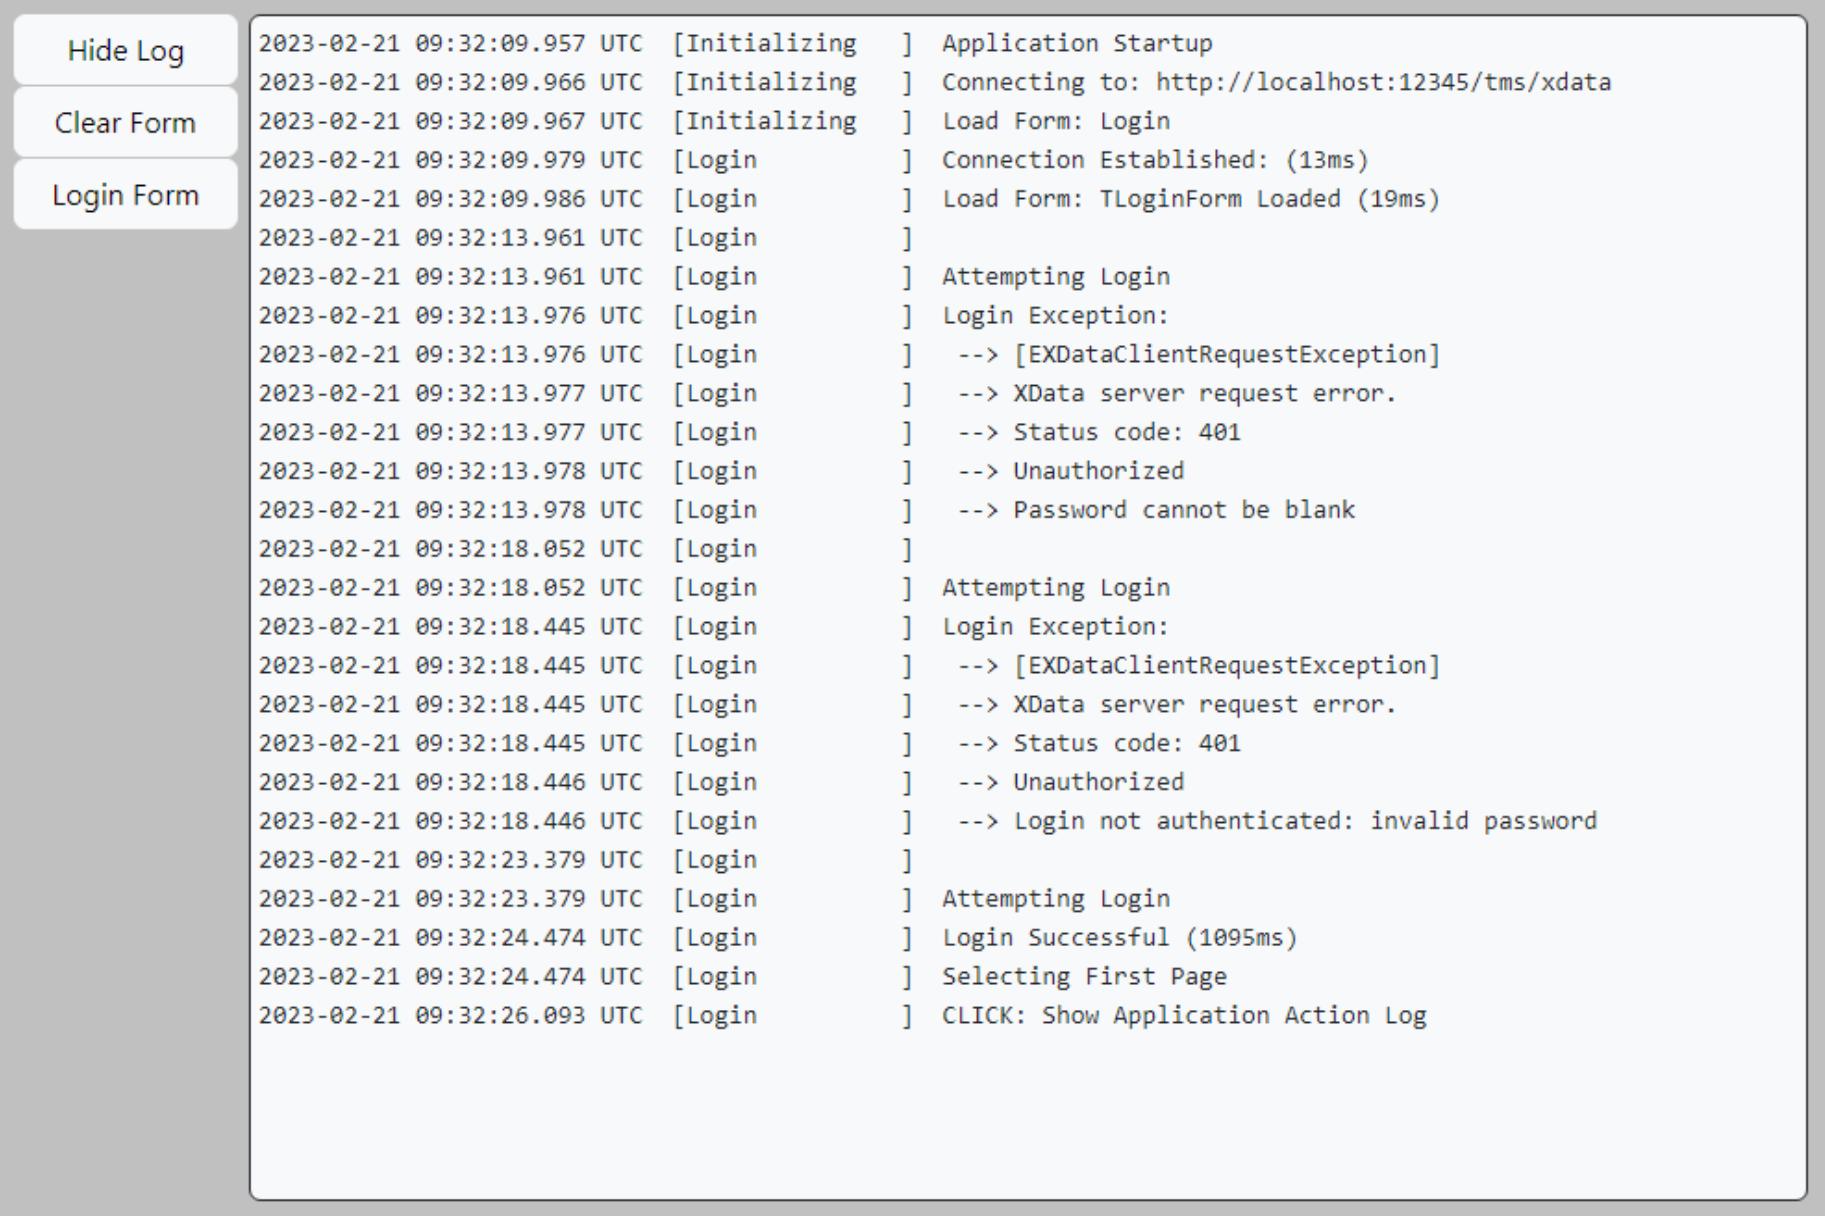
end;Here's what we end up with in the action log after a few login attempts. Having the action log available makes it pretty easy to see what is going on.
Action Log Login Attempts.
Just for fun, if you want to have a peek at the current JWT at any time, you can view it using the browser
developer console. Just reference the form variable that we've set up for it.
pas.UnitMain.MainForm.JWT;
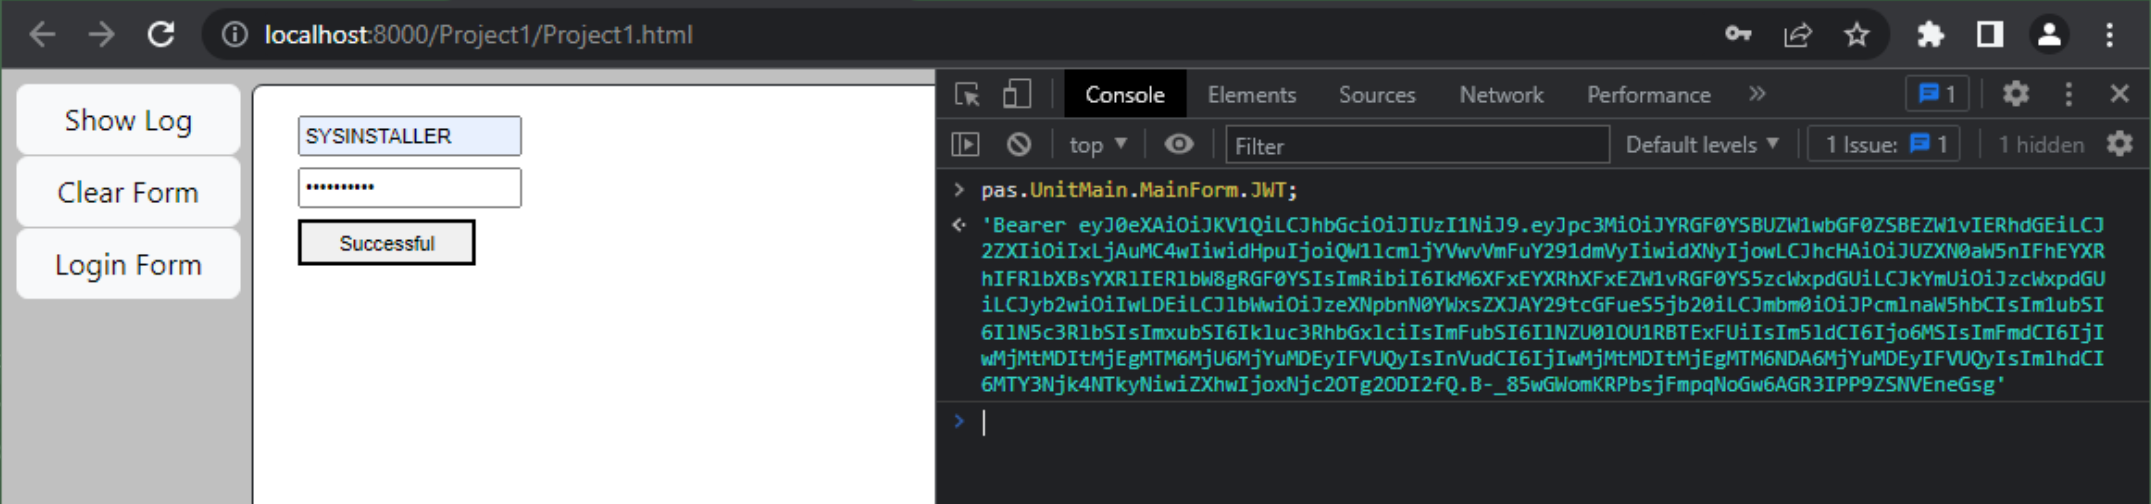
Using the Console to View a JWT.
At this stage, we've got a fully operational Login function that returns either a JWT or any number of
descriptive errors if the login wasn't successful. We'll do more with that JWT a bit later. Selecting which
page to load after login will be the first priority, but there are plenty of other things that we can do once
the JWT is available. Before we get to that, well, we'd like a little more styling for the login page. Which
is the whole point of this post, right?!
Intro to SCSS.
Many themes incorporate SCSS files, as do many web projects generally. So what is SCSS and why do we care? One way to think of SCSS is perhaps as a higher-level language that, when compiled, generates CSS files. In fact, straight-up CSS is perfectly valid SCSS syntax. What can this higher-level language do, then? Plenty! If you've often found CSS to be limiting in some respects, there's a good chance that SCSS might be of interest to you. A brief introduction to SCSS can be found on the Sass website here. The rise in SCSS popularity in templates is likely due to many of its key features.
- A hierarchy can be built (like $include files, really) using an @use rule.
- Rules can be nested. This can help simplify how the rules are defined, allowing a more readable structure.
- Mixins and Modules allow for something like CSS subroutines to be built.
It should be pointed out that any given SCSS file or set of files will ultimately get compiled into one or more CSS files. So, technically, there's not really anything you can do with SCSS that you can't do with CSS. Just like, technically, there's not anything you can do in Delphi that you can't do in assembly language. But once you've used a higher-level language, you might not want to go back.
SCSS files look and work a lot like CSS files. But you can't just add an SCSS file to your project in the
same way that you can a CSS file. So how do we generate a set of CSS files from a set of SCSS files? Well, this is
going to be a bit of a side adventure. One approach is to use Node.js and then install node-sass which gives
us the sass compiler command.
So what is Node.js? Think of it as a JavaScript runtime environment that can be used outside of a browser.
For Windows, the Node.js installer can be found here. After installation, opening a new Windows Command Prompt window should give us access to the necessary
commands to get started. The node command is used for running the JavaScript
environment. The npm command is used to access the Node package manager.
C:\Users\Andrew Simard>node -v
v18.14.2

C:\Users\Andrew Simard>npm -v
9.5.0
To install the Sass compiler, we'll use npm.
npm install -g sass
This only takes a moment, running through all of its dependencies and so on. The "-g" flag is used to
install the Sass package globally, so it can be used anywhere in your system rather than just in a specific project.
C:\Users\Andrew Simard>npm install -g sass

added 17 packages in 1s

2 packages are looking for funding
  run `npm fund` for details
To try it out, we can create a simple SCSS file and compile it into a CSS file. For example, let's create a
file called test.scss containing the following.
.fancydiv {
  border: 1px solid blue;
  background: white;
  padding: 5px;
  margin: 5px;
  color: blue;

  .header {
    background: blue;
    top: 0px;
    width: 100%;
    height: 30px;
    color: white;
  }
}
Note that CSS doesn't support nested rules. If we then run the command sass test.scss
test.css we end up with the compiled CSS file in test.css which looks
like this.
.fancydiv {
  border: 1px solid blue;
  background: white;
  padding: 5px;
  margin: 5px;
  color: blue;
}
.fancydiv .header {
  background: blue;
  top: 0px;
  width: 100%;
  height: 30px;
  color: white;
}

/*# sourceMappingURL=test.css.map */
There's also a .map file that is generated, but we don't need to be concerned about that - the CSS file is
what we're after. So that wasn't so bad, right? This was a trivial example, but the same approach is used
for far more complex SCSS sources where there may be hundreds of files interlinked. A bit crazy, really, but
best not to think about that.
Taking this a step further, templates, and web projects generally, may have other similar bits of code that need to be compiled, scripted, or otherwise fiddled with to produce the final JS/HTML/CSS that is loaded up into a web server. To help streamline this process, another Node package called gulp is often used. Think of gulp as a sort of generic build pipeline - it runs a series of tasks that take a bunch of source files and produce the final output files. It can be installed as a Node package just like Sass, using npm install -g gulp-cli.
Looking at the README.md file that comes with AdminLTE 4, it would appear we're ready to proceed. Here are
the steps indicated there.
1. `npm install` (install npm deps)
2. `npm install gulp-cli -g` (install gulp-cli globally)
3. _Optional:_ `gulp` (developer mode, autocompile with browsersync support for live demo)
4. `gulp compile` (compile css/js files)
But alas, this appears to not work as there are no longer any gulp files present. Poking around GitHub,
there's a discussion about AdminLTE 4 here, where instead the commands to get started are as follows, running
from within the AdminLTE-4-dev folder of our project.
1. "npm i"
2. "npm run dev"
3. Visit http://localhost:3000
Following these steps indeed gets us to the AdminLTE 4 template, running locally. Fantastic. But it isn't
fully functional. When trying to navigate to one of the login form examples In this particular build,
apparently, there's an error that blocks the generation of a required JavaScript file:
c:\Users\Andrew Simard\Documents\Embarcadero\Studio\Projects\TMS-WEB-Core-TemplateDemo\AdminLTE-4-dev\src\html\env.d.ts
  0:0  error  Parsing error: ESLint was configured to run on `<tsconfigRootDir>/src\html\env.d.ts` using `parserOptions.project`: <tsconfigRootDir>/tsconfig.json
However, that TSConfig does not include this file. Either:
- Change ESLint's list of included files to not include this file
- Change that TSConfig to include this file
- Create a new TSConfig that includes this file and include it in your parserOptions.project
See the typescript-eslint docs for more info: https://typescript-eslint.io/linting/troubleshooting#i-get-errors-telling-me-eslint-was-configured-to-run--however-that-tsconfig-does-not--none-of-those-tsconfigs-include-this-file
/src/html/env.d.ts
With that in place, the npm run dev command generates the necessary JavaScript file and we can then navigate to the login form example.

AdminLTE 4 Running Locally.
So that's pretty great, but how do we get that into our LoginForm? Well, we're
literally looking at a suitably rendered HTML page, so we can just view the HTML and copy that into the
UnitLogin.html file that is in our project. Without doing anything else at all, we don't get a nice result,
but it doesn't look all that far off.
Before Editing HTML.
To fix the theme aspects of the page, we'll need to copy over (or link to) the contents of the dist folder that is in the AdminLTE project folder. There are three subfolders - css, js, and assets. We can just copy those to the root of our project and add them using the Delphi Project Manager. Then, we can update the links in the LoginForm.html file to point to this new location.
For this page, there are just the main AdminLTE.css
and AdminLTE.js files that need to have the links updated. For making other
adjustments, we can also add our own CSS file to the mix. Let's call it template.css. There's likely something in AdminLTE somewhere that deals with things like background images and centering
elements, but for now, we'll just do this ourselves using a few CSS overrides.
.Login-Form {
  background: rgb(131,58,180);
  background: linear-gradient(90deg, rgba(131,58,180,1) 0%, rgba(253,29,29,1) 50%, rgba(252,176,69,1) 100%);
}

.login-box, .register-box {
  position: relative;
  width: 360px;
  margin: auto;
  top: 50%;
  transform: translate(0%,-50%);
}
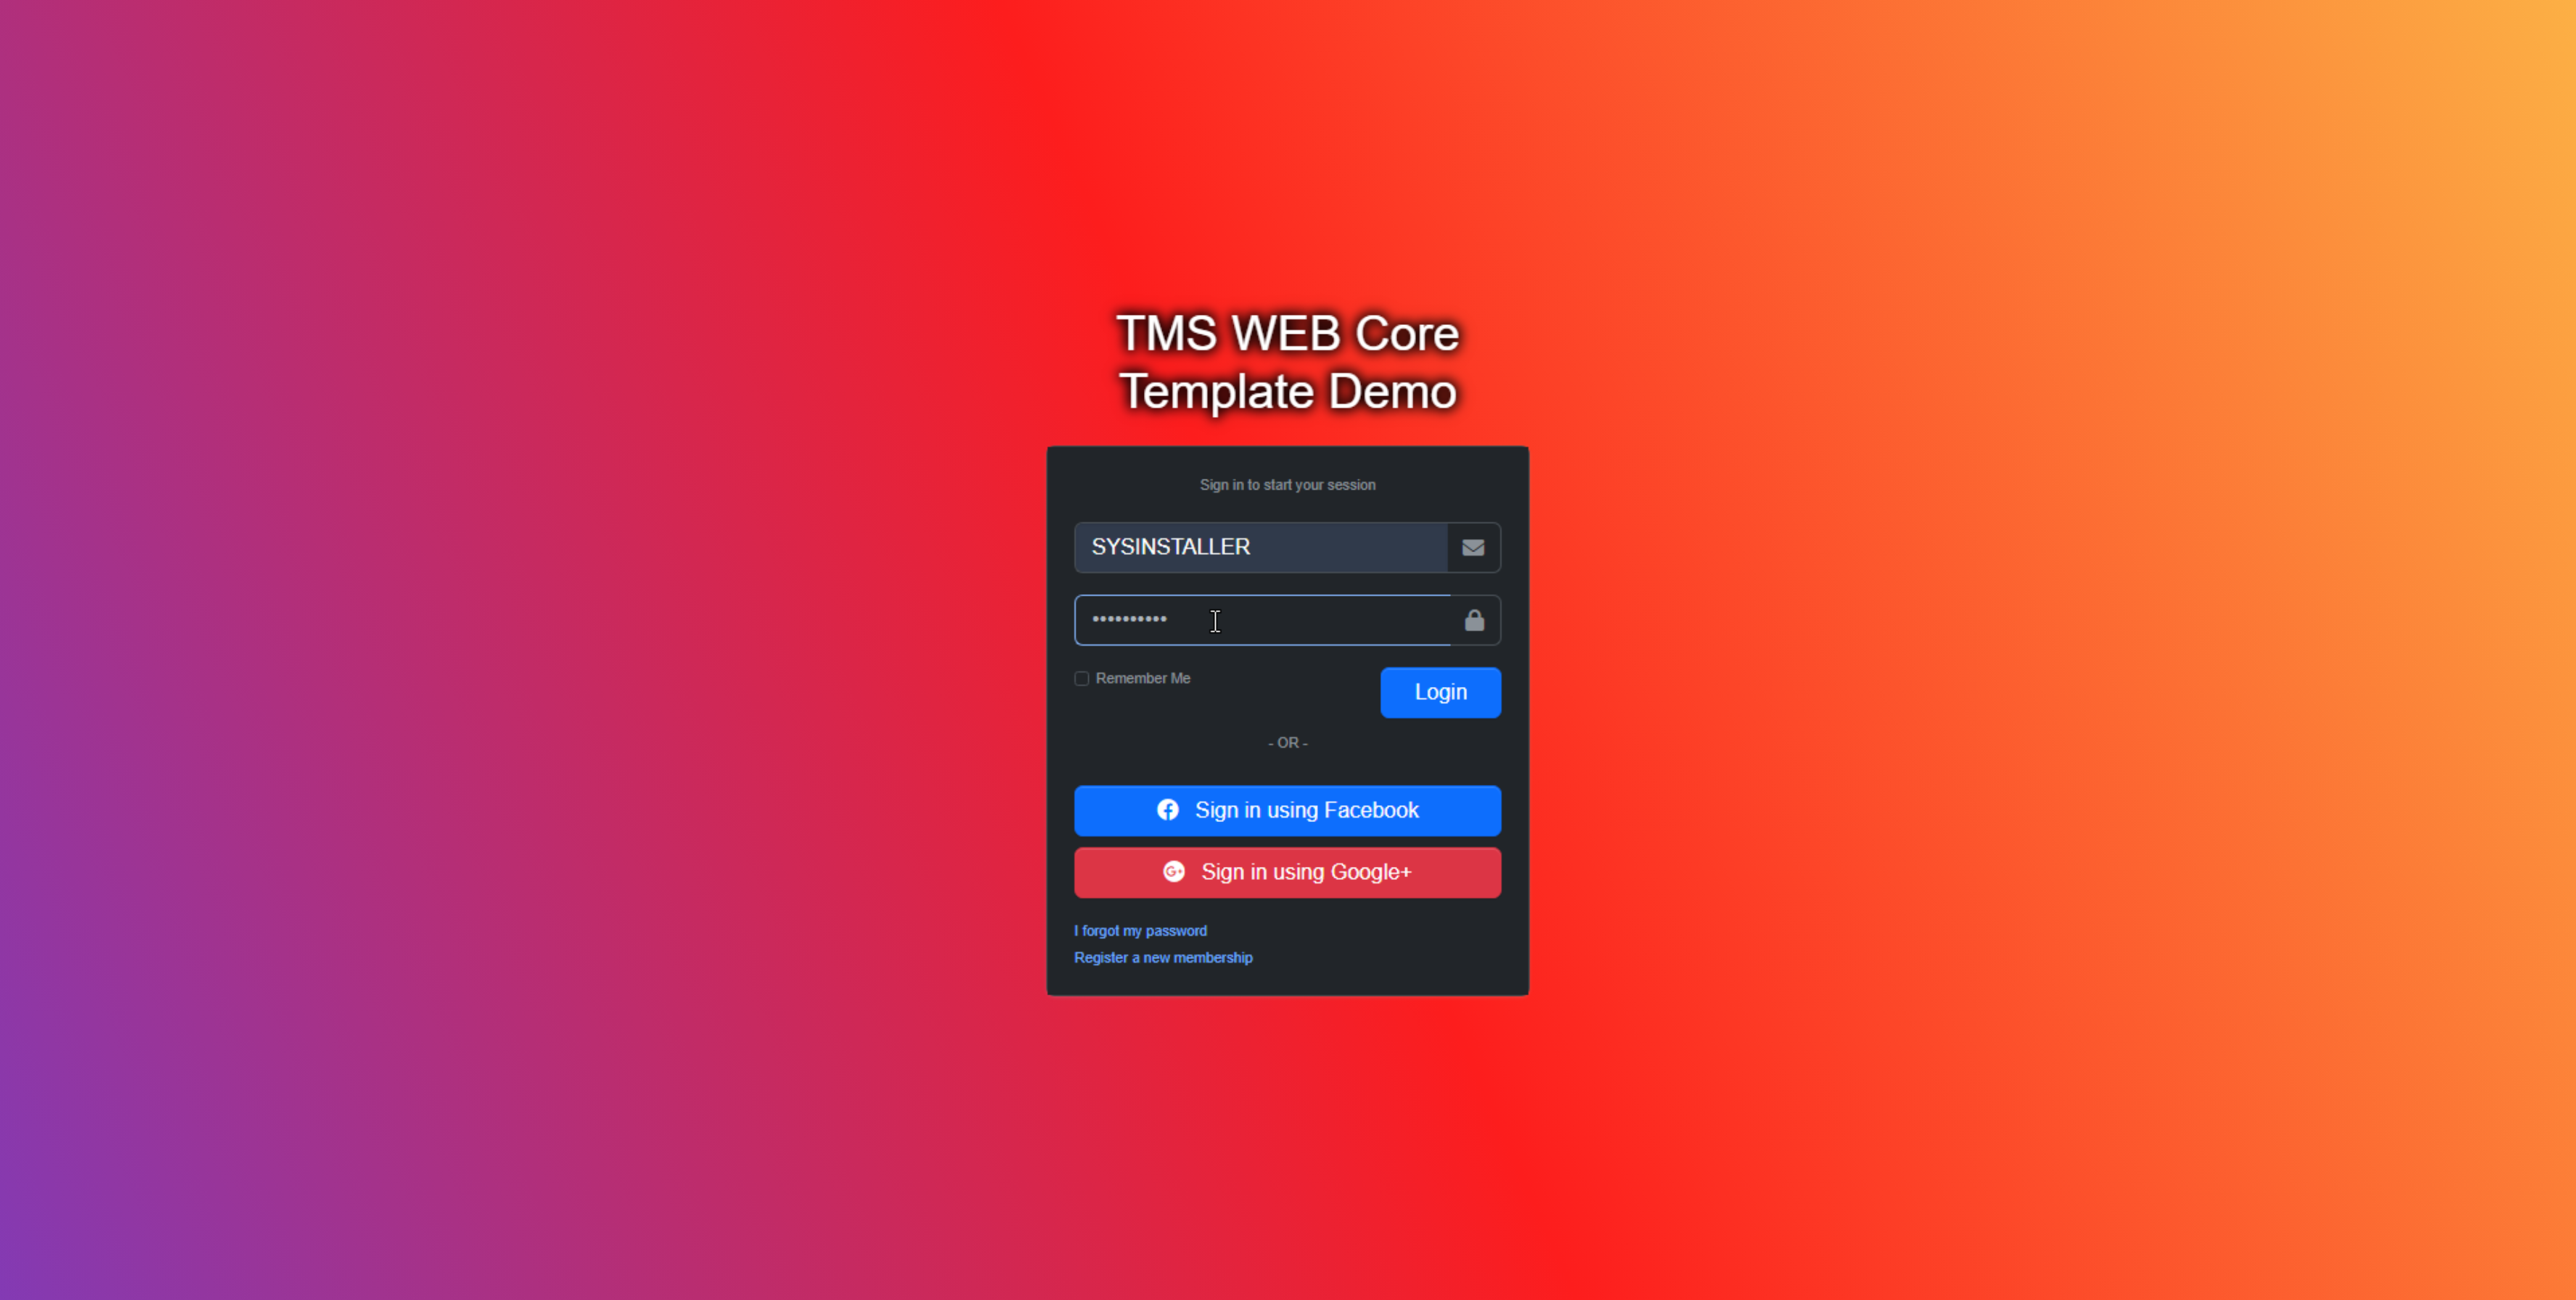
With that in place, and a fancy background using one of the examples from https://cssgradient.io, we get something that looks a lot closer to what we're after.
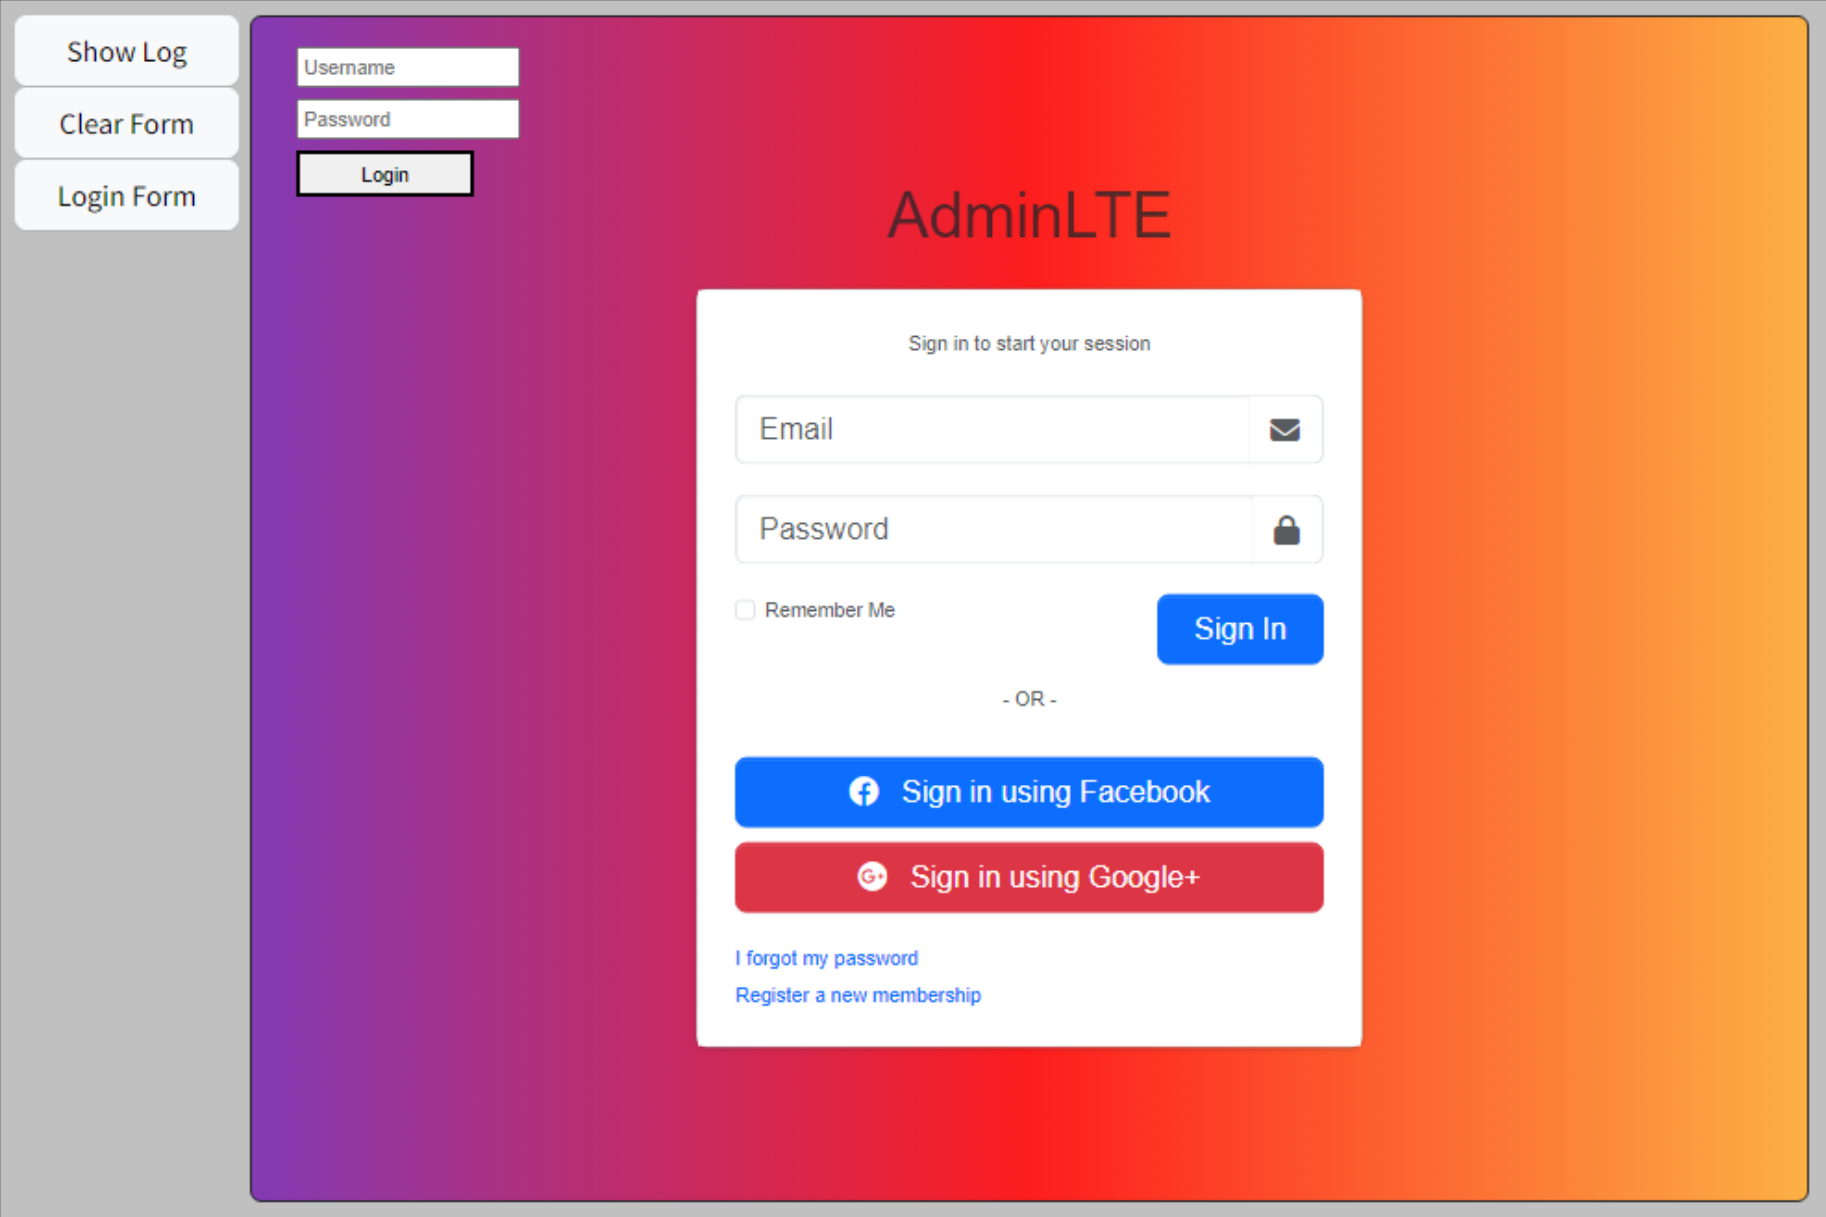
Properly Styled AdminLTE Template.
At the top, we can still see our original Username and Password components. What we're after next is to have those linked to
the elements in the template. This linkage is handled primarily by the use of HTML element ID attributes.
On the Delphi side, we can just update our components using the ElementID property. For the editUsername, editPassword, and btnLogin components, we'll set the ElementID property to be the same as the Name property.
In LoginForm.html, we'll need to find the elements that we want these components linked to. In some HTML templates, there are already ID attributes assigned to each of the HTML elements. Not the case here, so we'll have to add them manually. This involves a quick step of finding the <input> or <button> tags that we're interested in, and then adding id="editUsername" to the tag, for example.
Remember that element IDs need to be unique for all elements on a given page. Also, keep in mind that we're loading potentially multiple forms on the same page at the same time.
If all the relevant elements already had ID attributes (or if we were to add them ourselves). then there's also the option of using the provided "Control Bindings"
tool. If you right-click on the form and select this, you'll get a dialog that allows you to adjust these
links. Here we can see that we've not yet linked the msgLogin component that reports what is wrong if the
login fails.
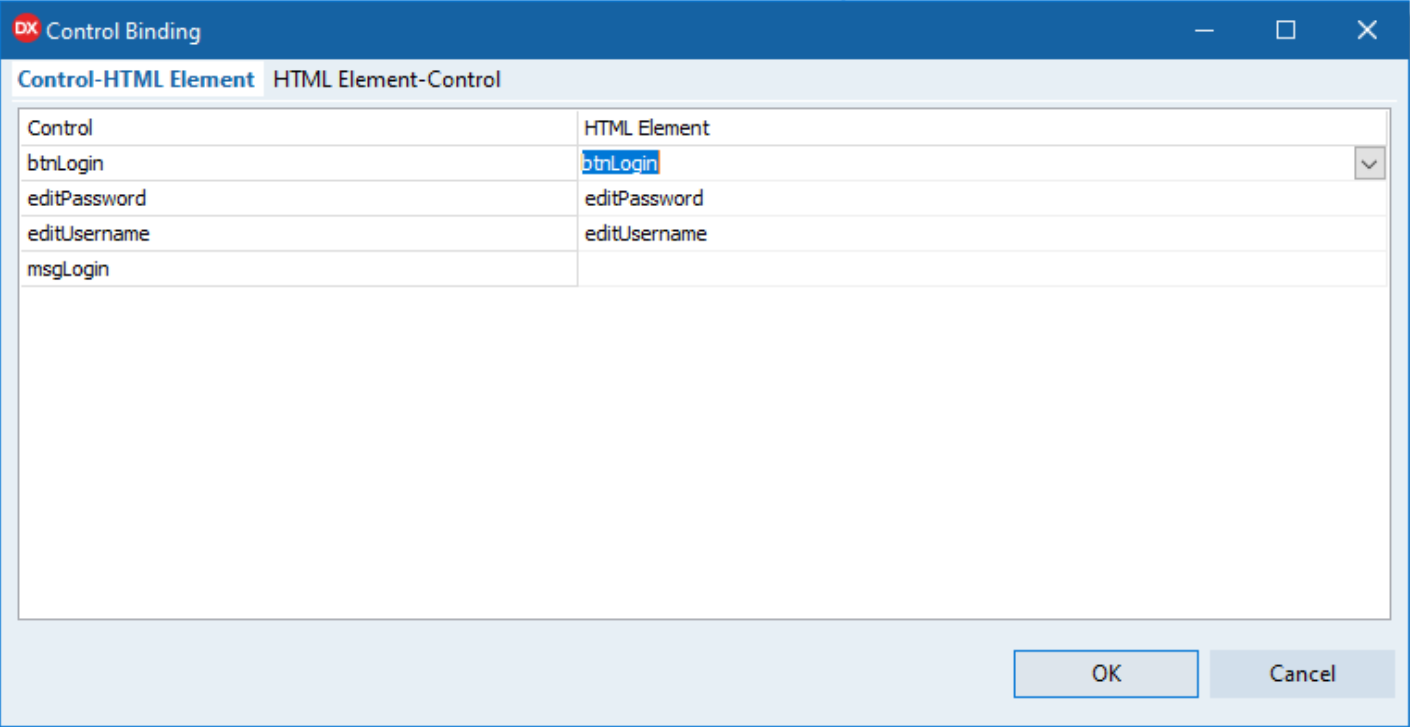
Control Binding - Delphi Perspective.
If we click on the option at the top to view the HTML Element-Control binding, we see that, from the
perspective of the HTML page, we've not yet added a binding for the "Remember Me" checkbox, which did have its
own ID assigned originally.
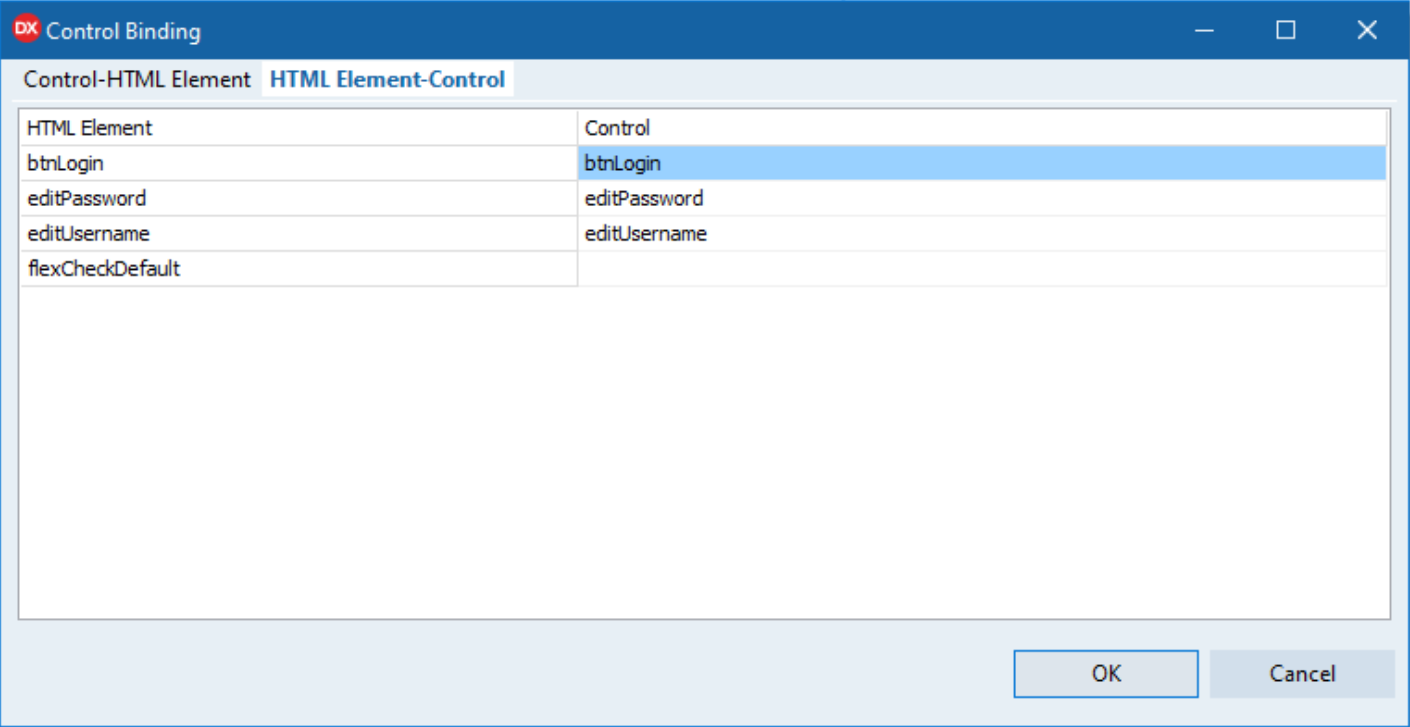
Control Binding - HTML Perspective.
We're not going to worry about the "Remember Me" function for now. Note that nothing else on the page
appears in this binding interface because nothing else has an ID assigned. The buttons for Facebook and Google, for
example, could be linked simply by adding an ID value. We could also just delete them from LoginForm.html,
or hide them using CSS until we're ready to wire them up if we were wanting to use them sometime down the road.
Likewise, if we
wanted to change the title, we could do that by editing the HTML or by adding an ID and linking it to another
component on our form. Let's do that, so we can then set the title to be the name of our application. For
the missing message text, let's use a toast to display the message instead.
Bootstrap 5 Toasts.
Toasts are those little messages that pop up on the page when there's an unexpected error of some kind. Here, we're using it as a bit of a catch-all to display messages when the template UI doesn't really have a good place for them. Toasts have been around for a long time, and there are many different implementations, often requiring various dependencies, like jQuery for example. As we're firmly in the Bootstrap 5 camp, with ideally no jQuery anywhere to be found, we'd rather not introduce jQuery as a dependency just for displaying toasts.
There
are a few challenges here, particularly the need to call a JavaScript function to show them, but nothing too
terrible. To make this a little easier, here's a Toast method added to MainForm that we can use. Not hard to
imagine extending this a little more with additional styles or a severity parameter, maybe some icons. But for
our purposes right now, this is plenty sufficient.
procedure TMainForm.Toast(Header, Body: String);
begin
  ToastCount := ToastCount + 1;
  asm
    var toast = document.createElement('div');
    toast.className = 'toast';
    toast.setAttribute('id','toast'+this.ToastCount);
    toast.setAttribute('role','alert');
    toast.setAttribute('aria-live','assertive');
    toast.setAttribute('aria-atomic','true');
    toast.setAttribute('data-bs-delay','15000');

    var toasth = document.createElement('div');
    toasth.className = 'toast-header bg-danger text-white';
    toasth.innerHTML = '<strong class="me-auto">'+Header+'</strong>'+
                       '<small class="text-light">just now</small>'+
                       '<button type="button" class="btn-close" data-bs-dismiss="toast" aria-label="Close"></button>';

    var toastb = document.createElement('div');
    toastb.className = 'toast-body';
    toastb.innerHTML = Body;

    toast.appendChild(toasth);
    toast.appendChild(toastb);
    divToasts.firstElementChild.appendChild(toast);

    new bootstrap.Toast(toast).show();
  end;
end;
There is some styling going on here, using Bootstrap classes naturally. The placement is handled with a divToasts
component that is positioned over our divHost component to mimic what it would
be like in a normal setting. And we've added a bit of CSS to deal primarily with the z-index. There's a
timeout value set (15s), and we've arranged it so that multiple toasts can be displayed in a familiar stacked
fashion.
Bootstrap 5 Toasts.
And with that in place, we're done with updating our LoginForm to use the AdminLTE template. Now, to be fair, all we've really done here is essentially copy over the contents of a page and use their CSS to get the same look on our page. More of a theming exercise than a template. But we'll get to more complex integrations in just a moment.
Some of the work we've done could be made to work with the template a little differently. For example, we could just include the CSS and JS directly in our own Project1.html, pointing it at either
the location within the AdminLTE dist folder or adding a deployment script of some kind to copy over those
files whenever we update AdminLTE itself.
Adding in ID values is more problematic though, and of course, the more changes that we make to the template, the less easy it would be to start using an updated template. Not so much of a problem with the login page, but more work as more forms are incorporated into our project.
It may also be the case that you might want to make changes to the template directly (editing those SCSS files for example) and have that carried through to the production website. CSS can be overridden easily enough. Changes to the template pages are more difficult to deal with. Once the template content is copied over into one of the forms, it will likely be modified to the point where it can't be easily copied again.
One idea to help with that might be to create separate template pages that have less content to begin with, and then add everything dynamically to those. This would give you a simpler template page to update when the time comes to upgrade AdminLTE or the template of your choice. A good candidate might be to create a "blank dashboard page" for example.
JWT Decoding.
Let's take a short break from the UI side of things and get back to our JWT. Once we've got one, we've got to
decide what to do next. Most likely this will involve loading up another form. But which form? And what do
we do about JWTs that might be expiring at some point? Are there other elements in the JWT that we can use in
our client application? Certainly, there are. So let's take it apart and get at that data.
JWTs are encoded as a set of three Base64-encoded strings, concatenated together with a period as a
delimiter.
- The header describes what kind of token it is (JWT) and what kind of encryption is used to
generate the signature (HS256 in our case), as a JSON object.
- The payload lists all of the claims, also as a JSON object, which is what we're primarily interested in.
- The signature contains a string encoded using the specified encryption algorithm, used to confirm that the payload has not been altered.
The signature is generated by encrypting the payload using a secret key known only to the server. When a JWT is presented to the server later, it can then validate it by encrypting the payload using the same secret key. It should be able to regenerate the same signature. If someone has tampered with the payload, then the signature generated as part of the validation won't match the signature embedded in the JWT, so the JWT will be rejected.
Note that the payload itself isn't encrypted, so we can easily get what we need out of it by extracting the middle Base64-encoded value, decoding it into a string, and then accessing the resulting JSON object for whatever claims we're interested in.
In many instances, we don't need to do this as the JWT is simply passed back to the server whenever we make a subsequent request. And it can decode the JWT to get what it needs for things like database access and so on. We can also get the information we're after by setting up another endpoint and just asking the server for it, or by passing back additional data when we receive the JWT in the first place. Lots of options. But as we have a JWT, and we know it contains what we're after, we can just look inside easily enough.
There are a few values we're after. First, the name and e-mail address of the user so we can present a more friendly interface. Second, the expiration time of the JWT, so we can be sure to renew it before it expires. And third, the list of roles that are associated with the user. We'll use this to decide what pages are available, as well as what page to navigate to as soon as the user logs in.
We can store all of these as form
variables so we don't have to decode the JWT after it is first received. And we can do that as part of our
Login method in MainForm.
 // We've got a JWT
  if Pos('Bearer ',NewJWT) = 1 then
  begin
    LogAction('Login Successful ('+IntToStr(MilliSecondsBetween(Now, ElapsedTime))+'ms)');
    Result := 'Success';
    LoggedIn := True;

    // Assign JWT to form variable - Added to authorization header via procedure TMainForm.XDataConnRequest
    JWT := NewJWT;

    // Get JSON Claims from JWT
    JWTClaims := TJSONObject.ParseJSONValue(Window.atob(Copy(JWT, Pos('.',JWT)+1, LastDelimiter('.',JWT)-Pos('.',JWT)-1))) as TJSONObject;

    // Extract user information
    User_FirstName :=  (JWTClaims.Get('fnm').JSONValue as TJSONString).Value;
    User_MiddleName :=  (JWTClaims.Get('mnm').JSONValue as TJSONString).Value;
    User_LastName :=  (JWTClaims.Get('lnm').JSONValue as TJSONString).Value;
    User_EMail :=  (JWTClaims.Get('eml').JSONValue as TJSONString).Value;
    User_Roles.CommaText :=  (JWTClaims.Get('rol').JSONValue as TJSONString).Value;

    // Set renewal to one minute before expiration
    JWT_Expiry := UnixToDateTime((JWTClaims.Get('exp').JSONValue as TJSONNumber).AsInt);
    tmrJWTRenewal.Enabled := False;
    tmrJWTRenewal.Interval := MillisecondsBetween(JWT_Expiry, TTimeZone.Local.ToUniversalTime(Now)) - 60000;
    tmrJWTRenewal.Enabled := True;

    // Extract Roles
    Role_Administrator := False;
    Role_Sales := False;
    Role_HR := False;
    i := 0;
    while i < User_Roles.Count do
    begin
      if User_Roles[i] = '1' then Role_Administrator := True;
      if User_Roles[i] = '2' then Role_Sales := True;
      if User_Roles[i] = '3' then Role_HR := True;
      i := i + 1;
    end;

    // Load selected form
    if Role_Administrator then
    begin
      LoadForm('Administrator');
    end
    else if Role_HR then
    begin
      LoadForm('HR')
    end
    else if Role_Sales then
    begin
      LoadForm('Sales');
    end;

    LogAction('Ready');
    ActivityDetected := False;
  end
There are plenty of other ways to accomplish the same task, particularly using JavaScript, but ideally, we'll end up in the same place regardless. As far as how roles are being handled, again this is an example of how you could do it, but if you envision having hundreds of roles, or roles that are perhaps defined a little more dynamically, then this approach is going to be less than ideal.
The idea here is that there will be many ways to organize people and control access. Role is intended more as a blunt instrument to help direct the application. Other more finely tuned attributes will be needed to properly secure various parts of the application and the underlying database. Not something we're going to worry about too much here. What we will need is another form to continue our adventure.
Administrator Form.
Ideally, when someone logs in they'll be presented with a dashboard that is specific to their particular role in the organization, perhaps to be used as a launching pad into other parts of the application. The AdminLTE template comes with a few dashboards as examples, so let's use one of those.
When we set up the login page, we just copied the HTML straight from the browser into our project. The page we were using was what came up when we used the npm run dev command and then pointed our browser at http://localhost:3000. While this worked pretty well, it felt a bit odd as one would think we could just copy over an HTML file instead, replacing LoginForm.html with whatever the template was using.
But by
launching the AdminLTE project in that manner, no HTML files were actually generated - nothing to copy!
However, if we instead run the npm run production command, it produces static
versions of all of the example pages in its dist/pages folder, ready to be
copied. And, as an extra bonus, this also generates minified versions of the CSS and JavaScript files coming from AdminLTE.
Let's use the second dashboard example. It's got the most variety of the three. Perhaps a little crazy, but plenty to work with. The basic steps are similar to before, so we don't need to go into detail again. Just to make sure we're covering everything, here is the general idea.
- Create a new form, in this case, it will be UnitAdministrator/AdministratorForm.
- Copy the AdminLTE template file (index2.html), replacing the UnitAdministrator.html file.
- Remove all the Font, CSS, and JS links that are already in the Project.html file.
- Move any new Font, CSS, and JS links to the Project.html file (eg: ChartJS).
- Move any remaining JavaScript code to the WebFormCreate method of AdministratorForm.
For this particular page, a chart is displayed using ChartJS, which we covered in a previous post here. When moving the raw JavaScript over to the WebFormCreate method, we can also
simplify it a bit. Normally, these pages are loaded up as standalone static pages. In our case, we're just
updating a <div> with new content - the page is already loaded. Any code that needs to run after,
say, a DOMContentLoaded event (triggered when the page is first fully rendered)
can be run right away within WebFormCreate without having to wait.
This brings up an important issue. The JavaScript that runs under the AdminLTE interface (handling button
clicks, menu navigation, and so on) is designed to load after just such an event, adding itself to the various elements on the page. Just adding elements to the page (via loading the form) isn't sufficient to kick off this process. To get around this, we can just trigger
the DomContentLoad event directly. This is
added to the rest of the JavaScript in the WebFormCreate event for this form.
    window.document.dispatchEvent(new Event("DOMContentLoaded", {
      bubbles: true,
      cancelable: true
    }));
While we're at it, let's also add a bit of CSS to make the page appear normally, without our special log
buttons and host "window" arrangement. We can do this directly in CSS, making it easy to bring back that interface if we need to troubleshoot something later. Let's also add a fun little background to our page, using one of the backgrounds from the
Catheedral project. We covered all kinds of things related to backgrounds in Part 3 of that project.
#divHost {
  border-radius: 0px !important;
  border: none !important;
  top: 0px !important;
  left: 0px !important;
  width: 100% !important;
  min-height: 100%;
  overflow: auto;
  z-index: 1;

  background: linear-gradient(27deg, #151515 5px, transparent 5px) 0 5px,
              linear-gradient(207deg, #151515 5px, transparent 5px) 10px 0px,
              linear-gradient(27deg, #222 5px, transparent 5px) 0px 10px,
              linear-gradient(207deg, #222 5px, transparent 5px) 10px 5px,
              linear-gradient(90deg, #1b1b1b 10px, transparent 10px),
              linear-gradient(#1d1d1d 25%, #1a1a1a 25%, #1a1a1a 50%, transparent 50%, transparent 75%, #242424 75%, #242424);
  background-color: #131313 !important;
  background-size: 20px 20px;
}
With a few more tweaks here and there, our login page now looks like this.
Updated Login Page.
After logging in (using an account with the Administrator role, naturally), we're then presented with a
functioning dashboard, albeit with none of our own data just yet.
Initial Administrator Page.
The menu on the left is collapsible, as are each of the panels in the main part of the dashboard. There's a
light/dark theme switch. Pretty slick, all things considered. Took a bit of fiddling, but the background
covers the page, even when scrolling. There are two charts on the page (a donut chart appears further
down).
As was the case with the login page, there are not many elements on this page that have an ID attribute
that we can use to bind to our Delphi components, but that's easily corrected. With so many different elements, and a few rather complex ones at that, it will take a bit of work to get things sorted out. But first, we need a bit more data to work with.
Dashboard Data.
As everyone logging in will be presented with a dashboard interface initially, it makes some sense to create XData endpoints to serve up data specific to each dashboard. The idea is to make a single call and get back a bit of JSON containing all the bits we'll need to initialize at least the common parts of the dashboard. Subsequent calls might be used to fill in the more complex elements where there might be substantially more data.
Looking at the page, there are a few candidates to get started with. The idea is to just pull in data from various SQL queries to populate the JSON being returned, and once we receive it, we can set about updating the dashboard elements. To begin with, let's try and get the following.
- User Photo (already have their name and e-mail address).
- The copyright notice at the bottom left.
- Organization slogan at the bottom right.
- The organization name at the top left.
From the XData side, we'll set up a new DashboardService and then add AdministratorDashboard as one of the endpoints. We don't need to pass it any parameters as the JWT contains enough for us to find all the data that we're after. It will return a TStream with the JSON we need, as we've covered in the last post.
Note that the JSON can contain elements that are arrays, as well as images encoded as Base64 strings,
so we should have no trouble on that side. The only coordination really is that we'll need to know what the
JSON element names are. But we can also add a bit of robustness by just checking for the existence of any
elements we're expecting, providing suitable defaults if some are missing, and skipping over any that are new
or unexpected. A little more forgiving than trying to define a list of parameters that needs to match perfectly. We can then add or remove elements on the TMS XData server side without it breaking the TMS WEB Core client side, for example.
As this is the kind of thing we'll be doing often (asking XData to return some JSON), we can add a method in MainForm, much like we've done for the Login method. In this case, we'll just return the JSON we've received, as a string. The parameters of the function that calls the endpoint are the actual endpoint we're interested in, and whatever the endpoint itself needs for parameters.
Note that we're passing an Array of JSValue, roughly equivalent to a dynamic Array of Variant - basically anything we
want, with as many elements as we want. Handy.
function TMainForm.JSONRequest(Endpoint: String; Params: array of JSValue): String;
var
  ClientConn: TXDataWebClient;
  Response: TXDataClientResponse;
  Blob: JSValue;
  Elapsed: TDateTime;
begin
  Elapsed := Now;
  Result := '';
  LogAction('Request: '+Endpoint);

  await(XDataConnect);
  if (XdataConn.Connected) then
  begin
    try
      ClientConn := TXDataWebClient.Create(nil);
      ClientConn.Connection := XDataConn;
      Response := await(ClientConn.RawInvokeAsync(Endpoint, Params));
      Blob := Response.Result;
      asm
        Result = await Blob.text();
      end;
    except on E: Exception do
      begin
        LogAction('Request Exception: '+Endpoint);
        LogAction(' --> ['+E.ClassName+']');
        LogAction(' --> '+E.Message);
      end;
    end;
  end;

  LogAction('Response: '+Endpoint+' ('+IntToStr(MillisecondsBetween(Now, Elapsed))+'ms)');
end;
In AdministratorForm, we call this function inside of a timer that is triggered
at the end of its own WebFormCreate. This is done to ensure that the UI gets updated even if
the query fails or takes a long time. Initially, we'll just dump the JSON to the console to check that it is
working. In a moment we'll add the code to pair up these values with elements in the AdminLTE dashboard template that we're using here.
On the XData side, we'll need to add more queries to get the information we're after. We've gone over a few queries previously, so no need to go into too much detail here. The only tricky bit was that for some reason returning a Text value from SQLite using .AsString somehow got tripped up. We've got a new photo table where the photo itself is stored in a Text column, and formatted as a Data URI (so basically a Base64-encoded image). Didn't have this issue with the Survey XData Server, and adjusting MaxStringSize in FireDAC didn't seem to work either.
What
did work was CAST(photo_datauri as BLOB), even though in Delphi we're still
using .AsString. Chalk it up to more fun with SQLite and FireDAC. The endpoint
in this case is building a JSON object that contains an array and a photo to start with. An extra function
was added to DBSupport to convert a query to a JSON array, which is returned as
a String.
function TDBSupport.QueryToJSON(QueryResult: TFDQuery): String;
var
  bm: TFDBatchMove;
  bw: TFDBatchMoveJSONWriter;
  br: TFDBatchMoveDataSetReader;
  os: TMemoryStream;
begin
  os := TMemoryStream.Create;
  bm := TFDBatchMove.Create(nil);
  bw := TFDBatchMoveJSONWriter.Create(nil);
  br := TFDBatchMoveDataSetReader.Create(nil);
  try
    br.Dataset := QueryResult;
    bw.Stream := os;
    bm.Reader := br;
    bm.Writer := bw;
    bm.Execute;
    SetString(Result, PAnsiChar(os.Memory), os.Size );
  finally
    br.Free;
    bw.Free;
    bm.Free;
    os.Free;
  end;
end;
The rest of the endpoint closely follows the same pattern as the other endpoints we've seen. Here's what we've got.
function TDashboardService.AdministratorDashboard: TStream;
var
  DBConn: TFDConnection;
  Query1: TFDQuery;
  DatabaseName: String;
  DatabaseEngine: String;
  ClientTimeZone: TBundledTimeZone;
  ValidTimeZone: Boolean;
  ElapsedTime: TDateTime;
  User: IUserIdentity;
  JWT: String;
  ResultJSON: TJSONObject;
  ResultArray: TJSONArray;
  Roles: TStringList;
  GotRole: Boolean;
  i: Integer;
begin
  // Returning JSON, so flag it as such
  TXDataOperationContext.Current.Response.Headers.SetValue('content-type', 'application/json');

  // Time this event
  ElapsedTime := Now;

  // Get data from the JWT
  User := TXDataOperationContext.Current.Request.User;
  JWT := TXDataOperationContext.Current.Request.Headers.Get('Authorization');
  if (User = nil) then raise EXDataHttpUnauthorized.Create('Missing authentication');

  // Setup DB connection and query
  try
    DatabaseName := User.Claims.Find('dbn').AsString;
    DatabaseEngine := User.Claims.Find('dbe').AsString;
    DBSupport.ConnectQuery(DBConn, Query1, DatabaseName, DatabaseEngine);
  except on E: Exception do
    begin
      MainForm.mmInfo.Lines.Add('['+E.Classname+'] '+E.Message);
      raise EXDataHttpUnauthorized.Create('Internal Error: CQ');
    end;
  end;

  // Check if we've got a valid JWT (one that has not been revoked)
  try
    {$Include sql\system\jwt_check\jwt_check.inc}
    Query1.ParamByName('TOKENHASH').AsString := DBSupport.HashThis(JWT);
    Query1.Open;
  except on E: Exception do
    begin
      MainForm.mmInfo.Lines.Add('['+E.Classname+'] '+E.Message);
      raise EXDataHttpUnauthorized.Create('Internal Error: JC');
    end;
  end;
  if Query1.RecordCount <> 1 then raise EXDataHttpUnauthorized.Create('JWT was not validated');

  // Check if user has the Administrator role
  Roles := TStringList.Create;
  Roles.CommaText := User.Claims.Find('rol').AsString;
  i := 0;
  GotRole := False;
  while i < Roles.Count do
  begin
    if Roles[1] = '1' then GotRole := True;
    i := i + 1;
  end;
  Roles.Free;
  if not(GotRole) then raise EXDataHttpUnauthorized.Create('Missing Administrator Role');

  // Create object to be returned
  ResultJSON := TJSONObject.Create;

  // Get All Organization Info
  try
    {$Include sql\system\list_by_id\list_by_id.inc}
    Query1.ParamByName('LISTID').AsInteger := 2;
    Query1.Open;
  except on E: Exception do
    begin
      MainForm.mmInfo.Lines.Add('['+E.Classname+'] '+E.Message);
      raise EXDataHttpUnauthorized.Create('Internal Error: List By ID');
    end;
  end;
  ResultArray := TJSONObject.ParseJSONValue(DBSupport.QueryToJSON(Query1)) as TJSONArray;
  ResultJSON.AddPair('Organization', ResultArray);

  // Add photo
  try
    {$Include sql\person\photo\photo.inc}
    Query1.ParamByName('PERSONID').AsInteger :=  User.Claims.Find('usr').AsInteger;
    Query1.Open;
  except on E: Exception do
    begin
      MainForm.mmInfo.Lines.Add('['+E.Classname+'] '+E.Message);
      raise EXDataHttpUnauthorized.Create('Internal Error: Photo');
    end;
  end;
  ResultJSON.AddPair('Photo', String(Query1.FieldByName('photo_datauri').AsString));

  // Not sure if there is another version of this that is more direct?
  Result := TStringStream.Create(ResultJSON.ToString);

  // Cleanup
  ResultJSON.Free;

  // Keep track of endpoint history
  try
    {$Include sql\system\endpoint_history_insert\endpoint_history_insert.inc}
    Query1.ParamByName('ENDPOINT').AsString := 'DashboardService.AdministratorDashboard';
    Query1.ParamByName('ACCESSED').AsDateTime := TTimeZone.local.ToUniversalTime(ElapsedTime);
    Query1.ParamByName('IPADDRESS').AsString := TXDataOperationContext.Current.Request.RemoteIP;
    Query1.ParamByName('APPLICATION').AsString := User.Claims.Find('app').AsString;
    Query1.ParamByName('DATABASENAME').AsString := DatabaseName;
    Query1.ParamByName('DATABASEENGINE').AsString := DatabaseEngine;
    Query1.ParamByName('EXECUTIONMS').AsInteger := MillisecondsBetween(Now,ElapsedTime);
    Query1.ParamByName('DETAILS').AsString := '[]';
    Query1.ExecSQL;
  except on E: Exception do
    begin
      MainForm.mmInfo.Lines.Add('['+E.Classname+'] '+E.Message);
      raise EXDataHttpUnauthorized.Create('Internal Error: EHI');
    end;
  end;

  // All Done
  try
    DBSupport.DisconnectQuery(DBConn, Query1);
  except on E: Exception do
    begin
      MainForm.mmInfo.Lines.Add('['+E.Classname+'] '+E.Message);
      raise EXDataHttpUnauthorized.Create('Internal Error: DQ');
    end;
  end;
end;
We'll be able to extend this function to add more bits of data easily enough, just by adding more JSON pairs.
The example data for photos was taken from https://boredhumans.com/faces.php
which uses AI to generate human-looking faces. We therefore don't have to worry about accidentally using someone's
actual face. Makes for good sample data.
These images were converted into a Data URI format and stored in simple text files. Those are then read in using TStringList.LoatFromFile and added to the photo table when it is first created in the database.
Once all that is in place, the result of our
endpoint invocation is the following.
{
  "Organization": [
    {
      "list_id": 2,
      "lookup_id": 0,
      "last_modified": "2023-02-22 20:36:50",
      "last_modifier": 0,
      "preference": 0,
      "value": "TMS WEB Core/XData Template",
      "attributes": "Organization Name"
    },
    {
      "list_id": 2,
      "lookup_id": 1,
      "last_modified": "2023-02-22 20:36:50",
      "last_modifier": 0,
      "preference": 1,
      "value": "Template",
      "attributes": "Organization Short Name"
    },
    {
      "list_id": 2,
      "lookup_id": 2,
      "last_modified": "2023-02-22 20:36:50",
      "last_modifier": 0,
      "preference": 2,
      "value": "TMS WEB Core and More",
      "attributes": "Organization Slogan"
    },
    {
      "list_id": 2,
      "lookup_id": 3,
      "last_modified": "2023-02-22 20:36:50",
      "last_modifier": 0,
      "preference": 3,
      "value": "Copyright (c) 2023",
      "attributes": "Copyright Notice"
    }
  ],
  "Photo": "<img src=\"data:image/jpeg;base64,/9j/4AAQSkZJRgABAQAAAQABAAD/2wBDAAMCAgMCAgMDAwMEAwMEBQgFBQQEBQoHBwYIDAoMDAsKCwsNDhIQDQ4RDgsLEBYQERMUFRUVDA8XGBYUGBIUFR
    ...70k clipped...
  COTabb3UV+Lu8t2uLDLfabKVgUJwRgqQCCQe3Tivmrx1o0+leLL+xa1eOcOEWELlgx6Ljuee1fT4u1KEakNHax4dCTq1JU5aq5/9k=\" alt=\"\" />"
}
From here, we can easily extract the data we need for updating our template.
Simple Template Elements.
The AdminLTE template we've chosen has a lot going on. We won't get through all of the elements in this post. Rather, we'll have a look at a few and see how it works. For some elements, all we'll be doing is adding an ID to the element so that we can pair it with a Delphi component and then update its value. For the simplest elements, this works pretty well.
For example, the two bits of text at the very bottom, the copyright notice, and the company slogan, can each be replaced with the equivalent values that were included in the JSON. Here's what is done for the copyright message.
- In AdministratorForm.html, find the copyright text block.
- Replace the text with <label id="labelCopyright"></label>.
- In the AdminstratorForm.pas form, add a TWebLabel component.
- Set its ElementID property to have the same ID value, labelCopyright.
- Update the value of the TWebLabel component with the value from the JSON object.
That last bit might be kind of tricky, depending on how you like your JSON served. We'll use the standard Delphi TJSONObject mechanism here. Great for portability. Not for much else, as the plain JavaScript version of the same code would be much simpler. But this also works just fine.
labelCopyright.HTML := (((ResponseJSON.GetValue('Organization') as TJSONArray).Items[3] as TJSONObject).GetValue('value') as TJSONString).Value;
We should probably do some error-checking to ensure that everything in that chain exists as expected. Something for later. But that's it - the value on the page will be updated with the value from our JSON
object. The same process can be followed for all of the simple elements in the template. Either adding an ID
value to an existing element if it is a <div>, a <span>, or something similar, or adding
an entirely new element (a <label> in this case) with an ID so that we can bind it to something on our
Delphi form.
This works roughly the same way for images, as we're passing just passing around a Data URI that can easily be dropped on the page. There is a bit more involved in ensuring that the image has the necessary classes added and that it is positioned properly.
Inserting a <span> that contains the image is what seems to work pretty well, pairing that up
with a TWebLabel component with the HTMLType
property set to tSPAN. Finding all the images within the AdminLTE template can be tricky. For the user
photo, there are two instances. One in the top-right menu, and one in the drop-down that appears when
clicking on the photo or the username. Here's how they've been set. The classes added here were used in the original template.
    spanPhoto.HTML := (ResponseJSON.GetValue('Photo') as TJSONString).Value;
    spanPhoto.ElementHandle.firstElementChild.className := 'user-image rounded-circle shadow';
    spanPhoto.ElementHandle.firstElementChild.setAttribute('alt','User Photo');

    spanPhotoBig.HTML := (ResponseJSON.GetValue('Photo') as TJSONString).Value;
    spanPhotoBig.ElementHandle.firstElementChild.className := 'rounded-circle shadow';
    spanPhotoBig.ElementHandle.firstElementChild.setAttribute('alt','User Photo');
    (spanPhotoBig.ElementHandle.firstElementChild as TJSHTMLElement).style.setProperty('max-width', '200px');
Just a quick note on using Data URIs for this purpose. It is certainly handy, from a JSON/database perspective, to just pass around strings. And everything is stored 100% in the database. The less good part is that, generally speaking, Data URIs are not cached by the browser like a typical image might be.
We will have to see how this plays out further down the road when more images are being passed around. Perhaps caching them locally will be enough in terms of optimizing network activity. Storing the images as files on the server that are then directly accessed using a URL, and then storing and passing around the URL, instead of a Data URI, would likely be the optimal approach in terms of browser performance. The good news is that this is a change that could likely be implemented entirely server-side, as the <img> in the Data URI could just as easily reference a URL without any change to the client application. But I like Data URIs so we'll leave it for now.
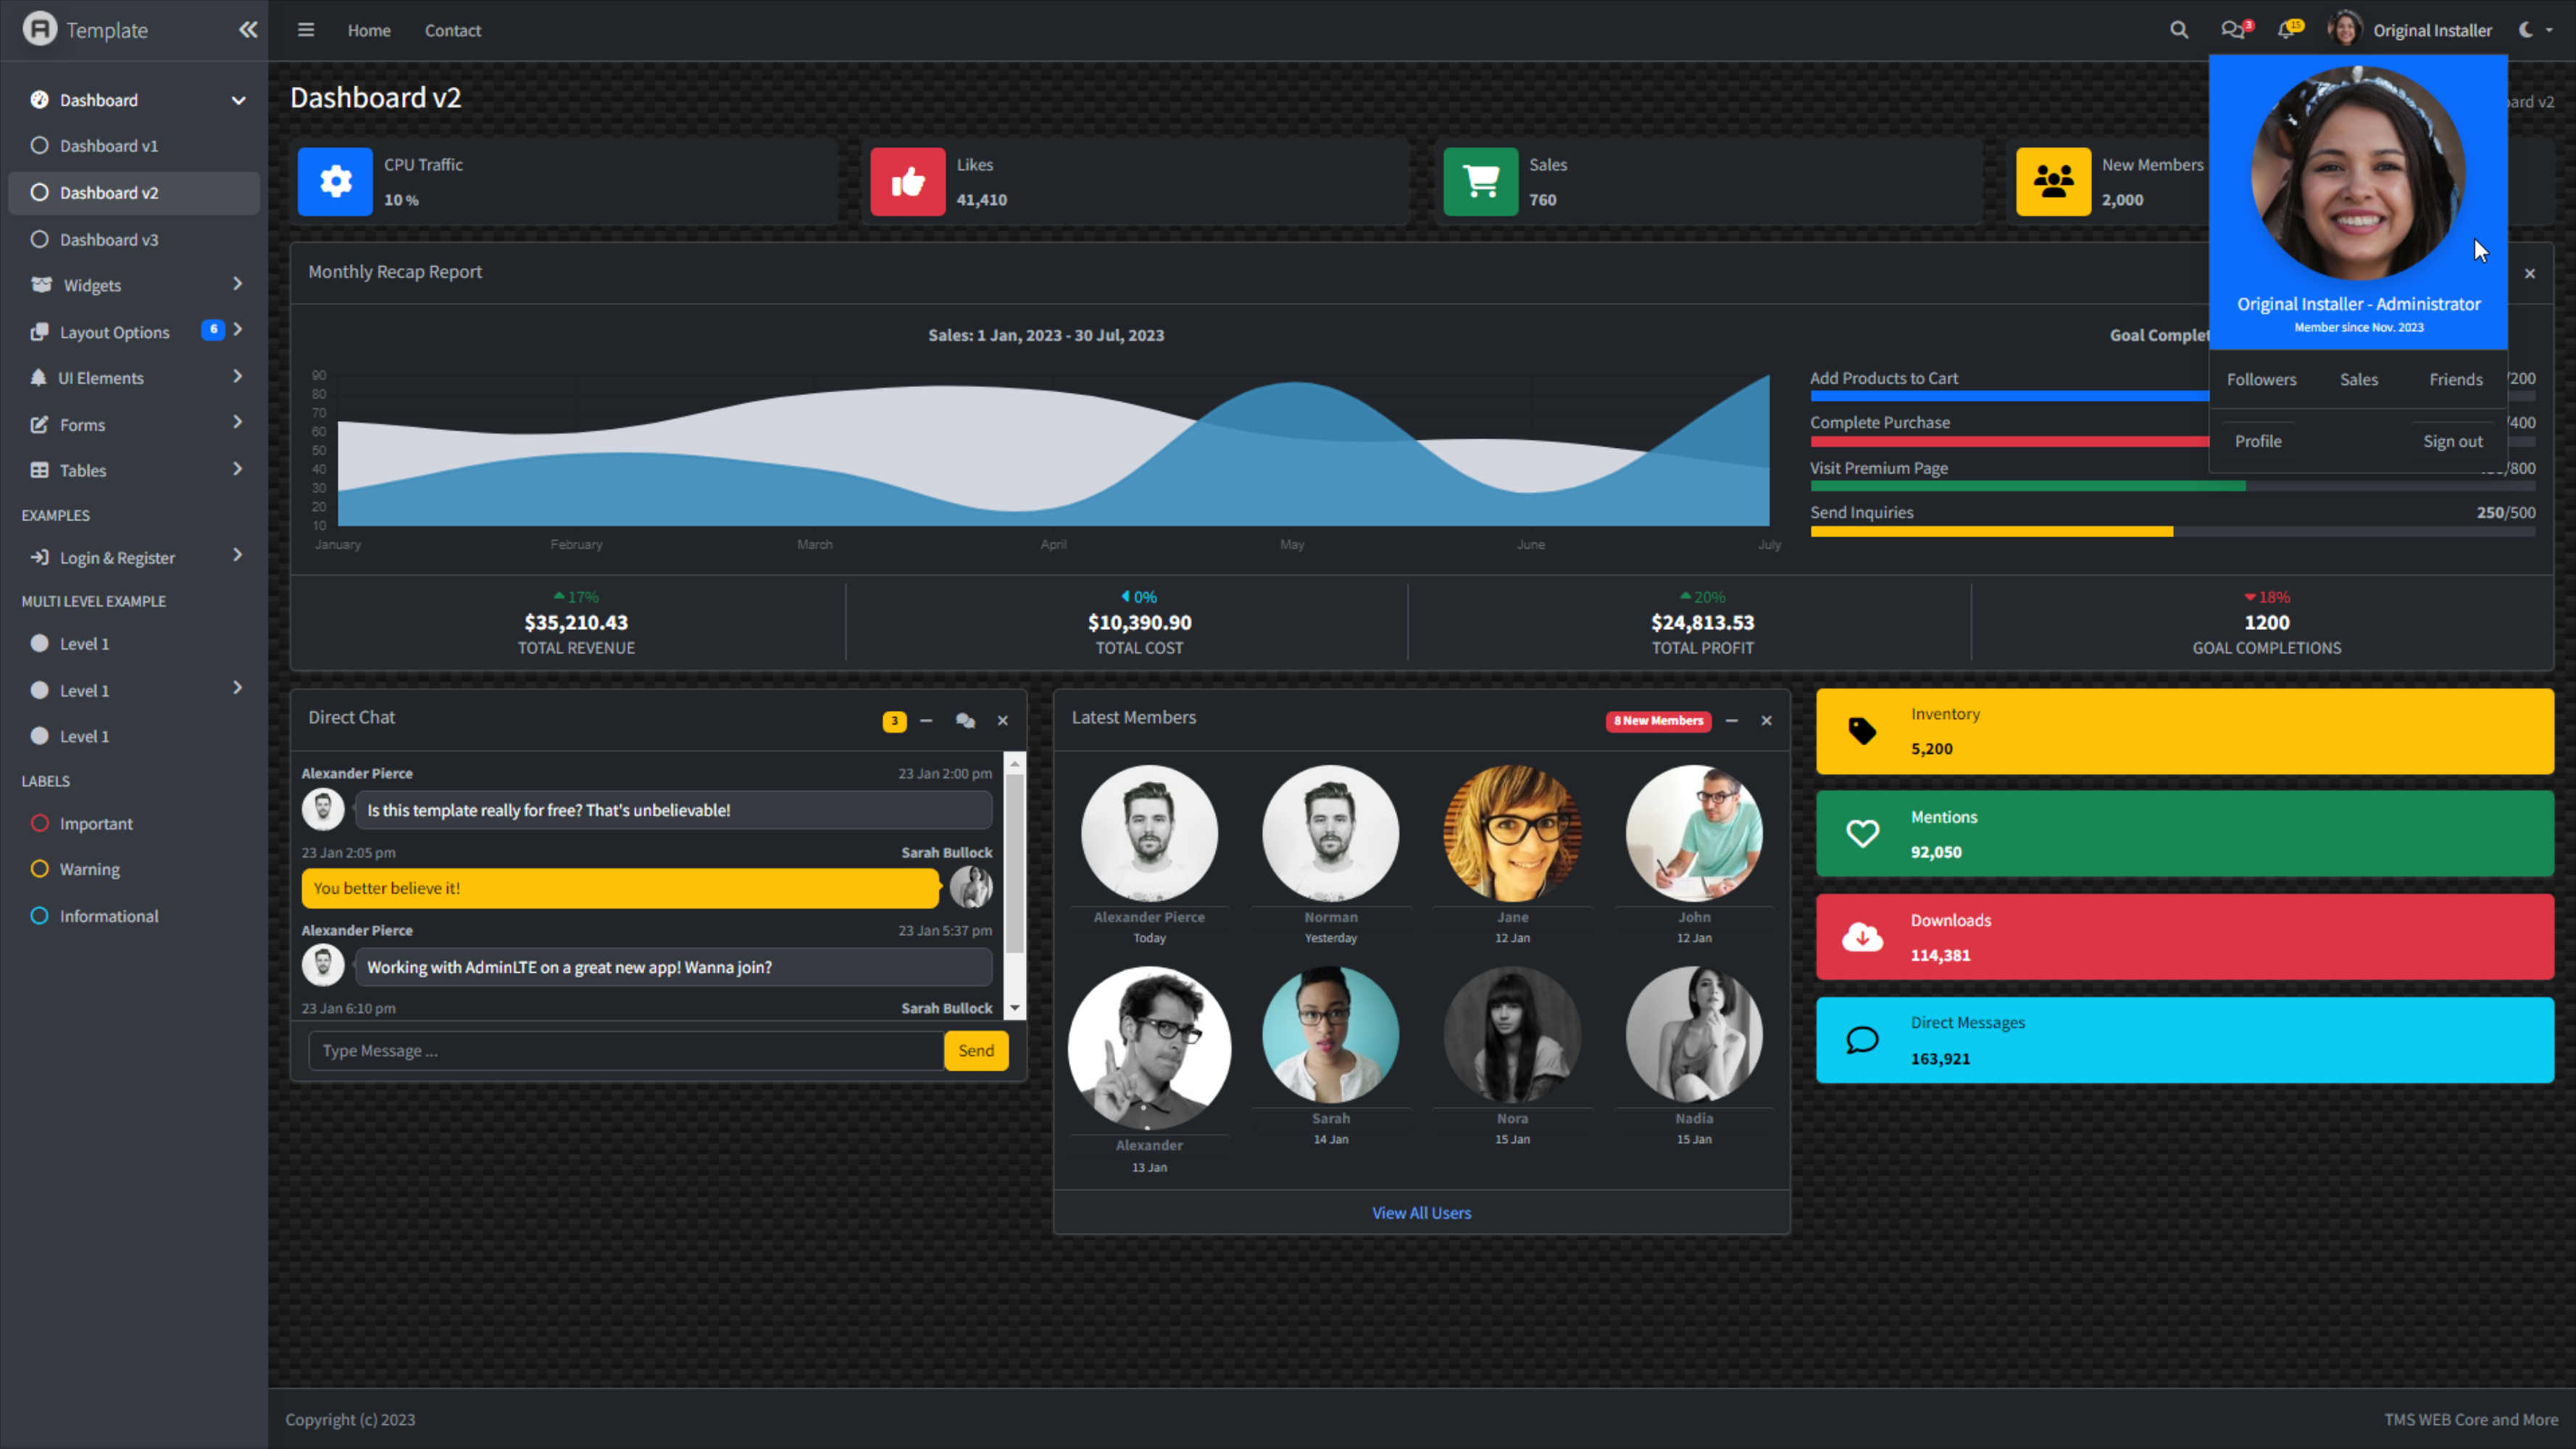
Template with XData Content.
Just the little bits in the corners have changed, and a few blocks were removed to fit everything into one
image. More data could be brought in by adding more content to the original JSON object we're getting back from the AdministratorDashboard endpoint. Or we could retrieve data from other endpoints as needed.
Less Simple Template Elements.
For the template elements we've seen so far, we're just swapping out whatever is in the template for some data that we've retrieved from our XData server. Extending this to all the simple elements on the page takes a bit of effort as there are quite a few of them we've not gotten to yet. Some of the template elements are not so simple. The charts, for example, are probably deserving of a little more attention, perhaps generating a separate XData request for each one.
In situations where the element is a component that we're
familiar with, like the ChartJS charts we have here, we already have a pretty good idea of how to interact
with them. In our many "JavaScript Libraries" posts, for example, we've gotten into the habit of dropping a
TWebHTMLDiv component on a form, and then using JavaScript to wire it up to the JavaScript library by passing an ElementID value. Here, using the
template, the approach is the same - we just need to be sure that there's an ID associated with it. For the
charts in the template, there are already IDs assigned because the template example needs them to show its own charts.
This also means that it is simple enough to swap out a similar component for one we might like better. If
you want to use an FNC Chart instead of a ChartJS chart, there's already a spot in the UI, so no trouble at
all, and we'll still get the benefit of the rest of the template, like the collapsible sections and so on. The same goes for data tables. No doubt this project will get outfitted with Tabulator tables just as soon as I can manage.
But perhaps the more interesting aspect is the ability to add entire components to the UI in the same style as what is there already. Perhaps you want two large charts. Or six "info boxes" at the top instead of four. The same building blocks that we see in the template can just be duplicated as needed or even copied from different blocks in other template pages.
The menu on the left could be (and should be) tailored specifically for the role or even the account that has logged in. Perhaps the Dashboard menu could drop down to show a separate option for each role that the user has been granted. These would then potentially load up separate dashboard forms with their own menus and content.
This brings up one last point. With our work so far, we've basically hosted the entire application within the divHost component on our MainForm. We could do something similar with the main working area of the template here, perhaps having several Administrator sub-forms that are swapped in and out of that area of the template.
This is probably a good idea, as then the menu
and the header and footer would remain and only the middle area of the page would change as that form gets
swapped in and out. No end to the possibilities here, but alas, this post cannot ramble on indefinitely.
Future Template Work.
The thinking at the moment is that the XData template will continue to be expanded with more tables and more
example data as time permits. Likewise, work on this template project will continue in tandem, and we'll
use them both as the starting point for some future posts. If there are features that you'd like to see
implemented, maybe integration with a particular component for example, please post a comment below or on
GitHub. This is really just the beginning steps, with so much more that is possible using this framework as a base.
Template Demo Repository on GitHub
Related Posts:
Templates - Part 1 of 2: TMS XData
Templates - Part 2 of 2: AdminLTE 4
Templates: Bonus Content
Follow Andrew on 𝕏 at @WebCoreAndMore or join our 𝕏 Web Core and More Community.
Andrew Simard

This blog post has received 9 comments.
 2. Thursday, March 2, 2023 at 6:52:05 PM
Thanks!!
2. Thursday, March 2, 2023 at 6:52:05 PM
Thanks!!
Andrew Simard
3. Friday, March 3, 2023 at 8:46:50 AM
Very interesting Andrew. Where on earth do you find the time to write all of these blogs?
Randall Ken
4. Friday, March 3, 2023 at 9:04:56 AM
Just seems to be a quiet stage of life at the moment, for better or for worse... ?!
Andrew Simard
5. Tuesday, July 18, 2023 at 6:33:58 AM
For the datetime conversions was receiving a conversion exception. The datetime format didn''t match Delphi precisely. Changed the FieldByName[''(field)''].AsDateTime references to using the VarToDateTime variant function, which is more flexible handling and resolved the issue. There are a couple references to your own user folder structure in the project options, but easily resolved. Learning a lot in this project! Thank you so much.
Terran Baylor
6. Tuesday, July 18, 2023 at 6:40:20 AM
I had thought I removed all the project option references to my user folder but I''ll recheck. Apologies! Glad to hear you''ve got something working with the datetime references. These can be a bit troublesome depending on what database you''re using. SQLite, used in this example, just uses a text field. And FireDAC has all kinds of issues all its own when it comes to datetime handling, and not everyone is on the same page when it comes to ISO8601. "T" or no "T" for a time delimiter, that sort of thing.
Andrew Simard
7. Tuesday, September 17, 2024 at 11:06:01 AM
When I use CurrentForm := TLoginForm.CreateNew(divHost.ElementID, @AfterCreate); , it repalces the id of divHost. Do I need to do anything specific to prevent that?
Emile
8. Tuesday, September 17, 2024 at 12:26:35 PM
Hm. I do not recall having that problem. Is there an id explicitly set by the new form? Seems odd to me. Normally, though, I load forms into their own div, one that is usually a child of whatever is containing it so that I can apply styles to the container a little more easily. In this case, I would have a div inside of divHost that would be the container I load the form into. I realize that this does not fix the issue you are having, but it might work around it easily enough. Note that if you create divs in the IDE, using TWebHTMLDiv, and then add stuff to them, treating them like a panel, whatever you''ve added will get replaced when you do this kind of thing. So if you had a toolbar or something, that would disappear. Having a child div (another TWebHTMLDiv for example) within the div specifically to attach the form to is a way around that as well.Andrew Simard
9. Wednesday, September 18, 2024 at 9:42:07 AM
That was the solution I was thinking of as well. But I wanted to follow your guide to being with as closely as possible. I downloaded your code from GitHub and noticed that your code did not have the same problem as I did, so I most have done something different. When I have the time, I will dig into it and give you an update.
Emile
All Blog Posts | Next Post | Previous Post
Morango Jose