Blog
All Blog Posts | Next Post | Previous Post

 TMS Web Core and More with Andrew:
Templates - Part 1 of 2: TMS XData
Friday, February 24, 2023

When building TMS
WEB Core projects, we've been covering a wide array of JavaScript libraries. They can be easily added to
our projects. And they can help accelerate, simplify, or extend the capabilities of whatever kind of web application
that we happen to be working on. But there's another very similar class of resources, which may themselves
also contain JavaScript libraries, that we can also take advantage of in our TMS WEB Core projects: HTML templates.
In some projects, in fact, an HTML template might be developed and managed entirely separate from the underlying
code that implements its core functions. TMS WEB Core was designed with this in mind and has features that
help make integrating HTML templates into our projects just as easy as JavaScript libraries.
One of the challenges when trying to build meaningful examples of this kind of thing, however, is
that we need a set of underlying sample data to work with. In this first of a two-part blog post, we are going
to create a very different kind of template - a comprehensive TMS
XData project that will give us a little bit more to work with. The idea is to also create an XData
project that we can use as a starting point for other projects in the future. So we'll spend quite a bit more
effort here than what might strictly be necessary to demonstrate how to use an HTML template.
In the second part, we'll take a look at building a TMS WEB Core application that will serve as a front-end to this XData project, using HTML templates to do the heavy lifting in terms of the user interface.
Contents
- Creating a New GitHub Repository.
- Creating a New XData Project.
- XData Services.
- Enabling Swagger.
- XData and SQLite.
- JWT - JSON Web Tokens.
- API Keys.
- Hashes.
- Login Endpoint.
- More Endpoints. More Queries. More of Everything.
- Just Getting Warmed Up.
Creating a New GitHub Repository.
To get started, we'll create a new XData project using the standard XData VCL Server template that is
provided. We've done this a couple of times before. We used XData in the ActorInfo project that was created as
part of the Tabulator
mini-series, which you can read about in Part
2 of those posts. And we used XData for one of the three projects that made up our Survey
mini-series. This time, we're going to do something very similar again. As we managed to get all the
issues with using SQLite as a database sorted out in the Survey project, we'll use that again as well. But we'll also
go the extra mile and set up our project in such a way as to make it easy to change database engines,
particularly if you're using another database engine supported by FireDAC.
First, let's create a new repository in GitHub Desktop, which we covered here. Let's call this one "TMS XData Template Demo Data". The basic steps in getting it set up in GitHub, before we even launch Delphi, include the following.
- Launch GitHub Desktop.
- File | New repository...
- Give it a name, keeping in mind that spaces will be replaced with hyphens.
- Give it a Description, which will be added to the default README.md file.
- Check that the local path is your Delphi project folder.
- Enable the "Initialize this repository with a README" option.
- Select "Delphi" from the list of "Git ignore" choices.
- Select a license - I'm a fan of "The Unlicense" which is the very last choice.
- Click the "Create repository" button.
This repository can be published to GitHub directly, where it will also prompt you about whether it is to be
kept private or not. We're big on sharing, so we'll mark it public. If you don't want to make it public until
later, or if you make it public and later change your mind, you can adjust this by using the GitHub website
directly. The option can be found at the very bottom of the "Settings" page for the repository, under Danger
Zone | Change repository visibility. I don't think there's (yet?) an option to change this in GitHub
Desktop. As XData projects are typically VCL projects, we don't have to change anything in the .gitignore
file that is generated, but we will in the next blog post when creating the TMS WEB Core project.
With that, we're ready to start work on our Delphi project. Whenever we complete a key feature, or end work for the day, or just plain feel like it, we can simply go into GitHub Desktop and push our changes to GitHub (aka commit), along with a note about what we've changed. If it has been some time since we last did this, it is easy to have a quick look through the file diffs that GitHub Desktop shows us beforehand. We can even look at the .DFM changes if we've just been working on UI elements, for example.
GitHub Desktop has a View
| History section where we can see what we've committed previously, or the same kind of thing can be
found on the GitHub website by clicking on the "commits" link that appears at the top-right of the list of files
on the main repository page.
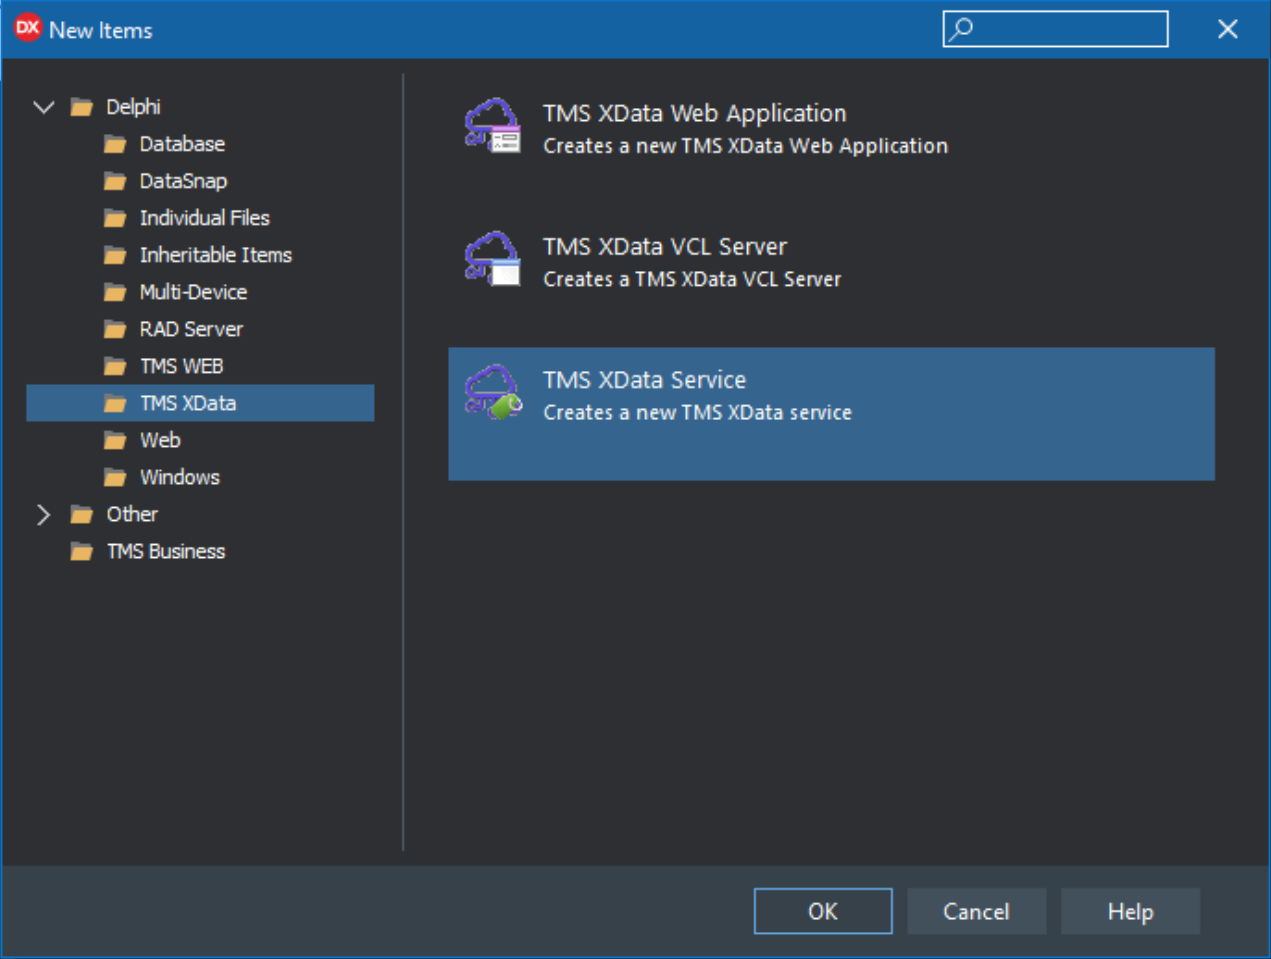
Creating a New XData Project.
Next, create an XData project using the "TMS XData VCL Server" project template.
Creating an XData Project using an Application Template.
This gets us a project with two units. Unit1 contains all the non-visual components that we can use to
configure the REST API server and many other aspects of our application.
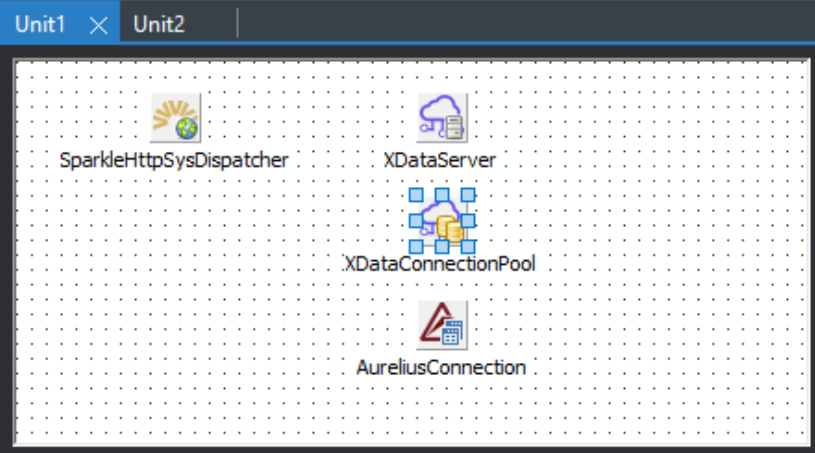
Unit1 - Non-Visual Components.
Unit2 contains the visual interface that we'll see when starting the application. This is deliberately very
simple, as it won't get a lot of use. Generally, it is used for starting and stopping the server, and maybe
showing a little bit of debugging or state information, usually of interest primarily while developing the
application.
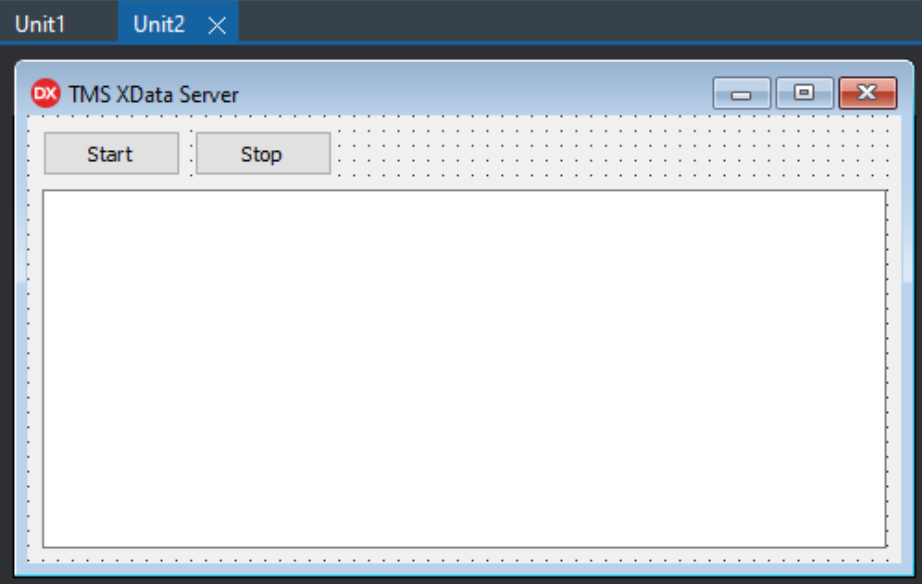
Unit2 - Administrative Interface.
Next, we should save this newly created project into the folder we created when we set up the repository. This
is done using File | Save Project As... from the main Delphi menu. It will prompt
for filenames for the project and for each unit. The default filenames are fine.
The executable platform that we'd like to build for is the next thing we can sort out. The default is Win32,
but we'd rather create a Win64 app. To do this, add a new target platform by right-clicking on the "Target
Platforms" in the Delphi Project Manager window, and add "Windows 64-bit" to the list, making it the default. You can change the current platform by double-clicking on entries in this list.
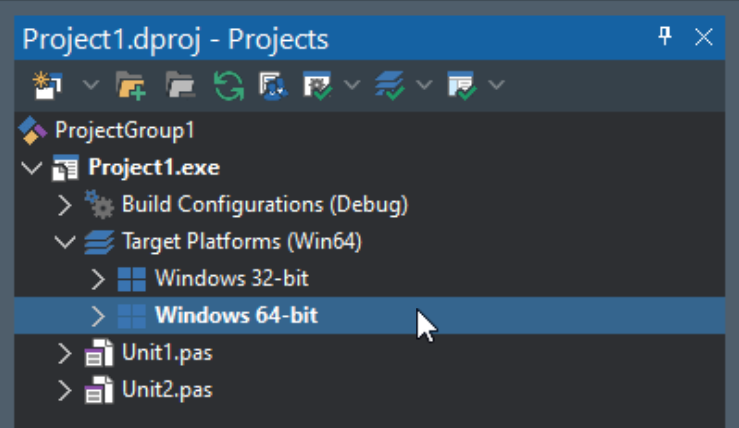
Adding Platform Support.
With that sorted, we can run our app for the first time. Nothing dramatic happens here, just a window,
indicating which URL is being used to serve the REST API.
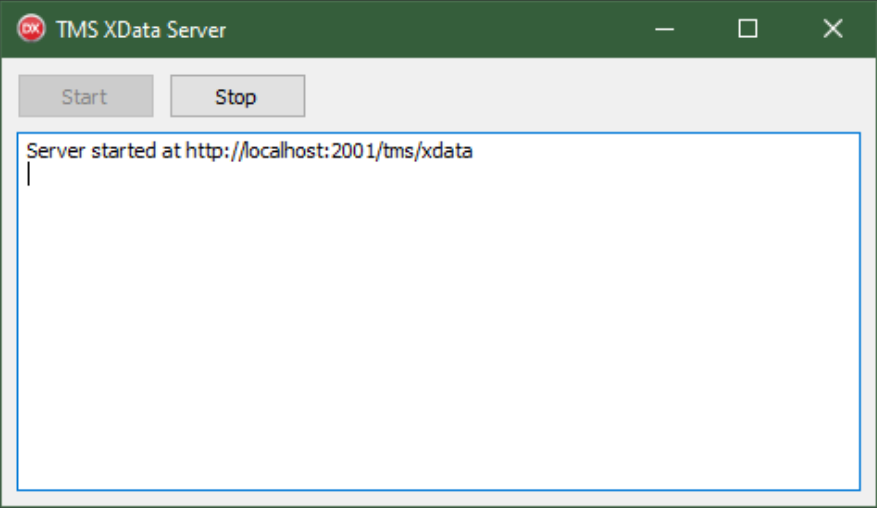
Default XData Application.
Note: If you ran the project before changing the platform to Windows 64-bit, and instead ran it as a Windows
32-bit application, you might encounter an error indicating that the "Control.res" file was not found. In my
installation (Delphi 10.3) I had to add the following to the Tools | Options | Language |
Delphi Options | Library | Library Path list, which contains the missing file. It was not in the debug
folder, only the release folder.
c:\Program Files (x86)\Embarcadero\Studio\20.0\lib\win32\release
Regardless of which platform you're targeting, the application will of course not look any different, nor will
it work much differently at this stage, so for our purposes, it doesn't much matter. Later, if your application
ends up consuming a lot of memory (deliberately) then having a Windows 64-bit application has definite benefits,
so we'll proceed with that as our target build platform from this point forward. Once the application is
running, the REST API server is normally started automatically. You can connect a web browser (typically on the
same development machine) to it and confirm that it is, indeed, working.
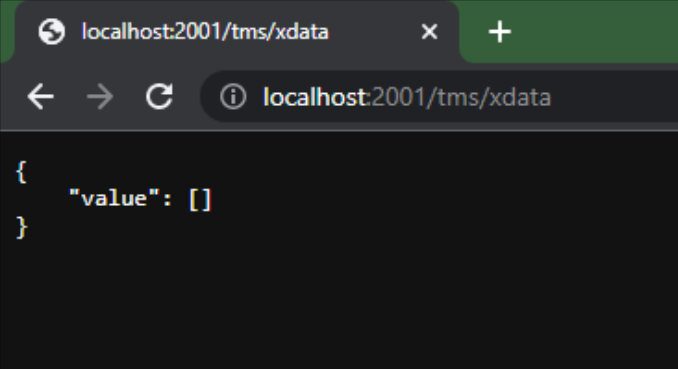
XData Server Default Response.
Not very exciting (yet!) but this shows that the XData server (aka the REST service, aka "the application") is
responding to requests, which is all that we've asked it to do so far.
There can be scenarios where something doesn't quite work even at this early stage. For example, the XData
server is configured by default to run on port 2001. If your development system is already using that port,
then you might encounter an error that looks something like this.
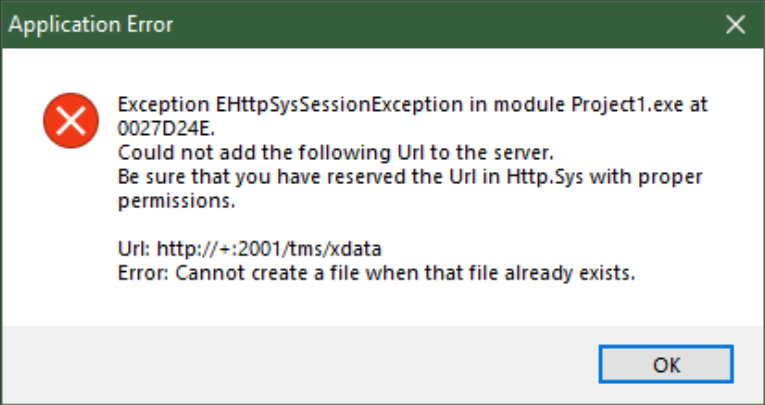
URL/Port Unavailable.
You could also encounter this if you attempted to start the same project using different platforms on the same
system. If you'd like to change the port that XData is running on, it can be set via the BaseUrl
property of the XDataServer non-visual component, which can be found in Unit1.
Once you've entered a new value there, you'll also (very likely) have to reserve that URL on your system. This
can be done with the TMS HTTP Config Tool that is included with XData. Simply
copy and paste the value from the BaseUrl property. Let's say we wanted to use
port 12345, for example. Remember that ports are numbered 0-65535, and most of the time you'll want to pick a higher-numbered port, certainly greater than 1024. After setting that number in the BaseUrl
property, copy the whole property value and then launch the TMS HTTP Config Tool. Click the Add button, and
then paste in the same value.
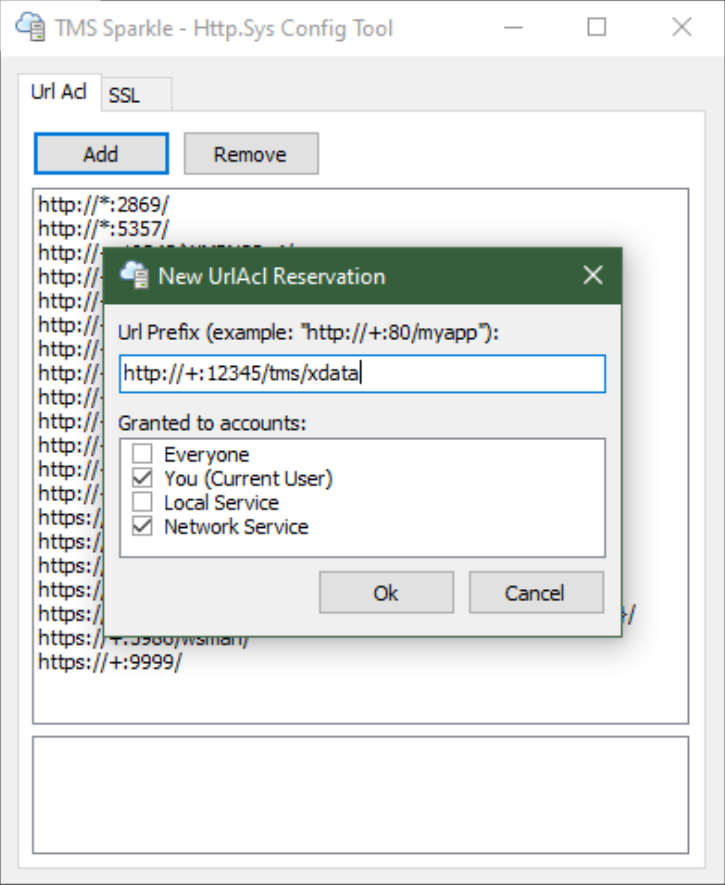
Adding URL Reservations.
With that in place, we can then run our application. It should be running the XData Server on the new port.
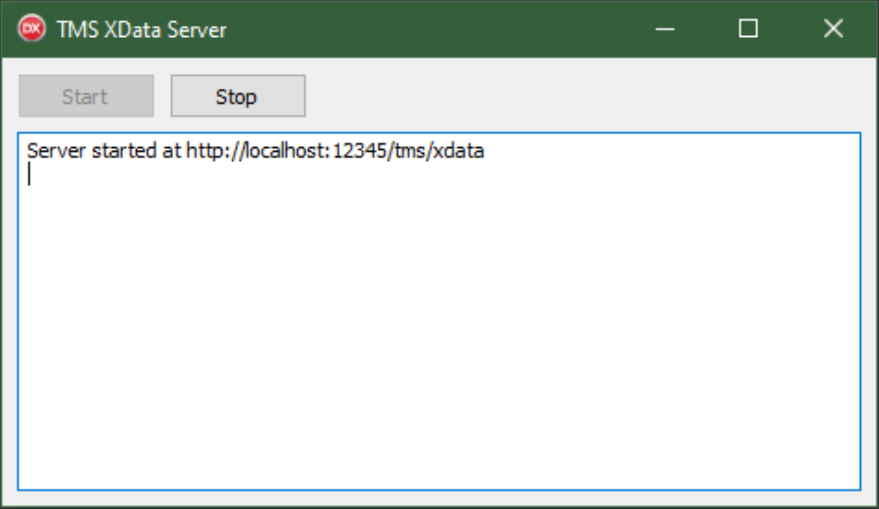
XData Server Port Changed.
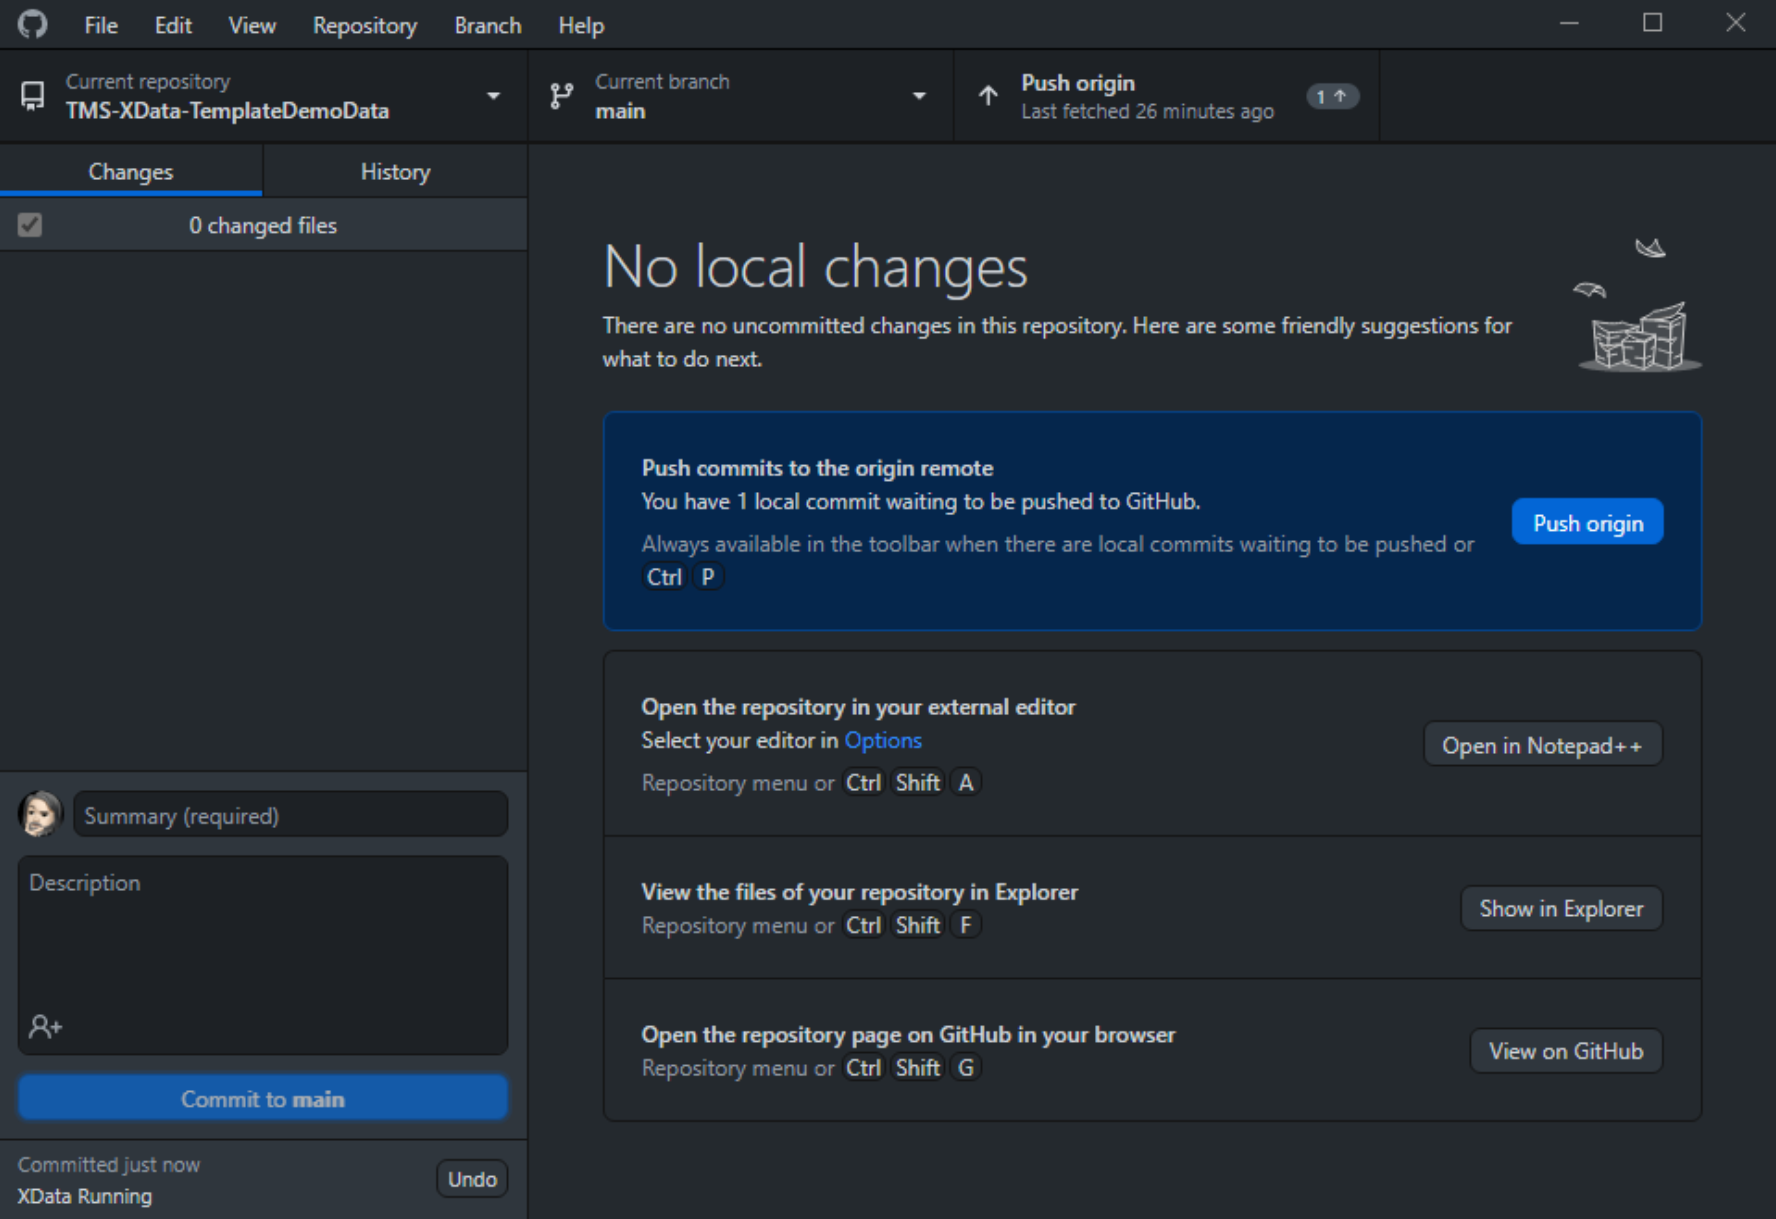
With that all set up and working, we're ready to move on to the next step. But this is a good commit point.
Flipping over to GitHub Desktop, or launching it if it wasn't still running, we can select this repository if it
wasn't already selected, and then fill out the section at the bottom left.

Committing Changes to GitHub.
As this is the first time we're committing changes since we created the project, all the files for the project
are listed in the Changes section. Later, when we're working on specific things, this will only include files
that we're working on. After clicking the "Commit to main" button, we're given the option to actually push the
changes to GitHub.
Pushing Code to GitHub.
Clicking the "Push origin" button completes our task, and all the changes are uploaded to GitHub. This
normally is very quick if there are only a few changes. If you've been working for a week on the project and
haven't committed any changes in that time, this task may take a few minutes to complete. Switching over to the
GitHub website, we can see the project files are now available there.
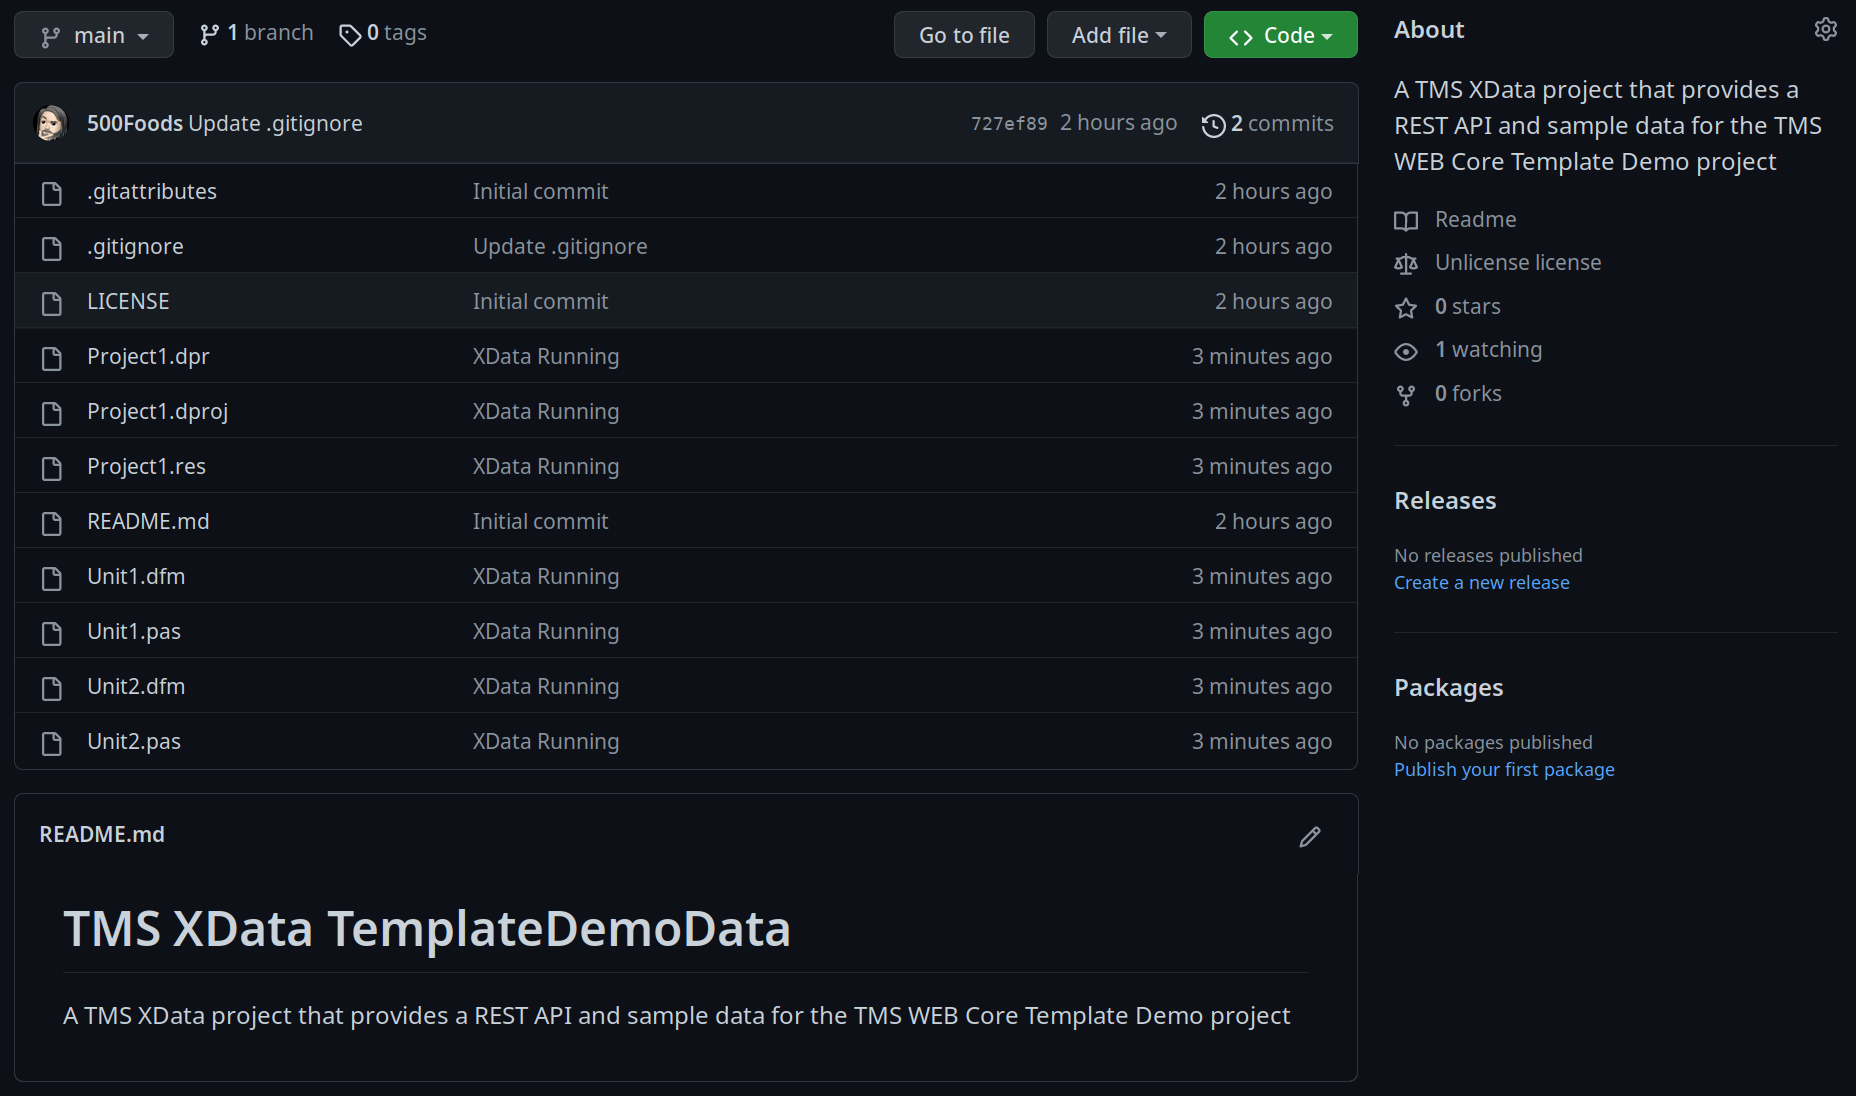
XData Project Published to GitHub.
As we progress through this project, we'll update GitHub in this same manner from time to time, so no need to
bring it up again. You can have a look at the project on GitHub by visiting https://github.com/500Foods/TMS-XData-TemplateDemoData.
From there, you can download the project using the "Code" button, or if you're also using GitHub Desktop, you
can clone the project directly using the File | Clone repository option. You can also view the commit history from there as well.
And before we move on, a quick note on SSL. Normally, connections to XData, particularly if it is accessible
over the internet, would be configured to use SSL. It would be hard to come up with a justification in 2023
where this was not the case, given that SSL certificates are freely available from multiple sources. When
working in development, this is usually not needed, particularly when testing is done through a local browser
connection on the same development system. We'll have another look at this later in the second blog post when
we look more closely at deployment.
XData Services.
With XData up and running, it isn't actually all that useful because it doesn't yet offer any services (aka
endpoints). We'll see a little bit later that, most of the time, services are only available to authorized
clients, for so many reasons. For our first service, though, we just want to get a few things sorted out and
tested, so let's add a new service that doesn't require any authorization - a simple service that returns a few
basic pieces of information. Adding a service is most easily accomplished using another template - the TMS XData
Service template, which we can find in the same place as the original TMS XData VCL Server template.
Adding a Service.
This brings up a dialog requesting a bit more information. For our generic system service, we're going to call
it "System". This is the name used for a collection of endpoints (functions) that the XData server will make available. We'll add a few more endpoints to this service before we're done. Having the code for the interface
and implementation in separate units isn't a bad idea. And we'll leave the default "Add sample methods"
checked. Not because we're going to use them but rather because it makes it easier to see where to place our
own methods later. The last option, "Use a specific model", isn't something we need to concern ourselves with,
at least at this stage.
Adding a Service - Supplemental Dialog.
Once this is done, we'll end up with two new units in our project. The first is called "SystemService" and
contains the interface definition, which includes the two sample methods, "Sum" and "EchoString".
unit SystemService;

interface

uses
  XData.Service.Common;

type
  [ServiceContract]
  ISystemService = interface(IInvokable)
    ['{F9CC965F-B6F1-4D38-A50A-E271705E9FCB}']
    [HttpGet] function Sum(A, B: double): double;
    // By default, any service operation responds to (is invoked by) a POST request from the client.
    function EchoString(Value: string): string;
  end;

implementation

initialization
  RegisterServiceType(TypeInfo(ISystemService));

end.
The second unit is called "SystemServiceImplementation" and contains, naturally, the implementation of the two
sample methods.
unit SystemServiceImplementation;

interface

uses
  XData.Server.Module,
  XData.Service.Common,
  SystemService;

type
  [ServiceImplementation]
  TSystemService = class(TInterfacedObject, ISystemService)
  private
    function Sum(A, B: double): double;
    function EchoString(Value: string): string;
  end;

implementation

function TSystemService.Sum(A, B: double): double;
begin
  Result := A + B;
end;

function TSystemService.EchoString(Value: string): string;
begin
  Result := Value;
end;

initialization
  RegisterServiceType(TSystemService);

end.
Running the project will prompt for the filenames for the two new units. The defaults here are fine - named after the units themselves, as one would expect. The application doesn't look any different though, as there's nothing in the UI to indicate what services or service endpoints are available. We'll address that in just a moment.
First, though, we'd like to create our own method. Let's call it "Info". We want it to return a bit of
JSON that contains assorted information about the application. If this were a large-scale production
application, perhaps the amount of information revealed here would be more restricted. Or not made available at
all. Or perhaps only made available to system administrators. But we're interested in using this as a tool of
sorts, so having a bit of information about what is going on can help troubleshoot issues down the road.
For the interface unit, we just need to give the method a name and supply whatever it is we're expecting as
parameters, along with a result data type. For this basic function, we'll be expecting a client timezone as a
parameter. We're interested in knowing what this is so that we can return data adjusted for the same timezone.
Often, the better approach is to return the data as UTC and let the client worry about that. Fair point.
However, if you're returning a report as a PDF, the data is already formatted in the report, far too late for
the client to do anything about it. So knowing this bit of information ahead of time can be useful. And it
can't be gleaned reliably by any other means, particularly with VPNs and the like obfuscating where an IP
address is geolocated.
Using TStream as the method's result data type might also be curious. Certainly, JSON could be formatted as a string without much trouble. But we'll also benefit from becoming familiar with stream handling when dealing with images, PDFs, or other binary data. Using a Base64 string is another way to handle these kinds of things, but often there's a "SaveToStream" method available for the objects we're using, so no reason to shy away from streams.
Our new method declaration then looks like this.
[HttpGet] function Info(TZ: String):TStream;
The [HttpGet] attribute indicates how the request to XData is to be structured. For simple methods, [HttpGet]
is generally pretty reasonable. The default, if no attribute is specified, is [HttpPost]. What's the
difference? In the case of [HttpGet], parameters are passed as part of the URL.
This can be limiting in that
the URL can only be so long. How long? Lots of things impact this, particularly the browser being used, but
let's say it is around 2,000 bytes to be on the safe side. It might be much longer than that in some cases. But if your request involves sending more data than that (uploading an image, for example), or if you don't want
your parameters included in the URL, then [HttpPost] is the better choice. Note that some firewalls and logging
systems track the URLs in their entirety, so this might not be what you want to do.
In order to use TStream in our interface unit, we'll also need to add "System.Classes" to our "uses" clause. After clearing out the sample methods, we end up with this.
unit SystemService;

interface

uses
  System.Classes,
  XData.Service.Common;

type
  [ServiceContract]
  ISystemService = interface(IInvokable)
    ['{F9CC965F-B6F1-4D38-A50A-E271705E9FCB}']

    [HttpGet] function Info(TZ: String):TStream;

  end;

implementation

initialization
  RegisterServiceType(TypeInfo(ISystemService));

end.
Over in the implementation unit, we can copy the declaration for our Info method, leaving off the [HttpGet]
attribute, and replace the sample methods there as well. We'll also need to add "System.Classes" to this unit's
"uses" clause. While we're at it, we can add System.JSON, System.SysUtils, and System.DateUtils as we'll
need those as well.
Some of the items that we'd like to return in this method are likely not going to change during the runtime of the XData application. For those items, we can define them in the FormCreate function of Unit2, and then display them when the application first starts.
Here, we're primarily after typical application information. Version information ultimately comes from the Delphi Project | Options | Application | Version Info panel, where the option to Auto increment build number is selected. Some information comes from the executable file that is generated. And some items come from other places, like the MainForm caption.
Combined, we end up with the following in Unit2.pas. These
code examples draw from all kinds of places, so attribution URLs have been provided where relevant. We'll also need a few more units
added to the uses clause - System.IOUtils, System.DateUtils,
IdStack, and psAPI. Note that this is all standard Delphi VCL stuff.
procedure TMainForm.FormCreate(ASender: TObject);
begin

  // Get System Values
  AppName := GetAppName;
  AppVersion := GetAppVersion;
  AppRelease := GetAppRelease;
  AppReleaseUTC := GetAppReleaseUTC;
  AppFileName := GetAppFileName;
  AppFileSize := GetAppFileSize;
  AppTimeZone := GetAppTimeZone;
  AppTimeZoneOffset := GetAppTimeZoneOffset;

  // This is a list
  AppParameters := TStringList.Create;
  AppParameters.QuoteChar := ' ';
  GetAppParameters(AppParameters);

  // This is also a list
  IPAddresses := TStringList.Create;
  IPAddresses.QuoteChar := ' ';
  GetIPAddresses(IPAddresses);

  UpdateGUI;

  // Display System Values
  mmInfo.Lines.Add('');
  mmInfo.Lines.Add('App Name: '+AppName);
  mmInfo.Lines.Add('App Version: '+AppVersion);
  mmInfo.Lines.Add('App Release: '+FormatDateTime('yyyy-mmm-dd (ddd) hh:nn:ss', AppRelease));
  mmInfo.Lines.Add('App Release UTC: '+FormatDateTime('yyyy-mm-dd hh:nn:ss.zzz', AppReleaseUTC));
  mmInfo.Lines.Add('App File Name: '+AppFileName);
  mmInfo.Lines.Add('App File Size: '+Format('%.1n',[AppFileSize / 1024 / 1024])+' MB');
  mmInfo.Lines.Add('App TimeZone: '+AppTimeZone);
  mmInfo.Lines.Add('App TimeZone Offset: '+IntToStr(AppTimeZoneOffset)+'m');
  mmInfo.Lines.Add('App Parameters: '+AppParameters.DelimitedText);
  mmInfo.Lines.Add('Server IP Addresses: '+IPAddresses.DelimitedText);
  mmInfo.Lines.Add('App Memory Usage: '+Format('%.1n',[GetMemoryUsage / 1024 / 1024])+' MB');
end;

function TMainForm.GetAppFileName: String;
begin
  Result := ParamStr(0);
end;

function TMainForm.GetAppFileSize: Int64;
var
  SearchRec: TSearchRec;
begin
  Result := -1;
  if FindFirst(ParamStr(0), faAnyFile, SearchRec) = 0
  then Result := SearchRec.Size;
  FindClose(SearchRec);
end;

function TMainForm.GetAppName: String;
begin
  Result := MainForm.Caption;
end;

procedure TMainForm.GetAppParameters(List: TStringList);
var
  i: Integer;
begin
  i := 1;
  while i <= ParamCount do
  begin
    List.Add('"'+ParamStr(i)+'"');
    i := i + 1;
  end;
end;

function TMainForm.GetAppRelease: TDateTime;
begin
  Result := System.IOUtils.TFile.GetLastWriteTime(ParamStr(0));
end;

function TMainForm.GetAppReleaseUTC: TDateTime;
begin
  Result := System.IOUtils.TFile.GetLastWriteTimeUTC(ParamStr(0));
end;

function TMainForm.GetAppTimeZone: String;
var
  ZoneInfo: TTimeZoneInformation;
begin
  GetTimeZoneInformation(ZoneInfo);
  Result := ZoneInfo.StandardName;
end;

function TMainForm.GetAppTimeZoneOffset: Integer;
var
  ZoneInfo: TTimeZoneInformation;
begin
  GetTimeZoneInformation(ZoneInfo);
  Result := ZoneInfo.Bias;
end;

// https://stackoverflow.com/questions/1717844/how-to-determine-delphi-application-version
function TMainForm.GetAppVersion: String;
const
  c_StringInfo = 'StringFileInfo\040904E4\FileVersion';
var
  n, Len : cardinal;
  Buf, Value : PChar;
  exeName:String;
begin
  exeName := ParamStr(0);
  Result := '';
  n := GetFileVersionInfoSize(PChar(exeName),n);
  if n > 0 then begin
    Buf := AllocMem(n);
    try
      GetFileVersionInfo(PChar(exeName),0,n,Buf);
      if VerQueryValue(Buf,PChar(c_StringInfo),Pointer(Value),Len) then begin
        Result := Trim(Value);
      end;
    finally
      FreeMem(Buf,n);
    end;
  end;
end;

// https://stackoverflow.com/questions/576538/delphi-how-to-get-all-local-ips
procedure TMainForm.GetIPAddresses(List: TStringList);
var
  i: Integer;
begin
  TIdStack.IncUsage;
  List.Clear;
  try
    GStack.AddLocalAddressesToList(List);
  finally
    TIdStack.DecUsage;
  end;
  i := 0;
  while i < List.Count do
  begin
    List[i] := '"'+List[i]+'"';
    i := i +1;
  end;
end;

// https://stackoverflow.com/questions/437683/how-to-get-the-memory-used-by-a-delphi-program
function TMainForm.GetMemoryUsage: NativeUInt;
var
  MemCounters: TProcessMemoryCounters;
begin
  MemCounters.cb := SizeOf(MemCounters);
  if GetProcessMemoryInfo(GetCurrentProcess, @MemCounters, SizeOf(MemCounters))
  then Result := MemCounters.WorkingSetSize
  else mmInfo.Lines.add('ERROR: WorkingSetSize not available');
end;
For the remaining items, those that change at each invocation, we can generate the data in the implementation. All we're really doing is creating a block of JSON with a number of elements, and returning that as a TStream. In order to make dealing with timezone conversions a little easier, we've also included TZDB. While not particularly complex, the JSON we're creating does have a couple of arrays, which we construct out of carefully crafted TStringList objects. Once these have been added to ResultJSON, they don't need to be freed independently as they get freed at the same time as ResultJSON gets freed. And Result gets freed by XData so no worries there either.
function TSystemService.Info(TZ: String):TStream;
var
  ResultJSON: TJSONObject;
  ServerIPArray: TJSONArray;
  ParametersArray: TJSONArray;
  ClientTimeZone: TBundledTimeZone;
  ValidTimeZone: Boolean;

begin
  // Returning JSON, so flag it as such
  TXDataOperationContext.Current.Response.Headers.SetValue('content-type', 'application/json');

  // Figure out if we have a valid TZ
  try
    ClientTimeZone := TBundledTimeZone.GetTimeZone(TZ);
    ValidTimeZone := True;
  except on E:Exception do
    begin
      if E.ClassName = 'ETimeZoneInvalid' then
      begin
        ValidTimeZone := False;
      end
      else
      begin
        ValidTimeZone := False;
        MainForm.mmInfo.Lines.Add('System Service Error: '+E.ClassName);
        MainForm.mmInfo.Lines.Add('System Service Error: '+E.Message);
      end;
    end;
  end;

  // Build our JSON Object
  ResultJSON := TJSONObject.Create;

  // This gets us a JSON Array of Parameters
  ParametersArray := TJSONObject.ParseJSONValue('['+Trim(MainForm.AppParameters.DelimitedText)+']') as TJSONArray;

  // This gets us a JSON Array of Server IP Addresses
  ServerIPArray := TJSONObject.ParseJSONValue('['+MainForm.IPAddresses.DelimitedText+']') as TJSONArray;

  ResultJSON.AddPair('Application Name',MainForm.AppName);
  ResultJSON.AddPair('Application Version',MainForm.AppVersion);
  ResultJSON.AddPair('Application Release',FormatDateTime('yyyy-mmm-dd (ddd) hh:nn:ss', MainForm.AppRelease));
  ResultJSON.AddPair('Application Release (UTC)',FormatDateTime('yyyy-mm-dd hh:nn:ss.zzz', MainForm.AppReleaseUTC));
  ResultJSON.AddPair('Application Parameters',ParametersArray);
  ResultJSON.AddPair('Application File Name',MainForm.AppFileName);
  ResultJSON.AddPair('Application File Size',TJSONNumber.Create(MainForm.AppFileSize));
  ResultJSON.AddPair('Application TimeZone',MainForm.AppTimeZone);
  ResultJSON.AddPair('Application TimeZone Offset',TJSONNumber.Create(MainForm.AppTimeZoneOffset));
  ResultJSON.AddPair('Application Memory',IntToStr(MainForm.GetMemoryUsage));
  ResultJSON.AddPair('IP Address (Server)',ServerIPArray);
  ResultJSON.AddPair('IP Address (Client)',TXDataOperationContext.Current.Request.RemoteIP);
  ResultJSON.AddPair('Current Time (Server)',FormatDateTime('yyyy-mm-dd hh:nn:ss.zzz', Now));
  ResultJSON.AddPair('Current Time (UTC)',FormatDateTime('yyyy-mm-dd hh:nn:ss.zzz', TTimeZone.Local.ToUniversalTime(Now)));
  if ValidTimeZone
  then ResultJSON.AddPair('Current Time (Client)',FormatDateTime('yyyy-mm-dd hh:nn:ss.zzz', ClientTimeZone.ToLocalTime(TTimeZone.Local.ToUniversalTime(Now))))
  else ResultJSON.AddPair('current Time (Client)','Invalid Client TimeZone');

  // Not sure if there is another version of this that is more direct?
  Result := TStringStream.Create(ResultJSON.ToString);

  // Cleanup
  ResultJSON.Free;

// These are now part of ResultJSON and get freed when that gets freed
// ServerIPArray.Free;
// ParametersArray.Free;

end;
NOTE: In this endpoint, there are references to MainForm.mmInfo.Lines.Add(). This is used primarily for initial debugging (and we'll use it again in the Login endpoint below for the same reason) but this is not thread-safe and could cause all kinds of problems if this was called continually by multiple endpoints simultaneously. Generally speaking, the memo on the XData UI is intended for showing startup and shutdown messages. Any kind of statistics or other ongoing status updates should be handled through thread-safe controls.
After running the project, we need to add our service and endpoint to the URL to be able to see it at
work. And as we've set it up to require a TZ parameter, this needs to be added to the URL as well.
The "%2F" is added to insert a forward-slash into the parameter. Using a forward-slash directly would
indicate a different path for the URL, which is not what we're after. URL parameters being escaped in this way
is kind of a nuisance, to be sure, so we'll address that in a moment, but first, let's have a look at the
output. Using Google Chrome, or Microsoft Edge we see the results as unformatted JSON. Not very nice to look
at.
Unformatted JSON Result.
Firefox returns a result that has been nicely formatted. To get the same output in Chrome, we can use a Chrome
plugin called JSON
Viewer. It also supports themes and other options. This gets us something considerably more friendly.
Formatted JSON Result.
And with that, our endpoint is complete. Later, we'll see how to change it so that it isn't available to
unauthorized users, but for now, we can use it to troubleshoot our application.
Having to figure out what the
URL is, and having to encode the URL manually as we've done here, could be better. And this will
only get worse as we add more endpoints, more parameters, and more complex data. So let's address that before
we get any further.
Enabling Swagger.
REST APIs have become so prolific that many tools have been created to support their use. TMS XData already supports one of the more important tools - Swagger. Swagger is used to provide a web interface to a REST
API, allowing it to be documented, most importantly, but it also provides a handy tool for testing the API. Instead of fiddling with URL parameters, encoding peculiarities, and wrestling with endpoint paths, we can just
load up a web page where everything is already laid out for us, ready to test. To get started with Swagger,
though, we first have to enable it in our project.
While we're at it, we're also going to enable a few other things at the same time. To start with, let's
update the "middleware" that is part of our XDataServer object in Unit1. To do that, right-click on the XDataServer component, and select the Manage
middleware list... option from the context menu.
Adding Middleware to XDataServer Component.
From the available list, we're interested in JWT, CORS,
and Compression for now. The others are also interesting, but a little beyond
what we're after at the moment. JWT is used to implement a token system we'll be using as part of our
authorization mechanism. CORS refers to "cross-origin resource sharing" which undoubtedly trips up everyone at
some point. More on both of those later. And Compression naturally compresses data that we serve up from XData before it is sent to the client, often improving performance as a result. Not really much more to
say on that topic, other than that it uses a standard compression algorithm that is well-supported, making this
functionality largely transparent, in most cases.
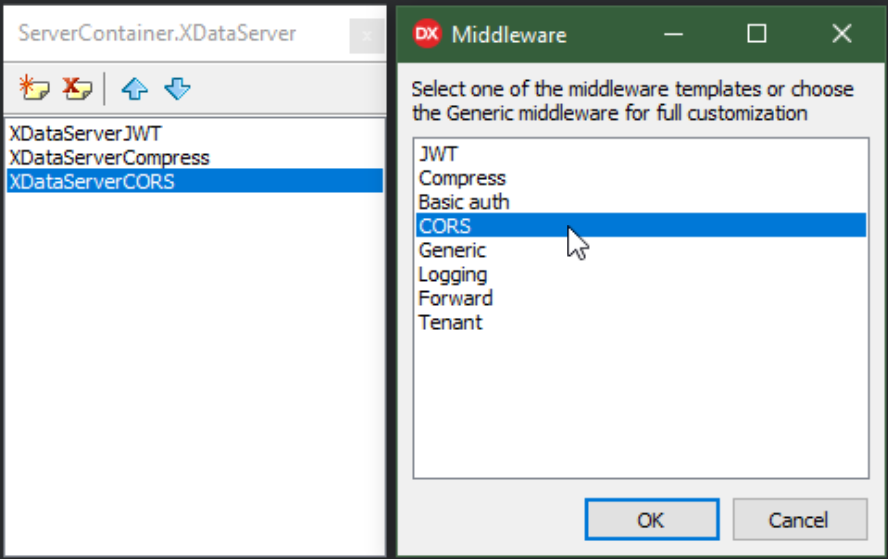
Available Middleware.
With those in place, there are some properties that we'd like to set first for those, and then for the
XDataServer component, just using the Delphi Object Inspector.
- First, select the JWT component (the first in the left window above), and then
find the Secret property and fill in a really long value, longer than 32
characters. For example:
ThisIsAReallyLongSecretThatReallyDoesNeedToBeLongAsItIsUsedAsACriticalPartOfOurXDataSecurityModel
- Second, select the CORS component (the third in the left window above), and then find the Origin property and set its value to simply an asterisk (*).
- Third, select the original XDataServer component from the form and find the SwaggerOptions property group. There, change AuthMode to JWT, and check the Enabled property.
- Finally, in the same component, find the SwaggerUIOptions property group.
Here, we'll want to check the Enabled, TryItOutEnabled,
and ShowFilter properties.
When we run the project now, nothing looks any different. To see the Swagger interface, we just have to add
/swaggerui to the default URL. We then get an entirely new web page where we can interact with our endpoint,
and even fill in a TZ value and see the results. Here, we didn't need to do anything about encoding the URL for
our TZ parameter, and we get a nicely formatted JSON output, regardless of whether we've installed the Chrome
plugin.
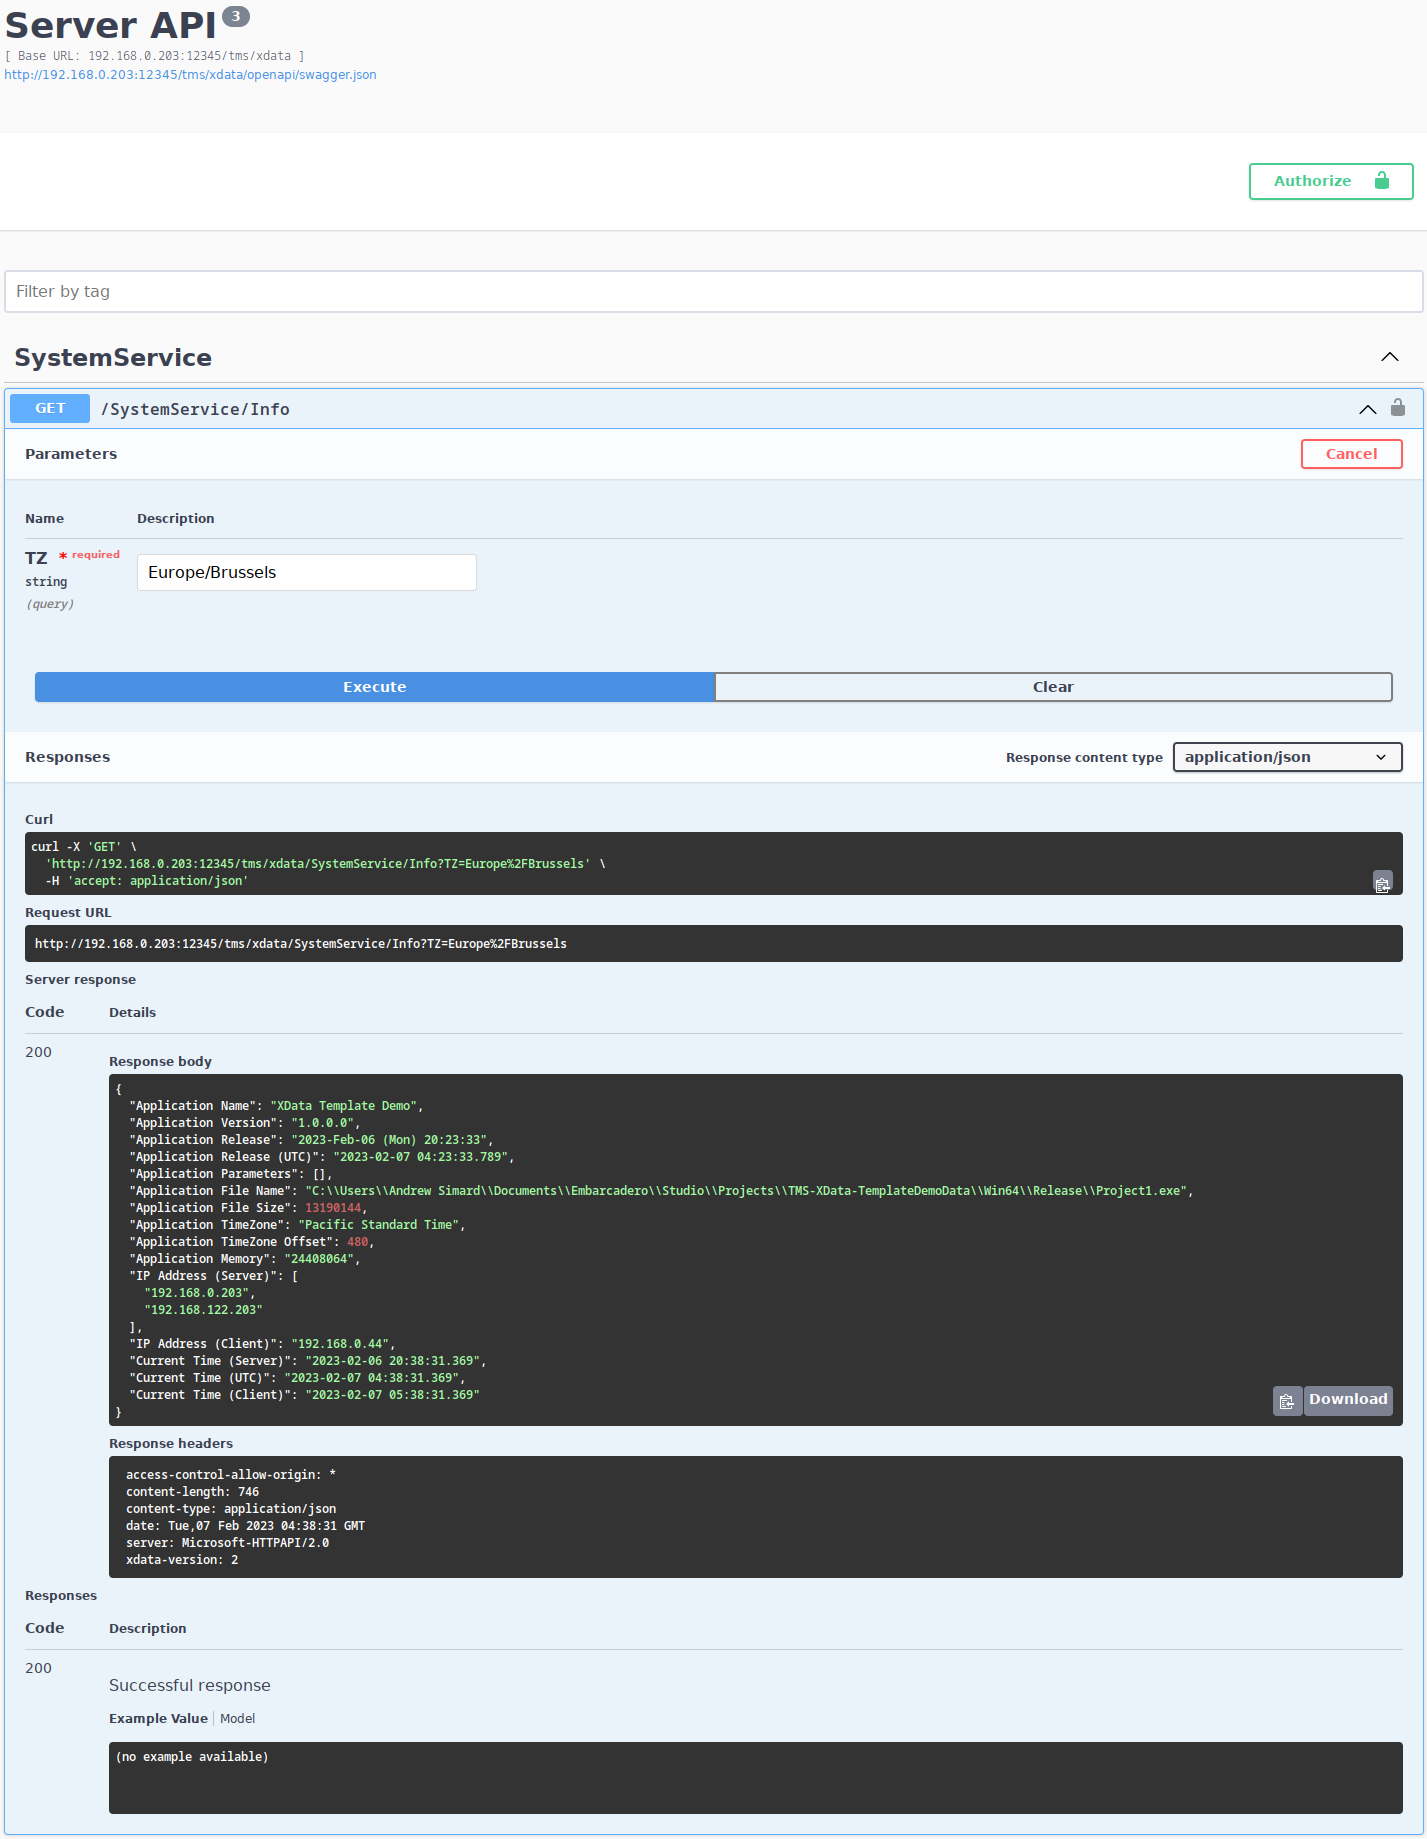
Testing with Swagger.
As we'll likely be using Swagger a lot during testing, let's add a button to the main interface of our
application in Unit2. We can just copy and paste the "Stop" Button, but then
change the Name property to btSwagger, and then the
OnClick method to the following. We'll also need to add WinAPI.ShellAPI
to the uses clause for Unit2 in order to launch a
browser session in this fashion.
procedure TMainForm.btSwaggerClick(Sender: TObject);
var
  url: String;
const
  cHttp = 'http://+';
  cHttpLocalhost = 'http://localhost';
begin
  url := StringReplace(
      ServerContainer.XDataServer.BaseUrl,
      cHttp, cHttpLocalhost, [rfIgnoreCase])+'/swaggerui';
  ShellExecute(0, 'open', PChar(url), nil, nil, SW_SHOWNORMAL);
end;
Let's change the block of HTML that appears at the very top of the Swagger page. Perhaps something more
specific to our project, rather than the default "Server API", for example. As Unit1
is a TDataModule (not a TForm, like
Unit2), we can add a block of code to the DataModuleCreate method, which we can create by
double-clicking on the form's background. We'll also need to add XData.Aurelius.ModelBuilder
to the uses clause of Unit1.
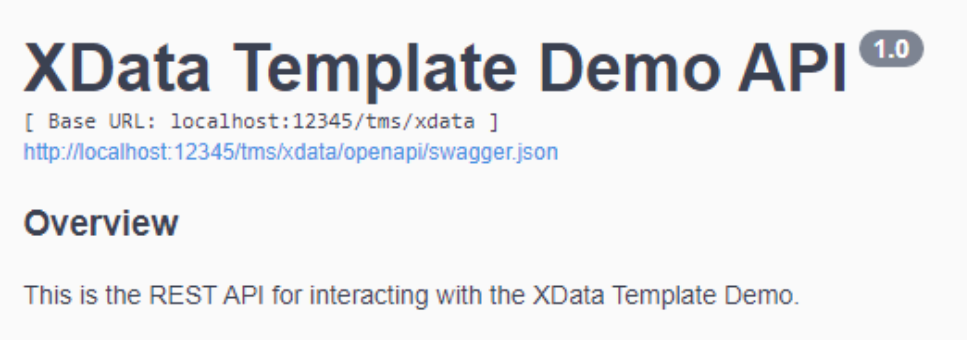
procedure TServerContainer.DataModuleCreate(Sender: TObject);
begin
  TXDataModelBuilder.LoadXMLDoc(XDataServer.Model);
  XDataServer.Model.Title := 'XData Template Demo API';
  XDataServer.Model.Version := '1.0';
  XDataServer.Model.Description :=
    '### Overview'#13#10 +
    'This is the REST API for interacting with the XData Template Demo.';
end;
This gets us something a little more specific to our project.
Updating Swagger Title.
The last Swagger thing we want to do is add a bit of inline documentation to our code. Right now, when we look
at our method in Swagger, we see this.

Swagger - Undocumented Endpoint.
But we can do better. Delphi natively supports XML comments. And Swagger will pick those up and use them if
they're available. To enable XML comments, we've got to set a couple of Delphi options.
- Find the Delphi Project/Options/Building/Delphi Compiler/Compiling page.
- Enable the Generate XML documentation option.
- Set the XML output directory to your application's debug folder.
You can also do this separately for each combination of platform and debug/release using the combo box near the top of the page. Which you'll want to do if you access Swagger in different configurations often. Usually whatever you're working with regularly is sufficient. But when it comes time for deployment, make sure that this is enabled for that configuration so that Swagger content is included in the files that get copied to your production server, if you want Swagger to be included in that scenario.
And lastly, we'll need to add XML comments to our endpoint code. These are drawn from each of the interface
units that are in our project. Starting with SystemService.pas that we've been
working on. Here, we can add a block of comments before the method declaration, and use various keywords
and formatting to get a bit more control over how things look.
    ///  <summary>
    ///    XData Application Information
    ///  </summary>
    ///  <remarks>
    ///    Returns JSON that includes information about the currently running application.
    ///  </remarks>
    ///  <param name="TZ">
    ///    The TimeZone of the connecting client.  This is used in determining what
    ///    adjustments to make when displaying dates and times on reports, or where
    ///    similar data needs to be converted to a local context.  This uses IANA
    ///    TimeZone names.  If an invalid TimeZone is provided, the JSON object for
    ///    Current Time (Client) will indicate as much.  Here are some examples.
    ///    - Pacific Standard Time
    ///    - America/New_York
    ///    - Europe/Paris
    ///    - EET
    ///    - UTC
    ///    - GMT
    ///    - EST
    ///    - PST8PDT
    ///  </param>
    [HttpGet] function Info(TZ: String):TStream;
After reloading the Swagger page (if it was already open) we then get the following updated page.
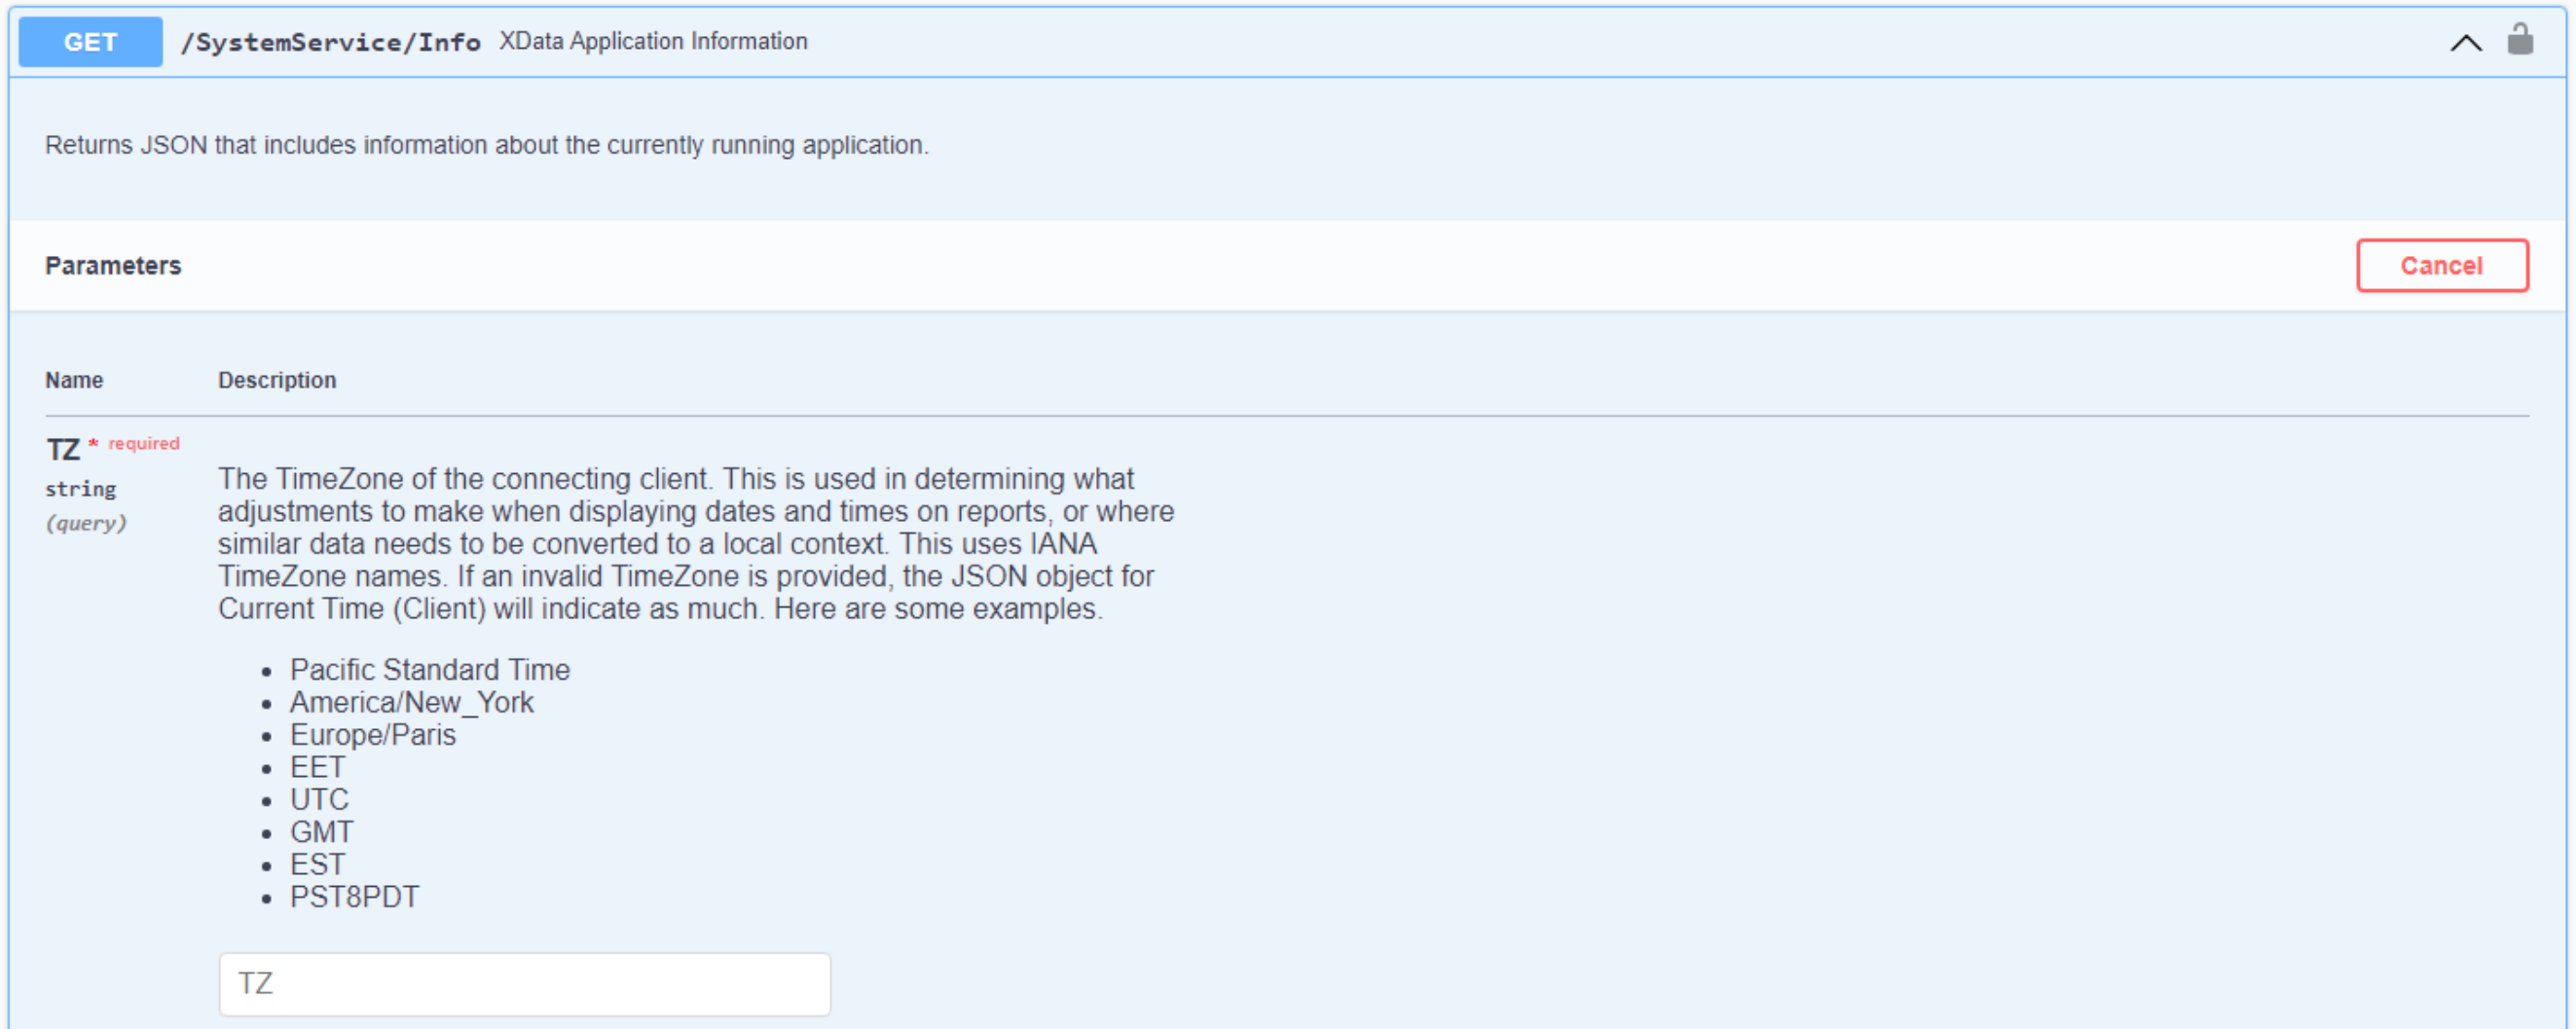
Swagger - Documented Endpoint.
As we add more endpoints, we'll be sure to add comments in the same way, so that Swagger will pick them up. Very handy! And with that, we're going to focus on the next big topic, the reason for this project, after all,
the data.
XData and SQLite.
A few disclaimers before we proceed with this section. The data for this project is going to be stored in a SQLite database. Honestly, this wouldn't be my first choice for a database, but it is well supported by FireDAC which most Delphi users have access to, and it is (I believe?) the only database that works without installing another database product of some kind.
Certainly, if you have a preferred database, swapping out the code to access it instead of SQLite is likely not all that hard. `In fact, we'll lay some of the groundwork to make this almost trivial to add in the future. There might even be another database engine added by the time this blog post is published.
SQLite, as its name implies, supports SQL, which is the main thing we're after. In our
Survey project work, we addressed how to access SQLite, typically deployed as a single-user database, from
XData, which is a multi-threaded environment, without making a mess of things. Well, not too much of a mess
anyway. The Survey project also showed that the most popular databases used by blog readers are MySQL/MariaDB
and MS SQLServer, neither of which I would be in a rush to choose for a new project, for what it's
worth. Good thing FireDAC supports so many databases natively!
Much of the work that follows assumes that we'll be using SQL to access the database and do all of our work, typically through FireDAC. This means we'll eventually end up with endpoints to handle all the CRUD operations we'll need. This is by no means the only way to do this, and may even be more work than necessary. Other ORM products, particularly TMS Aurelius, offer an alternative approach that may work better for many situations. Support for a specific ORM might also be a good rationale for creating a fork of this project.
There are also many features within
XData that can be expanded and brought to bear on larger projects. Connection pooling (XData connections and/or
database connections), multi-tenant database configurations, multiple XData servers supporting one application
or one database, and so on. We're not going to get into much of that here, but the XData
Documentation goes into many of these topics in some detail.
Finally, the database layout used here, the choice of tables, column naming conventions, data types used,
and so on, is intended to help achieve our primary goal of providing a structure for our demonstration. While
spending decades working on client/server databases, I've formed opinions and habits that may not translate
particularly well to all environments or projects. So by all means take what is here and adapt it to your
own environment, or toss it out completely and use whatever arrangement you like. The lesson here is more about
showing what you can do, not what you should do. As usual, it is all about giving you more
choices, not less.
Certainly, your choice of database will allow you to do things differently. While many databases support
triggers, foreign keys, views, user-defined functions, auto-generated values, and more, there may well be
differences in SQL syntax or other considerations that either encourage or inhibit their use. Just as an
example, I'd find it hard to believe any other database would use a generic "text" datatype as the storage
mechanism for a timestamp, as we're doing here with SQLite. So no judgment, use whatever you are comfortable
with. The idea is also that what we're doing here is likely to be the lowest common denominator when it comes
to the design of a production database. But sufficient content to get the ball rolling.
With that, let's get connected to our database, creating it automatically if it doesn't exist, and let's use optional "DBNAME" and "DBENGINE" application parameters. We'd likely add more parameters (like DBUSER and DBPASS) if using other kinds of databases, so we'll check for those as well, but won't use them in SQLite.
The
initialization of the database has been added to a timer that gets triggered after the main form is loaded, in Unit2.
The main reason for this was to have it in a place where the startup could be viewed, as in some cases, it can
take a moment or two to complete. The initial setup involves processing the parameters being passed to the application, to
see if anything other than the defaults are required, and then establishing a connection to the database. Or
creating the database entirely if it doesn't exist already.
  // FDConnection component dropped on form - DBConn
  // FDPhysSQLiteDriverLink component droppoed on form
  // FDQuery component dropped on form - Query1
  // DatabaseName is a Form Variable
  // DatabaseEngine is a Form Variable
  // DatabaseUsername is a Form Variable
  // DatabasePassword is a Form Variable

  mmInfo.Lines.Add('Initializing Database...');

  DatabaseEngine := 'sqlite';
  DatabaseName := 'DemoData.sqlite';
  DatabaseAlias := 'DemoData';
  DatabaseUsername := 'dbuser';
  DatabasePassword := 'dbpass';
  DatabaseConfig := '';

  i := 1;
  while i <= ParamCount do
  begin
    if Pos('DBNAME=',Uppercase(ParamStr(i))) = 1
    then DatabaseName := Copy(ParamStr(i),8,length(ParamStr(i)));

    if Pos('DBALIAS=',Uppercase(ParamStr(i))) = 1
    then DatabaseAlias := Copy(ParamStr(i),8,length(ParamStr(i)));

    if Pos('DBENGINE=',Uppercase(ParamStr(i))) = 1
    then DatabaseEngine := Lowercase(Copy(ParamStr(i),10,length(ParamStr(i))));

    if Pos('DBUSER=',Uppercase(ParamStr(i))) = 1
    then DatabaseUsername := Copy(ParamStr(i),8,length(ParamStr(i)));

    if Pos('DBPASS=',Uppercase(ParamStr(i))) = 1
    then DatabasePassword := Copy(ParamStr(i),8,length(ParamStr(i)));

    if Pos('DBCONFIG=',Uppercase(ParamStr(i))) = 1
    then DatabaseConfig := Copy(ParamStr(i),8,length(ParamStr(i)));

    i := i + 1;
  end;

  FDManager.Open;
  DBConn.Params.Clear;

  if (DatabaseEngine = 'sqlite') then
  begin
    // This creates the database if it doesn't already exist
    DBConn.Params.DriverID := 'SQLite';
    DBConn.Params.Database := DatabaseName;
    DBConn.Params.Add('DateTimeFormat=String');
    DBConn.Params.Add('Synchronous=Full');
    DBConn.Params.Add('LockingMode=Normal');
    DBConn.Params.Add('SharedCache=False');
    DBConn.Params.Add('UpdateOptions.LockWait=True');
    DBConn.Params.Add('BusyTimeout=10000');
    DBConn.Params.Add('SQLiteAdvanced=page_size=4096');
    // Extras
    DBConn.FormatOptions.StrsEmpty2Null := True;
    with DBConn.FormatOptions do
    begin
      StrsEmpty2Null := true;
      OwnMapRules := True;
      with MapRules.Add do begin
        SourceDataType := dtWideMemo;
        TargetDataType := dtWideString;
      end;
    end;
  end;

  DBConn.Open;
  Query1.Connection := DBConn;
A similar block could be added for any other database engine supported by FireDAC, with its own specific parameters. Here, there are a few things specific to SQLite, like converting "widememo" fields (aka: Text) into "widestring" fields, which helps with those Text-based datetime fields. Other database-specific options would likely include username/password or other authentication mechanisms, as well as items relating to database connection pooling and so on.
Also note that we're not doing any error checking here as we might normally want to do - such as testing to see if the database exists, or even if the connection succeeds, for example. With all that out of the way, we can create our tables. The process is the same for each.
- Create a table if it doesn't already exist.
- Check if the table has any rows using a select count(*) query.
- If there are no rows, add in a set of default data for the table.
Other database engines may require a different approach. Perhaps the DDL will be in a separate script executed
outside of our application. Or maybe you're connecting to a pre-existing database, so adding default data is
never going to be necessary. Or you're setting up a tenant-type database and will need to make adjustments to
better accommodate that scenario. Regardless, by the time we've run through this the first time, we'll likely not need
to do it again - all our tables will be created and populated with data. Checking this at startup each time
isn't something that takes very long though, and if we ever add or alter a table, we won't have to do anything
differently than what we're doing here.
To help keep this manageable when there might potentially be hundreds of tables with multiple variants to support different SQL dialects, a bit of a structure has been created using {$Include} directives. There are other ways this could be handled, but this makes quick work of it.
Adding a new database engine would just
involve updating the {$Include} files for the most part. And this makes our initialization code relatively
simple - we just have one {$Include} per table. But that {$include} contains a bit of code to decide which
variant to include. So a two-level {$Include} hierarchy. For our first batch of tables (this is likely to grow
considerably before we're done), we have this list.
  mmInfo.Lines.Add('...['+DatabaseEngine+'] '+DatabaseName);

  // Create and populate tables
  {$Include ddl\person\person.inc}
  {$Include ddl\role\role.inc}
  {$Include ddl\person_role\person_role.inc}
  {$Include ddl\api_key\api_key.inc}
  {$Include ddl\contact\contact.inc}
  {$Include ddl\endpoint_history\endpoint_history.inc}
  {$Include ddl\ip_allow\ip_allow.inc}
  {$Include ddl\ip_block\ip_block.inc}
  {$Include ddl\list\list.inc}
  {$Include ddl\login_fail\login_fail.inc}
  {$Include ddl\login_history\login_history.inc}
  {$Include ddl\token\token.inc}

  mmInfo.Lines.Add('Done.');
  mmInfo.Lines.Add('');
As an example of one of the simpler tables, let's take a look at role.inc. It just includes the SQLite version, role_sqlite.inc. When support is added for additional database engines, they can be added to role.inc.
mmInfo.Lines.Add('...role');
{$Include ddl\role\role_sqlite.inc}
The SQLite version that we're working with today then has checks to ensure that it isn't applied to the wrong
database engine. It then uses the appropriate SQL dialect to go about its business.
// [table] role

if (DatabaseEngine = 'sqlite') then
begin

  with FDQuery1 do
  begin

    SQL.Clear;
    SQL.Add('create table if not exists role ('+
            '  role_id                    integer     NOT NULL, '+
            '  last_modified              text        NOT NULL, '+
            '  last_modifier              integer     NOT NULL, '+
            '  name                       text        NOT NULL, '+
            '  icon                       text        NOT NULL, '+
            '  CONSTRAINT constraint_name PRIMARY KEY (role_id), '+
            '  UNIQUE(name) '+
            ');'
           );
    ExecSQL;

    SQL.Clear;
    SQL.Add('select count(*) records from role;');
    Open;

    if FieldByName('records').AsInteger = 0 then
    begin
      SQL.Clear;

      // Default roles
      SQL.Add('insert into role values( 0, current_timestamp, 0, "Login",         "<i class=""fa-solid fa-right-to-braket""></i>" );');
      SQL.Add('insert into role values( 1, current_timestamp, 0, "Administrator", "<i class=""fa-solid fa-user-gear""></i>"       );');
      SQL.Add('insert into role values( 2, current_timestamp, 0, "Manager",       "<i class=""fa-solid fa-user-clock""></i>"      );');
      SQL.Add('insert into role values( 3, current_timestamp, 0, "Supervisor",    "<i class=""fa-solid fa-user-tag""></i>"        );');
      SQL.Add('insert into role values( 4, current_timestamp, 0, "Worker",        "<i class=""fa-solid fa-user""></i>"            );');

      ExecSQL;
    end;
  end;
end;
Within each table's {$Include} code, the general idea is to define each table with the following
characteristics.
- Primary key fields, usually an integer id of some kind, maybe a GUID in some cases. Maybe a compound
primary key.
- Add last_modified and last_modifer fields.
- Add the other fields needed for the particular table.
- Add a constraint for the primary key (most tables should have a primary key, but not necessarily all...).
- Add any other unique constraints.
Once the table is created and/or upgraded, a check is done to see if the table is empty. If it is, sample data is generated for that table. Not all tables do this, but many do. Note that this introduces a bit of an issue in that the order of the {$Include} files becomes important, as some sample data is generated based on other data. It would likely be the case that the order was important also if you were defining foreign keys or other table relationships.
Once all of these tables have been created, the database is ready for use. If the database is being generated for the first time, this might take a moment or two. If the database already exists and is populated, then this won't take any time at all.
For SQLite, a popular external tool for managing databases is DB
Browser for SQLite. But there are many. I'm sure there are even some great database tools written in
Delphi. If you've got one you're particularly fond of, please leave a note in the comments. Here's what our
table above looks like when viewed in this tool.
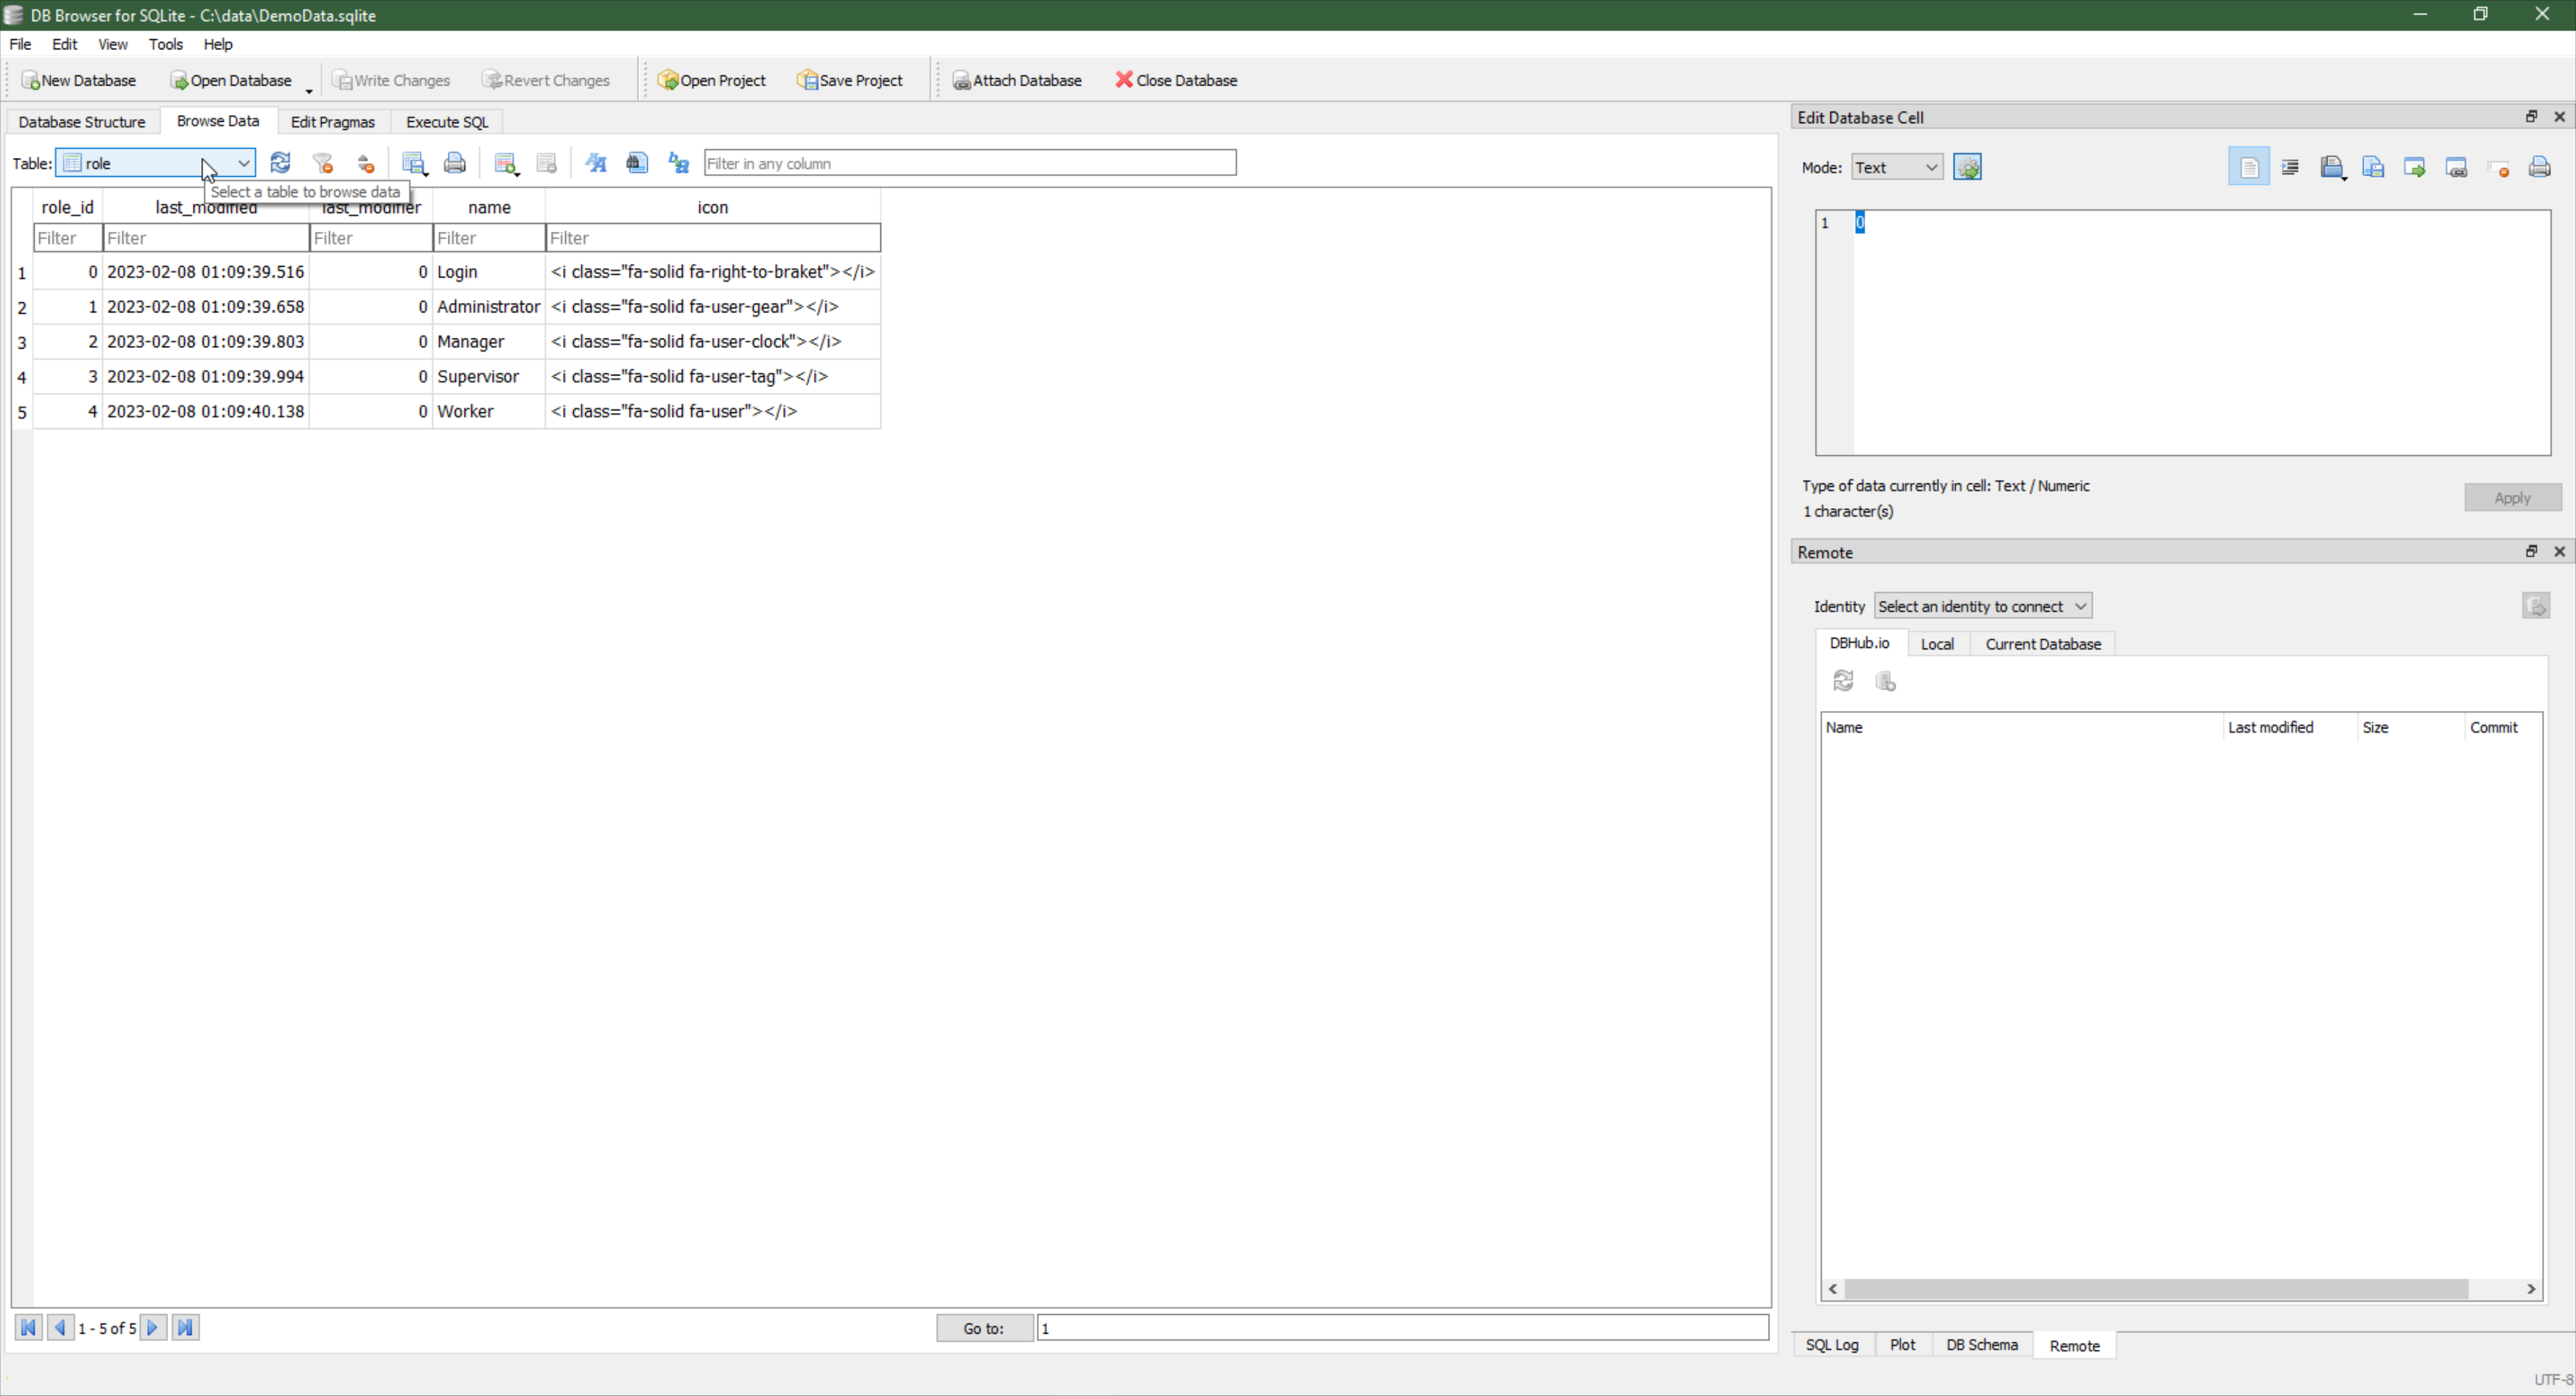
DB Browser for SQLite.
There are a number of tables defined as part of the project, and more will be added as time permits, expanding
in the direction of a general ERP-style database, initially focused perhaps more on labor management than
anything else. Once things get a little more complicated, other tools, like entity-relationship diagrams and so
on, will become more important, but we'll leave that for another day.
With all of our tables in place, the startup of our application now looks like this.
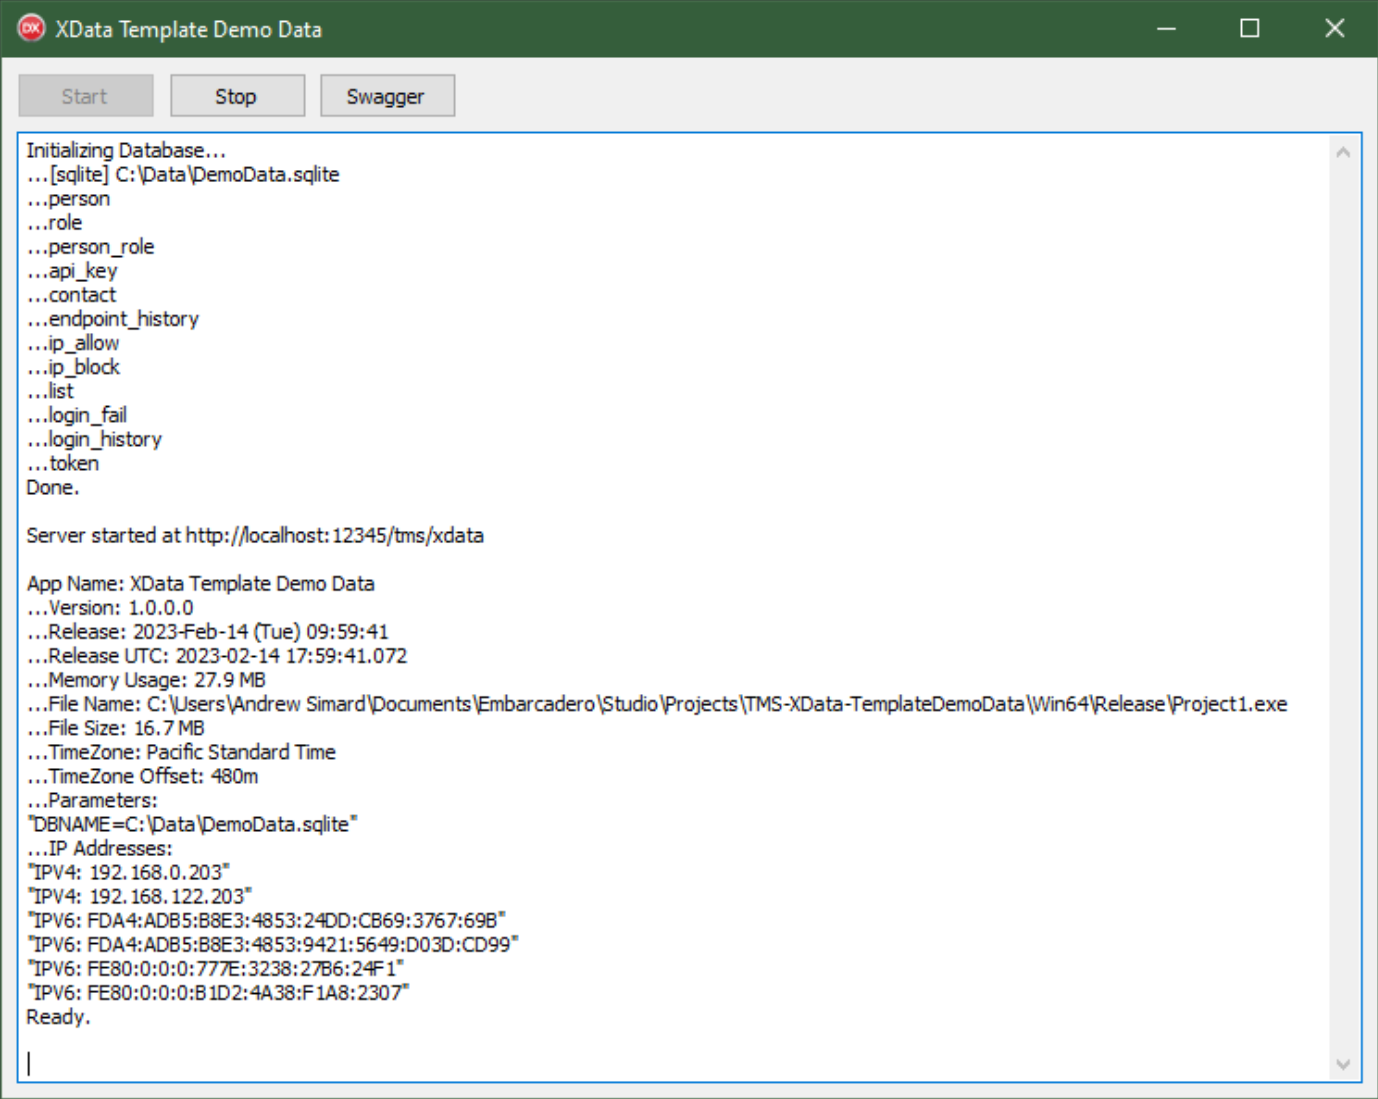
Application Startup.
Not much else is going to change in this part of the application from this point forward. More tables will be
added as needed, but nothing more is required from this UI.
JWT - JSON Web Tokens.
With our database populated and active, we're ready to embark on creating a few new endpoints. But before we
can do that, let's cover a little bit of information about what a JWT is - an acronym that contains an acronym,
no less. Using JWTs is a topic that is covered pretty well in the XData documentation. The basic idea is that
a JWT is an encoded string that contains a set of "claims" that are passed back and forth between a client
application and a server application. Think of it as a fancy keycard that is encoded to open a specific set of
doors for a specific amount of time. If it expires, the client will have to request a new one. Often, the renewal
happens automatically before it expires if the user remains active. This is one way to implement an application
timeout mechanism, like when accessing a banking website, for example.
In order to acquire a JWT, a client application needs to make a request from the server, usually involving something like a username and password. The server then assesses these credentials, making a determination about both authentication and authorization.
Authentication generally refers to whether someone is who they say they are. In our case, we'll be using a username/password mechanism where the username will typically be an e-mail address. Two-factor authentication could also be implemented by, well, adding a second step. Perhaps sending a secret code via an e-mail and having the user input that through a second request. Authentication determines whether a person gets a key card in the first place.
Authorization, on the other hand, is concerned more with what access is to be granted. Which doors can be opened, for example. This might also cover when access is to be granted. One way to make this a little simpler is through the use of roles. A user might be granted certain roles, such as the ability to log in. When the JWT is generated, these roles are included as part of the list of claims, something akin to a list of doors that can be opened.
An expiration time
is set for the JWT, usually something like 15 minutes, an hour, or perhaps a day. It could also be set to the
minimum time remaining for any of the available roles, forcing a new JWT to be generated when a role expires. In some cases, it may be a really long period of time, particularly if it is something that is used privately.
This information, and anything else that the server might want to know about later, is encoded into a JWT in a specific way that makes it virtually tamper-proof. The JWT is then sent back to the client. Any subsequent requests that the client makes will then include this JWT, so the server will then know what levels of access are available for a given request. Kind of like adding a bit of state to the conversation. If the client were to unilaterally change the JWT (say they want to add their own door or want to change the expiration time), the client won't be able to encode the JWT properly, due to not being able to sign it using the server's private key, so it will get rejected.
So what claims might be included in a JWT? Ideally nothing too complex, so it is kept relatively small. But here
are a few elements that might be worth considering. Note that there are a few reserved
claims to be mindful of when adding claims of your own. Not always something that is easy to troubleshoot
either - see this
TMS Support Center thread for an example of what can happen if someone (ahem) isn't paying close attention.
- A timestamp indicating when the JWT will expire (I think this one is required).
- A timestamp indicating when the JWT was issued.
- The username, account id, or equivalent to use for subsequent database access, if applicable.
- The name of the database if multiple databases are available.
- If using a tenant-type database system, the tenant id.
- A list of roles that describe what levels of access are available.
- Client TimeZone, potentially used to return data formatted for that TimeZone.
- IP Address of the client, if you don't want to allow the same JWT to be used from multiple IP addresses.
Once a client has acquired a JWT, it can make server requests with the same JWT without having to log in again, so long as the JWT hasn't expired. JWTs are often configured with a short expiration period if you want to either force the user or force the application to authenticate periodically like in the case of enforcing an application timeout we mentioned a moment ago.
In some cases, this is less of an issue. In our recent coverage of both Home Assistant and GitHub, JWTs were used as access tokens, where the expiration period was weeks or months in the case of GitHub, and ten years in the case of Home Assistant. Generally speaking, the Home Assistant token would only be used by another application running locally, so not something to be as concerned with. GitHub, on the other hand, actively scans repositories and will quickly disable any access token that it finds. In both cases, though, there is a mechanism available to explicitly issue and revoke JWTs.
Whether we need that kind of mechanism in our project might be something to think about. Certainly, if you want to have a longer expiration period, then this is a really important thing to have. If you have a really short expiration period, then perhaps less so. Something else to consider is whether you want to allow a user to be logged in on more than one device, and when they log out, whether they want to log out of all devices. This can be important if your application is likely to be used on public computers, or on multiple devices throughout the day, by the same user.
Remember that having a valid JWT gives the user a wide berth in terms of ongoing access. If
the ability to terminate that access is important, then that's another consideration. Also, providing the user
access to their own login history can often be important. It may also be necessary to revoke the token from the server side.
To help make this project work for a broad array of scenarios, let's assume that we'll keep track of the JWTs
that are issued and then we'll have the option of revoking them. We can do this just by logging the JWTs that
are created (or a hash of them) and then simply checking that that hashed value is available whenever a new request
is made. This is considerably less work than going through all the steps needed to generate a new JWT. When an
existing (and valid) JWT is renewed, we'll be very careful to make sure that its list of roles is updated to
whatever is current at that time, and that the old JWT is discarded when the new JWT is issued. A bit more
work, but may very well be worth the effort, depending on how tightly access needs to be controlled. A token table has been added for this purpose.
API Keys.
Related to this, JWTs are used to control user access to a server, but let's give some thought as to what applications are authorized. Many REST API services require the use of an API key in order to process a request. This is used in part to track usage, but also to limit usage. If an API key is used to make too many requests, for example, those requests might be throttled, or the API key might be revoked, or perhaps a fee would be levied for the overage.
Sometimes, a fee needs to be paid to get an API key in the first place.
Securing API keys is also a problem. If you're writing an app that makes use of some random REST API's key, for
example, you don't want to include your API key in your web application as someone could extract it and
use it without your permission, or even add it to their own web application. Using XData, we can actually proxy
these kinds of requests, hiding an API key behind our own REST API. But what if we're the ones offering the REST
API?
For now, we'll just pass an API key as a parameter. This isn't inherently insecure as this isn't what is
granting access - the login credentials deal with that. This is just about restricting what applications can be
used to connect in the first place. If the API key reaches some kind of threshold, it can be revoked, a
notification sent out, or some other action taken. More complex systems can also be used for distributing and
using API keys, beyond what we're doing here.
Hashes.
When we eventually get around to authenticating a username and password that a client is providing, we have to compare these values to something. But we really do not want to store someone's password in our database. Instead, what we'll do is store a password "hash". In this context, a hash is a one-way conversion of a string (say, a password) into another encoded string. The principle is that the only way to get that encoded string is to start from the same original string.
Let's say someone has a password of "password". We won't store the string value of "password" but rather the hashed version which might be "5e884898da28047151d0e56f8dc6292773603d0d6aabbdd62a11ef721d1542d8", using a straight SHA256 hash algorithm. Then, when someone gives us a password, we run it through the same hash algorithm and see if it matches.
The
cryptographic principle is that it is impossible to get "password" from that hashed value. However, there are
databases of password hashes floating around as well. In fact, if you search for that specific hashed value,
several hits reference tools for essentially breaking this kind of cryptography. So what to do? Well, we
can add something to the password hash step, like an obscure prefix or suffix, and then hash that value. The result
is far less likely to show up in any kind of search.
Some databases include hash functions but alas SQLite isn't one of them, at least not for the hash function we're interested in. We're primarily going to use the SHA256 algorithm for our purposes. Not the strongest, but if you're looking for something stronger, it is easy enough to swap out that for something else.
We'll make
use of the TMS
Cryptography Pack to provide the implementation of this function, and we'll use a simple wrapper function
to make it just a little bit easier to use. Note that this relies on a RandomDLL.DLL file that we'll have to
include in our project as well, which is included in the TMS product. We'll also set up a separate unit to have
some of these kinds of functions that might be used by multiple endpoints, Unit3 (DBSupport).
Let's add our hash function to that. This produces the same output as something like an online SHA256
Tool.
// uses HashObj, MiscObj

function TDBSupport.HashThis(InputText: String):String;
var
  SHA2: TSHA2Hash;
begin
  SHA2 := TSHA2Hash.Create;
  SHA2.HashSizeBits:= 256;
  SHA2.OutputFormat:= hexa;
  SHA2.Unicode:= noUni;
  Result := LowerCase(SHA2.Hash(InputText));
  SHA2.Free;
end;
In addition to storing passwords using this hash function, we'll also use it in our token table to store the JWTs that we've issued, as there's no reason anyone needs to see those, and they could also be used for unauthorized access. Of course, if someone gains unauthorized access to the token table, we're likely in a pretty bad spot anyway.
Login Endpoint.
With all that sorted, let's get to work on some endpoints. First up is the Login
endpoint. The gist of what we need to do here is the following. Note that we're doing a lot of work here, but
ultimately we'll end up with a JWT. Once we have that, we'll have comparatively very little to do when
implementing other endpoints. A little bit of pain now for plenty of gain later.
- Parameters include API_Key, Login_ID, Password, and TZ.
- Check that we've got valid parameters.
- Check that the TZ exists.
- Check if the API_Key is in the api_key table.
- If so, get the application name and limit the expiration date.
- Check if the IP address is in the ip_allow table.
- If it isn't, check if the IP Address is in the ip_block table.
- Check if the login_fail table indicates too many attempts, and increment the count.
- If too many failures, add a temporary ip_block.
- If it passes, check if the Login_ID is in the contact table.
- If we don't find anything, return an error indicating this.
- If we do find a match, see if they have the required login role.
- If they do, then we can compare the password to the password_hash in the person table.
- If it doesn't match, return an error indicating this.
- Use the roles to limit the expiration date.
- Otherwise, if everything is good, issue a new JWT and add it to the token table.
Seems like a lot of work. And it is. But we're covering quite a lot of bases here, with plenty of ways to
customize this to your particular needs. Our first step involves checking that we've got our basic parameters. Here, we'll need another unit - XData.Sys.Exceptions - and we'll see right away
how we can handle any problems we encounter - just raise an exception. We can also provide a bit of feedback as
to why the login has failed.
function TSystemService.Login(Login_ID, Password, API_Key, TZ: String): String;
...
  if Trim(Login_ID) = '' then raise EXDataHttpUnauthorized.Create('Login_ID cannot be blank');
...
end;
We've covered how to validate the TimeZone already, so we can just copy and paste that code here, raising an exception if necessary. For the next few sections, we're going to need to run queries. Sometimes we're interested in a result set. Sometimes we're interested in just logging something.
To help make this a little easier, and also prepare for supporting multiple database engines, we'll use the same {$Include} mechanism we used earlier for the actual queries, but also add a supporting function to handle the setup and tear down of the query and the related connection. We also did this with the Survey project, which worked pretty well.
If we were using another database engine, or if we wanted to do a bit more work with this engine, performance-wise, this is where we'd spend some time to optimize how connections are established. Ideally, we'd have one connection to a given database, and then run multiple queries to it, across multiple endpoint calls, without having to establish a new connection.
This can improve the speed of queries dramatically, particularly when you have many queries running one after another, or if you have many concurrent users. For now, though, we'll just recreate the connection each time we need to, typically once per endpoint invocation. Here's how we're setting up the query until we get around to that optimization stage.
procedure TDBSupport.ConnectQuery(var conn: TFDConnection; var qry: TFDQuery; DatabaseName: String; DatabaseEngine: String);
begin
  try
    // Establish a new connection for each endpoint invocation (not ideal!)
    if DatabaseEngine = 'sqlite' then
    begin
      conn := TFDConnection.Create(nil);
      conn.Params.Clear;
      conn.Params.DriverID := 'SQLite';
      conn.Params.Database := DatabaseName;
      conn.Params.Add('DateTimeFormat=String');
      conn.Params.Add('Synchronous=Full');
      conn.Params.Add('LockingMode=Normal');
      conn.Params.Add('SharedCache=False');
      conn.Params.Add('UpdateOptions.LockWait=True');
      conn.Params.Add('BusyTimeout=10000');
      conn.Params.Add('SQLiteAdvanced=page_size=4096');
      // Extras
      conn.FormatOptions.StrsEmpty2Null := True;
      with conn.FormatOptions do
      begin
        StrsEmpty2Null := true;
        OwnMapRules := True;
        with MapRules.Add do begin
          SourceDataType := dtWideMemo;
          TargetDataType := dtWideString;
        end;
      end;
    end;

    conn.Open;

    // Create a query to do our work
    qry := TFDQuery.Create(nil);
    qry.Connection := conn;

  except on E: Exception do
    begin
      // If the above fails, not a good thing, but at least try and make a note as to why
      Mainform.mmInfo.Lines.Add('[ '+E.ClassName+' ] '+E.Message);
    end;
  end;
end;
The bulk of our Login endpoint is concerned with running queries and checking values, ultimately ending up generating a valid JWT. It is likely that this will be the most complex of any of the endpoints in our project, so a solid understanding of what this is doing goes a long way toward understanding everything else that is to come.
function TSystemService.Login(Login_ID, Password, API_Key, TZ: String): TStream;
var
  DBConn: TFDConnection;
  Query1: TFDQuery;
  DatabaseEngine: String;
  DatabaseName: String;
  ClientTimeZone: TBundledTimeZone;
  ValidTimeZone: Boolean;
  ElapsedTime: TDateTime;

  PersonID: Integer;
  ApplicationName: String;
  Roles: String;
  EMailAddress: String;
  PasswordHash: String;

  JWT: TJWT;
  JWTString: String;
  IssuedAt: TDateTime;
  ExpiresAt: TDateTime;

begin
  // Returning JWT, so flag it as such
  TXDataOperationContext.Current.Response.Headers.SetValue('content-type', 'application/jwt');

  // Time this event
  ElapsedTime := Now;

  // We're creating a JWT now that is valid for 15 minutes
  IssuedAt := Now;
  ExpiresAt := IncMinute(IssuedAt,15);

  // Check that we've got values for all of the above.
  if Trim(Login_ID) = '' then raise EXDataHttpUnauthorized.Create('Login_ID cannot be blank');
  if Trim(Password) = '' then raise EXDataHttpUnauthorized.Create('Password cannot be blank');
  if Trim(API_Key) = '' then raise EXDataHttpUnauthorized.Create('API_Key cannot be blank');
  if Trim(TZ) = '' then raise EXDataHttpUnauthorized.Create('TZ cannot be blank');

  // Figure out if we have a valid TZ
  try
    ClientTimeZone := TBundledTimeZone.GetTimeZone(TZ);
    ValidTimeZone := True;
  except on E:Exception do
    begin
      if E.ClassName = 'ETimeZoneInvalid' then
      begin
        ValidTimeZone := False;
      end
      else
      begin
        ValidTimeZone := False;
        MainForm.mmInfo.Lines.Add('System Service Error: '+E.ClassName);
        MainForm.mmInfo.Lines.Add('System Service Error: '+E.Message);
      end;
    end;
  end;
  if not(ValidTimeZone) then raise EXDataHttpUnauthorized.Create('Invalid TZ');

  // Setup DB connection and query
  DatabaseName := MainForm.DatabaseName;
  DatabaseEngine := MainForm.DatabaseEngine;
  try
    DBSupport.ConnectQuery(DBConn, Query1, DatabaseName, DatabaseEngine);
  except on E: Exception do
    begin
      DBSupport.DisconnectQuery(DBConn, Query1);
      MainForm.mmInfo.Lines.Add('['+E.Classname+'] '+E.Message);
      raise EXDataHttpUnauthorized.Create('Internal Error: CQ');
    end;
  end;

  // Check if we've got a valid API_Key
  try
    {$Include sql\system\api_key_check\api_key_check.inc}
    Query1.ParamByName('APIKEY').AsString := LowerCase(API_Key);
    Query1.Open;
  except on E: Exception do
    begin
      DBSupport.DisconnectQuery(DBConn, Query1);
      MainForm.mmInfo.Lines.Add('['+E.Classname+'] '+E.Message);
      raise EXDataHttpUnauthorized.Create('Internal Error: AKC');
    end;
  end;
  if Query1.RecordCount = 0 then
  begin
    DBSupport.DisconnectQuery(DBConn, Query1);
    raise EXDataHttpUnauthorized.Create('API_Key was not validated');
  end;
  ApplicationName := Query1.FieldByName('application').AsString;
  if not(Query1.FieldByName('valid_until').isNull) and
     (ExpiresAt > TTimeZone.Local.ToLocalTime(Query1.FieldByName('valid_until').AsDateTime))
  then ExpiresAt := TTimeZone.Local.ToLocalTime(Query1.FieldByName('valid_until').AsDateTime);

  // Check if the IP Address is always allowed
  try
    {$Include sql\system\ip_allow_check\ip_allow_check.inc}
    Query1.ParamByName('IPADDRESS').AsString := TXDataOperationContext.Current.Request.RemoteIP;
    Query1.Open;
    if Query1.RecordCount = 0 then
    begin
      try
        {$Include sql\system\ip_block_check\ip_block_check.inc}
        Query1.ParamByName('IPADDRESS').AsString := TXDataOperationContext.Current.Request.RemoteIP;
        Query1.Open;
        if Query1.RecordCount > 0 then raise EXDataHttpUnauthorized.Create('IP Address has been temporarily blocked')
      except on E: Exception do
        begin
    DBSupport.DisconnectQuery(DBConn, Query1);
          MainForm.mmInfo.Lines.Add('['+E.Classname+'] '+E.Message);
          raise EXDataHttpUnauthorized.Create('Internal Error: IBC');
        end;
      end;
    end;
  except on E: Exception do
    begin
      DBSupport.DisconnectQuery(DBConn, Query1);
      MainForm.mmInfo.Lines.Add('['+E.Classname+'] '+E.Message);
      raise EXDataHttpUnauthorized.Create('Internal Error: IAC');
    end;
  end;

  // IP Check passed.  Next up: Login attempts.  First we log the attempt.  Then we count them.
  try
    {$Include sql\system\login_fail_insert\login_fail_insert.inc}
    Query1.ParamByName('LOGINID').AsString := LowerCase(Login_ID);
    Query1.ParamByName('IPADDRESS').AsString := TXDataOperationContext.Current.Request.RemoteIP;
    Query1.Execute;
  except on E: Exception do
    begin
      DBSupport.DisconnectQuery(DBConn, Query1);
      MainForm.mmInfo.Lines.Add('['+E.Classname+'] '+E.Message);
      raise EXDataHttpUnauthorized.Create('Internal Error: LFI');
    end;
  end;
  try
    {$Include sql\system\login_fail_check\login_fail_check.inc}
    Query1.ParamByName('LOGINID').AsString := LowerCase(Login_ID);
    Query1.ParamByName('IPADDRESS').AsString := TXDataOperationContext.Current.Request.RemoteIP;
    Query1.Open;
  except on E: Exception do
    begin
      DBSupport.DisconnectQuery(DBConn, Query1);
      MainForm.mmInfo.Lines.Add('['+E.Classname+'] '+E.Message);
      raise EXDataHttpUnauthorized.Create('Internal Error: LFC');
    end;
  end;
  if Query1.FieldByNAme('attempts').AsInteger >= 5 then
  begin
    try
      {$Include sql\system\ip_block_insert\ip_block_insert.inc}
      Query1.ParamByName('IPADDRESS').AsString := TXDataOperationContext.Current.Request.RemoteIP;
      Query1.ParamByName('REASON').AsString := 'Too many failed login attempts.';
      Query1.ExecSQL;
    except on E: Exception do
      begin
        DBSupport.DisconnectQuery(DBConn, Query1);
        MainForm.mmInfo.Lines.Add('['+E.Classname+'] '+E.Message);
        raise EXDataHttpUnauthorized.Create('Internal Error: IBI');
      end;
    end;
    raise EXDataHttpUnauthorized.Create('Too many failed login attempts.  Please try again later.')
  end;

  // Alright, the login has passed all its initial checks.  Lets see if the Login_ID is known
  try
    {$Include sql\system\contact_search\contact_search.inc}
    Query1.ParamByName('LOGINID').AsString := LowerCase(Login_ID);
    Query1.Open;
  except on E: Exception do
    begin
      DBSupport.DisconnectQuery(DBConn, Query1);
      MainForm.mmInfo.Lines.Add('['+E.Classname+'] '+E.Message);
      raise EXDataHttpUnauthorized.Create('Internal Error: CS');
    end;
  end;
  if Query1.RecordCount = 0 then
  begin
    DBSupport.DisconnectQuery(DBConn, Query1);
    raise EXDataHttpUnauthorized.Create('Login not authenticated: invalid login')
  end
  else if Query1.RecordCount > 1 then
  begin
    DBSupport.DisconnectQuery(DBConn, Query1);
    EXDataHttpUnauthorized.Create('Login not authenticated: ambiguous login');
  end;

  // Got the Person ID
  PersonID := Query1.FieldByName('person_id').AsInteger;

  // Ok, we've got a person, let's see if they've got the required Login role
  try
    {$Include sql\system\person_role_check\person_role_check.inc}
    Query1.ParamByName('PERSONID').AsInteger := PersonID;
    Query1.Open;
  except on E: Exception do
    begin
      DBSupport.DisconnectQuery(DBConn, Query1);
      MainForm.mmInfo.Lines.Add('['+E.Classname+'] '+E.Message);
      raise EXDataHttpUnauthorized.Create('Internal Error: PRC');
    end;
  end;
  if Query1.FieldByName('role_id').AsInteger <> 0 then raise EXDataHttpUnauthorized.Create('Login not authorized');

  // Login role is present, so let's make a note of the other roles
  Roles := '';
  while not(Query1.EOF) do
  begin
    Roles := Roles + Query1.FieldByName('role_id').AsString;

    // Limit token validity of role expires before token expires
    if not(Query1.FieldByName('valid_until').isNull) and
       (ExpiresAt > TTimeZone.Local.ToLocalTIme(Query1.FieldByName('valid_until').AsDateTime))
    then ExpiresAt := TTimeZone.Local.ToLocalTime(Query1.FieldByName('valid_until').AsDateTime);

    Query1.Next;
    if not(Query1.EOF) then Roles := Roles + ',';
  end;

  // Get the first available EMail address if possible
  EMailAddress := 'unavailable';
  try
    {$Include sql\system\contact_email\contact_email.inc}
    Query1.ParamByName('PERSONID').AsInteger := PersonID;
    Query1.Open;
    if Query1.RecordCount > 0
    then EMailAddress := Query1.FieldByName('value').AsString;
  except on E: Exception do
    begin
      DBSupport.DisconnectQuery(DBConn, Query1);
      MainForm.mmInfo.Lines.Add('['+E.Classname+'] '+E.Message);
      raise EXDataHttpUnauthorized.Create('Internal Error: CE');
    end;
  end;

  // Finally, let's check the actual passowrd.
  PasswordHash := DBSupport.HashThis('XData-Password:'+Trim(Password));
  try
    {$Include sql\system\person_password_check\person_password_check.inc}
    Query1.ParamByName('PERSONID').AsInteger := PersonID;
    Query1.ParamByName('PASSWORDHASH').AsString := PasswordHash;
    Query1.Open;
  except on E: Exception do
    begin
      DBSupport.DisconnectQuery(DBConn, Query1);
      MainForm.mmInfo.Lines.Add('['+E.Classname+'] '+E.Message);
      raise EXDataHttpUnauthorized.Create('Internal Error: PPC');
    end;
  end;
  if Query1.RecordCount <> 1 then raise EXDataHttpUnauthorized.Create('Login not authenticated: invalid password');

  // Login has been authenticated and authorized.

  // Generate a new JWT
  JWT := TJWT.Create;
  try
    // Setup some Claims
    JWT.Claims.Issuer := MainForm.AppName;
    JWT.Claims.SetClaimOfType<string>( 'ver', MainForm.AppVersion );
    JWT.Claims.SetClaimOfType<string>( 'tzn', TZ );
    JWT.Claims.SetClaimOfType<integer>('usr', PersonID );
    JWT.Claims.SetClaimOfType<string>( 'app', ApplicationName );
    JWT.Claims.SetClaimOfType<string>( 'dbn', DatabaseName );
    JWT.Claims.SetClaimOfType<string>( 'dbe', DatabaseEngine );
    JWT.Claims.SetClaimOfType<string>( 'rol', Roles );
    JWT.Claims.SetClaimOfType<string>( 'eml', EMailAddress );
    JWT.Claims.SetClaimOfType<string>( 'fnm', Query1.FieldByName('first_name').AsString );
    JWT.Claims.SetClaimOfType<string>( 'mnm', Query1.FieldByName('middle_name').AsString );
    JWT.Claims.SetClaimOfType<string>( 'lnm', Query1.FieldByName('last_name').AsString );
    JWT.Claims.SetClaimOfType<string>( 'anm', Query1.FieldByName('account_name').AsString );
    JWT.Claims.SetClaimOfType<string>( 'net', TXDataOperationContext.Current.Request.RemoteIP );
    JWT.Claims.SetClaimOfType<string>( 'aft', FormatDateTime('yyyy-mm-dd hh:nn:ss.zzz',  TTimeZone.local.ToUniversalTime(IssuedAt))+' UTC');
    JWT.Claims.SetClaimOfType<string>( 'unt', FormatDateTime('yyyy-mm-dd hh:nn:ss.zzz',  TTimeZone.local.ToUniversalTime(ExpiresAt))+' UTC');
    JWT.Claims.SetClaimOfType<integer>('iat', DateTimeToUnix(TTimeZone.local.ToUniversalTime(IssuedAt)));
    JWT.Claims.Expiration := ExpiresAt; // Gets converted to UTC automatically

    // Generate the actual JWT
    JWTSTring := 'Bearer '+TJOSE.SHA256CompactToken(ServerContainer.XDataServerJWT.Secret, JWT);
    Result := TStringStream.Create(JWTString);

  finally
    JWT.Free;
  end;

  // Add the JWT to a table that we'll use to help with expring tokens
  try
    {$Include sql\system\token_insert\token_insert.inc}
    Query1.ParamByName('TOKENHASH').AsString := DBSupport.HashThis(JWTString);
    Query1.ParamByName('PERSONID').AsInteger := PersonID;
    Query1.ParamByName('VALIDAFTER').AsDateTime := TTimeZone.local.ToUniversalTime(IssuedAt);
    Query1.ParamByName('VALIDUNTIL').AsDateTime := TTimeZone.local.ToUniversalTime(ExpiresAt);
    Query1.ParamByName('APPLICATION').AsString := ApplicationName;
    Query1.ExecSQL;
  except on E: Exception do
    begin
      DBSupport.DisconnectQuery(DBConn, Query1);
      MainForm.mmInfo.Lines.Add('['+E.Classname+'] '+E.Message);
      raise EXDataHttpUnauthorized.Create('Internal Error: TI');
    end;
  end;

  // Keep track of login history
  try
    {$Include sql\system\login_history_insert\login_history_insert.inc}
    Query1.ParamByName('LOGGEDIN').AsDateTime := TTimeZone.local.ToUniversalTime(IssuedAt);
    Query1.ParamByName('IPADDRESS').AsString := TXDataOperationContext.Current.Request.RemoteIP;
    Query1.ParamByName('PERSONID').AsInteger := PersonID;
    Query1.ParamByName('APPLICATION').AsString := ApplicationName;
    Query1.ExecSQL;
  except on E: Exception do
    begin
      DBSupport.DisconnectQuery(DBConn, Query1);
      MainForm.mmInfo.Lines.Add('['+E.Classname+'] '+E.Message);
      raise EXDataHttpUnauthorized.Create('Internal Error: LHI');
    end;
  end;

  // Cleanup after login
  try
    {$Include sql\system\login_cleanup\login_cleanup.inc}
    Query1.ParamByName('IPADDRESS').AsString := TXDataOperationContext.Current.Request.RemoteIP;
    Query1.ParamByName('LOGINID').AsString := LowerCase(Login_ID);
    Query1.ExecSQL;
  except on E: Exception do
    begin
      DBSupport.DisconnectQuery(DBConn, Query1);
      MainForm.mmInfo.Lines.Add('['+E.Classname+'] '+E.Message);
      raise EXDataHttpUnauthorized.Create('Internal Error: LCI');
    end;
  end;

  // Keep track of endpoint history
  try
    {$Include sql\system\endpoint_history_insert\endpoint_history_insert.inc}
    Query1.ParamByName('ENDPOINT').AsString := 'SystemService.Login';
    Query1.ParamByName('ACCESSED').AsDateTime := TTimeZone.local.ToUniversalTime(ElapsedTime);
    Query1.ParamByName('IPADDRESS').AsString := TXDataOperationContext.Current.Request.RemoteIP;
    Query1.ParamByName('APPLICATION').AsString := ApplicationName;
    Query1.ParamByName('DATABASENAME').AsString := DatabaseName;
    Query1.ParamByName('DATABASEENGINE').AsString := DatabaseEngine;
    Query1.ParamByName('EXECUTIONMS').AsInteger := MillisecondsBetween(Now,ElapsedTime);
    Query1.ParamByName('DETAILS').AsString := '['+Login_ID+'] [Passowrd] [API_Key] ['+TZ+']';
    Query1.ExecSQL;
  except on E: Exception do
    begin
      DBSupport.DisconnectQuery(DBConn, Query1);
      MainForm.mmInfo.Lines.Add('['+E.Classname+'] '+E.Message);
      raise EXDataHttpUnauthorized.Create('Internal Error: EHI');
    end;
  end;


  // All Done
  try
    DBSupport.DisconnectQuery(DBConn, Query1);
  except on E: Exception do
    begin
      MainForm.mmInfo.Lines.Add('['+E.Classname+'] '+E.Message);
      raise EXDataHttpUnauthorized.Create('Internal Error: DQ');
    end;
  end;

end;
NOTE: As mentioned previously, the use of MainForm.mmInfo.Lines.Add() is not thread-safe. Here we're using it because it is awfully convenient and because we're primarily on the lookout for errors with our queries, which will likely manifest themselves the first time we use this endpoint.
If we run into a situation where a lot of queries are failing at the same time, there is likely a more serious issue that needs attention. Most of the time, we should be logging information to the database or another thread-safe facility like TMS Logging or something like that.
It does take a bit of effort to get through the above code, both in terms of reading it here, and also in terms of processing - usually taking well under 1s but occasionally longer, depending on how responsive the database is, how fast the server it is running on might be, and so on.
There's more still we could do, particularly around notifications, but we'll save that for another time. For now, this is just running through a series of queries, managed through the same {$Include} mechanism that we used for the table definitions. The very first one checks for a valid API Key. It looks like this.
// [query] api_key_check

if (ServerContainer.DatabaseEngine = 'sqlite') then
begin

  with Query1 do
  begin

    SQL.Clear;
    SQL.Add('select '+
            '  applicaiton, valid_until '+
            'from '+
            '  api_key '+
            'where '+
            '  lower(api_key) = :APIKEY '+
            '  and (valid_after < current_timestamp) '+
            '  and (valid_until > current_timestamp);'
           );

  end;
end;
The rest are very similar, either returning a few key fields or just handling a record insert of some kind. Be sure to check the full project on GitHub for the details of any particular step that might be of interest to you.
Once complete, though, a JWT is returned. Using Swagger, we can of course test that this, in fact, works. Changing any of the values will generate an appropriate "unauthorized" result, as one would expect. But if we enter a valid set of parameters, we'll end up with a JWT.
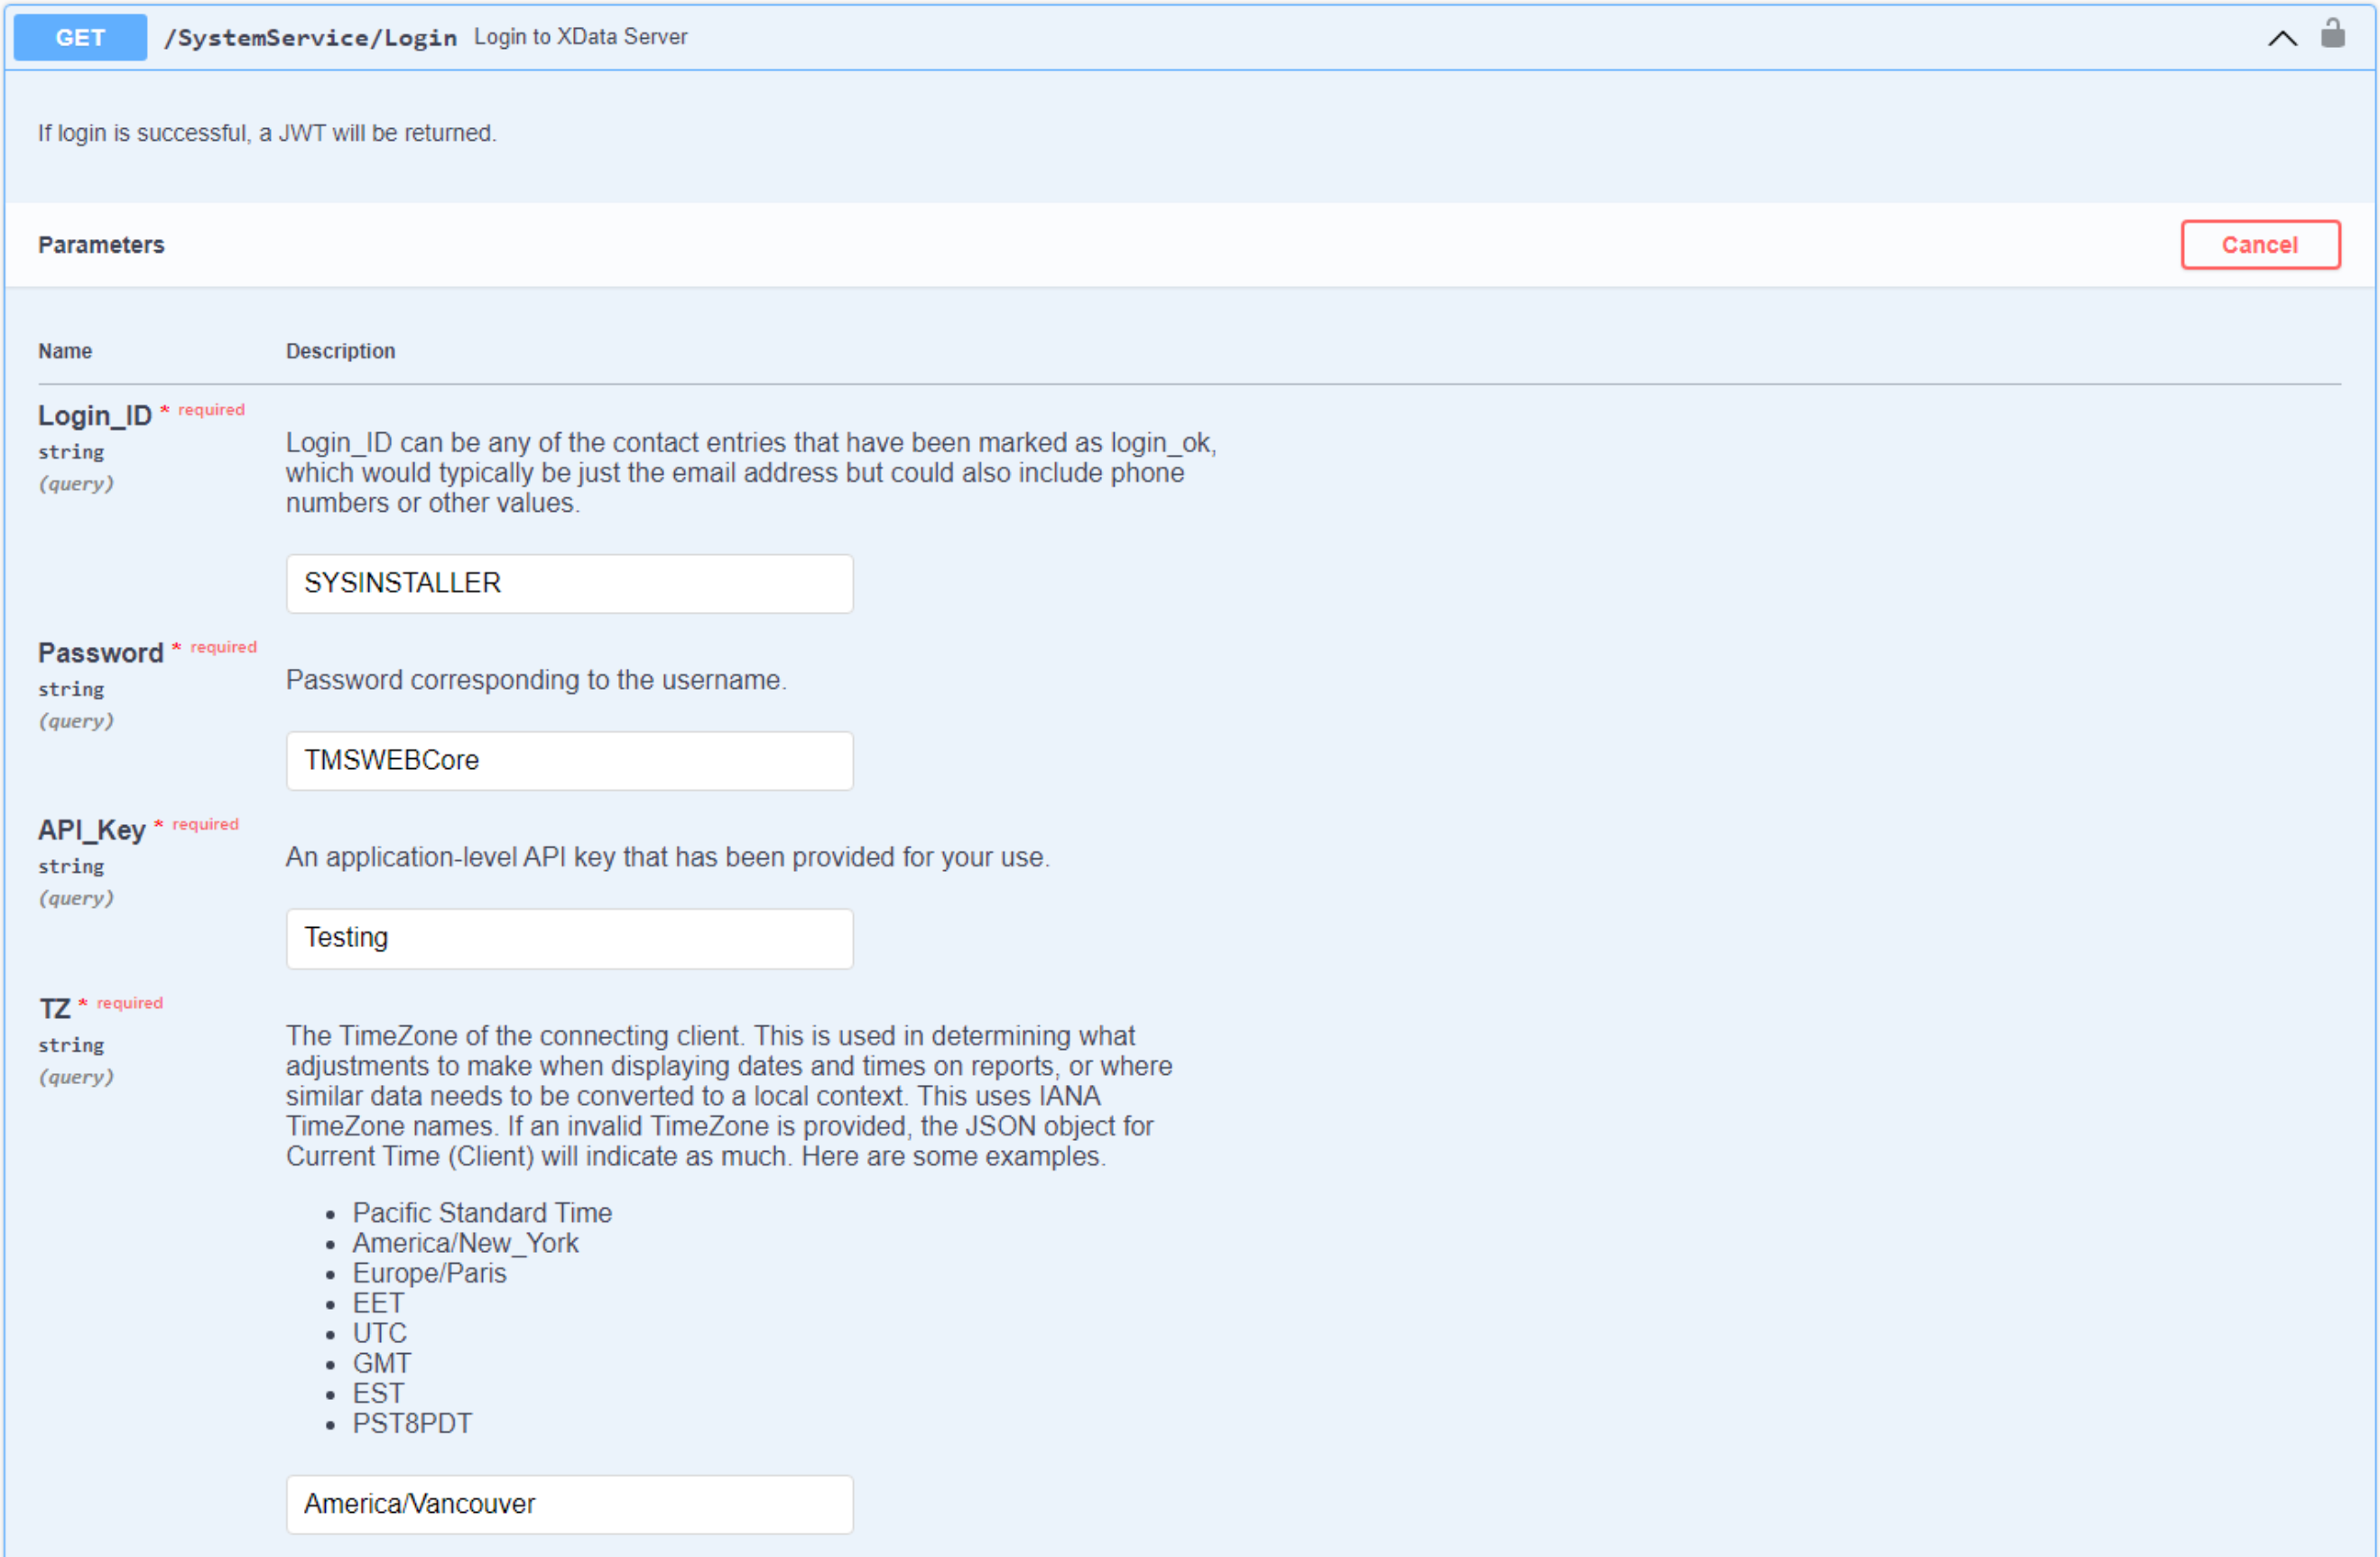
Logging in via Swagger.
Once the parameters are filled in, clicking the Execute button sends off the request, hopefully returning a JWT.
In case something is amiss, Swagger will return one of the exception messages that we've defined. If we get a
JWT, it will look something like this. Here, the "Bearer" prefix is already included.
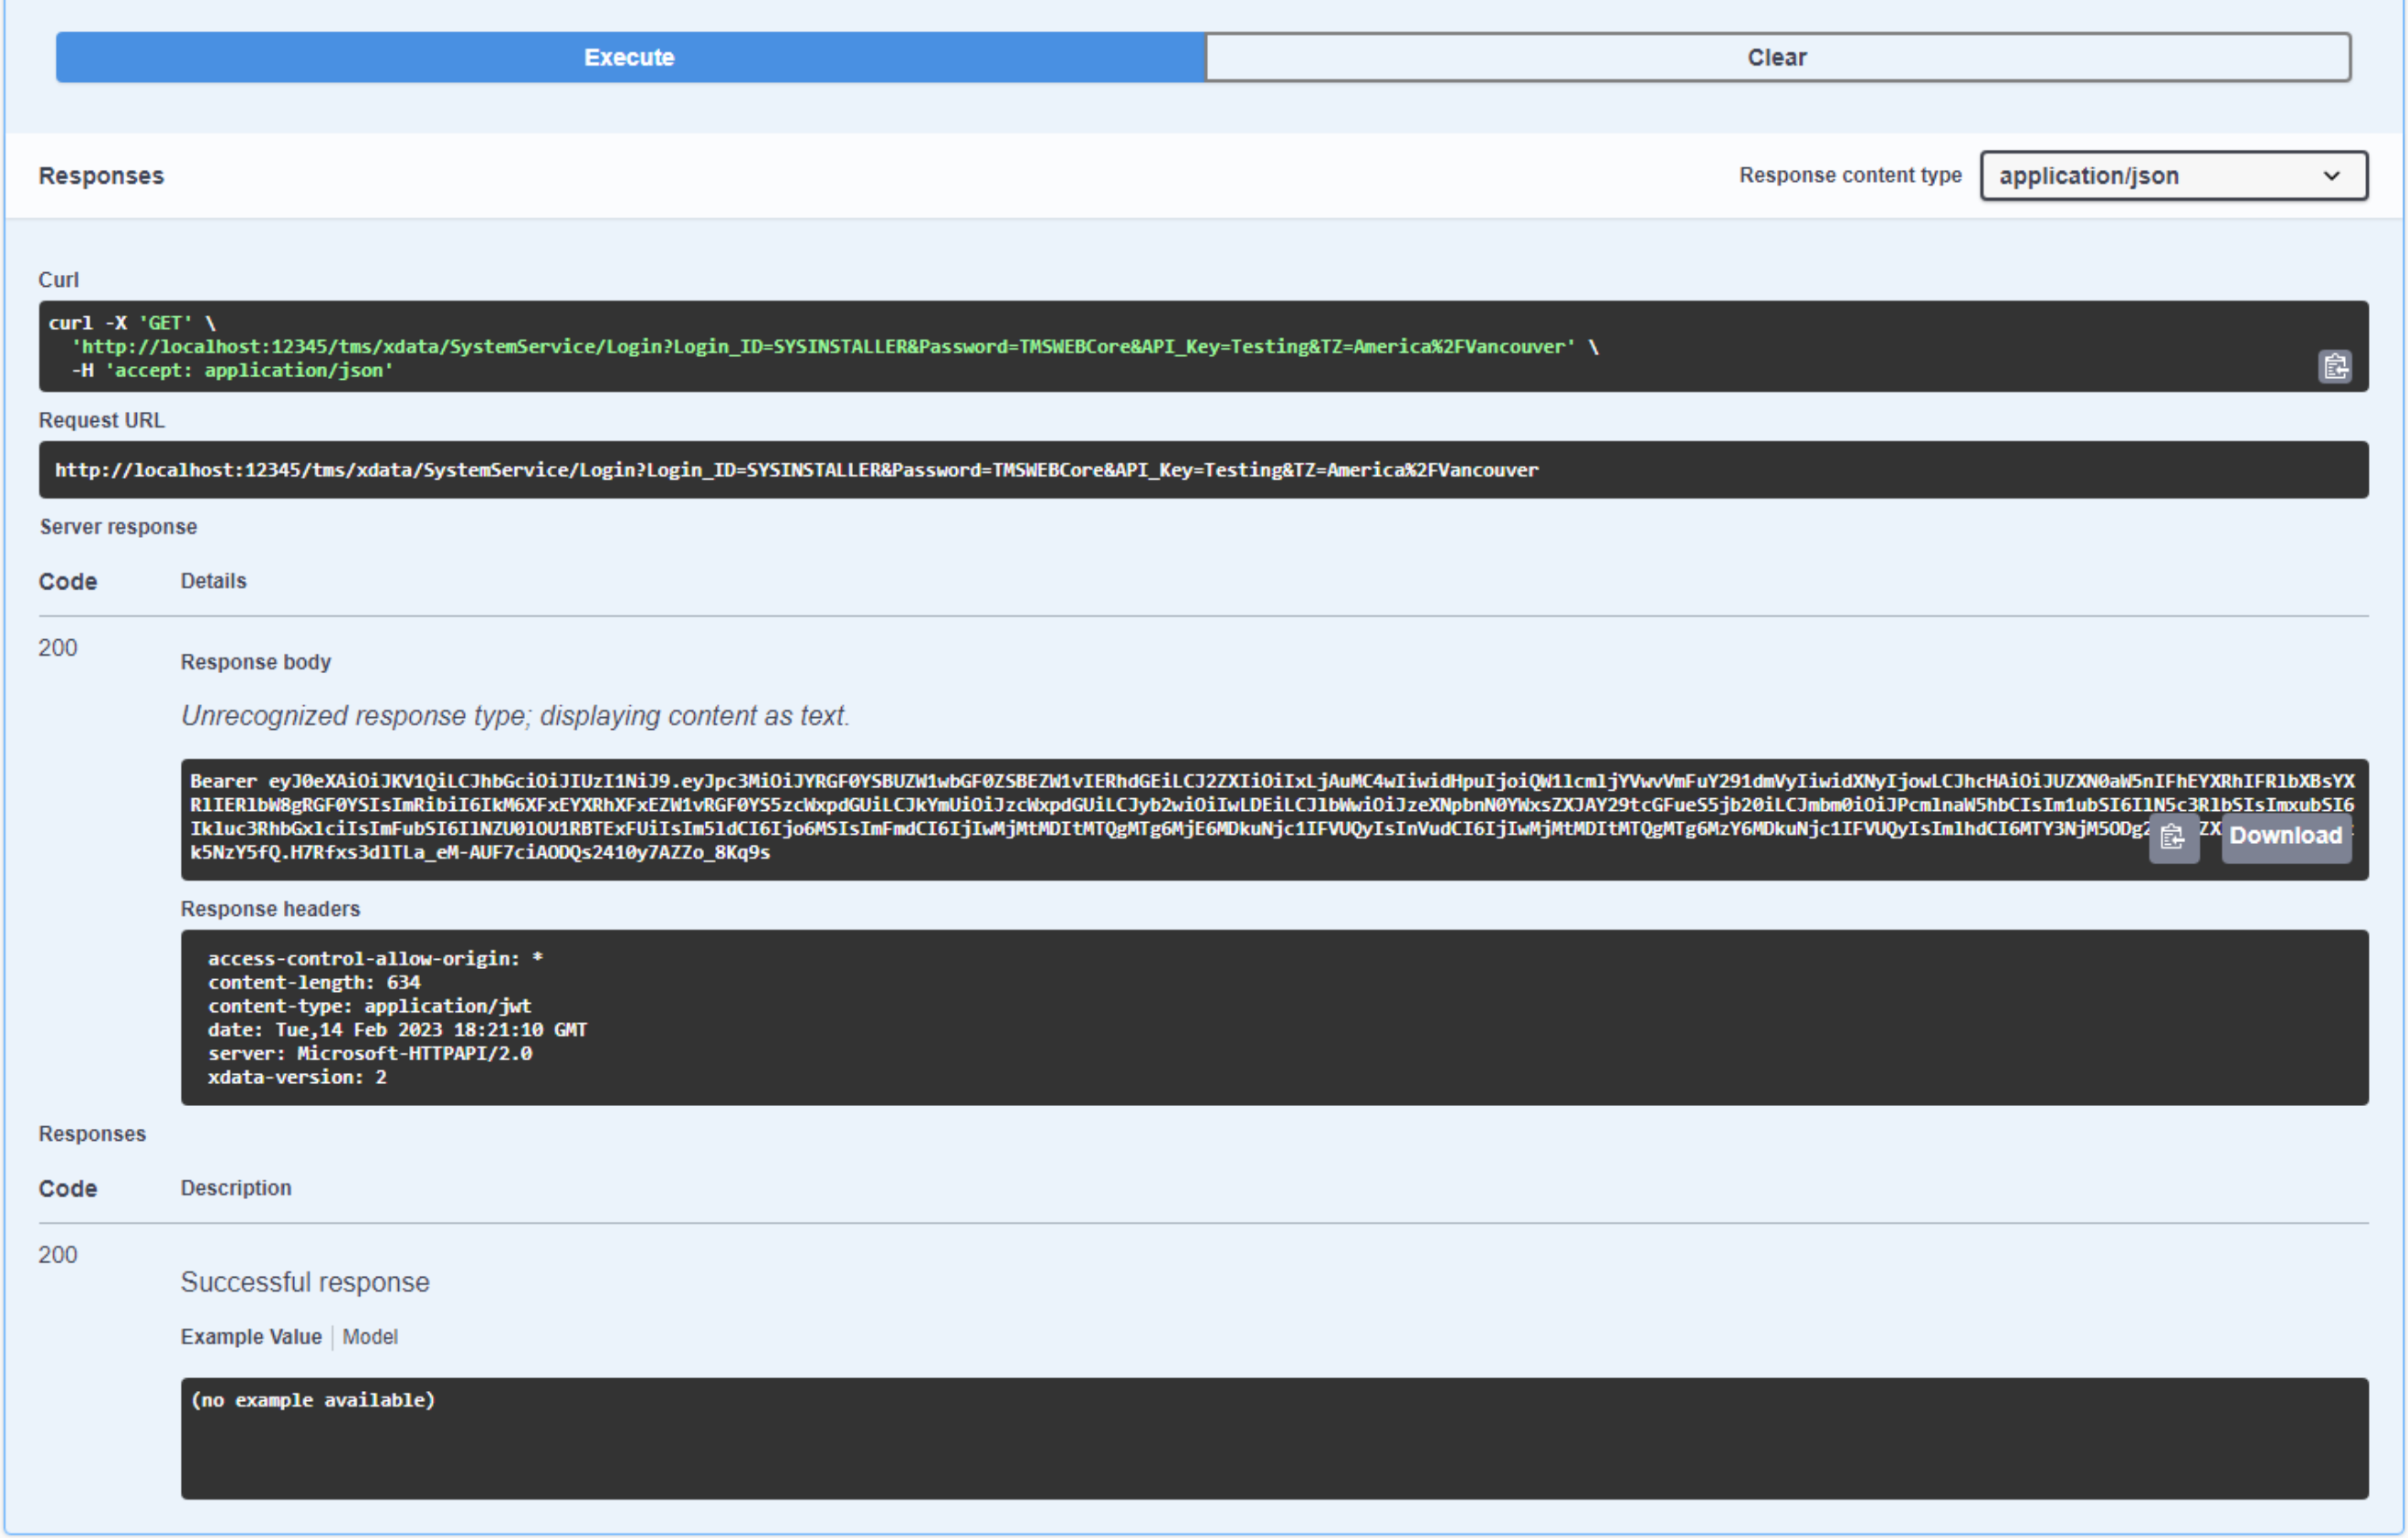
Login Successfully Returned a JWT.
To quickly check and see what is actually in the JWT, copy & paste the JWT (leaving out the Bearer prefix)
into a website like JWT.io. This will decode the claims part of the JWT so you can see what is included. Don't
paste anything there that is critical, naturally, but it is handy for checking that the claims are what you
expect. Common things to look for? Maybe you've added two claims with the same name (so one is
missing), or the date/time formats are not what you expected, that sort of thing.
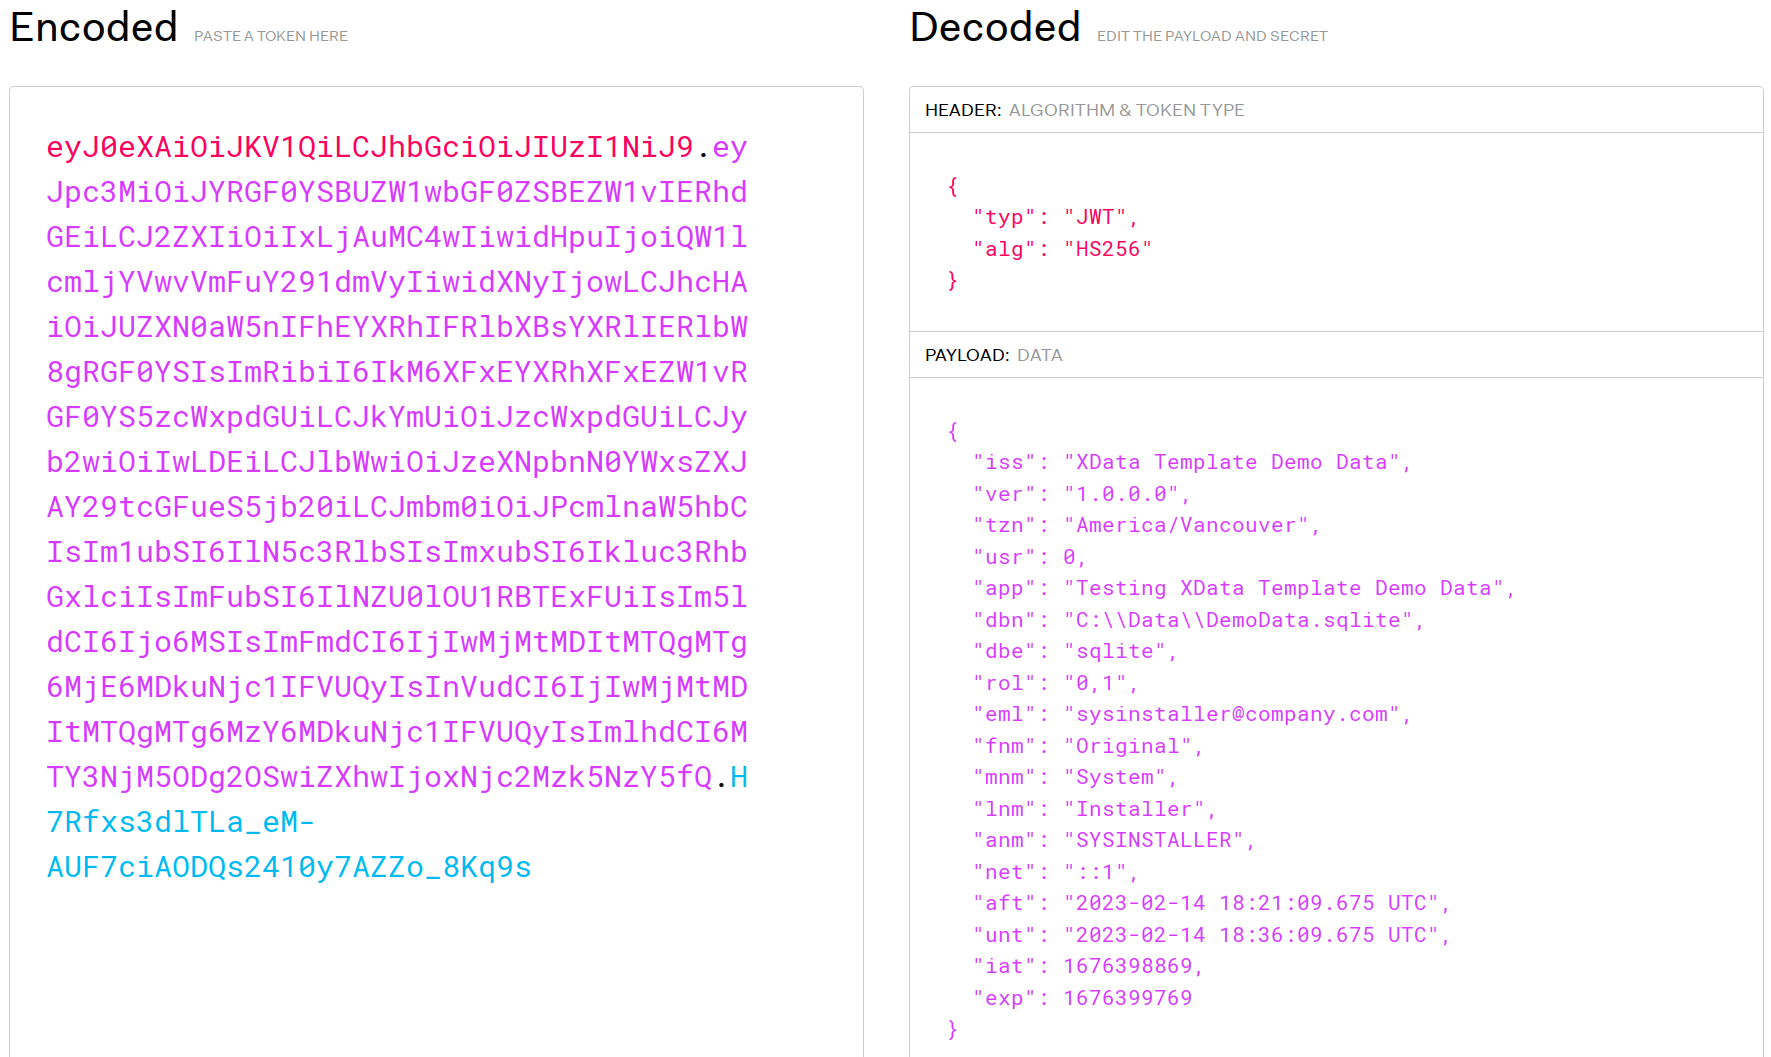
JWT Decoded at JWT.io.
Some of these claims are a bit redundant but are included to make them a little easier to read. Like the
"after/until" dates, which are the same as the "iat/exp" dates, just displayed as human-readable dates rather
than the Unix epoch format. From the client perspective, it generally doesn't care at all what is in it. The
client just receives it as part of the login process and then includes it as part of the authorization header
when making subsequent requests. We'll also be able to test that out in Swagger, which we'll cover in the next
section.
More Endpoints. More Queries. More of Everything.
With our Login endpoint, we've got an example of how we can pass parameters, and then use these as inputs to a series of SQL queries of different flavors. But what if we want to return a dataset of some kind from a query? We don't know what kinds of other applications might want to use our service, so let's plan on supporting a variety of formats.As this is likely to be a pretty common thing to want to do, we'll add it as a function in our DBSupport unit, Unit3. All this does is take a query that is active (one with a result set, presumably) and return the data as a TMemoryStream in the selected format.
procedure TDBSupport.Export(Format: String; QueryResult: TFDQuery;  var OutputStream: TStream);
var
  ContentFormat: String;
  ContentType: String;

  L: TStringList;
  S: String;

  bm: TFDBatchMove;
  bw: TFDBatchMoveJSONWriter;
  br: TFDBatchMoveDataSetReader;

  ms: TMemoryStream;

  i: Integer;
begin
  ContentFormat := Uppercase(Trim(Format));
  ContentType := 'text/plain';


  if (ContentFormat = 'FIREDAC') then
  begin
    ContentType := 'application/json';
    OutputStream := TMemoryStream.Create;
    QueryResult.SaveToStream(OutputStream, sfJSON);
  end

  else if (ContentFormat = 'XML') then
  begin
    ContentType := 'application/xml';
    OutputStream := TMemoryStream.Create;
    CoInitialize(nil);
    try
      QueryResult.SaveToStream(OutputStream, sfXML);
    finally
      CoUninitialize;
    end;
  end

  else if (ContentFormat = 'BINARY') then
  begin
    ContentType := 'text/plain';
    ms := TMemoryStream.Create;
    try
      QueryResult.SaveToStream(ms,sfBinary);
      ms.Position := 0;
      OutputStream := TMemoryStream.Create;
      TNetEncoding.Base64.Encode(ms, OutputStream);
    finally
      ms.Free;
    end;
  end

  else if (ContentFormat = 'PLAIN') then
  begin
    ContentType := 'text/plain';
    L := TStringList.Create;
    S := '';
    try
      QueryResult.First;
      while not QueryResult.Eof do
      begin
        S := '';
        for i := 0 to QueryResult.FieldCount - 1 do
        begin
          if (S > '') then S := S + '';
          S := S + '' + QueryResult.Fields[i].AsString + '';
        end;
        L.Add(S);
        QueryResult.Next;
      end;
    finally
      OutputStream := TMemoryStream.Create;
      L.SaveToStream(OutputStream);
      L.Free;
    end;
  end

  else if (ContentFormat = 'CSV') then
  begin
    ContentType := 'text/csv';
    L := TStringList.Create;
    S := '';
    for i := 0 to QueryResult.FieldCount - 1 do
    begin
      if (S > '') then S := S + ',';
      S := S + '"' +QueryResult.FieldDefs.Items[I].Name + '"';
    end;
    L.Add(S);
    try
      QueryResult.First;
      while not (QueryResult.EOF) do
      begin
        S := '';
        for i := 0 to QueryResult.FieldCount - 1 do
        begin
          if (S > '') then S := S + ',';
          S := S + '"' + QueryResult.Fields[I].AsString + '"';
        end;
        L.Add(S);
        QueryResult.Next;
      end;
    finally
      OutputStream := TMemoryStream.Create;
      L.SaveToStream(OutputStream);
      L.Free;
    end;
  end

  else // if ContentFormat = 'JSON' then
  begin
    ContentType := 'application/json';
    OutputStream := TMemoryStream.Create;
    bm := TFDBatchMove.Create(nil);
    bw := TFDBatchMoveJSONWriter.Create(nil);
    br := TFDBatchMoveDataSetReader.Create(nil);
    try
      br.Dataset := QueryResult;
      bw.Stream := OutputStream;
      bm.Reader := br;
      bm.Writer := bw;
      bm.Execute;
    finally
      br.Free;
      bw.Free;
      bm.Free;
    end;
  end;

  TXDataOperationContext.Current.Response.Headers.SetValue('content-type', ContentType);

end;
There are a handful of formats here that may or may not be all that useful to a client application.
- FIREDAC - This is a special kind of JSON that FireDAC exports that contains everything you'd need to recreate the dataset, including data types. As TMS WEB Core doesn't natively support FireDAC, a TMS WEB Core client would have to do a bit of extra work if this level of detail was needed, which you can read about here.
- XML - Great for exchanging data with other complex clients that are XML-aware.
- BINARY - Useful when transferring data to another FireDAC instance, perhaps a VCL client.
- PLAIN - Simplest version of the data, not really all that easy to parse though.
- CSV - Includes headers, good for when the client isn't very sophisticated - kind of a lowest-common-denominator format, good for Excel, etc.
- JSON - a simpler version of JSON that is just an array that includes column names and field data without anything further in terms of data types or field lengths. Likely to be the most popular.
As an example, let's say we want to have a "directory" function - just the list of people and their contact information. A simple query, really. So what does our endpoint need to do? A few things.
- Check that the request is authorized.
- Check that the JWT is still valid (not revoked).
- Run the query.
- Export the result in the selected format.
- Add an entry to the endpoint log.
As we'll want these kinds of queries to be authorized in advance, we can add an [authorize] attribute in the
interface unit where the endpoint is first defined. For our example here, this looks like the following.
    ///  <summary>
    ///    Return directory dataset.
    ///  </summary>
    ///  <remarks>
    ///    All person records are returned, along with their contact information.
    ///  </remarks>
    ///  <param name="format">
    ///     Valid dataset formats for this request include the following.
    ///    - CSV - Comma Separated Values Format, includes header row
    ///    - PLAIN - No delimiters or header row
    ///    - FIREDAC: FireDAC JSON Format
    ///    - BINARY: FireDAC Binary Format
    ///    - XML: FireDAC XML Format
    ///    - JSON: Simple JSON Format
    ///  </param>
    [Authorize] [HttpGet] function Directory(Format: String): TStream;
Note that we're again returning a TStream. The implementation then looks like this.
function TPersonService.Directory(Format: String): TStream;
var
  DBConn: TFDConnection;
  Query1: TFDQuery;
  DatabaseName: String;
  DatabaseEngine: String;
  ClientTimeZone: TBundledTimeZone;
  ValidTimeZone: Boolean;
  ElapsedTime: TDateTime;
  User: IUserIdentity;
  JWT: String;
begin

  // Time this event
  ElapsedTime := Now;

  // Get data from the JWT
  User := TXDataOperationContext.Current.Request.User;
  JWT := TXDataOperationContext.Current.Request.Headers.Get('Authorization');
  if (User = nil) then raise EXDataHttpUnauthorized.Create('Missing authentication');

  // Setup DB connection and query
  try
    DatabaseName := User.Claims.Find('dbn').AsString;
    DatabaseEngine := User.Claims.Find('dbe').AsString;
    DBSupport.ConnectQuery(DBConn, Query1, DatabaseName, DatabaseEngine);
  except on E: Exception do
    begin
      MainForm.mmInfo.Lines.Add('['+E.Classname+'] '+E.Message);
      raise EXDataHttpUnauthorized.Create('Internal Error: CQ');
    end;
  end;

  // Check if we've got a valid JWT (one that has not been revoked)
  try
    {$Include sql\system\jwt_check\jwt_check.inc}
    Query1.ParamByName('TOKENHASH').AsString := DBSupport.HashThis(JWT);
    Query1.Open;
  except on E: Exception do
    begin
      MainForm.mmInfo.Lines.Add('['+E.Classname+'] '+E.Message);
      raise EXDataHttpUnauthorized.Create('Internal Error: JC');
    end;
  end;
  if Query1.RecordCount <> 1 then raise EXDataHttpUnauthorized.Create('JWT was not validated');

  try
    {$Include sql\person\directory\directory.inc}
    Query1.Open;
  except on E: Exception do
    begin
      MainForm.mmInfo.Lines.Add('['+E.Classname+'] '+E.Message);
      raise EXDataHttpUnauthorized.Create('Internal Error: Directory');
    end;
  end;

  // Assuming Result is an uninitialized TStream
  DBSupport.Export(Format, Query1, Result);

  // Keep track of endpoint history
  try
    {$Include sql\system\endpoint_history_insert\endpoint_history_insert.inc}
    Query1.ParamByName('ENDPOINT').AsString := 'SystemService.Login';
    Query1.ParamByName('ACCESSED').AsDateTime := TTimeZone.local.ToUniversalTime(ElapsedTime);
    Query1.ParamByName('IPADDRESS').AsString := TXDataOperationContext.Current.Request.RemoteIP;
    Query1.ParamByName('APPLICATION').AsString := User.Claims.Find('app').AsString;
    Query1.ParamByName('DATABASENAME').AsString := DatabaseName;
    Query1.ParamByName('DATABASEENGINE').AsString := DatabaseEngine;
    Query1.ParamByName('EXECUTIONMS').AsInteger := MillisecondsBetween(Now,ElapsedTime);
    Query1.ParamByName('DETAILS').AsString := '['+Format+']';
    Query1.ExecSQL;
  except on E: Exception do
    begin
      MainForm.mmInfo.Lines.Add('['+E.Classname+'] '+E.Message);
      raise EXDataHttpUnauthorized.Create('Internal Error: EHI');
    end;
  end;

  // All Done
  try
    DBSupport.DisconnectQuery(DBConn, Query1);
  except on E: Exception do
    begin
      MainForm.mmInfo.Lines.Add('['+E.Classname+'] '+E.Message);
      raise EXDataHttpUnauthorized.Create('Internal Error: DQ');
    end;
  end;
end;
With a bit of work, this function could be reduced a bit further by coding the common bits into another DBSupport function or two. But ultimately we'll want to run the same code regardless of how it is packaged. As this is now an authorized function, in order to run it within Swagger we'll need to first use the login endpoint to get a JWT, and then copy and paste that into the login field, accessible from any of the lock buttons within Swagger, before we can use our new endpoint.
If all goes according to plan, you'll get the following result.
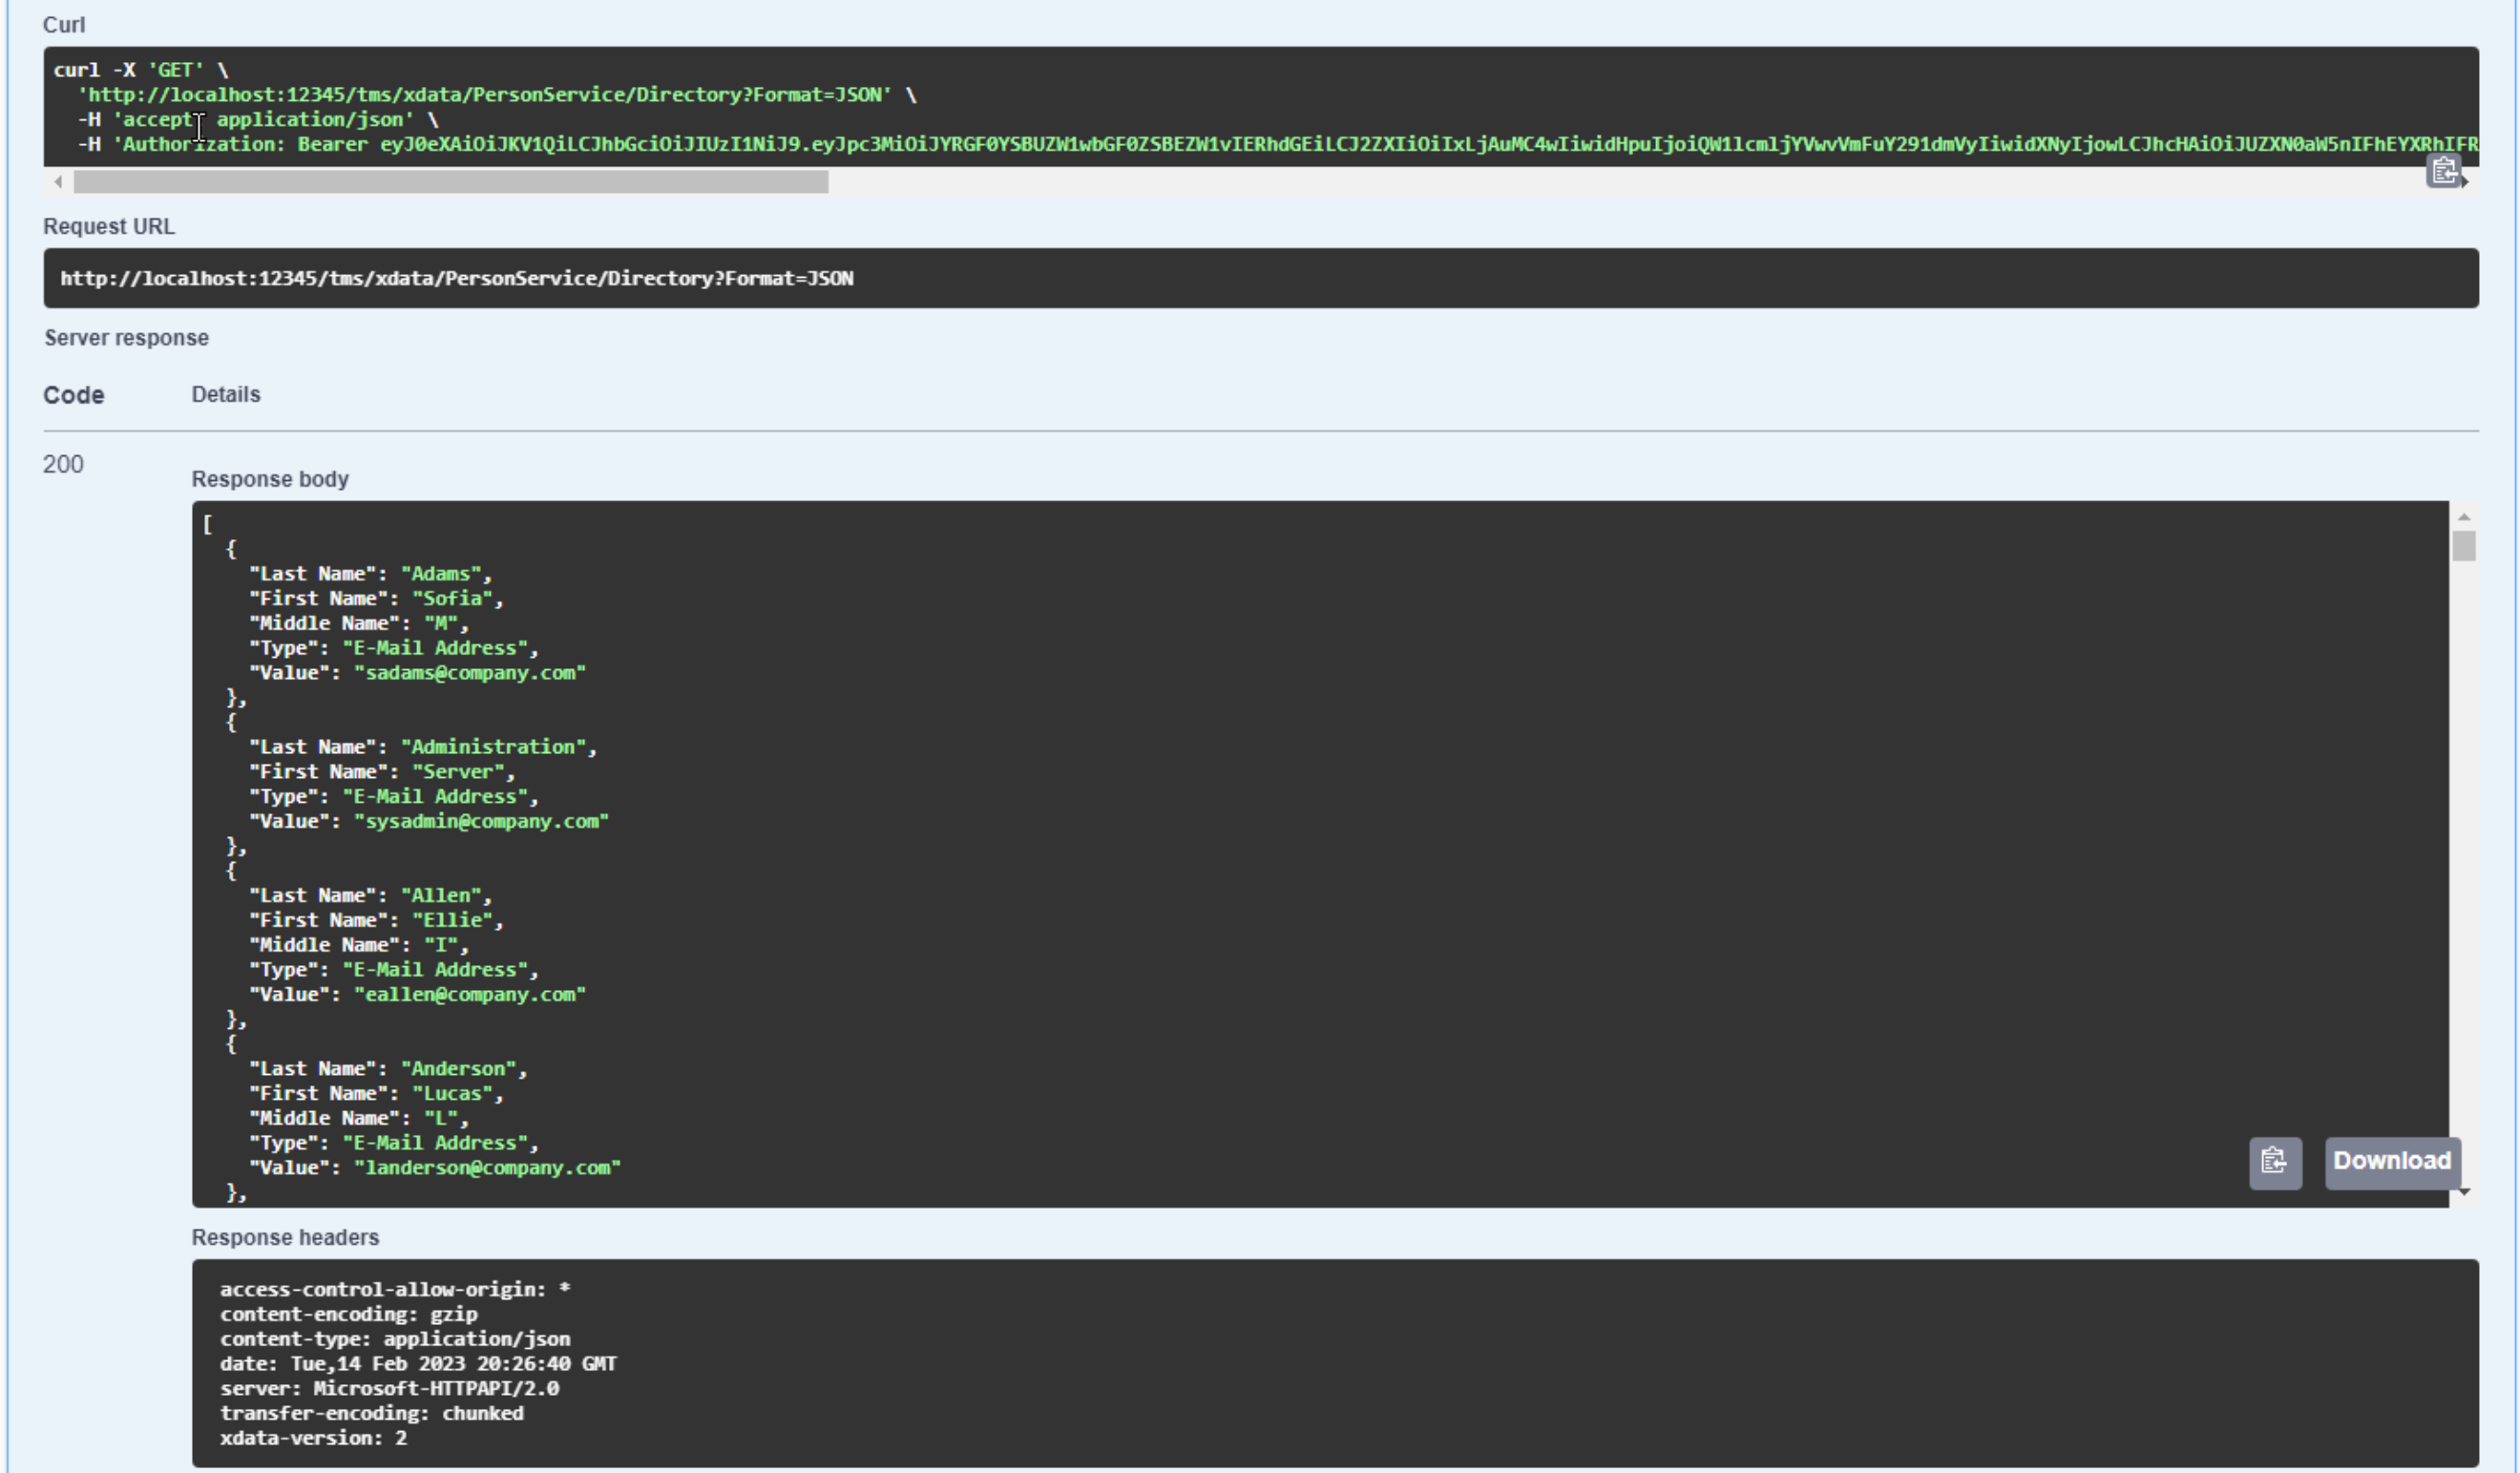
Query Result.
When testing, it would be convenient to have a longer expiration time for the JWT so you don't have to go
through the login process quite so often. But if you leave the Swagger page open, logging in again is just a few clicks, so
not too much trouble.
Note also that we're returning JSON that results from a query, so essentially an array of
records. If a person had two contact records, for example, you'd end up with two records in the JSON that is returned, rather
than a person record with two contact objects as children of that person, like you might otherwise see in other JSON
examples. That could be done here with a more complex SQL query, but not really what we're after at the moment.
Just Getting Warmed Up.
This is the basics of the XData Template. Naturally, we'll need quite a few more tables to make an interesting application, along with more sample data. But this gets us moving pretty well, and plenty enough to help with the next post - wiring up an HTML template that can serve as a front-end for this kind of data.
If any of this is of interest to you, keep an eye on the GitHub repository. It will get updated to include other database engines and will be used as the starting point for at least a couple of future blog posts currently simmering away.
And if you've got some ideas about how this could be improved in a way that would make it more useful for your projects, by all means, please post a comment below, open an Issue on GitHub, or perhaps even contribute some code to the project.
XData
Template Project on GitHub
Templates - Part 1 of 2: TMS XData
Templates - Part 2 of 2: AdminLTE 4
Templates: Bonus Content
Follow Andrew on 𝕏 at @WebCoreAndMore or join our 𝕏 Web Core and More Community.
Update (2023-Feb-26): Minor corrections and fixes, Login endpoint updated with additional code for freeing query in exception conditions, additional notes relating to thread-safe calls, added detail for Export function.
Andrew Simard

This blog post has received 7 comments.
 2. Friday, February 24, 2023 at 8:28:46 PM
You are most welcome! And thank you very much for posting. Comments are generally the only feedback I get so I appreciate them very much!
2. Friday, February 24, 2023 at 8:28:46 PM
You are most welcome! And thank you very much for posting. Comments are generally the only feedback I get so I appreciate them very much!
Andrew Simard
3. Saturday, February 25, 2023 at 10:05:32 PM
Looking forward to working through this one - great article.
Winstanley Tim
4. Sunday, February 26, 2023 at 12:21:41 AM
Thanks! There is a lot here, apologies for the length, but I had an end-goal in mind - going from a blank page to a functioning and useful base to build off of. The next post will help bring a lot of this into focus.
Andrew Simard
5. Monday, February 27, 2023 at 12:13:22 AM
Awesome article, Andrew! A great material for those beginning with XData, thank you!
Wagner Landgraf
6. Monday, February 27, 2023 at 2:34:42 AM
Thanks! And you are most welcome. And this is just the first two endpoints. Imagine what else is possible!
Andrew Simard
7. Sunday, March 5, 2023 at 4:58:15 PM
Hi Andrew ,i will start a project and i decide to use TMS for this.
I read your articles and i must thank to you .
I follow your github page and will feedback.
DERNEGI CANSUYU
All Blog Posts | Next Post | Previous Post
Thanks for, yet again, a great article.
You have a friendly and detailed writing style, easy to follow along even for beginners, I really like it.
Kind regards,
Ole
Ole Ekerhovd