Blog
All Blog Posts | Next Post | Previous Post

 TMS WEB Core and More with Andrew:
Working with Home Assistant - Part 4: Sensors
Friday, February 10, 2023

Last time out, we got our TMS
WEB Core app up and running, using the Miletus
Framework. The basic layout of the app was created, and we sorted out the WebSocket
API connection to the Home
Assistant server. This time out, we're going to deal with the rest of the data returned by the Home
Assistant server, resulting from the "get_states" and "subscribe_events" calls. We'll also wrap up the
Configuration pages of our UI and add a bit more to the overall structure of our app in preparation for the posts
that follow.
About Those Buttons.
Once we got connected to the Home Assistant server, we enabled the three buttons at the bottom of the Configuration page. But we never really covered what they were for. We'll get to all three in this post, but first, let's ease into things by having a look at the buttons themselves.

Configuration Buttons.
There's a little more going on there than just a standard button. Two icons. Different colors. Left-aligned multi-line text. And, in fact, icons from entirely different sources. The arrows come courtesy of Font Awesome. But for some reason, there isn't a Home Assistant icon in Font Awesome. Home Assistant itself uses primarily Material Design Icons throughout. And, unsurprisingly, they do have an official Home Assistant icon. We'll have a use for other Material Design Icons as well, so let's add another JavaScript library, or in this case, a CSS library, to the mix by including these icons in our Project.html file.
<link rel="stylesheet" href="https://cdn.jsdelivr.net/npm/@mdi/font@7.1.96/css/materialdesignicons.min.css">
With Font Awesome, we can add icons by using an <i> tag, as in <i class="fa-solid fa-right-long"></i>. With Material Design Icons, we need to use classes, as in <span class="mdi mdi-home-assistant"></span>. Within Home Assistant itself, icons are usually referenced using a convention that indicates what kind of icons are being used, as in "mdi:home-assistant".
Converting from Home Assistant icon references into the CSS class versions isn't much of a problem. As TWebButton components can take HTML as part of their "Caption" property, we're free to do whatever we like to layout the content of our buttons. Even if it is a little over the top at times. Here's what the "Caption" property contains for the first of these three buttons. The others are very similar.
<div class="d-flex align-items-center justify-content-stretch flex-row">
  <i class="fa-solid fa-right-left fa-fw" style="color:black; font-size:24px;"></i>
  <div class="pe-2 mdi mdi-home-assistant" style="color:#3399CC; font-size:32px;"></div>
  <div class="lh-1" style="color:black;text-align:left;">
    Update Links to<br />
    Home Assistant
  </div>
</div>
Now, this isn't to say that you have to do this kind of thing. It would be easy enough to set the
TWebButton "Caption" property to "Update Links" and call it a day. But if you want to, you can indeed
have very finely-tuned control over even the smallest parts of literally everything on the button, or indeed on
the page. And this is a bit of a theme we'll be revisiting in future posts in this miniseries - that you can
craft anything you like. There aren't really any limits imposed here. While we use many components and
third-party tools to make our work easier, at the end of the day, as developers, we still have all the means at
our disposal to design whatever we like.
Sensors and States.
With that out of the way, we're back to looking at the data coming from the Home Assistant server. At the end of the last post, we had a look at what was returned when we sent a "get_config" request. An assortment of measurement units, location information, and so on that we can use later on when displaying data.
Tthe data that we'll be displaying comes from the state data stored within the Home Assistant database. Each object defined in Home Assistant has an "entity_id" that is stored along with whatever state information, values, attributes, and so on that pertain to that object. Often, these objects are "sensors" - bits of data that report the given state of something, or even a calculation of some kind. Some objects, like a light switch, might have very little associated information. Others, like the current weather forecast, might be very complex with dozens of values.
When we issue the "get_states" command, the Home Assistant server will return all of its state information, unfiltered. This comes back as a giant array. It may contain dozens, hundreds, or even thousands of entries, depending on how much data is being fed into Home Assistant. As this is the second request posted in our code, it initially comes back with an "id" of "2". But subsequent connection resets may return a different "id" value, so we keep track of this using the same approach we did previously, this time using the HAGetStates variable. Here's what the data looks like in the browser console.
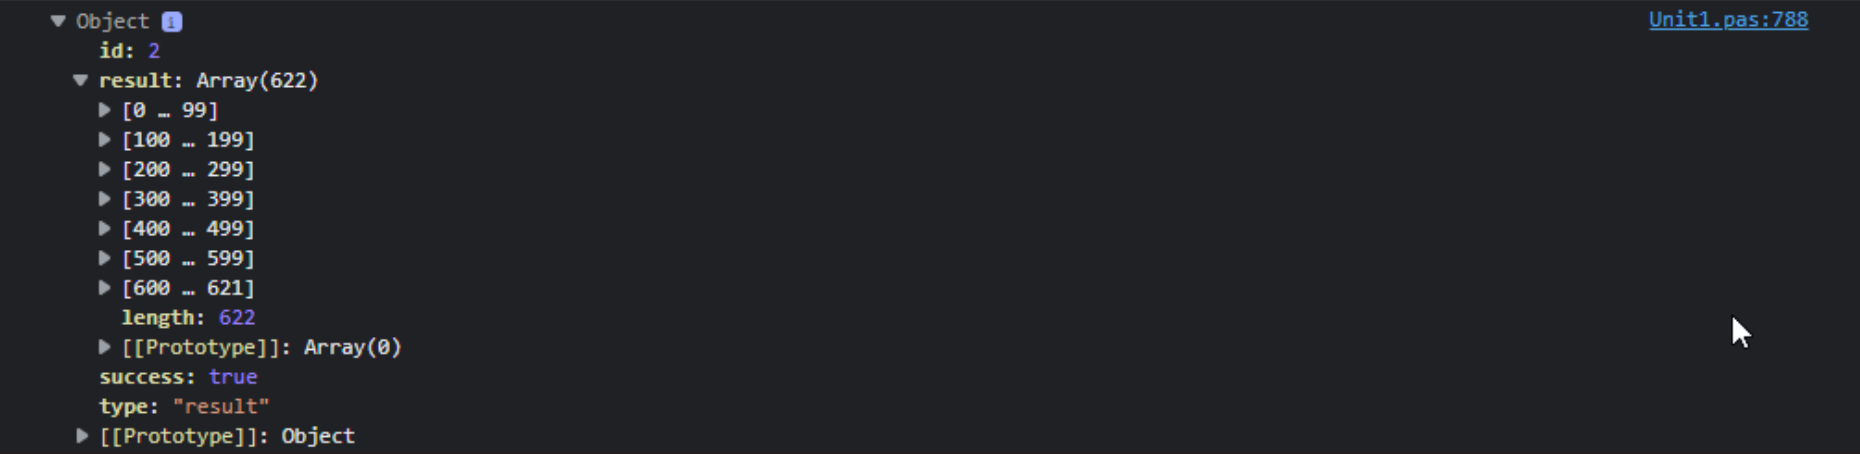
Home Assistant get_states Results.
That's a lot of data (622 array elements), which is one of the reasons why we don't really want to poll the Home
Assistant server for this - we'd have to parse through all of this data each time. If we search through this
array, we can find a simple example of an object, such as a Dining Table light. This happens to represent a
single Philips Hue color bulb. The "entity_id" reference for this is "light.dining_table".
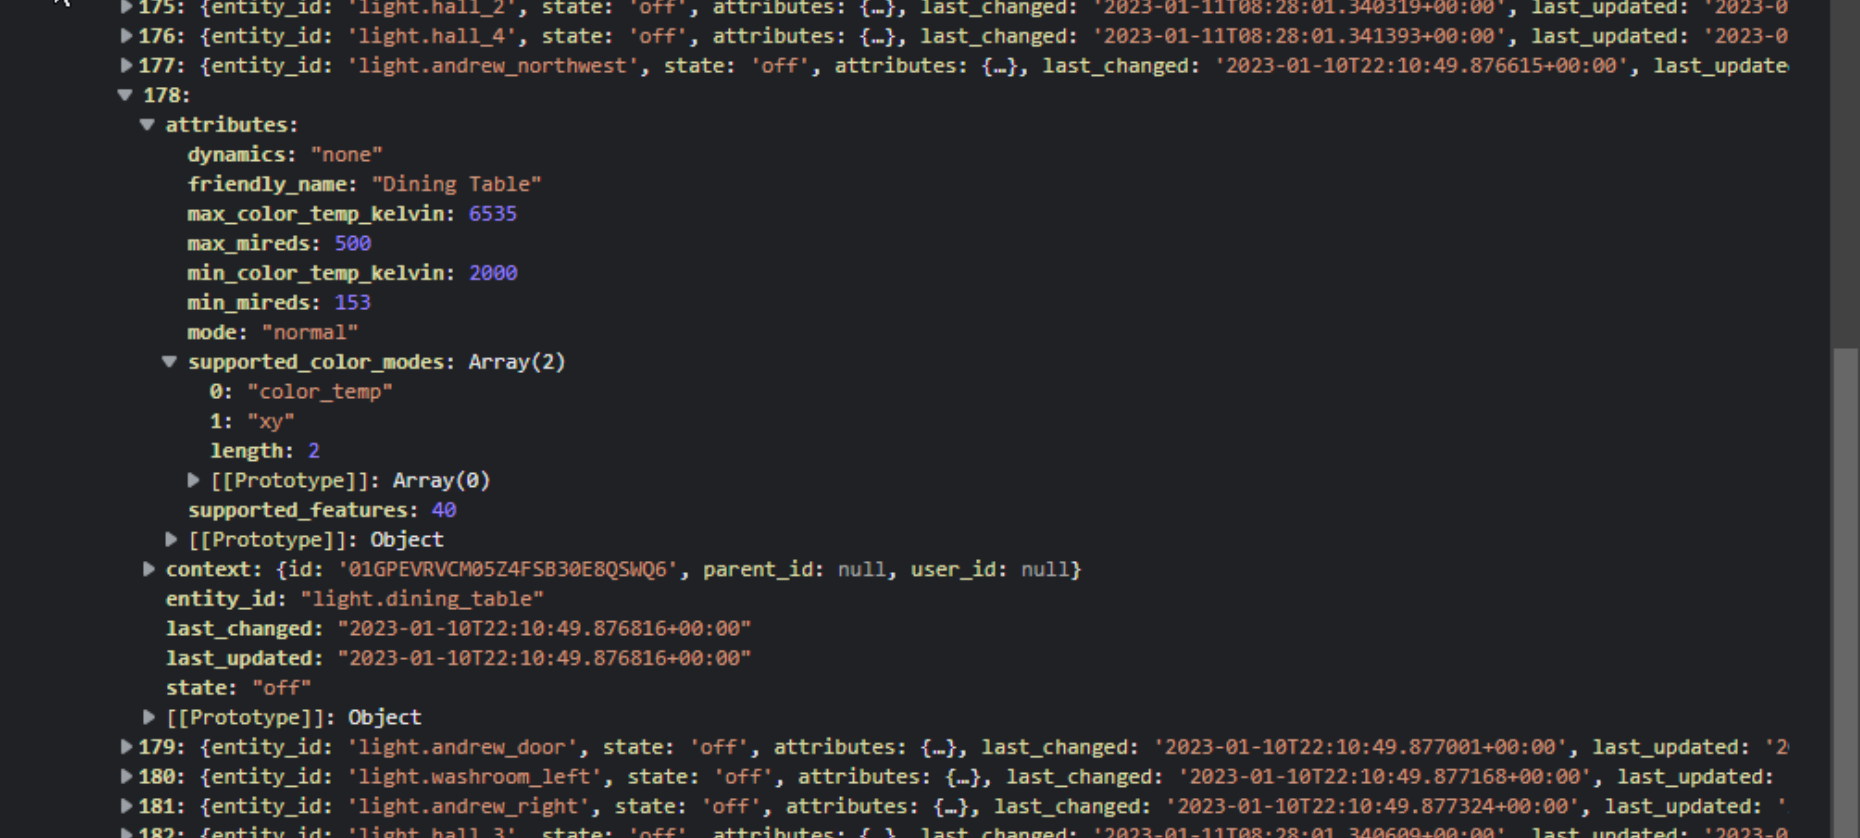
State Information for a Philips Hue Light.
We can even find the data we created in the second post of this miniseries, concerning our XData server. The
"entity_id" for this was something we created ourselves, "sensor.actorious_server_memory".
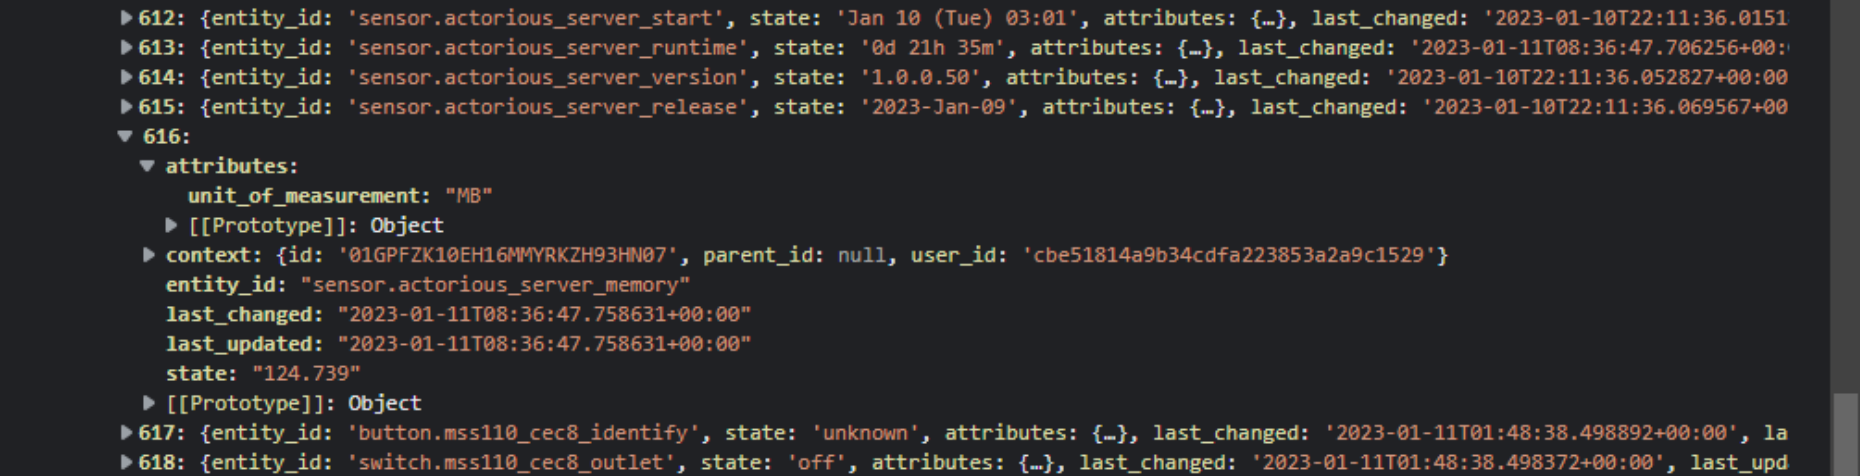
Custom State Information.
For a more complex object, here's what is found within the weather forecast for my location. Weather information
is a tricky business in Home Assistant, with many national sources of data available, with different conventions
for how the data is represented. For now, we can see that the "entity_id" in this case is
"weather.vancouver_hourly_forecast".
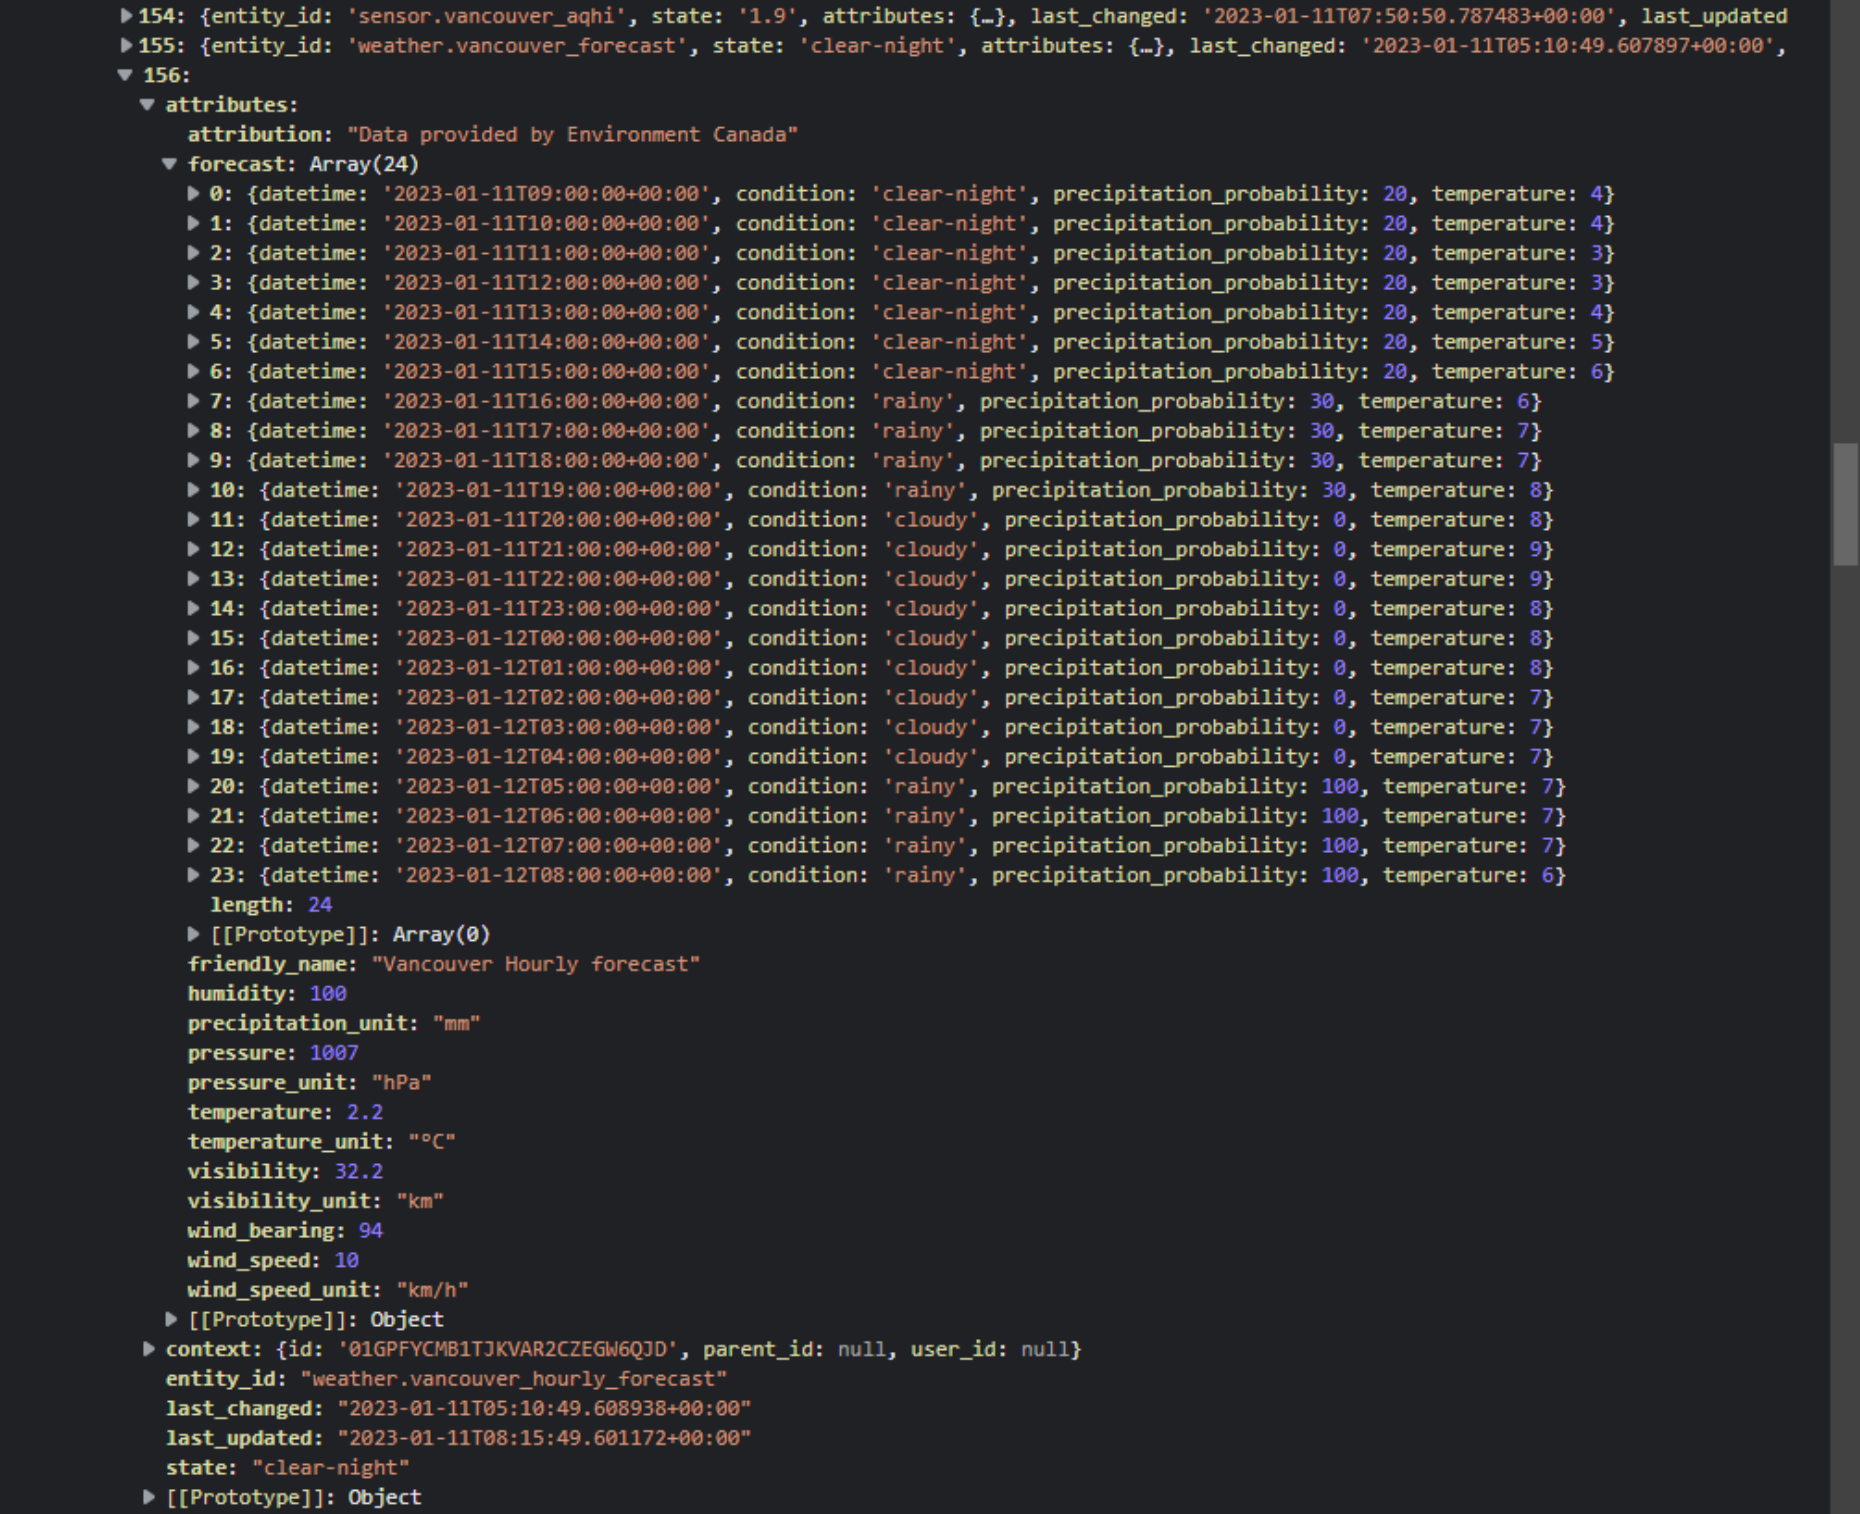
Weather Forecast Information.
Combined, this block of JSON containing all the current Home Assistant state information comes in at nearly
300k for my installation. Not hard to imagine this exceeding 1MB for a larger home with more sensors. We don't really want to have to wade through all of this data repeatedly, particularly if we're running on
a much smaller device like a Raspberry Pi.
Fortunately, we usually only have to look at this particular block of JSON
when first connecting, to get the current state of objects that we're most interested in, and maybe sporadically after that, if we make Configuration changes, for example.
After the app has initialized, we can keep tabs on those objects by monitoring the other request we made to
"subscribe_events". This sends back a block of JSON for each individual object that has changed state. This
JSON is considerably smaller and in a slightly different format. Here's what comes back when
"light.dining_table" is switched on.
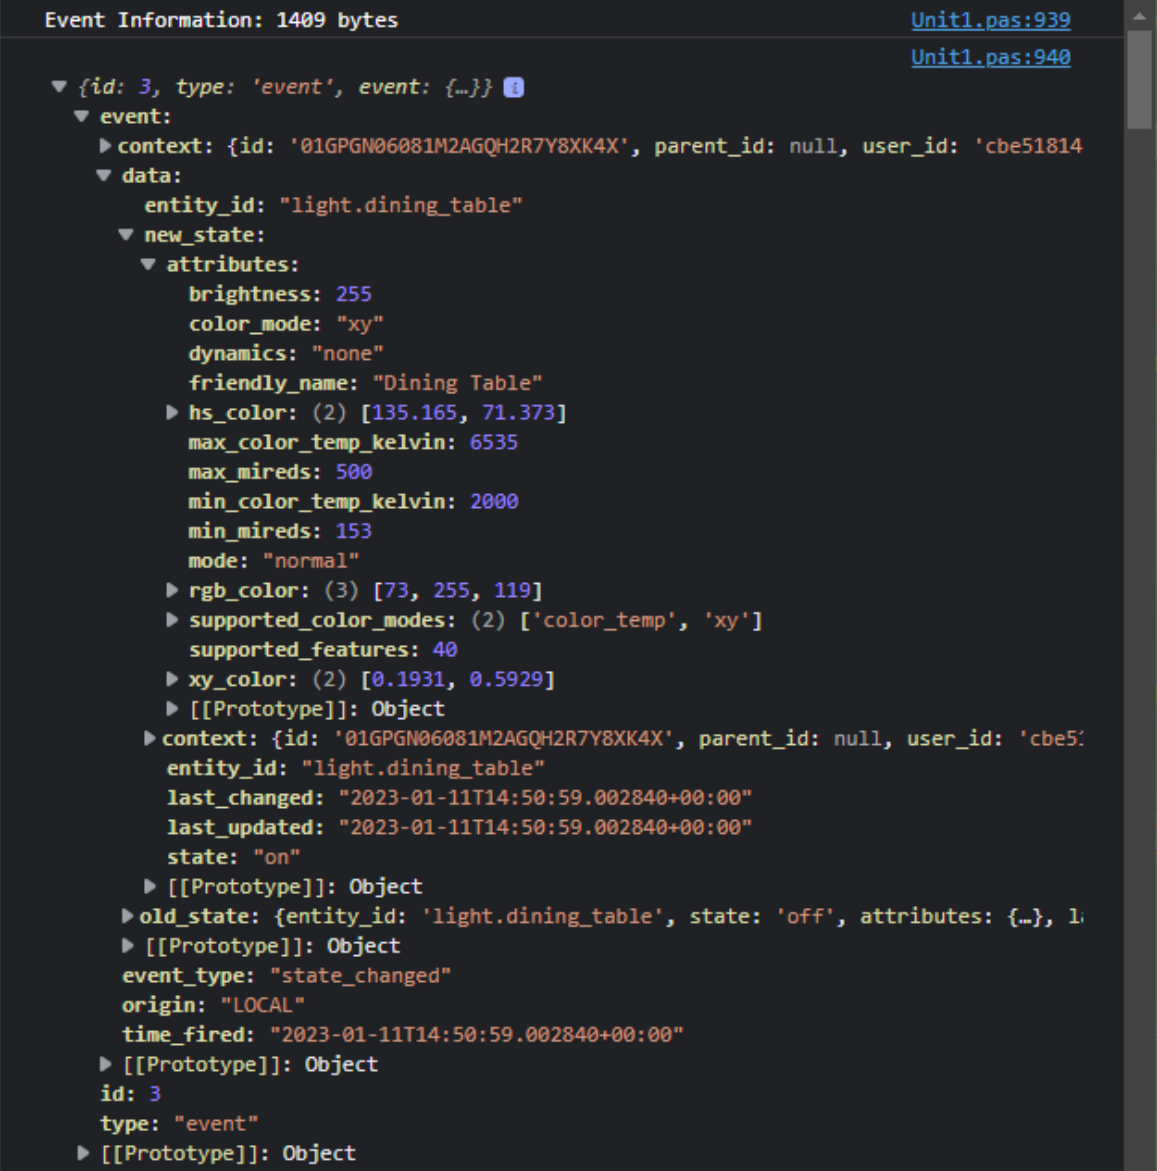
Event Information.
On the one hand, the JSON is much smaller, just 1,409 bytes. But it turns out that the JSON contents are different when the light is on versus when it was off earlier. The "event" returns the same object but with an updated state. Which is, after all, exactly what we're after. It also happens to return the previous state, which makes it possible to tell what is different. Not a lot of use for that in a light switch, perhaps, but this may come in handy for other objects.
Importantly, though, we can see that the object can be extracted from the "get_states" call by finding the array element in the "result" object within the JSON based on the "entity_id", and then using that as the "root" of the object we're looking at.
In the "subscribe_events" case, we first have to determine whether the
event corresponds to an "entity_id" that we're interested in, which we can use {event].{data}.entity_id for, and
then we have to navigate to the {event}.{data}.{new_state} part of the JSON to get the same "root" of the object. Once we've got that root object extracted from the surrounding JSON, in either the "get_states" or
"subscribe_events" JSON, we are then in a position to do something with it.
Which Objects Do We Care About?
With the call to "get_states" returning hundreds of Home Assistant objects, and "subscribe_events" potentially returning hundreds more, one at a time, we'll need to first figure out which objects we're actually interested in, and then apply some kind of filter. And that gives us a bit of a problem. What objects are we actually interested in, when it comes to our bespoke Catheedral UI? Well, let's divide them up into two categories - Fixed and Dynamic - for the purposes of our discussion. These aren't really categories that have any meaning outside of our project, just terms I'm using to help explain our predicament.
For Fixed objects, the idea is that we have parts of our UI that are, well, somewhat fixed in nature. Let's take something like the daily sunrise and sunset times. These are likely to appear somewhere in our UI, in a spot reserved exactly for that little bit of data. These times are attributes of an object with a specific "entity_id" within Home Assistant that is likely not going to change, even though the times themselves will change. So it would be handy to just pluck those values out of the data stream coming from Home Assistant, regardless of whether it is the "get_states" or "subscribe_events" that presents the data.
We can store the values we're interested in as regular Delphi Form variables. Then, when we want to display them in the UI, we can just apply those variables to a TWebLabel or other component, without having to rummage through all that JSON each time. Honestly, we could store them in the TWebLabel components directly if we were so inclined, but using Form variables makes it a little easier to re-use them as well as to access them from both JavaScript and Delphi. And also less of a penalty when updating them, if they're not currently being displayed.
For Dynamic objects, we'll still need to pluck the values out of the data stream, but we don't know what they are ahead of time, necessarily. For example, we're ultimately going to have a page that displays a generic "room" that may have one or more lights, thermostats, or other objects contained within it. So we can't really get by with simple Form variables, and we don't want to explicitly define them ahead of time in any event. 4Instead, we'll have to maintain this state in a more, well, dynamic data structure of some kind. As this data is accessed somewhat less frequently, we can perhaps more afford the computational expense of a costly lookup for this data.
Another way to think about it is that we'll have a "Home" page with many elements. Some of these will be
updated every second or, at most, every minute. So accessing the data underlying those elements needs to be as
quick and painless as possible, so we'll use the "Fixed" approach. Data on other pages is accessed considerably
less often, so incurring a bit of a penalty for accessing that data is a reasonable trade-off. We'll still try
and make it efficient, but we don't know anything about those objects initially, and, just as importantly, we
don't want to make any assumptions as it is indeed more "Dynamic" in nature.
Finally, there are often many Home Assistant objects of the same type. Lights, for example. Or temperature sensors. Or any number of other object types. For the Home page, we'll want to select specific objects for display that are applicable to that particular Catheedral instance.
For example, perhaps Catheedral is running
on a device in a particular room. The main temperature display should show the data for the temperature sensor
in that room. Having the ability to specifically select objects in this way allows for this kind of
customization.
Selecting Home Assistant Objects.
For the Fixed objects, we'll need a way to indicate to Catheedral which "entity_id" values we're interested in. We can then use these to filter the incoming data and find our little bits of data. In the Home Assistant UI, referencing "entity_id" values is something that happens a lot, particularly when setting up cards and selecting what data to use.For example, if you want a button on the Home Assistant dashboard to control a light in your home, in the card for the button you have to select the light that you want it to control. This is done usually by finding the "entity_id" for the light you're interested in, where typically all of the "entity_id" objects that are lights start with "light." as a prefix. Auto-completion makes quick work of this, as typing "light." then gives you the list of lights in your home. Often, Home Assistant objects also have a "friendly name" assigned to help distinguish between objects when the entity_id value is something more obscure. We'll certainly be using those names, but not in this part of the UI at this time.
When we first receive the initial "get_states" results, we can actually pull out a complete list of "entity_id"
values and have that available in our UI as well. And in JavaScript, this is really easy to do. Here, we're just
taking the data returned from the call to "get_states" and extracting an array of "entity_id" values. These are
then sorted and stored in the HAEntities Delphi Form variable, where it has been declared as a public JSValue. We won't need to
use it in Delphi, so this becomes very simple. One of those crazy JavaScript one-liners.
  asm
    // This is a list of the names of all the entities that have a state, sorted
    this.HAEntities = this.HAStates.map( obj => obj.entity_id ).sort();
  end;
All we need then is a place to list the objects we're expecting to access and some kind of UI for selecting elements from this list. Regular TMS Blog readers I'm sure will be not at all surprised to see Tabulator make an appearance here. Probably wondering what took so long! In any event, this is going to be quick work for Tabulator. First, we'll need a list of objects that we'd like to keep track of as part of the "Fixed" part of our implementation. Here, we can define an array that includes a name and even an example of the type of "entity_id" that we're expecting to use.
  asm
    var FeatureData = [
      {"id":  1, "feature":"Sun Sensor"           , "example":"eg: sun.sun" },
      {"id":  2, "feature":"Moon Sensor"          , "example":"eg: sensor.moon_phase" },
      {"id":  3, "feature":"Custom Page 1"        , "example":"eg: http://www.example.com" },
      {"id":  4, "feature":"Custom Page 2"        , "example":"eg: http://www.example.com" },
      {"id":  5, "feature":"Custom Page 3"        , "example":"eg: http://www.example.com" },
      {"id":  6, "feature":"Custom Page 4"        , "example":"eg: http://www.example.com" }
    ];
    this.Features = FeatureData.length;
  end;
We've got just a handful defined here, but we'll expand this as we get to the more interesting parts of the UI. To start with, we'll have something for the sun and moon, and a handful of others that really have nothing to do with Home Assistant at all - Custom Content URLs we might want to display. We'll get to those shortly.
For the Tabulator table, we just want to display these columns while having an extra column to select the object from Home Assistant. We'd also like to type in arbitrary values for these fields, as in some cases, like the "Custom Page" rows, there isn't going to be a Home Assistant object anyway. We'll call this collection of selections "Features".
The Tabulator definition then contains the usual columns and other setup steps we've seen previously, but with a
special "Entity" column that provides for our auto-complete combo box-style interface. In Tabulator-speak these
are called "list" editors and have quite a large number of options, which you can read about here. The most important one is that we can pass our HAEntities Form variable directly into this editor and have it do all
the work for us.
    this.tabSensors = new Tabulator('#divSensors',{
      data: FeatureData,
      index: "id",
      height: 360,
      layout: "fitColumns",
      headerVisible: false,
      popupContainer: true,
      columnDefaults: {
        resizable: false,
        visible: true
      },
      columns: [
        { title: "#", field: "id", width: 50, hozAlign: "center" },
        { title: "Feature", field: "feature", width: 225 },
        { title: "Entity", field: "entity_id",  editor: "list", editorParams:{
            valuesLookup:function(cell, filterTerm) {
              return pas.Unit1.Form1.HAEntities
            },
            emptyValue: "",
            autocomplete: true,
            verticalNavigation: "hybrid",
            freetext: true,
            clearable: true,
            placeholderEmpty: '<span class="text-white">No Matching Home Assistant Entities Found</span>',
            elementAttributes: {
              spellcheck: false
            }
        }},
        { title: "Example", field: "example", width: 400 },
      ]
    });
Displaying the Tabulator interface will involve another Configuration page, and it will take up all the space we have available if we want the text to be readable. And we'll need to have a fair number of CSS rules to adjust everything to mesh with the rest of our UI. Here's what that looks like.
/* Tabulator settings (Configuration) */
.tabulator {
font-family: Cairo !important;
font-size: 20px !important;
border-radius: 6px;
border: 2px solid white;
opacity: 0.9;
filter: drop-shadow(0px 0px 2px black) drop-shadow(0px 0px 2px black);
background-color: #222222 !important;
}
input {
color: white !important;
}
.tabulator-row.tabulator-row-even {
background-color: #333333 !important;
}
.tabulator-row.tabulator-row-odd {
background-color: #444444 !important;
}
.tabulator-cell {
filter: drop-shadow(0px 0px 2px black) drop-shadow(0px 0px 2px black);
border: none !important;
}
.tabulator-row > div:nth-child(1) {
color: deepskyblue;
}
.tabulator-row > div:nth-child(2) {
color: white;
}
.tabulator-row > div:nth-child(3) {
color: deepskyblue;
}
.tabulator-row > div:nth-child(4) {
color: white;
}
div.tabulator-cell.tabulator-editing {
border: 2px solid white !important;
border-radius: 6px;
background: black;
color: white !important;
outline-offset: 0px;
outline: 1px solid #FF0;
filter: drop-shadow(0px 0px 2px black) drop-shadow(0px 0px 2px black);
}
.tabulator-edit-list {
border: 2px solid white;
border-radius: 6px;
opacity: 0.9;
margin-top: -1px;
background: black;
min-width: 608px;
max-width: 608px;
width: 608px;
overflow-x: hidden;
transform: translate(-2px, 0px);
}
.tabulator-edit-list-item {
color: white !important;
font-size: 18px;
height: 28px;
padding: 0px 4px !important;
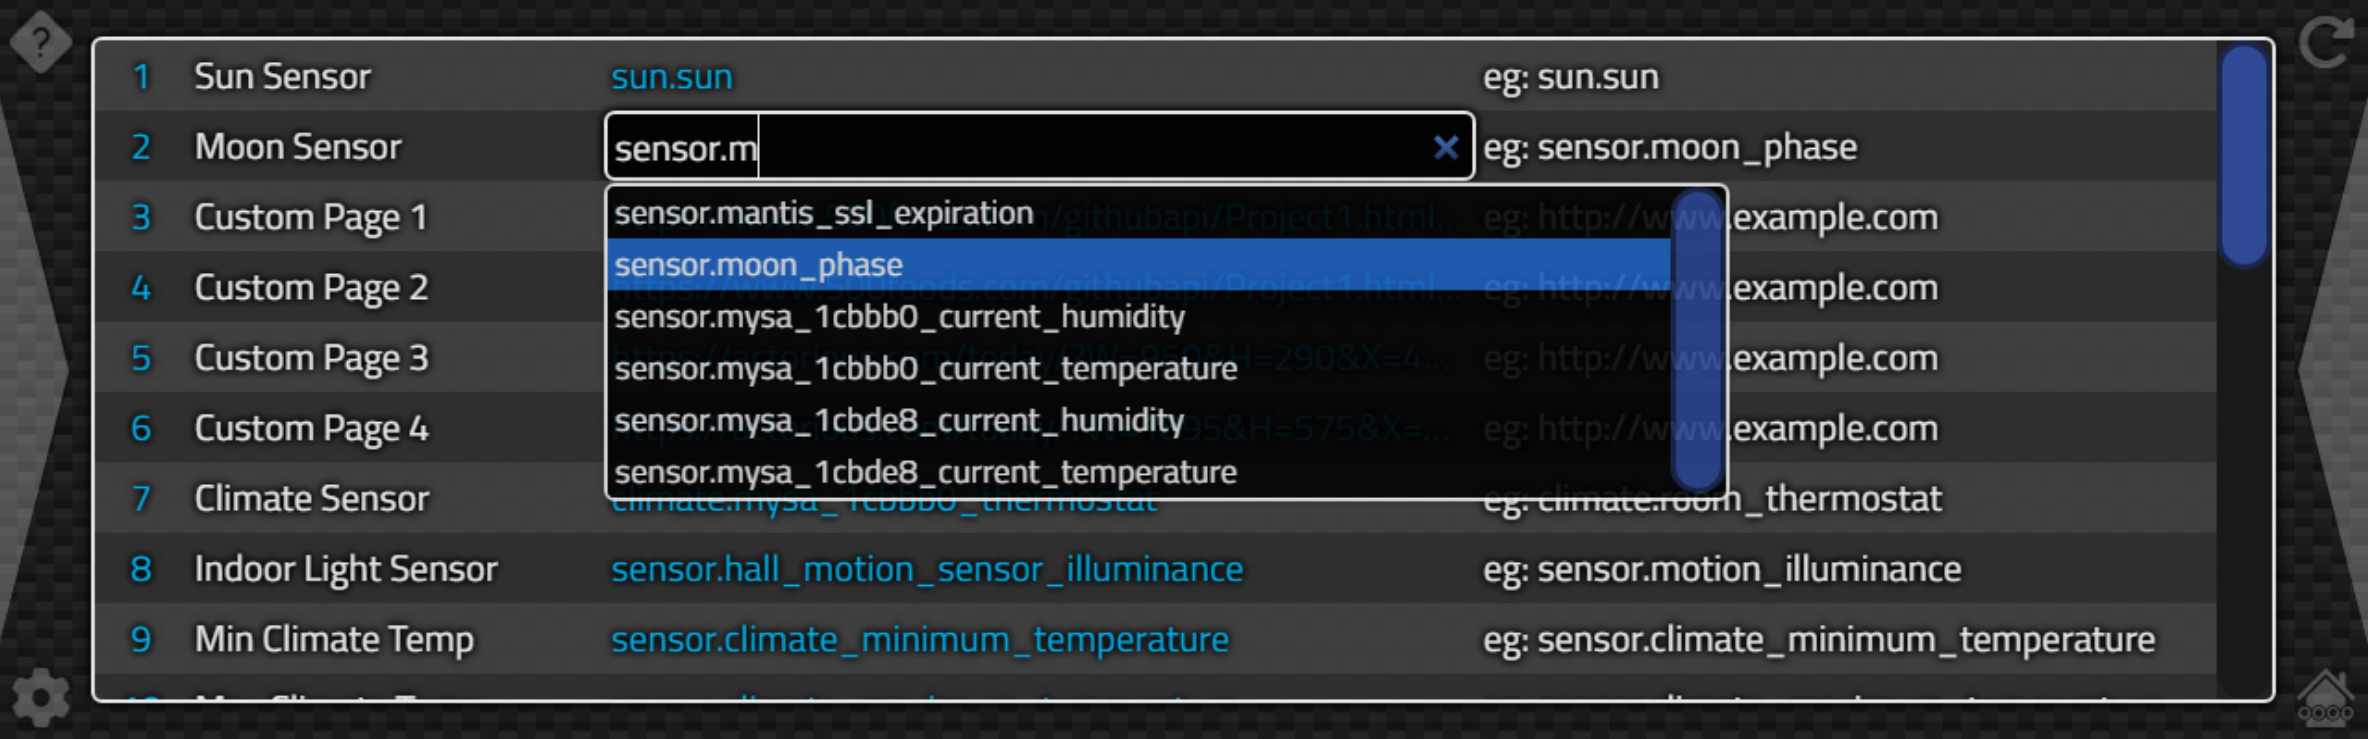
}This gets us our final Configuration page, which we can access by clicking on the first of our three Configuration buttons. Here, typing "sensor.m" shortens the list of Home Assistant objects, and we can see the "sensor.moon_phase" object that we're after for this entry.
Configuring Home Assistant Sensor Links.
As our UI evolves to make use of more "Fixed" elements, this list will need to be updated with the new Home Assistant objects that we're interested in. The screenshot above gives a bit of a sneak peek into some of those, but we'll cover what sensors we're after when it comes time to display the data that they contain, starting in the next blog post of this miniseries.
For now, we have our mechanism in place for selecting which Home Assistant
object we want to use for a given Feature. And we can also type in other values that aren't in the list when
needed, such as for the Custom Content URL entries.
Configuration Persistence, Revisited.
Now that we've got the data entered into Tabulator, we'll need to save these in our INI file so that we don't have to enter them each time. As all the entries are just string values, we can write them out easily enough. We also keep a copy of each of these in Delphi Form variables so we don't have to look them up in Tabulator each time we need to reference them. // Save each of the links to Home Assistant to the INI file as well
// Kind of a pain to get it out of Tabulator, but it is an odd thing we're doing...
FeatureKey := '';
FeatureValue := '';
for i := 1 to Features do
begin
asm
var table = this.tabConfigSensors;
FeatureKey = table.getRow(i).getCell('feature').getValue();
FeatureValue = table.getRow(i).getCell('entity_id').getValue();
if (FeatureKey === undefined) {FeatureKey = ''};
if (FeatureValue === undefined) {FeatureValue = ''};
end;
AppIniFile.WriteString('Home Assistant', FeatureKey, FeatureValue);
end;
// Update current Form variables
asm
var table = this.tabConfigSensors;
this.SunSensor = table.getRow(1).getCell('entity_id').getValue();
this.MoonSensor = table.getRow(2).getCell('entity_id').getValue();
this.CustomPage1URL = table.getRow(3).getCell('entity_id').getValue();
this.CustomPage2URL = table.getRow(4).getCell('entity_id').getValue();
this.CustomPage3URL = table.getRow(5).getCell('entity_id').getValue();
this.CustomPage4URL = table.getRow(6).getCell('entity_id').getValue();
end;
This is less than ideal, in terms of directly mapping rows in a table to individual Form variables. This is why we won't be doing this for the "Dynamic" objects. But it does end up simplifying a lot of the code we'll need to write later on, and having these values in Delphi rather than having to do a lookup in JavaScript against the Tabulator table makes everything potentially a little more performant as well.
Loading data into Tabulator from the INI file works much the same way.
  // Add each of the links for Home Assistant from the INI file as well
  // Kind of a pain to get it back into Tabulator, but it is an odd thing we're doing...
  FeatureKey := '';
  FeatureValue := '';
  for i := 1 to Features do
  begin
    asm
      var table = this.tabConfigSensors;
      FeatureKey = table.getRow(i).getCell('feature').getValue();
      if (FeatureKey === undefined) {FeatureKey = ''};
    end;
    FeatureValue := await(String, AppINIFile.ReadString('Home Assistant', FeatureKey, ''));
    asm
      var table = this.tabConfigSensors;
      table.getRow(i).getCell('entity_id').setValue(FeatureValue);
    end;
  end;

  // Update current Form variables
  asm
    var table = this.tabConfigSensors;

    this.SunSensor = table.getRow(1).getCell('entity_id').getValue();
    this.MoonSensor = table.getRow(2).getCell('entity_id').getValue();

    this.CustomPage1URL = table.getRow(3).getCell('entity_id').getValue();
    this.CustomPage2URL = table.getRow(4).getCell('entity_id').getValue();
    this.CustomPage3URL = table.getRow(5).getCell('entity_id').getValue();
    this.CustomPage4URL = table.getRow(6).getCell('entity_id').getValue();
  end;
This all works pretty well. An idea might be to use the number of the Feature instead of the name of the Feature
when reading/writing the INI files, in case we want to change the name of the Feature at some future point, but
the tradeoff here is whether you want the INI file to be more human-readable or not.
Plucking Data.
With the Form variables populated with Home Assistant "entity_id" values, we can then update our procedure that handles incoming data to do the plucking we were referring to earlier. Because there may be a large number of these sensors that we'll be tracking, and we'll be looking both in the response to "get_states" and the response to "subscribe_events", we'll set up an array that we can use for this purpose. At the moment it is just two, but this will grow to considerably more as we get going with other parts of the UI.
      window.SensorList = [
        this.SunSensor,
        this.MoonSensor,
      ];
In the case of "get_states", the data arrives as a block with all the objects combined. So we can iterate through our list and see if any of our sensors are present.
        // Run through our list of sensors and see if any match
        for (var i = 0; i < window.SensorList.length; i++) {
          if (window.SensorList[i] !== '') {
            var sensor = this.HAEntities.find(o => o === window.SensorList[i]);
            if (sensor !== undefined) {
              this.StateChanged(sensor, hadata.result.find(o => o.entity_id === sensor));
            }
          }
        }
If data arrives as a result of the "subscribe_events" call, we do something similar.
          for (var i = 0; i < window.SensorList.length; i++) {
          if (window.SensorList[i] !== '') {
            if (hadata.event.data.entity_id == window.SensorList[i]) {
              this.StateChanged(hadata.event.data.entity_id, hadata.event.data.new_state);
              break;
            }
          }
        }
In both cases, we ultimately end up calling the same Delphi procedure, "StateChanged", passing it both the name of the Home Assistant object and the JSON that represents the current state of the object. In this procedure, we then extract whatever data we are looking for from that JSON data and either update yet more Form variables, or directly update TWebLabel components or whatever else we want to do with that data. For our sunrise/sunset data, we'll just get the values we're after and store them in a set of Form variables for later, as we might want to display them in more than one place. Here's a shortened version of that procedure.
procedure TForm1.StateChanged(Entity: String; State: JSValue);
begin
  // This is used to convert data coming from Home Assistant into something that we can use.
  if (Entity = SunSensor) then
  begin
    asm
      var timestr = luxon.DateTime.fromISO(State.attributes.next_rising).toFormat('HH:mm:ss');
      this.SunRise = (parseInt(timestr.substr(0,2))*3600 + parseInt(timestr.substr(3,2))*60 + parseInt(timestr.substr(6,2)))/86400;

      timestr = luxon.DateTime.fromISO(State.attributes.next_setting).toFormat('HH:mm:ss');
      this.SunSet = (parseInt(timestr.substr(0,2))*3600 + parseInt(timestr.substr(3,2))*60 + parseInt(timestr.substr(6,2)))/86400;

      timestr = luxon.DateTime.fromISO(State.attributes.next_dawn).toFormat('HH:mm:ss');
      this.SunDawn = (parseInt(timestr.substr(0,2))*3600 + parseInt(timestr.substr(3,2))*60 + parseInt(timestr.substr(6,2)))/86400;

      timestr = luxon.DateTime.fromISO(State.attributes.next_dusk).toFormat('HH:mm:ss');
      this.SunDusk = (parseInt(timestr.substr(0,2))*3600 + parseInt(timestr.substr(3,2))*60 + parseInt(timestr.substr(6,2)))/86400;
    end;
  end
end;
In this case, we're using Luxon to convert the ISO UTC timestamp coming from Home Assistant into local time and storing those values so we don't have to calculate them again. At least until Home Assistant reports that the "sun.sun" object state has changed, sometime over the course of the day.
Later, when we are working on the UI where those values are shown, we can just reference the Form variables assigned here. As the UI is refreshed by a timer, whenever these values change, they'll eventually find their way to the UI as well without having to do anything else.
We can do the same for many other bits of data, including climate and weather data, and data about people that is
managed within Home Assistant. All content that appears on the Catheedral Home page is handled in this fashion.
This is essentially everything related to our "Fixed" approach. This also means we're almost ready to open the floodgates on designing the actual useful parts of the Catheedral application. Almost.
Configuration Persistence, One Last Time.
But before we get to that, we have a couple more buttons on the Configuration page still left to deal with. Recall at the outset of this project that we wanted to store as much data as possible directly in Home Assistant? Well, that applies specifically to our configuration settings.In addition to storing these values in an INI file,
we'd also like to store them in Home Assistant. This would make it easy to copy settings from one Catheedral
device to another. Or, if you happen to be a TMS WEB Core developer, it would make it easier to copy these values
from one build of the project to another, where each build target ends up in its own folder with its own INI file. Either way, the idea is to simply write the same data we're writing in the INI file to Home Assistant (the second
of the three buttons) or read the same data back (the third button).
But.... there's a problem. A very curious problem. It turns out that Home Assistant doesn't really retain its
state. That doesn't sound quite right, does it? Well, the current states of all of its objects are retrieved from
the various Integrations continuously. When the Home Assistant server is restarted, these values are all empty,
but they are quickly populated as all the devices check in with their current status.
Home Assistant does retain a history for most things, so it could look up the last value of any given object, yet somehow it doesn't. 4If we were to write a value to Home Assistant the same way we did with the REST API, it would be gone the next time the Home Assistant server is restarted. This happens with the REST API as well, but as we're continually updating that data, this isn't really an issue.
There have been some rather colorful discussions about this in the Home Assistant community, with certain core
developers facing off against others to defend this particular design choice. Fortunately, as an open-source
project (and apparently once ranked 10th in terms of the number of unique contributors on GitHub!) others have
stepped in to address this seemingly obvious shortcoming. Another thing that should likely just be included with
Home Assistant automatically. The add-on, along with installation instructions and other information, can be
found here.
Setting up "variables" in Home Assistant this way provides us with the needed mechanism to store values that don't
disappear after a restart. Unfortunately, these variables have to be declared ahead of time, and cannot be
created dynamically (boo!). This means we have to plan for how many variables we'll need, and then set up Home
Assistant in advance. This involves adding a stanza to the configuration.yaml file. Editing this file is something that
happens often, at least initially, when setting up Home Assistant. For our purposes, let's assume we'll
eventually need 40 "Features" that we'll want to keep in Home Assistant.
Complicating things a little bit more, Home Assistant objects have certain properties, like "entity_id" and
"state" that get used quite a lot. The "state" property would seem to be the logical choice here, but it is a
string value that cannot exceed 255 characters. So that's a problem. Fortunately, there is also a property
called "attributes" where you can add more key/value pairs, and these attributes don't have that restriction. They still need to be declared in advance though. Ultimately, what we end up with is the following addition to
configuration.yaml.
 var:
  catheedral_version:
  catheedral_configuration:
    attributes:
      feature_000: " "
      feature_001: " "
      feature_002: " "
      feature_003: " "
      feature_004: " "
      feature_005: " "
      feature_006: " "
      feature_007: " "
      feature_008: " "
      feature_009: " "
      feature_010: " "
      feature_011: " "
      feature_012: " "
      feature_013: " "
      feature_014: " "
      feature_015: " "
      feature_016: " "
      feature_017: " "
      feature_018: " "
      feature_019: " "
      feature_020: " "
      feature_021: " "
      feature_022: " "
      feature_023: " "
      feature_024: " "
      feature_025: " "
      feature_026: " "
      feature_027: " "
      feature_028: " "
      feature_029: " "
      feature_030: " "
      feature_031: " "
      feature_032: " "
      feature_033: " "
      feature_034: " "
      feature_035: " "
      feature_036: " "
      feature_037: " "
      feature_038: " "
      feature_039: " "
      feature_040: " "
After a Home Assistant restart, needed after making changes to configuration.yaml, these variables are available. To update them with our configuration values, we'll send commands using the WebSocket API interface.
procedure TForm1.btnHASaveConfigurationClick(Sender: TObject);
var
  Command: String;
  Data: String;
  i: Integer;

begin

  // Change icon to indicate an update is happening.
  // Though in this case it might be too quick to be visible
  btnHASaveConfiguration.Caption := '<div class="d-flex align-items-center justify-content-stretch flex-row">'+
                                      '<i class="fa-solid fa-rotate fa-fw fa-spin" style="color:black; font-size:24px;"></i>'+
                                      '<div class="mdi mdi-home-assistant pe-2" style="color:#3399CC; font-size:32px;"></div>'+
                                      '<div class="lh-1" style="color:black;text-align:left;">Save Configuration<br />to Home Assistant</div>'+
                                    '</div>';

  // Update version information
  HAID := HAID + 1;
  Data := 'Catheedral: Version '+dataConfigVersion.Caption+', Released '+dataConfigRelease.Caption;
  Command := '{"id":'+IntToStr(HAID)+', "type":"call_service", "domain":"var", "service":"set", "service_data":{"entity_id":"var.catheedral_version","value":"'+Data+'"}}';
  HAWebSocket.Send(Command);

  // Update Configuration var as JSON
  HAID := HAID + 1;
  Data := '{"LD":"'+editConfigLongDate.Text+'",'+
           '"SD":"'+editConfigShortDate.Text+'",'+
           '"LT":"'+editConfigLongTime.Text+'",'+
           '"ST":"'+editConfigShortTime.Text+'",'+
           '"BG":"'+editConfigBackground.Text+'"}';
  asm Data = JSON.stringify(Data); end;
  Command := '{"id":'+IntToStr(HAID)+', "type":"call_service", "domain":"var", "service":"set", "service_data":{"entity_id":"var.catheedral_configuration","value":"'+FormatDateTime('yyyy-mm-dd hh:nn:ss',Now)+'","attributes":{"feature_000":'+Data+',';

  // Update var 001+ values from table, where the number of entries in the table
  // should match the number of var entries in Home Assistant, ideally
  i := 1;
  while (i <= Features) do
  begin
    asm Data = this.tabSensors.getRow(i).getCell('entity_id').getValue(); end;
    Command := Command+'"feature_'+Format('%.*d',[3,i])+'":"'+Data+'"';
    if (i < Features)  then Command := Command+','
    else Command := Command+'}}}';
    i := i + 1
  end;

  HAWebSocket.Send(Command);

  // Revert to normal icon
  btnHASaveConfiguration.Caption := '<div class="d-flex align-items-center justify-content-stretch flex-row">'+
                                      '<i class="fa-solid fa-right-long fa-fw" style="color:black; font-size:24px;"></i>'+
                                      '<div class="mdi mdi-home-assistant pe-2" style="color:#3399CC; font-size:32px;"></div>'+
                                      '<div class="lh-1" style="color:black;text-align:left;">Save Configuration<br />to Home Assistant</div>'+
                                    '</div>';

  ResetInactivityTimer(Sender);
end;
The tricky bit here, aside from fiddling with animated icons, is in knowing how to populate the command that we're using. Adding the "var" project to Home Assistant enables the ability to change variables using a service called "var.set" but in order to do this over the WebSocket API, we need to format the JSON to have the following structure.
{
 "id": ***id number***,
 "type":"call_service",
 "domain":"var",
 "service":"set",
 "service_data":{"entity_id":"***variable name***",
                 "value":"***whatever we want to store in state***",
                 "attributes":["key":"value",
                               "key":"value",
                                ....]
                }
}
The main "value" in this example becomes the "state" in Home Assistant, and we also pile on all the "attributes" as key:value pairs into the call so they get updated as well. If everything works as planned, then we can go into the Home Assistant Developer Tools page (also not enabled by default, if memory serves?!). Here, we can look at individual entities and states. Searching for "catheedral.configuration" gets us what we're after.
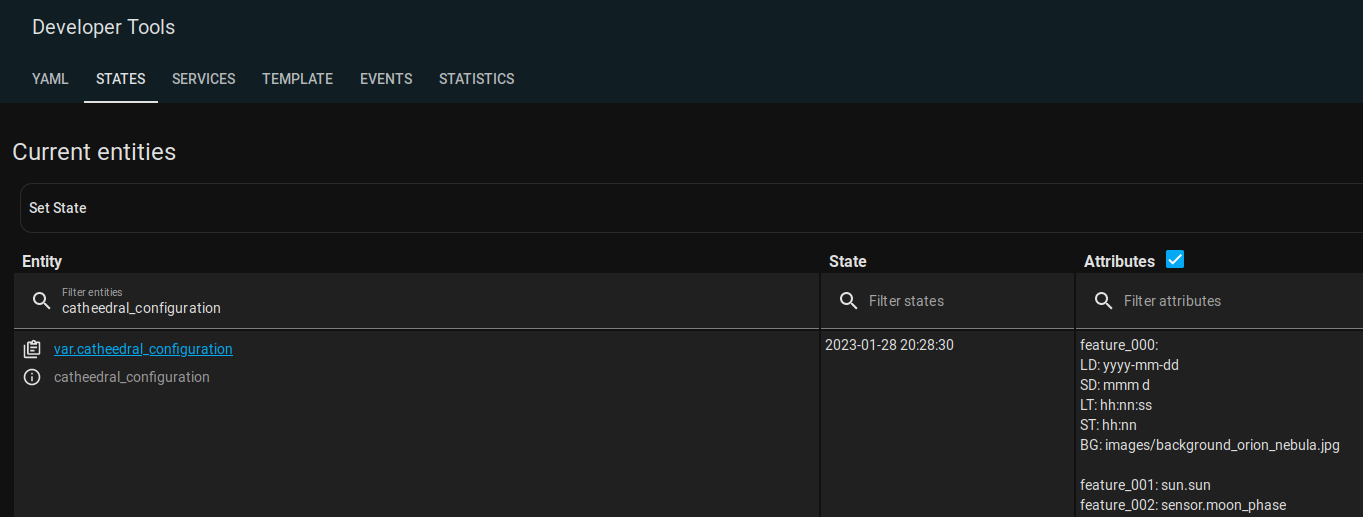
Catheedral Configuration Stored in Home Assistant.
Only the first few Features are shown above, but they're all there as expected. The "state" in this case
corresponds to the timestamp when these values were last updated. feature_000 is used to store the values from
the main Configuration screen, and Feature_001 onwards correspond to the entries from the Tabulator interface.
Getting data back works the same way. Wait, no it doesn't. It works a completely different way! In this case,
we simply make another request for "get_states" but this time, we set a flag so that when these variables come
back (they are included in the state after all), we can again "pluck" them out of that data and load them into our
application. Here's what happens when we click on that third Configuration button.
procedure TForm1.btnHALoadConfigurationClick(Sender: TObject);
begin
  // Change icon to indicate an update is happening.
  // Though in this case it might be too quick to be visible
  btnHALoadConfiguration.Caption := '<div class="d-flex align-items-center justify-content-stretch flex-row">'+
                                      '<div class="mdi mdi-home-assistant" style="color:#3399CC; font-size:32px;"></div>'+
                                      '<i class="fa-solid fa-rotate fa-spin fa-fw" style="color:black; font-size:24px;"></i>'+
                                      '<div class="ps-2 lh-1" style="color:black;text-align:left;">Load Configuration<br />from Home Assistant</div>'+
                                    '</div>';

  // Set flag to indicate that when states arrive, we want to retrieve the configuration
  HALoadConfig := True;

  // Request full set of states again (no option to limit what is returned
  HAID := HAID + 1;
  HAGetStates := HAID;
  HAWebSocket.Send('{"id":'+IntToStr(HAID)+',"type": "get_states"}');

  ResetInactivityTimer(Sender);
end;
In this case, we're changing the icon (as we did with saving the values) but we don't change it back because we've not loaded the data yet. Instead, we have to look at the incoming data. We'll change the icon back once we've loaded it all up again. Over in the OnDataReceived event handler, we have a little extra bit that checks and sees if the incoming response matches our HAGetStates value, and that our HALoadConfig flag is set.
      // Load Configuration from Home Assistant Data (triggered by button click - not automatic)
      asm
        if (this.HALoadConfig == true) {
          var config = hadata.result.find(o => o.entity_id === 'var.catheedral_configuration');
          if (config !== undefined) {
            for (var i = 0; i <= this.Features; i++) {
              var param = config.attributes['feature_'+String(i).padStart(3,'0')];
              if (param !== undefined) {
                // Date/TimeFormats and Background as JSON stored in 000
                if (i == 0) {
                  editConfigLONGDATE.value = param.LD;
                  editConfigSHORTDATE.value = param.SD;
                  editConfigLONGTIME.value = param.LT;
                  editConfigSHORTTIME.value = param.ST;
                  editConfigBACKGROUND.value = param.BG;
                }
                // List of sensors stored in 001..Features
                else {
                  this.tabSensors.getRow(i).getCell('entity_id').setValue(param);
                }
              }
            }
          }

          // Reconnect to reload everything
          this.editConfigChange(null);
          this.editConfigBACKGROUNDChange(null);
          this.dataConfigSTATUSClick(null);

          // And don't run this again unless asked
          this.HALoadConfig = false;

          // Put back the normal icon
          this.btnHALoadConfiguration.SetCaption('<div class="d-flex align-items-center justify-content-stretch flex-row">'+
                                                   '<div class="mdi mdi-home-assistant pe-2" style="color:#3399CC; font-size:32px;"></div>'+
                                                   '<i class="fa-solid fa-right-long fa-fw" style="color:black; font-size:24px;"></i>'+
                                                   '<div class="lh-1 ps-2" style="color:black;text-align:left;">Load Configuration<br />from Home Assistant</div>'+
                                                 '</div>');
        }
      end;
With that in place, we can then save and load whatever changes we make to the Configuration pages back to Home Assistant. We just have to remember that these are not loaded automatically, on purpose. The idea is that we can save our settings to Home Assistant and then load them back if we want to copy them to another instance of Catheedral. More like a backup of the INI file, but without the Home Assistant URL or Long-Lived Token.
This
could be changed easily enough, where these values are loaded when Catheedral first connects to the Home
Assistant server, just by setting HALoadConfig to True at application startup. It would then get these values
loaded as soon as the first get_states call is returned. If you left HALoadConfig always set to True, then you
could, for example, change the background on one Catheedral instance and then save it to the Home Assistant
Server. This would then automatically update all of the other Catheedral instances to change their backgrounds. This isn't done specifically so that we can set these values differently for each instance, but this
is a choice that you, as a developer, may decide differently. Or perhaps load the configuration from Home Assistant if no local configuration is available, as would be the case if Catheedral was being run for the very first time. Lots of options here.
And, thankfully, that also brings us to the end of the Configuration pages!
Custom Content Pages.
We've now got three Configuration pages set up and ready to go. And a Help page for each, for good measure. We know we'll be needing a Home page, as well as a page for Rooms and a page for Scenes, but we'll get to those in future posts.
An easy one to knock off first, though, is the ability to display Custom Content pages. We've already set up everything configuration-related to keep track of these URLs, by just entering them into the Configuration Sensors page. Catheedral has been set up with four such pages, but this could be increased if needed easily enough. Now it is just a matter of displaying them. This is roughly equivalent to what we were doing in Home Assistant in the first post of this miniseries. Our version of a Home Assistant Webpage card. And, in fact, we're going to use the same URLs here.
This involves adding four more pages to our TWebPageControl component, each with a single TWebHTMLDiv component that fills the
page. We'll just be adding an <iframe> with the src attribute set to the URL corresponding to that page. Not too much trouble. In fact, we can do this when the configuration is first loaded so that the pages are
available before we even display them.
  if   divCustom1.HTML.Text <> '<iframe src="'+CustomPage1URL+'" class="CustomPage">'
  then divCustom1.HTML.Text := '<iframe src="'+CustomPage1URL+'" class="CustomPage">';

  if   divCustom2.HTML.Text <> '<iframe src="'+CustomPage2URL+'" class="CustomPage">'
  then divCustom2.HTML.Text := '<iframe src="'+CustomPage2URL+'" class="CustomPage">';

  if   divCustom3.HTML.Text <> '<iframe src="'+CustomPage3URL+'" class="CustomPage">'
  then divCustom3.HTML.Text := '<iframe src="'+CustomPage3URL+'" class="CustomPage">';

  if   divCustom4.HTML.Text <> '<iframe src="'+CustomPage4URL+'" class="CustomPage">'
  then divCustom4.HTML.Text := '<iframe src="'+CustomPage4URL+'" class="CustomPage">';
The CSS for this is also very simple. Primarily in place to ensure that the loaded page doesn't add any scrollbars and that the Catheedral background will show through if the web page being loaded doesn't have a background of its own.
/* Custom Content URL pages (usually <iframe> elements) */
.CustomPage {
  width: 100%;
  height: 100%;
  background: none;
  overflow: hidden;
}
In our first post in this miniseries, we added content to the Home Assistant dashboard by using a Webpage card with URLs directed at our TMS WEB Core projects. We can do the same thing here, adjusting the URLs to fit the Catheedral dimensions. Tweaking the scale or color choices involves updating the URL in the Configuration Sensor page.
Here are the same four pages that we had created as Home Assistant dashboard cards previously, each with a
different background to show how they look in different settings. If the web page being loaded had a background,
it would replace whatever background that Catheedral is currently using, but in this case, the web page
deliberately does not have a background specified.
GitHub Page Views.
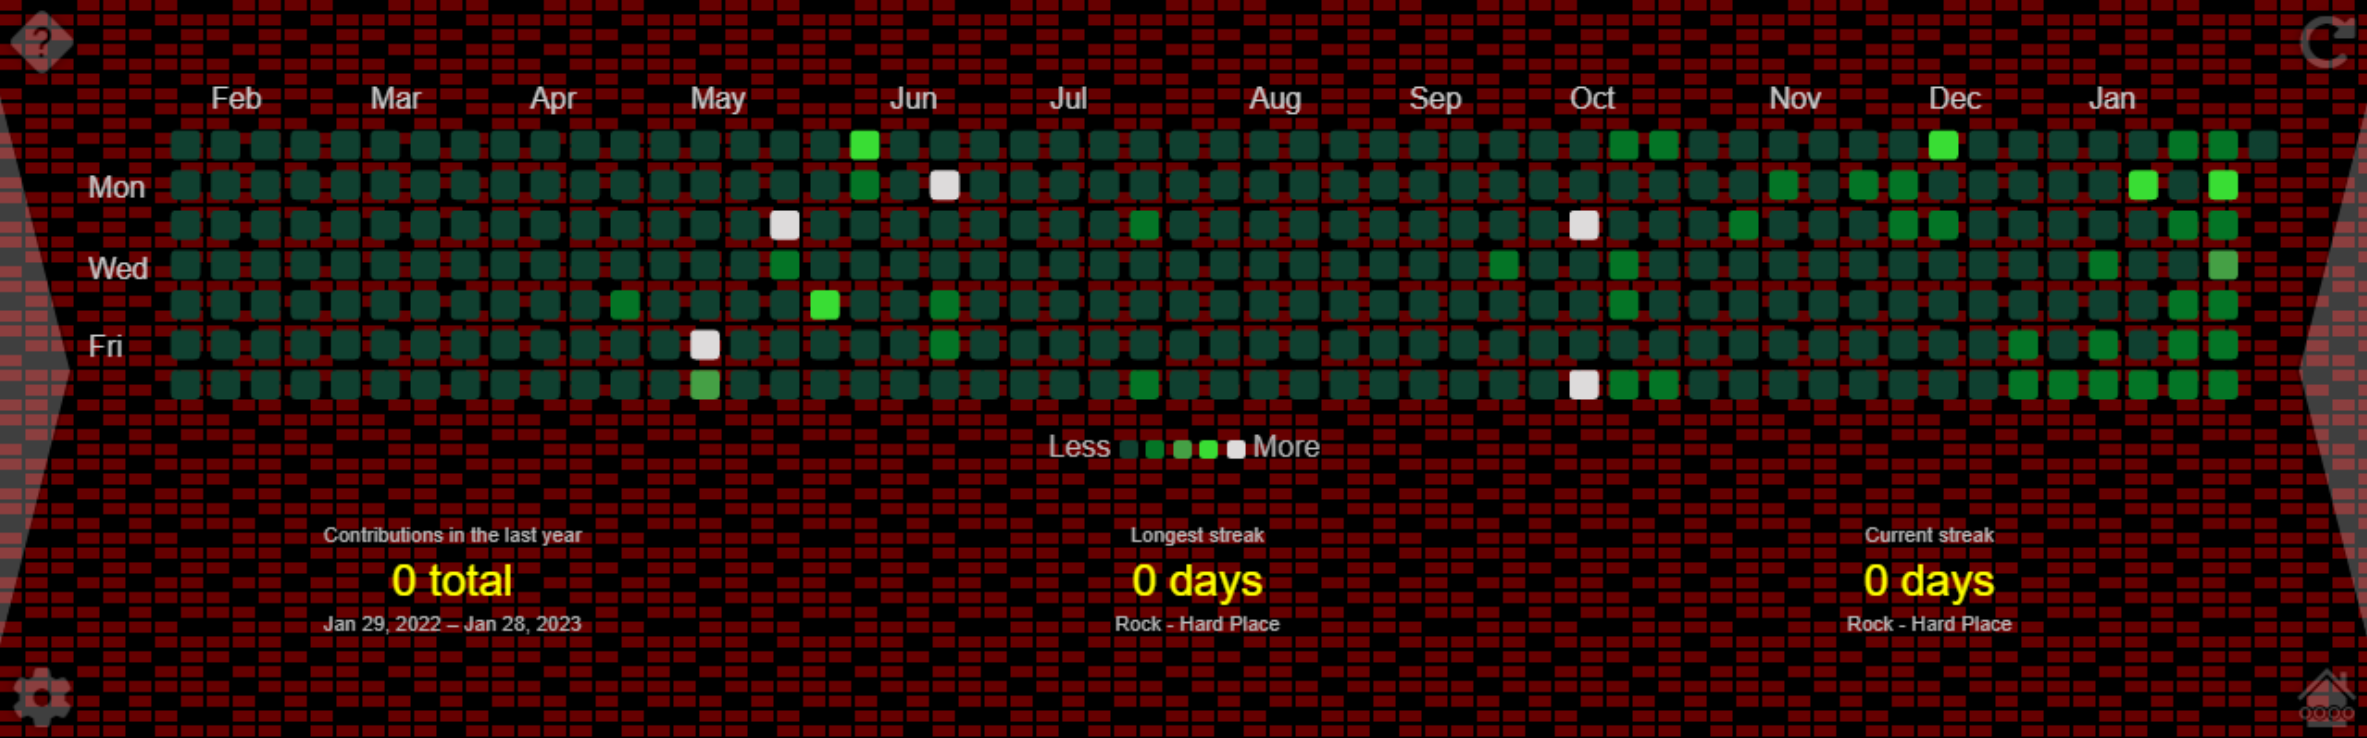
GitHub Contribution Calendar.

ActoriousToday - Top 5.

ActoriousToday - Next 20.
Other data could be displayed in the same way, keeping in mind that it is an <iframe> and that you're
working within a 1280x400 window. In these examples, we've conveniently been using our own TMS WEB Core project,
where we can explicitly pass width, height, top, left, background, and scale values as URL parameters to get
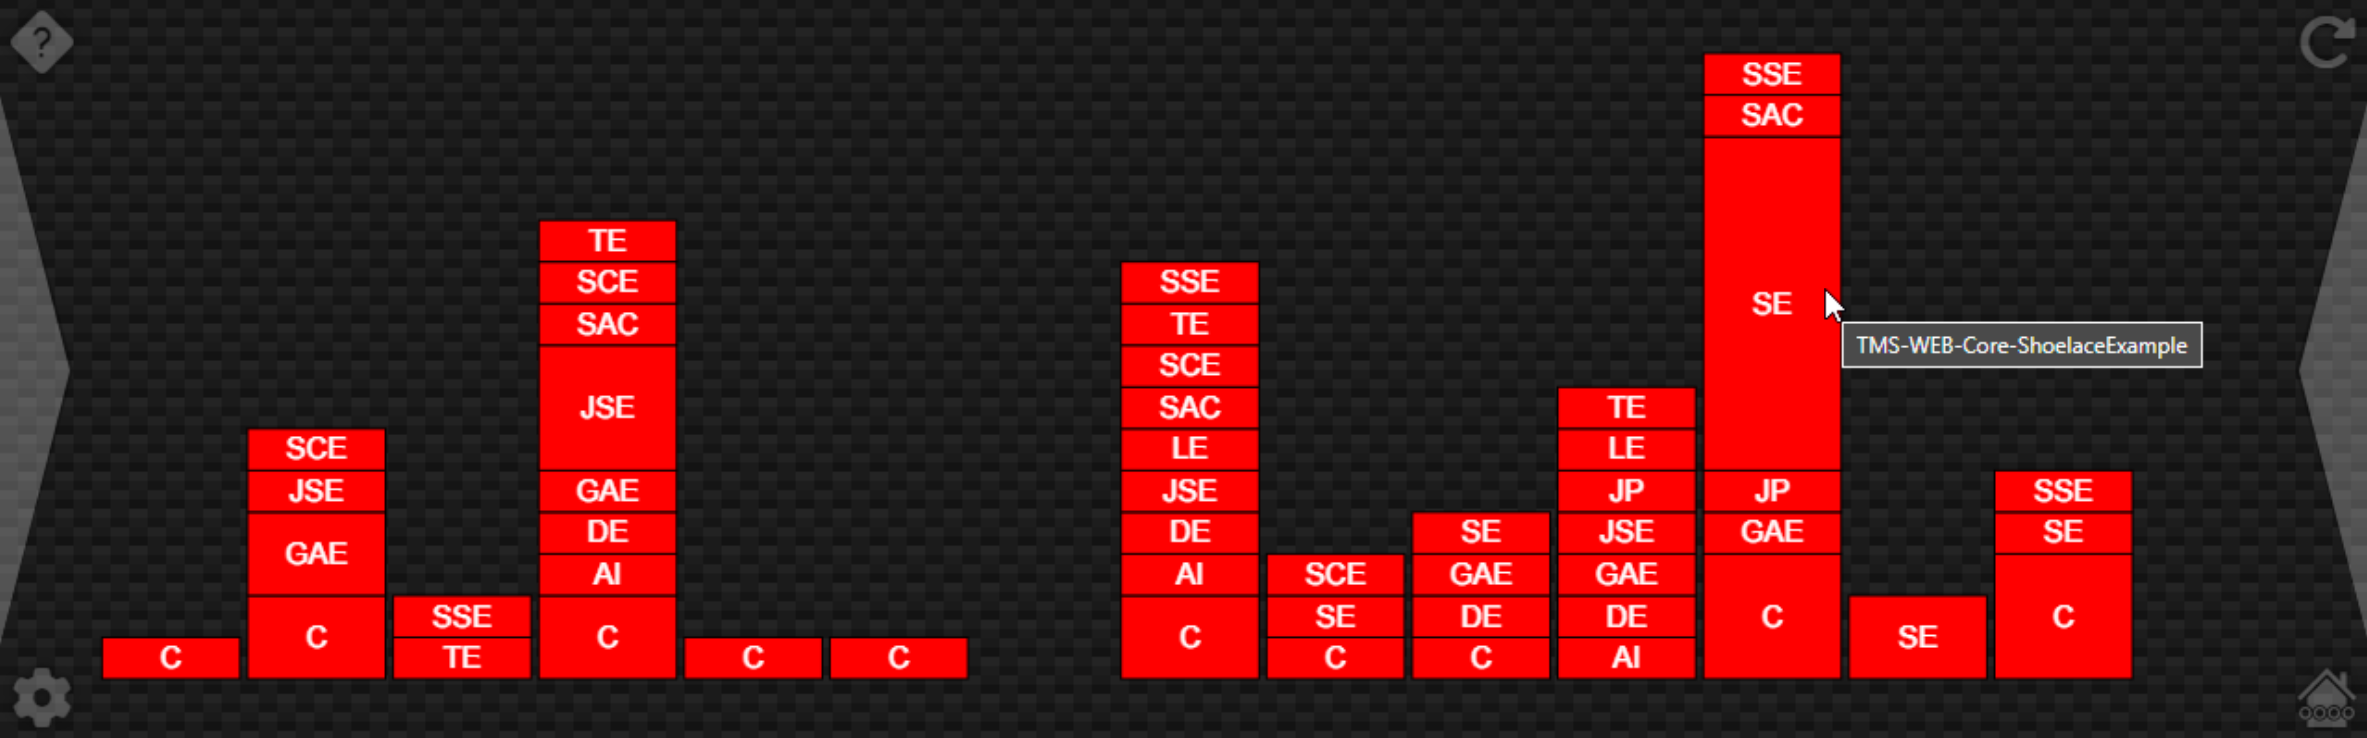
everything sized up just as we'd like. Note also that in the GitHub Contribution Calendar, the counts at the
bottom are broken again. Seems the underlying JavaScript library isn't current with whatever GitHub uses to
publish the underlying data. The calendar data is accurate enough, though.
Moving Around.
Now that we've got more than a handful of pages to display, we'll need to give a bit more thought to how we might navigate between them. We could perhaps order the pages of the TWebPageControl component in such a way that moving left or right would just involve moving to the next or previous page. But as we have different sets of pages we might want to cycle through, this approach might not hold up very well.
For example, we'd like
to cycle through the Configuration pages separately from how we might cycle through Help pages or other pages. We'll need something custom, that takes our current page and returns what page we should go to next. If we're
moving left, we'll cycle through the pages in one order. If we're moving right, we'll want to reverse that
order. There are no doubt other ways, very possibly better ways, to do this, but we'll give this way a try and
update it if we run into any problems.
procedure TForm1.navLeftClick(Sender: TObject);
var
  Custom1,
  Custom2,
  Custom3,
  Custom4: Integer;
begin
  // 00 - Configuration Main
  // 01 - Home
  // 02 - Rooms
  // 03 - Scenes
  // 04 - HELP: Main Configuration
  // 05 - Configuration Sensors
  // 06 - Configuration Information
  // 07 - Custom URL 1
  // 08 - Custom URL 2
  // 09 - Custom URL 3
  // 10 - Custom URL 4
  // 11 - Initialization - Should not appear again
  // 12 - HELP: Configuration Information
  // 13 - HELP: Configuration Sensors
  // 14 - HELP: Custom Pages
  // 15 - HELP: Home Page

  // Not all custom pages are available, so if we kick out
  // some of them (or all of them), still want cycle to work
  Custom1 :=  7;
  Custom2 :=  8;
  Custom3 :=  9;
  Custom4 := 10;
  if Trim(CustomPage1URL) = '' then Custom1 := 2;
  if Trim(CustomPage2URL) = '' then Custom2 := Custom1;
  if Trim(CustomPage3URL) = '' then Custom3 := Custom2;
  if Trim(CustomPage4URL) = '' then Custom4 := Custom3;

  // Configuration cycle: 3
  // 06 - 00 - 05
  // Sensors - Config - Info

  // Main Cycle: 7
  // 09 - 10 - 03 - 01 - 02 - 07 - 08
  // Custom3 - Custom4 - Scenes - Home - Rooms - Custom1 - Custom2

  // Help Cycle: 5
  // 13 - 04 - 12 - 14 - 15
  // Cs - Cf - Ci - C1 - Hm

  // Configuration Cycle
  if      (pages.TabIndex =  6) then SwitchPages(  6,  5)
  else if (pages.TabIndex =  0) then SwitchPages(  0,  6)
  else if (pages.TabIndex =  5) then SwitchPages(  5,  0)

  // Main Cycle
  else if (pages.TabIndex =  9) then SwitchPages(  9, Custom2)
  else if (pages.TabIndex = 10) then SwitchPages( 10, Custom3)
  else if (pages.TabIndex =  3) then SwitchPages(  3, Custom4)
  else if (pages.TabIndex =  1) then SwitchPages(  1,       3)
  else if (pages.TabIndex =  2) then SwitchPages(  2,       1)
  else if (pages.TabIndex =  7) then SwitchPages(  7,       2)
  else if (pages.TabIndex =  8) then SwitchPages(  8, Custom1)

  // Help
  else if (pages.TabIndex = 13) then SwitchPages( 13, 15)
  else if (pages.TabIndex =  4) then SwitchPages(  4, 13)
  else if (pages.TabIndex = 12) then SwitchPages( 12,  4)
  else if (pages.TabIndex = 14) then SwitchPages( 14, 12)
  else if (pages.TabIndex = 14) then SwitchPages( 15, 14);

  ResetInactivityTimer(Sender);
end;
Perhaps not the most intuitive. There's an equivalent function for navRightClick, where everything is sorted in the opposite direction. We also have to be mindful that not all pages are necessarily available, such as with the Custom pages. Another approach would be to write this function using the TWebTabSheet names instead of the numbers, as we're not really using the order itself for anything in particular. Just adding pages as we go. Which isn't very friendly. We may also end up with other cycles depending on how things work out with Rooms or other data we might want to incorporate.
As an amusing side note, perhaps, this "cycling" gave rise to the idea of using "Carousel" as the name for the project. So we could have an opening splash page saying "Welcome to Carousel". This might be particularly amusing if you're over 30 and have seen the movie "Logan's Run". Yes, I'm at the age where I laugh at my own jokes perhaps more than might be healthy. Back to work!
While we're on the topic of moving around, let's also throw in a bit of keyboard handling. Nothing fancy. The numbers 1-4 will be used to activate the four Main Buttons. And cursor-left and cursor-right will switch pages. But we don't want to do these things while we're editing data, so we check that the current element that has focus is not in fact an <input> tag.
procedure TForm1.MiletusFormKeyDown(Sender: TObject; var Key: Word; Shift: TShiftState);
begin

  if (document.activeElement.tagName <> 'INPUT') then
  begin
    if (char(Key) = '1') then
    begin
      btnHelpClick(Sender);
    end
    else if (char(Key) = '2') then
    begin
      btnChangeClick(Sender);
    end
    else if (char(Key) = '3') then
    begin
      btnHomeClick(Sender);
    end
    else if (char(Key) = '4') then
    begin
      btnConfigurationClick(Sender);
    end
    else if (Key = VK_LEFT) and (document.activeElement.tagName <> 'input') then
    begin
      navLeftclick(Sender);
    end
    else if (Key = VK_RIGHT) and (document.activeElement.tagName <> 'input') then
    begin
      navRightclick(Sender);
    end;
  end;

end;
This won't be of much use on a touch device, but it does make things a little easier when testing. For example, typing "44" (slowly) will exit the application.
Startup Conductor.
For our final topic today, let's use another timer, tmrStartup, to orchestrate an initialization routine. What we're after here is to start with a blank screen, and then fade in various bits of the UI. For the main splash screen, we'll fade in a bit of text and maybe a logo. Along the way, we'll also kick off other initialization steps so that everything is in order by the time we're done.
procedure TForm1.tmrStartupTimer(Sender: TObject);
var
  HelpFilename: String;
begin

  // This orchestrates a number of events at startup for
  // a bit more dramatic effect, but also to try and ensure
  // things appear in an orderly fashion

  // We don't want to do anything if Tabulator hasn't
  // been initialized yet.  Normally this doesn't take long.
  if ConfigTableReady = false then exit;

  // Stage 0: Load Configuration
  if (tmrStartup.Tag = 0) then
  begin
    LoadConfiguration;
  end

  // Stage 1: Kick off Home Assistant Connection
  else if (tmrStartup.Tag = 1) then
  begin
    tmrConnect.Enabled := True;
  end

  // Stage 1: Display main TWebPageControl
  else if (tmrStartup.Tag = 2) then
  begin
    pages.Visible := True;
    pages.ElementHandle.style.setProperty('opacity','1');
    pageInit.ElementHandle.style.setProperty('opacity','1');
  end

  // Stage 2: Show title
  else if (tmrStartup.Tag = 3) then
  begin
    divCatheedral.ElementHandle.style.setProperty('opacity','1');
  end

  // Stage 3: Show subtitle
  else if (tmrStartup.Tag = 4) then
  begin
    divInit.ElementHandle.style.setProperty('opacity','1');
  end

  // Stage 4: Show corner icons
  else if (tmrStartup.Tag = 5) then
  begin
    btnHelp.ElementHandle.style.setProperty('opacity','0.25');
    btnHelp.Top := MainButtonPad;
    btnHelp.Left := MainButtonPad;

    btnChange.ElementHandle.style.setProperty('opacity','0.25');
    btnChange.Top := MainButtonPad;
    btnChange.Left := PanelWidth - MainButtonSize - MainButtonPad;

    btnHome.ElementHandle.style.setProperty('opacity','0.25');
    btnHome.Top := PanelHeight - MainButtonSize - MainButtonPad;
    btnHome.Left := PanelWidth - MainButtonSize - MainButtonPad;

    btnConfiguration.ElementHandle.style.setProperty('opacity','0.25');
    btnConfiguration.Top := PanelHeight - MainButtonSize - MainButtonPad;
    btnConfiguration.Left := MainButtonPad;
  end

  // Stage 5: Show navigation arrows
  else if (tmrStartup.Tag = 6) then
  begin
    navLeft.Left := 0;
    navRight.Left := PanelWidth - MainNavSize;
  end

  // Stage 6: Add Event Listeners
  else if (tmrStartup.Tag = 7) then
  begin
    asm
      pages.addEventListener('mousemove', function() {
        pas.Unit1.Form1.ResetInactivityTimer(null);
      });
      const scrolls = document.querySelectorAll('.Scroll');
      scrolls.forEach(scroll => {
        scroll.addEventListener('scroll', function() {
          pas.Unit1.Form1.ResetInactivityTimer(null);
        })
      })
    end
  end

  // Stage 8: Load Help Content
  else if (tmrStartup.Tag = 8) then
  begin
    asm
      const helpcontent = document.querySelectorAll('.Help');
      helpcontent.forEach(help => {
        pas.Unit1.Form1.LoadHelp(help.id);
      });
    end;
  end

  // All done with Startup
  else if (tmrStartup.Tag = 9) then
  begin
    tmrSecondsTimer(nil);  // No delay
    tmrSeconds.Enabled := True;
  end

  // Show the Home page if connected,
  // or the Configuration page if not
  else if (tmrStartup.Tag >= 10) then
  begin
    tmrStartup.Enabled := False;

    if dataConfigSTATUS.Caption = 'Connected'
    then SwitchPages(11,1)
    else SwitchPages(11,0);

    ResetInactivityTimer(Sender);
  end;

  tmrStartup.Tag := tmrStartup.Tag + 1;

end;
Finally, when the startup sequence has been completed, we just check and see if we've got a connection yet. If we do, we switch from our splash screen (TabIndex = 11) to the Home page (TabIndex=1). Otherwise, we switch to the Configuration page (TabIndex=0). There are several places where we've also seen a call to "ResetInactivityTimer". This is another timer that we use to switch back to the Home page after nothing happens for a while. Kind of tricky, needing to reset it all the time when there are elements being interacted with. But not difficult to implement.
procedure TForm1.ResetInactivityTimer(Sender: TObject);
begin
  tmrInactivity.Enabled := False;
  tmrInactivity.Enabled := True;
end;

procedure TForm1.tmrInactivityTimer(Sender: TObject);
begin
  if pages.TabIndex <> 1
  then SwitchPages(pages.TabIndex,1);

  tmrInactivity.Enabled := False;
end;
If we're already on the Home page, we naturally don't want to switch to the Home page, nor do we really want to process the event again. Switching pages automatically restarts this timer, and in the startup sequence, a few events were added to try and reset it if mouse or scroll events are detected, like when scrolling a Help page, for example. Not the worst thing if it fires unexpectedly, but we'll try to only do this when we're sure there is nothing going on. So lots of ResetInactivityTimer calls whenever something is being done.
Next Time.
And with that, we've got the bulk of the support work done for our project. Navigation is working. Data coming from Home Assistant is handled. Everything configuration-related has been implemented. All we've got left is the actual useful bit - displaying data from Home Assistant in new and interesting ways. Which is of course where the fun really starts!
Here's a bit of a sneak peek of what that is going to look like, as well as a look at the
results of all of that startup work. The next several posts will each cover in detail a set of rings from the Home
page, starting with the Time panel on the left, followed by Climate (which includes items like inside temperature,
humidity, and lights), Weather (outside temperature, etc.), and Energy (which also includes People).

Welcome to Catheedral!
Follow Andrew on 𝕏 at @WebCoreAndMore or join our 𝕏 Web Core and More Community.
Andrew Simard

This blog post has not received any comments yet.
All Blog Posts | Next Post | Previous Post