Blog
All Blog Posts | Next Post | Previous Post

 TMS WEB Core and More with Andrew:
Working with Home Assistant - Part 2: Rest API
Friday, February 3, 2023

In the first post of this "Home Assistant" miniseries, we covered a bit about home automation in general and we had
an initial look at Home Assistant. We added a TMS WEB Core app to the Home Assistant Dashboard, with its output
displayed on a card. This worked pretty well but didn't really involve working with Home Assistant directly.
The app, being inside an <iframe>, didn't even have access to anything in Home Assistant via this method.
This time out, we're going to have a look at the Home Assistant REST API and see how we can interact with it a
little more directly.
Tokens for Everyone.
Given that Home Assistant is most often used as a tool for monitoring and managing a person's home, it comes set up by default with various security features. If we want to interact with Home Assistant, access its database, or be notified of anything, our project will need to navigate those security features to gain access. For applications, like our TMS WEB Core projects, this is handled through the use of tokens. These tokens are then used as authentication credentials when making calls to Home Assistant, which is what we're doing with their REST API.
We'll need a token, much like we needed a token for accessing the GitHub API in this post. This is also equivalent to using JavaScript Web Tokens (JWTs) with XData, which we covered in this post. In the current version of Home Assistant, you can generate a "Long-Lived Access Token" for just this kind of purpose. These are created with a 10-year lifespan. Just about long enough to forget that they're there! In any event, you can find the section for creating these by clicking on the person icon in the bottom-left corner of the Home Assistant web interface and then scrolling to the very bottom.
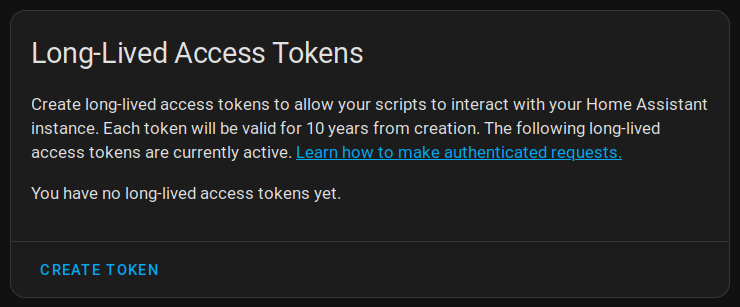
Home Assistant Long-Lived Access Tokens.
As is usually the case with tokens, it is only visible when it is first created. If you don't copy
it somewhere, you'll have to create a new one later. My first run-through when attempting to create tokens for
use with the REST API wasn't successful. The trick I think was to make sure the REST API was installed first. Then, explicitly log out and log in again. Then try and create a new token. Only then were the
tokens accepted. If you're having trouble, be sure to check out this
post for a bit of help getting started with Home Assistant and its REST API.
Where's the Server?
Next, we can use the generated token to post data to the Home Assistant server. In order to do this, you'll
first need to know the address of the server. This may vary quite a bit, depending on where you're trying to
contact it from, and whether there have been any changes to the default settings for things like the port, and
whether or not SSL is enabled. Here's a bit of a breakdown of what you might use.
Local. By default, if you're connecting to your Home Assistant server from the same network, you can
use a local address. This defaults to "http://homeassistant.local:8123" which magically resolves to the IP address of
your Home Assistant server - how that works is an interesting topic all its own. Port 8123 is what it uses by default, and if you've used one of the default VM
images, this is likely already configured and ready to go. You can also just reference the IP address directly
if you happen to know what it is or use an IP name if you've set that up separately in your network. If you've
changed the port, then you already know what number to use there. Essentially, whatever is in the URL of your
web browser when you log in to Home Assistant is what we're after. Note that this is normally an HTTP connection and not an HTTPS connection and that this is typically used on a local (private) network.
External. By default, Home Assistant isn't necessarily configured for external access. It isn't all
that difficult to set up, but things can get considerably more complex when you want to enable SSL, which you
absolutely should be doing. Fortunately, all the pieces are there to make this all work properly. There's even
an NGINX reverse proxy plugin and a LetsEncrypt plugin to make this all work seamlessly. And a dynamic DNS
plugin as well, if you want to go that route. Plenty of online help to get that all working, but once it is,
you can usually just point at a regular domain name (whatever you've used to register an SSL certificate
against). This will then be the address for your server when accessing it from outside of its local network.
Which one you will use will depend on where your TMS WEB Core App (or TMS XData app) will be in reference to
your Home Assistant server. Usually, this is on a local network, and a regular local HTTP URL will be fine. But
if your Home Assistant server is elsewhere (or your app is elsewhere) then the external address will be needed. The general advice around this topic seems to be to use the HTTPS/SSL external address for everything external,
and the HTTP/non-SSL address for everything internal. This is because SSL requires the domain name to be used
for validation, which isn't all that easy when accessing the website internally. Lots of routers aren't going
to be all that cooperative if you're trying to connect to the external address of your network, so it is
sometimes best not to try and force the issue.
The Home Assistant mobile app even has separate options for the local and external addresses, so you can plug
in both values and then move about without having to think about it anymore. This is a fairly advanced Home
Assistant topic, though, and there are many factors that go into what these addresses might be for your
particular installation. It would be best to ensure that you can access Home Assistant (login to it) from
wherever your app will be connecting from. Make sure that works (and that SSL is working properly if connecting
externally) before anything else.
Home Assistant REST API.
We're going to be using the Home Assistant REST API for the rest of this post. The API is reasonably well documented, and you can find that documentation here.
Just as with an XData project (which is, after all, a REST API server in its own right) the Home Assistant REST
API is set up with a number of endpoints to call. All of them require authentication. Some require an HTTP GET
call. And some require an HTTP POST call. For our purposes today, all we're looking to do is add data to
Home Assistant, which we can do with an HTTP POST call to the /api/states/<entity_id> endpoint.
The Objective.
What we're going to do in this example is have an XData application log some status information to the Home Assistant database. XData servers are great, but we still might want to keep tabs on them from time to time, in case something comes up. So in this case, we're actually using one REST server to log information in another REST server. This same access method could also be used directly in a TMS WEB Core app with very few changes required. But for now, let's consider an XData app that we want to monitor. We're interested in tracking just a small handful of items.
- Application version.
- Application release date.
- Last start time.
- Current running time (uptime).
- Amount of memory in use.
Getting these values from an XData application is easy enough as this is a traditional VCL application - all
the old Delphi tricks work fine here. A lot of these were just copied and pasted from Google searches, so there
may be more current methods, particularly with the latest versions of Delphi, but for completeness, here is what
is in the app we're testing this with - the Actorious app. This was first created way back in this
post. You can also check out the Actorious website (www.actorious.com)
if you're interested in seeing that in action.
For the AppVersion and AppRelease values, this is used.
procedure TMainForm.GetAppVersionString;
var
  verblock:PVSFIXEDFILEINFO;
  versionMS,versionLS:cardinal;
  verlen:cardinal;
  rs:TResourceStream;
  m:TMemoryStream;
  p:pointer;
  s:cardinal;
  ReleaseDate: TDateTime;
begin
  // Lot of work to just get the Application Version Information
  m:=TMemoryStream.Create;
  try
    rs:=TResourceStream.CreateFromID(HInstance,1,RT_VERSION);
    try
      m.CopyFrom(rs,rs.Size);
    finally
      rs.Free;
    end;
    m.Position:=0;
    if VerQueryValue(m.Memory,'\',pointer(verblock),verlen) then
      begin
        VersionMS:=verblock.dwFileVersionMS;
        VersionLS:=verblock.dwFileVersionLS;
        AppVersion :=
          IntToStr(versionMS shr 16)+'.'+
          IntToStr(versionMS and $FFFF)+'.'+
          IntToStr(VersionLS shr 16)+'.'+
          IntToStr(VersionLS and $FFFF);
      end;
    if VerQueryValue(m.Memory,PChar('\\StringFileInfo\\'+
      IntToHex(GetThreadLocale,4)+IntToHex(GetACP,4)+'\\FileDescription'),p,s) or
        VerQueryValue(m.Memory,'\\StringFileInfo\\040904E4\\FileDescription',p,s) then //en-us
          AppVersionString:=PChar(p)+' v'+AppVersion;
  finally
    m.Free;
  end;
  Application.Title := AppVersionString;
  MainForm.Caption := AppVersionString;

  FileAge(ParamStr(0), ReleaseDate);
  AppRelease := FormatDateTime('yyyy-MMM-dd', ReleaseDate);

end;
For the last start time and runtime, a form variable is set when the application starts (ElapsedTime) and then
these values are calculated when preparing the JSON for submission. The amount of memory being used is
calculated using something along these lines.
procedure TMainForm.GetMemUse(Sender: TObject);
var
  i: Integer;
  ProgressSize: Integer;
  st: TMemoryManagerState;
  sb: TSmallBlockTypeState;
  mem1: UInt64;
  mem2: UInt64;
begin

{$WARN SYMBOL_PLATFORM OFF}
  GetMemoryManagerState(st);
  mem1 := 0;
  for sb in st.SmallBlockTypeStates do
    mem1 := mem1 + (sb.UseableBlockSize * sb.AllocatedBlockCount);
  mem2 := mem1 + st.TotalAllocatedMediumBlockSize + st.TotalAllocatedLargeBlockSize;
{$WARN SYMBOL_PLATFORM ON}

  MemoryUsage := FloatToStrF(mem2/1024/1024,ffFixed,10,3)
  MemoryUsageNice := FloatToStrF(mem2/1024/1024,ffNumber,10,3)

end;
These main values (AppVersion, AppRelease, ElapsedTime, MemoryUsage) are stored as Form variables in the main
XData project form (Unit2 in the default XData project - MainForm in the example below). This means they are
running in the main XData Server thread. If you were interested in having the state of a particular XData
service endpoint log data, this kind of thing could be run from there, potentially. Hopefully on an endpoint
that is called relatively infrequently. This would also be a way to manually trigger the update - call an
endpoint which then calls the function below and logs the data. If you didn't want to use a timer, for
example. Lots of ways to string these kinds of things together to accomplish whatever you're trying to do.
Making the Call.
With these values in hand. we're ready to make the call. The main thing to know about the Home Assistant REST API (which is pretty common among REST APIs generally) is that all data is passed back and forth using JSON. As we're not doing anything complicated here, we can just write out the JSON in a string without using any Delphi JSON objects. But if you're doing something more complex, or passing a lot of data, using a Delphi JSON object of some flavor will help ensure that it is in fact valid JSON.
In the Actorious XData Server application, we'll want to call this periodically, so a function has been set up
to do just that. It is called when the server first starts, and then periodically by a simple timer after that. Here's what it looks like.
procedure TMainForm.UpdateHomeAssistant;

var
  Client: TNetHTTPClient;
  URL: String;
  Token: String;
  Endpoint: String;

  Data: TStringStream;
  Response: String;

begin

  // NOTE: ElapsedTime, MemoryUsage, MemoryUsageNice, AppVersion and AppRelease are Form Variables defined elsewhere

  // Decide if you're going to use a Home Assistant Internal vs. External URL
  // And that they might differ in whether SSL is used
  URL := 'http://192.168.0.123:8123';
  Token := '<insert your Long-Lived Token here>;

  // Setup the Main Request
  Client := TNetHTTPClient.Create(nil);
//  Client.SecureProtocols := [THTTPSecureProtocol.SSL3, THTTPSecureProtocol.TLS12];
  Client.ContentType := 'application/json';
  Client.CustomHeaders['Authorization'] := 'Bearer '+Token;

  try

    Endpoint := '/api/states/sensor.actorious_server_start';
    Data := TStringStream.Create('{"state": "'+FormatDateTime('mmm dd (ddd) hh:nn', ElapsedTime)+'" }');
    Response := Client.Post(URL+Endpoint, Data).ContentAsString;
    if Pos('"entity_id"', Response) = 0 then mmInfo.LInes.Add(FormatDateTime('yyyy-mm-dd HH:nn:ss.zzz', ElapsedTime)+'  '+Response);
    Data.Free;

    Endpoint := '/api/states/sensor.actorious_server_runtime';
    Data := TStringStream.Create('{"state": "'+IntToStr(DaysBetween(Now, ElapsedTime))+'d '+FormatDateTime('h"h "n"m"', Now-ElapsedTime)+'" }');
    Response := Client.Post(URL+Endpoint, Data).ContentAsString;
    if Pos('"entity_id"', Response) = 0 then mmInfo.LInes.Add(FormatDateTime('yyyy-mm-dd HH:nn:ss.zzz', ElapsedTime)+'  '+Response);
    Data.Free;

    Endpoint := '/api/states/sensor.actorious_server_version';
    Data := TStringStream.Create('{"state": "'+AppVersion+'" }');
    Response := Client.Post(URL+Endpoint, Data).ContentAsString;
    if Pos('"entity_id"', Response) = 0 then mmInfo.LInes.Add(FormatDateTime('yyyy-mm-dd HH:nn:ss.zzz',Now)+'  '+Response);
    Data.Free;

    Endpoint := '/api/states/sensor.actorious_server_release';
    Data := TStringStream.Create('{"state": "'+AppRelease+'" }');
    Response := Client.Post(URL+Endpoint, Data).ContentAsString;
    if Pos('"entity_id"', Response) = 0 then mmInfo.LInes.Add(FormatDateTime('yyyy-mm-dd HH:nn:ss.zzz',Now)+'  '+Response);
    Data.Free;

    Endpoint := '/api/states/sensor.actorious_server_memory';
    Data := TStringStream.Create('{"state":"'+MemoryUsage+'", "attributes":{"unit_of_measurement":"MB"}}');
    Response := Client.Post(URL+Endpoint, Data).ContentAsString;
    if Pos('"entity_id"', Response) = 0 then mmInfo.LInes.Add(FormatDateTime('yyyy-mm-dd HH:nn:ss.zzz',Now)+'  '+Response);
    Data.Free();

    Endpoint := '/api/states/sensor.actorious_server_memory_nice';
    Data := TStringStream.Create('{"state": "'+MemoryUsageNice+'", "attributes":{"unit_of_measurement":"MB"}}');
    Response := Client.Post(URL+Endpoint, Data).ContentAsString;
    if Pos('"entity_id"', Response) = 0 then mmInfo.LInes.Add(FormatDateTime('yyyy-mm-dd HH:nn:ss.zzz',Now)+'  '+Response);
    Data.Free();

  except on E: Exception do
    begin
      mmInfo.LInes.Add(FormatDateTime('yyyy-mm-dd HH:nn:ss.zzz',Now)+'  '+E.ClassName+': '+E.Message);
    end;
  end;

  Client.Free;
end;
Nothing too complicated. You could just as easily use the Indy library for this kind of call. The main
headache here was figuring out which overloaded version of the Post command to use, and how to get the data
in the correct format for that version. We've gone with the TStream version here. I tried the TStringList
version originally but didn't have much luck. The JSON is not at all complicated. And you can see how the
Token is added to the request header at the beginning of the function.
Note that we've got two versions of the MemoryUsage value. One is passed without formatting so that Home
Assistant can do calculations on it, and one is passed as a formatted value that looks nicer. This is because it
is a pain to try and format data in Home Assistant. It has a comprehensive template system for just this kind
of thing, where you can create a new entity with the appropriate formatting. Not obvious, and as that would
need another entity anyway, we'll just pass another entity formatted the way we like directly into Home
Assistant and save a bit of trouble and overhead along the way.
Once the above code has run successfully the first time, any sensors that didn't already exist within the HomeAssistant database will be created automatically, and all of the values for all the sensors will be updated immediately. You can see the data directly in Home Assistant by using the Developer Tools interface and searching for the "States" with the names you've chosen.
Once you see them there, they can be added to the Home Assistant Dashboard using any
of the available cards. The "Entities" card provides a way to show several values at the same time in a list. This is what it looks like. Home Assistant primarily uses Material
Design Icons which we'll cover a bit more later in this miniseries. Font Awesome icons can also be added
to Home Assistant after adding the Font Awesome integration. There's a built-in mechanism for searching for icons, with an assortment chosen for these
values.
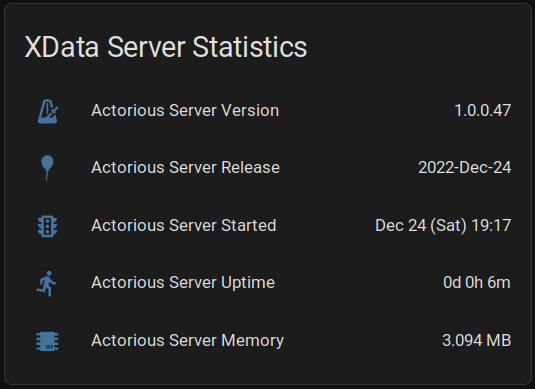
Home Assistant Showing XData Server Content.
The "Memory" value was also created with a "unit_of_measurement" attribute. This is useful when you have a bit
of data that you might use in a chart or where you might want to convert it or compare it to other values. Other attributes can also be passed along, like "friendly_name" for example. Most of the values we've passed on
to Home Assistant were already formatted on the XData side where it is a bit easier (for a Delphi developer,
anyway!) than it is trying to figure out some of the more cryptic methods in Home Assistant. Certainly possible
to do in Home Assistant, but as we're not doing anything else with these, there's not really any reason to give
it much thought.
One Thing Leads to Another.
Now that the data has arrived in Home Assistant, it becomes available for use in other ways. For example,
sensor history is automatically generated and maintained. Just clicking on the "Actorious Server Memory" entry in the card above brings up this display. By default, Home Assistant records 10 days of history. Clicking the
"Show more" link brings up an interface to show a longer period.
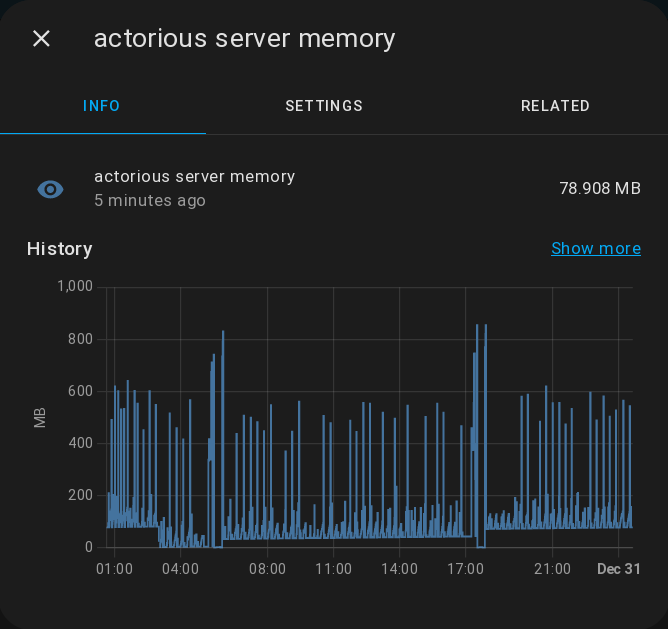
Home Assistant: Sensor History.
Home Assistant has a robust system for handling events, triggers, notifications, scripts, and probably a few
more things I've yet to encounter. These can all interact with anything else in Home Assistant as well. For
example, we could set up a trigger that sends a notification when the Actorious Server Memory value exceeds some
threshold value. We can even direct that notification to a specific device, or multiple devices, with a
customized message.
Let's say I want to know right away if that threshold is exceeded, via a notification on my iOS devices. As the Home Assistant Companion app has been installed on my iPad and iPhone (available of course in Apple's App Store here), it can display regular persistent iOS notifications without much trouble at all. Here's what the definition of the trigger might look like. This is created within the "Automation" section, found within the Home Assistant Settings page.
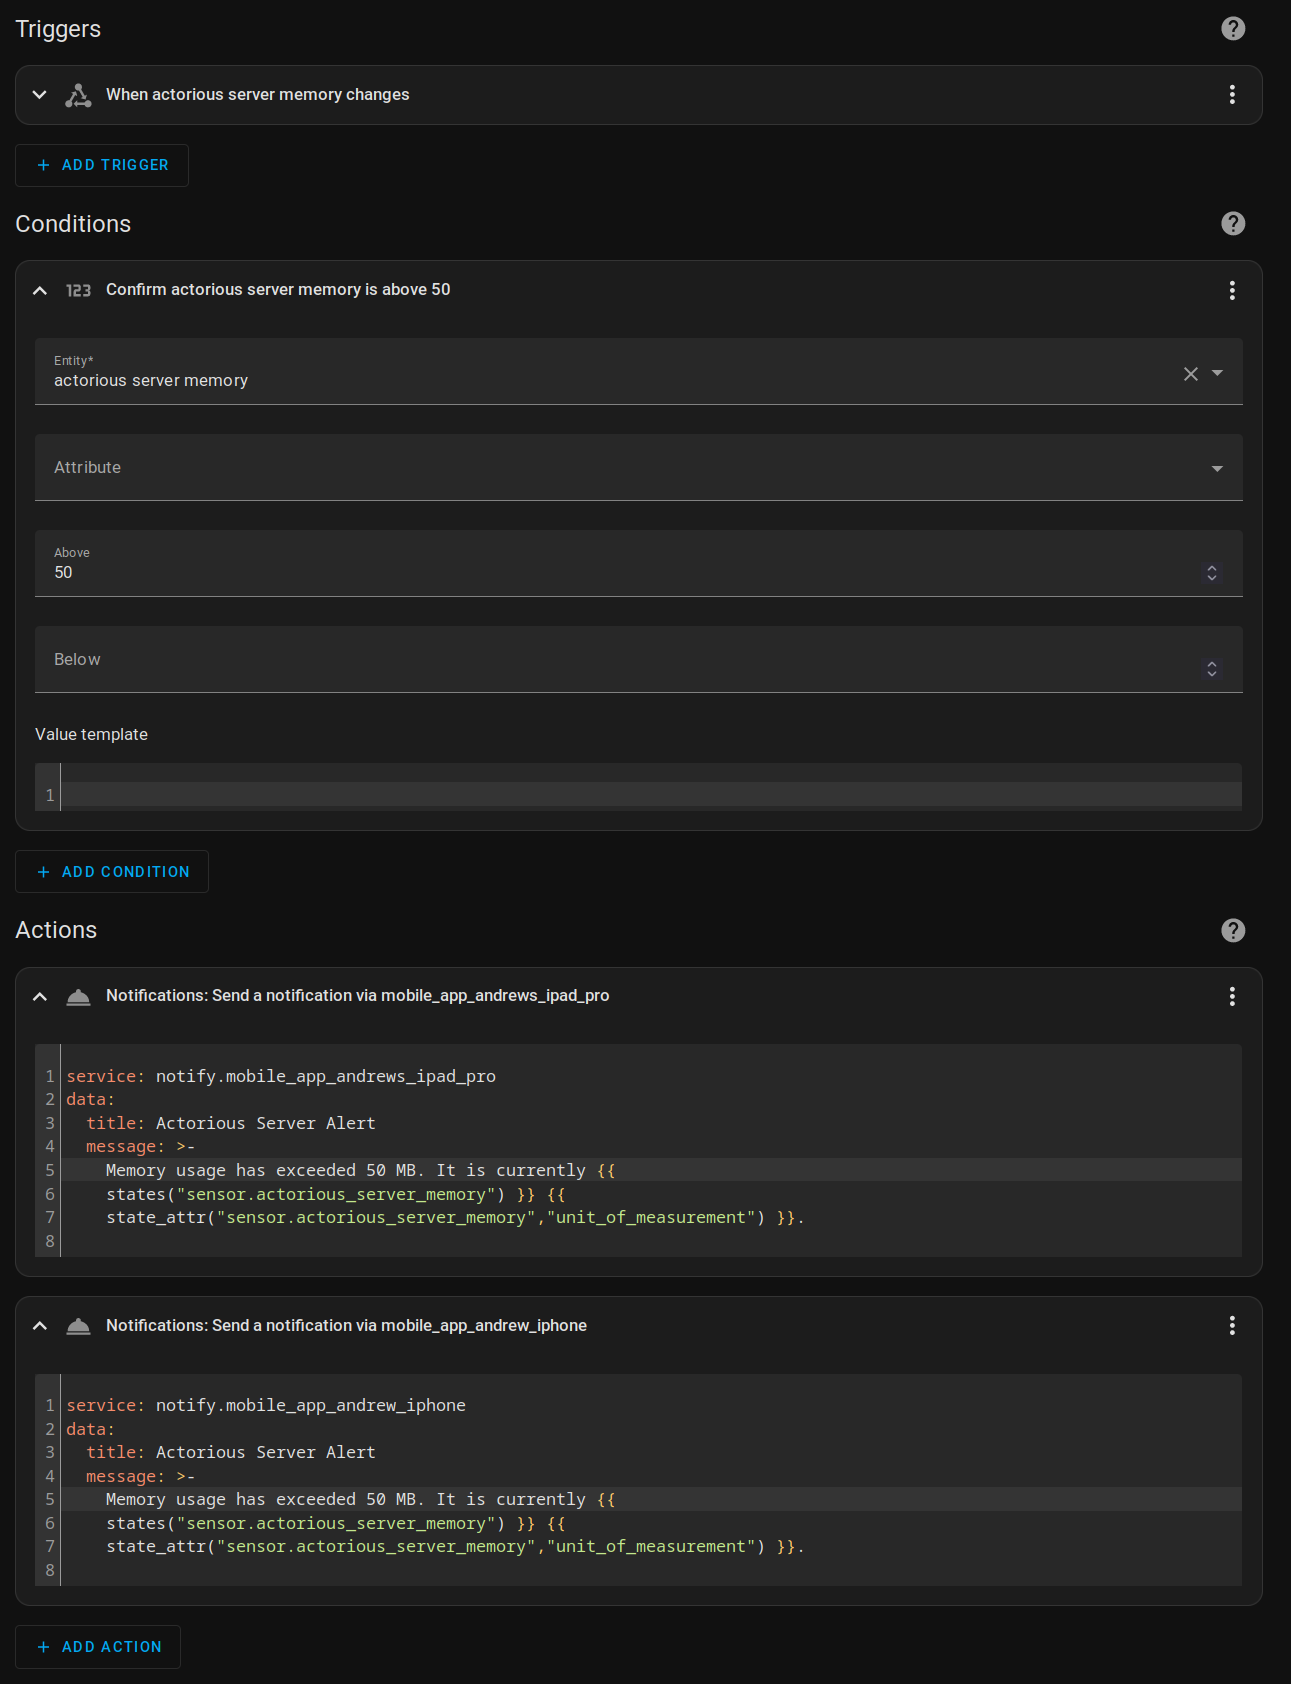
Home Assistant Automation: Configuring a Trigger.
Note that the Actions are defined using these little configuration files if you want to include variables, but
if you don't, the normal UI is available. These are the configuration files I was referring to earlier. They
allow for endless customization, but also some degree of trouble if you're not careful. And you'll likely have
to look up how to do the most basic things, like including the variables that have been used here. Again, very
workable, but not especially intuitive. This is what it looks like when it arrives on the iPad.
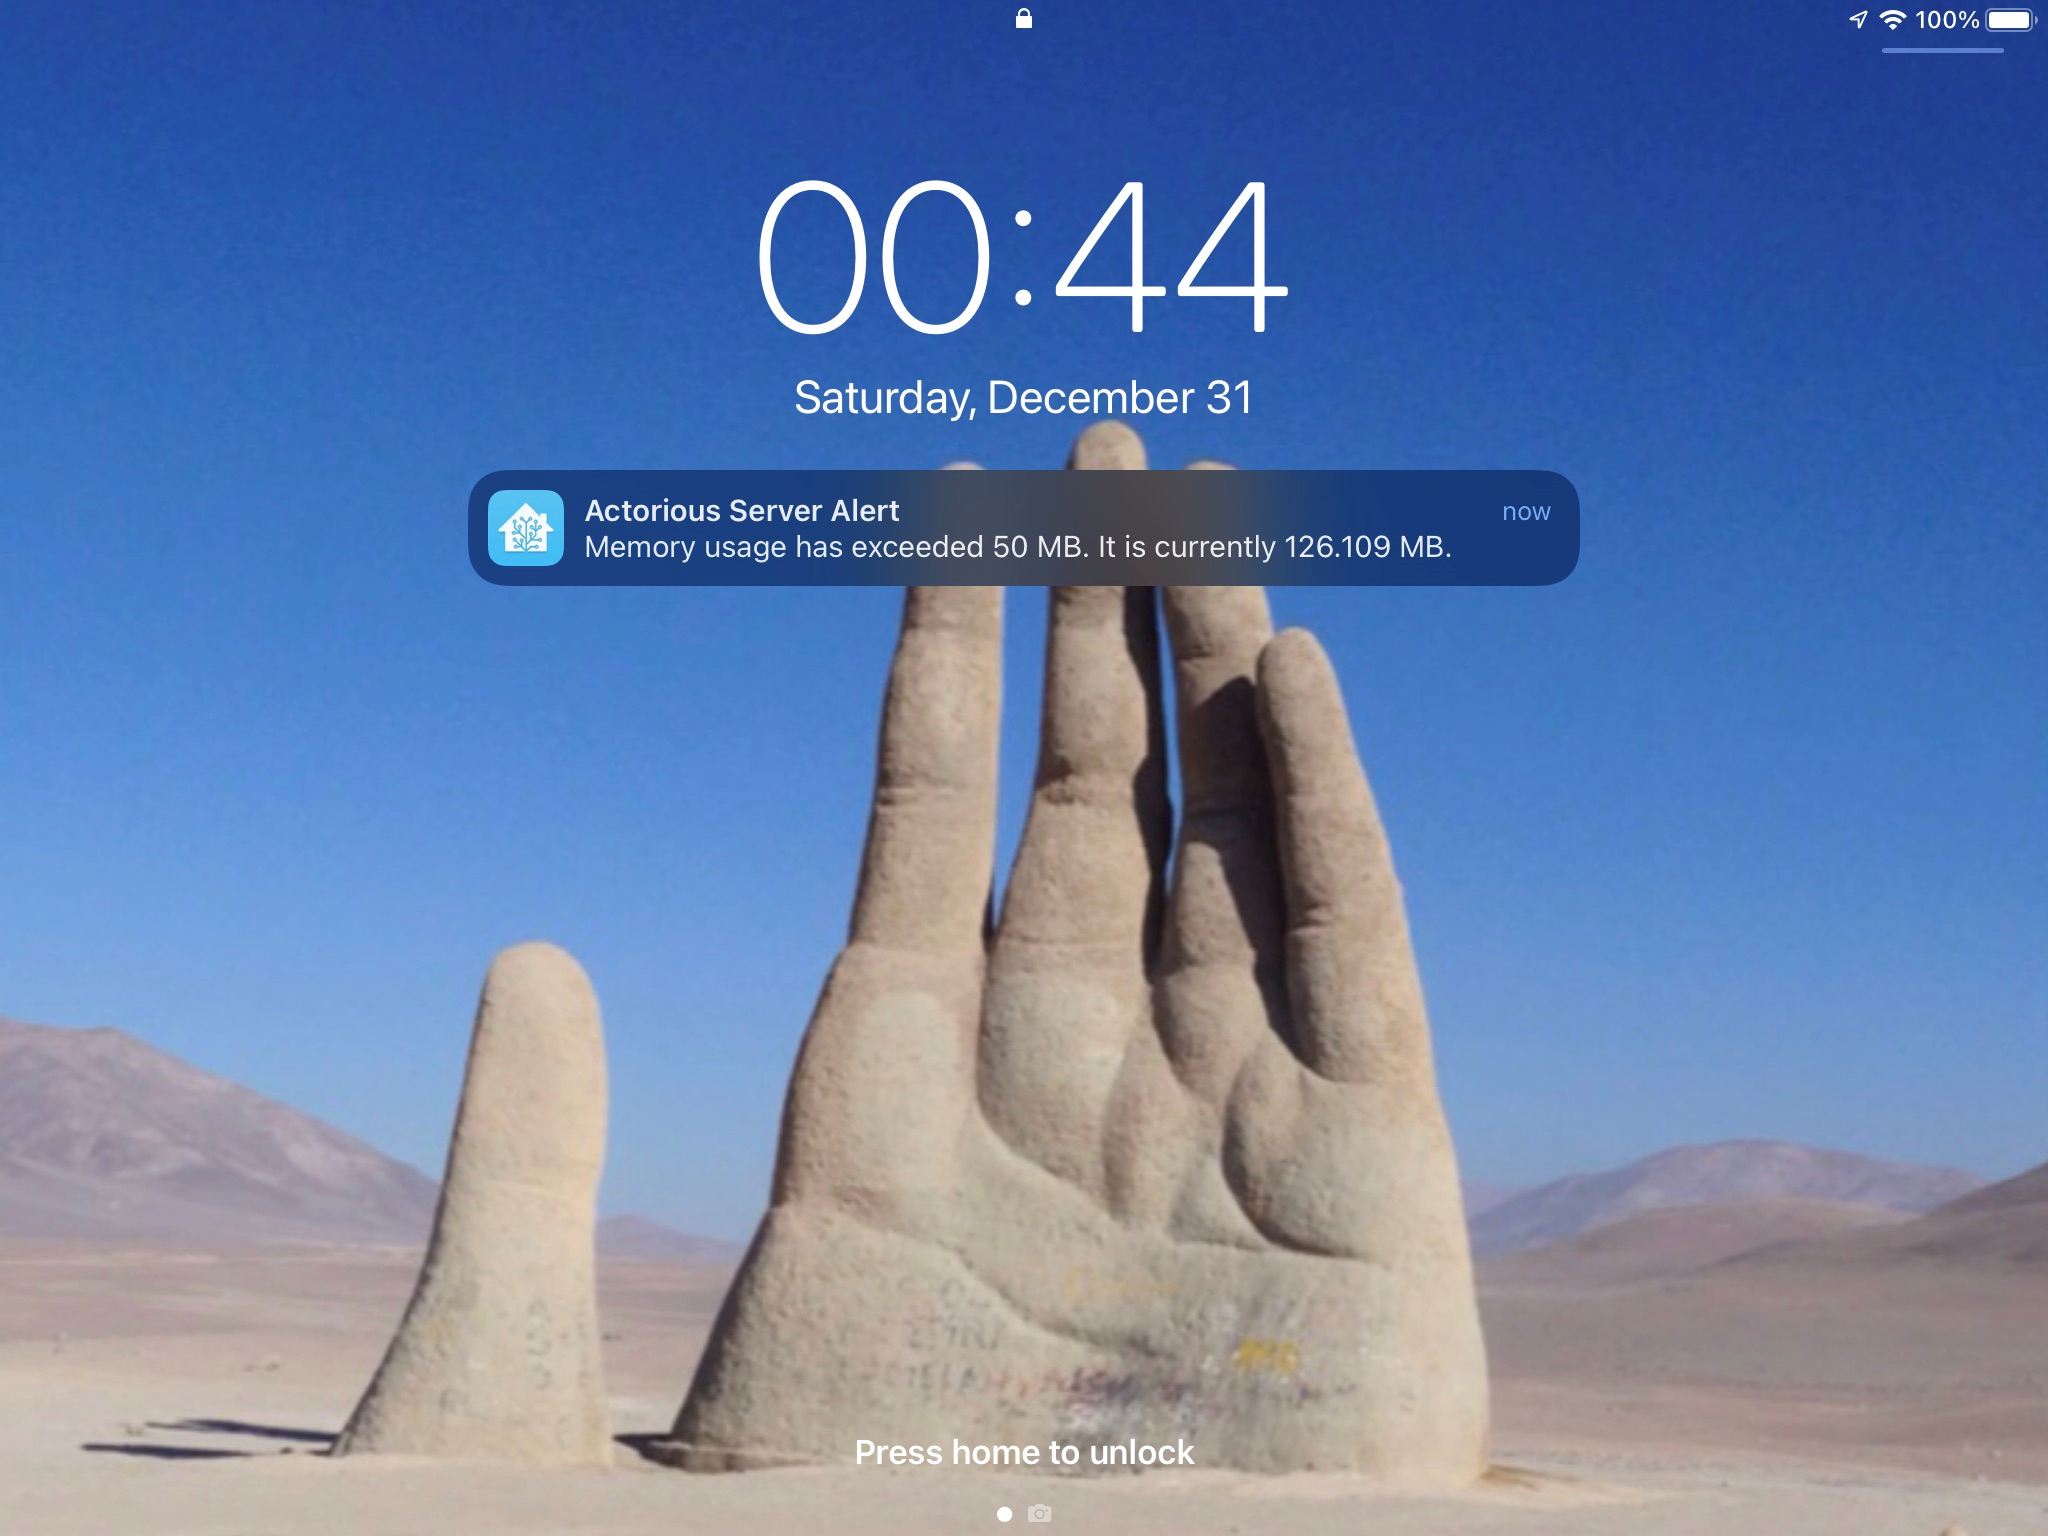
Home Assistant: iOS Notifications.
If you happen to have an Apple Watch connected to an iPhone, alerts can be displayed there as well. Here's what
it looks like.
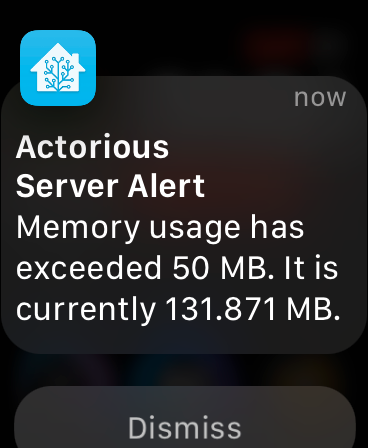
Apple Watch Notifications.
The frequency of notifications can be set, or it will send a notification whenever the value is updated. Based
on the chart above I'll need to adjust the threshold, or perhaps have a look at why the app is using so much
memory in that fashion. Easier to adjust the threshold perhaps! In any event, notifications can be sent elsewhere,
with more or less detail, or other events can be triggered. Maybe a light could turn on (or off) as a more
visual indication that something needs attention.
And of course, this kind of thing can be configured for
whatever data you happen to be contributing to the Home Assistant database. Additional conditions can be used
for more complex scenarios, combining different sensor values, for example. Or perhaps filtering the
notifications so that they are only sent during working hours... Not really any limits to what can be done
here.
Next Time.
That about covers the most basic aspects of the REST API. There are plenty of other functions available, in particular those involving retrieving data from Home Assistant, that we've not covered. This was deliberate because, as it turns out, there is quite a bit of useful data that we simply cannot get from the REST API, as no endpoints are available to provide it. Such as information about rooms (known as "Areas" in Home Assistant).
And, often, we'd rather not use the REST API in many situations as it doesn't much help when it comes to keeping tabs on when data in Home Assistant changes. Sure, we can get a notification about something right now, or we can poll the server and see what's changed, but that's a bit of a pain to set up for more than a handful of sensors. And, we can't readily receive those kinds of notifications directly in our app.
Or can we? Well, we're not going to cover any more of the REST API because there's another one - the Home
Assistant WebSocket API - that addresses both of these issues and will be far more useful to us as we
embark on the bigger part of our adventure - crafting our own comprehensive Home Assistant UI entirely within
TMS WEB Core. But that's a topic we'll get started on next time!
Follow Andrew on 𝕏 at @WebCoreAndMore or join our 𝕏 Web Core and More Community.
Andrew Simard

This blog post has not received any comments yet.
All Blog Posts | Next Post | Previous Post