Frequently Asked Component Specific Questions
Options |
|
Display all FAQ items |
Displaying items 76 to 90 of 888, page 6 of 60
<< previous next >>

 TMS FMX Cloud Pack
Displaying the login page in the TMSFMXCloudWebBrowser control
If a login page from a cloud service is not correctly displayed in the TMSFMXCloudWebBrowser control, you can force your app to use a newer emulated IE version in the Windows registry by adding the executable name at the following location in the registry: HKEY_LOCAL_MACHINE or HKEY_CURRENT_USER \Software\Microsoft\Internet Explorer\Main\FeatureControl\FEATURE_BROWSER_EMULATION Detailed information can be found here: https://msdn.microsoft.com/en-us/library/ee330730(VS.85).aspx#browser_emulation

 TAdvTreeView
How to change the starting directory for TAdvDirectoryTreeview
You can use the following code to initialize the treeview with all the drives:
procedure TForm1.FormCreate(Sender: TObject);
begin
  AdvDirectoryTreeView1.LoadDrives;
end;

 TMS IntraWeb Component Pack Pro Script Edition
TIWCheckListBox: How to determine which item has been clicked
You can use the Index paramter of the OnAsyncCheckClick event to determine which item in the TIWCheckListBox was clicked.

 TAdvStringGrid
Auto filtering in a grid with dynamically formatted cell values based on real cell values
Suppose a grid filled with numbers loaded from a database for example but these numbers are dynamically formatted via the OnGetDisplText event. If we want to perform auto filtering via a filter dropdown, the filtering typically needs to be performed on the real cell data and not the formatted cell text. In this case, the formatting that is done is to add a currency suffix €. In the filter condition we also want to display the currency suffix but we still want the filtering to be applied on the real cell value with real value filter conditions.
The grid is filled with randome numbers between 0 and 100 and the formatting is applied via OnGetDisplText to append the currency suffix €:
procedure TForm1.FormCreate(Sender: TObject);
begin
  advstringgrid1.RandomFill(false);
  advstringgrid1.FilterDropDownCheck := true;
end;

procedure TForm1.AdvStringGrid1GetDisplText(Sender: TObject; ACol,
  ARow: Integer; var Value: string);
begin
  if (arow > 0) and (acol > 0) then
    Value := Value +''€'';
end;
The filter dropdown is filled with 3 conditions and these conditions include the currency suffix:
procedure TForm1.AdvStringGrid1GetColumnFilter(Sender: TObject; Column: Integer;
  Filter: TStrings);
begin
  Filter.Add(''>10€ & <20€'');
  Filter.Add(''>20€ & <50€'');
  Filter.Add(''>50€'');
end;
First thing that needs to be done is set the real filter condition based on numbers only from the OnFilterCheck event:
procedure TForm1.AdvStringGrid1FilterCheck(Sender: TObject; Column,
  ItemIndex: Integer; FriendlyName: string; var FilterCondition: string;
  CheckList: TCheckListBox);
begin
  //
  caption := inttostr(advstringgrid1.Filter.Count);
  case ItemIndex of
  0: FilterCondition := ''>10 & <20'';
  1: FilterCondition := ''>20 & <50'';
  2: FilterCondition := ''>50'';
  end;
end;
Then we need to instruct for the filter condition to take the real cell value and not the formatted value in account:
This can be done in two ways in the OnBeforeFilter event that is triggered when the filter conditions are all built-up and just before these will be applied. Either set the filter instructions to use the real grid value or to specify the suffix:
Method 1:
procedure TForm1.AdvStringGrid1BeforeFilter(Sender: TObject);
var
  i:integer;
begin
  for i := 0 to advstringgrid1.Filter.Count - 1 do
    advstringgrid1.Filter.Items[i].Data := fcNormal;
end;
Method 2:
procedure TForm1.AdvStringGrid1BeforeFilter(Sender: TObject);
var
  i:integer;
begin
  for i := 0 to advstringgrid1.Filter.Count - 1 do
    advstringgrid1.Filter.Items[i].Suffix := ''€'';
end;

 TAdvStringGrid
How to configure the grid so that a clipboard copy of a single cell value can be pasted at once to multiple cells
Initialize a default grid with:
begin
  advstringgrid1.Navigation.AllowClipboardAlways := true;
  advstringgrid1.Navigation.AllowClipboardShortCuts := true;
  advstringgrid1.Navigation.AllowSmartClipboard := true;
  advstringgrid1.Cells[1,1] := ''1'';
end;
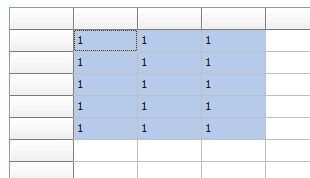
Select cell 1,1 and select a different range of cells and paste to see it in use.


 TAdvStringGrid
Getting checked rows in a filtered grid
In a filtered grid with a checkbox column, when you want to retrieve the rows with a selected checkbox, you need to use the real row index to get the selected state, not the display row index.
This sample code applied to a default TAdvStringGrid demonstrates this:
// initialize the grid

procedure TForm1.FormCreate(Sender: TObject);
begin
  AdvStringGrid1.SaveFixedCells := false;
  AdvStringGrid1.LoadFromCSV(''e:\tms\temp\cars.csv'');
  AdvStringGrid1.FilterDropDownAuto := true;
  AdvStringGrid1.FixedCols := 0;
  AdvStringGrid1.AddCheckBoxColumn(0);
  AdvStringGrid1.Options := AdvStringGrid1.Options + [goEditing];
end;

// loop through all rows and for rows with a checked checkbox, add the 2nd column cell value to a listbox:

procedure TForm1.Button1Click(Sender: TObject);
var
  i:integer;
  state: boolean;
begin
  for I := 1 to AdvStringGrid1.RowCount - 1 do
  begin
    AdvStringGrid1.GetCheckBoxState(0,AdvStringGrid1.RealRowIndex(i),state);
    if state then // add value of cell in column 2 for selected rows to the listbox
      listbox1.Items.Add(AdvStringGrid1.Cells[2,i]);
  end;
end;

 TAdvPanel
How to have a caption with an image float left or right and have text rendered next to the image
You can achieve this through new HTML floating alignment in the
tag features in the HTML engine and insert the right aligned image this way.
This new feature is described in the TMS Component Pack What’s new guide on page 30.
Example:
This adds a clickable right aligned image & text in the AdvPanel caption:
procedure TForm2.FormCreate(Sender: TObject);
begin
   advpanel1.Caption.Text := ''<p align="left" float="left">Product A</p><p align="right">123.456<a href="test"><img src="idx:0"></a></p>'';
end;

 TMS VCL Chart
Showing values in bars
You can accomplish this by using the following code (based on a default TAdvChartView)
procedure TForm1.DoGetBarValueText(Sender: TObject; Serie, PointIndex: integer;
  AFont: TFont; var BarText: String; var Alignment: TAlignment);
begin
  BarText := floattostr(AdvChartView1.Panes[0].Series[Serie].Points[PointIndex].SingleValue);
end;

procedure TForm1.FormCreate(Sender: TObject);
begin
  AdvChartView1.BeginUpdate;
  AdvChartView1.InitSample;
  AdvChartView1.Panes[0].Series.Delete(0);
  AdvChartView1.Panes[0].Series.Delete(0);
  AdvChartView1.Panes[0].Series[0].ChartType := ctbar;
  AdvChartView1.Panes[0].Series[0].OnGetBarValueText := DoGetBarValueText;
  AdvChartView1.EndUpdate;
end;

 TMS VCL Cloud Pack
How to retrieve the files and folders for a specific folder from GDrive
TadvGDrive: To retrieve the files and folders for a specific folder, use the GetFolderList call with the folder’s ID as a parameter.
Example:
    var
        ciFolderList: TCloudItems;
    begin
        ciFolderList := AdvGDrive.GetFolderList(AdvGDrive.GetFileInfo(FolderID));

 TMS Scripter
Using records defined by DefineRecordByRTTI from Delphi code
Scripter has a method named DefineRecordByRTTI which you can use from Delphi 2010 and up to define a record wrapper. It makes it easier to manipulate records, compared to the previous way which doesn’t use enhanced RTTI. When using that method, all records in scripter are represented by the TGenericRecordWrapper class. Thus when received those “records” in a Delphi method via parameter, you need to cast the object to that class and then retrieve the record pointer. Suppose your record type being wrapped is TMyRecord. You’ll need to declare a pointer to it named PMyRecord.
type
  PMyRecord = ^TMyRecord;

procedure TatTestLibrary.__ReadRecord(AMachine: TatVirtualMachine);
var
  MyRecord: PMyRecord;
  Wrapper: TGenericRecordWrapper;
begin
  //Get the record from the script
  Wrapper := VarToObject(AMachine.GetInputArg(0)) as TGenericRecordWrapper;
  MyRecord := PMyRecord(Wrapper.Rec);

  // From now on you can use MyRecord to access the record.
end;

 TDBAdvGrid
Lookup other lookup source DB field values when editing with a TAdvDBLookupCombox in TDBAdvGrid
When you want to access or use values from other listsource fields used in a TAdvDBLookupComboBox when it is used in a TDBAdvGrid as inplace editor, the appropriate place where to access the dataset field values is from the FormControlEditLink.OnGetEditorValue() event. This event is triggered when the DBAdvGrid is about to be updated with the updated value from the TAdvDBLookupComboBox and thus, at this time, the values for other DB fields in the lookup source can be accessed by accessing the lookup source dataset fields. In the sample, this is done by getting the value for the field ‘Capital’ in the COUNTRY table and storing that field value also in the main TDBAdvGrid in a readonly column.
The code is:
procedure TForm1.FormControlEditLink1GetEditorValue(Sender: TObject;
  Grid: TAdvStringGrid; var AValue: string);
var
  s:string;
begin
  AValue := AdvDBLookupComboBox1.Text;
  // get the value from the lookup dataset
  s := adotable2.FieldByName(''Capital'').AsString;
  // store the value in the main dataset
  adotable1.FieldByName(''Capital'').AsString := s;
end;
A full sample source application can be downloaded via: https://download.tmssoftware.com/download/advdblookupcomboboxindbadvgrid.zip

 TMS FlexCel for VCL & FMX
Expanding formulas in consecutive cells with FlexCel
One common thing you might want to do when entering formulas in FlexCel is to change the column or rows where they appear. So for example, let’s imagine you have this formula in A1:
=A2 * 2
And you want to expand the formula to Columns B to Z.
In B1, you will want the formula =B2 * 2, in C1 you will want =C2 * 2 and so on.
There are multiple ways to achieve this:
1)You can enter the formula in A1:
xls.SetCellValue(1, 1, TFormula.Create(''=A2 * 2''));
And then copy the cell to the range B:X:
xls.InsertAndCopyRange(TXlsCellRange.Create(1, 1, 1, 1), 1, 2, 25, TFlxInsertMode.NoneRight, TRangeCopyMode.All);
This will work the same as in Excel, and the formulas will be adapted when copied. Same as in Excel absolute formulas (like $B$1) won’t be changed, but relative formulas will change when copied.
2)You can manually create the formulas by using TCellAddress
TCellAddress is the record you use in FlexCel to convert cell references from/to numbers to letters. Here is a little example on how you can get the Row and column from the string "B5" and also how to get the string "B5" from the row and column:
var
  a: TCellAddress;
begin
  //From string to number
  a:= TCellAddress.Create(“B5”);
  xls.GetCellValue(a.Row, a.Col);

  //from numbers to string
  a := TCellAddress.Create(5, 2);
  DoSomething(a.CellRef);
end;
So, for our original example, we could use some code like this:
  for col := 1 to 26 do
  begin
    xls.SetCellValue(1, col, TFormula.Create(''='' + TCellAddress.Create(2, col).CellRef +'' * 2''));
  end;
3)Using R1C1 notation
R1C1 is an alternative notation to the classical “A1” notation, to describe formulas based in their rows and columns, instead of in a letter and a number. R1C1 is completely equivalent to A1, but has the advantages of always using row numbers, and that the cells are relative to their position, which is what you normally want. You can find a lot of information in R1C1 cell references internet just by a web search, so we will focus in how to use it from FlexCel.
There are a couple of properties that govern R1C1 in FlexCel.:
A)xls.FormulaReferenceStyle := TReferenceStyle.R1C1 :
https://download.tmssoftware.com/flexcel/hlp/vcl/index.htm?FlexCel.Core.TExcelFile.FormulaReferenceStyle.htm
This will affect how you can insert the formulas (so the formula you quoted would be valid), but Excel will still show the formulas in the file as R1C1.
B) xls.OptionsR1C1 := true
https://download.tmssoftware.com/flexcel/hlp/vcl/index.htm?FlexCel.Core.TExcelFile.OptionsR1C1.htm
OptionsR1C1 only affects how Excel shows the formulas, but not how FlexCel expects them. So TFormula.Create(''=SUM(R[-2]C:R[-1]C)'') would still fail: You need to use FormulaReferenceStyle for FlexCel as shown in A)
So for our original example, here is the code to do it with R1C1 notation. Note that due to the fact that R1C1 is relative, the formula is always exactly the same. There is no need to calculate a formula for each cell as we did in Solution 2):
  xls.FormulaReferenceStyle := TReferenceStyle.R1C1;
  for col := 1 to 26 do
  begin
    xls.SetCellValue(1, col, TFormula.Create(''=R[1]C * 2''));
  end;
Also note that while we used R1C1 internally to enter the formulas, in Excel they will show in A1 exactly the same as they do with the other 2 solutions. FlexCel comes with full R1C1 support built in.
Bonus track
R1C1 formulas are not only nice to enter formulas, but also to check for consistency in existing files. Imagine you have a file with formulas like in our example above, and you want to check that they are all as they are supposed to be. So for example in Column J, you have =J2 * 2 and not =A2 * 2. Checking this in A1 notation can be very complex, specially if the formulas are not simple. But retrieve the formulas in R1C1 instead, and all you need to do to check for consistence is that all formulas in A1:Z1 are the same!. That is, retrieve the formula in A1 (in this case "=R[1]C * 2") and then check that all other formulas in the range are the same as the text in A1. If a formula is different, then it is not consistent.

 TMS FMX UI Pack
TTMSFMXListEditor: How to have a lookup function
Example:
procedure TForm1.DoApplyStyleLookup(Sender: TObject);
var
  b: TFMXObject;
  c: TFMXObject;
begin
  if Sender is TFMXObject then
  begin
    c := Sender as TFMXObject;
    if Sender is TTMSFMXEdit then
    begin
      if c.ChildrenCount > 0 then
        c := c.Children[0];
      b := c.FindStyleResource(''background'');
      if Assigned(b) and (b is TControl) then
        (b as TControl).Visible := False;
    end;
  end;
end;

procedure TForm1.TMSFMXListEditor1EditorCreate(Sender: TObject;
  var AClass: TTMSFMXCustomListEditorControlClass);
begin
  AClass := TTMSFMXEdit;
end;

procedure TForm1.TMSFMXListEditor1EditorUpdate(Sender: TObject;
  AItemIndex: Integer; var AText: string);
var
  ed: TStyledControl;
begin
  ed := TMSFMXListEditor1.Editor;
  if Assigned(ed) then
  begin
    (ed as TTMSFMXEdit).Text := AText;
    (ed as TTMSFMXEdit).Lookup.Enabled := True;
    (ed as TTMSFMXEdit).Lookup.DisplayList.Add(''Item 1'');
    (ed as TTMSFMXEdit).Lookup.DisplayList.Add(''Item 2'');
    (ed as TTMSFMXEdit).Lookup.DisplayList.Add(''Item 3'');
    (ed as TTMSFMXEdit).OnApplyStyleLookup := DoApplyStyleLookup;
  end;
end;

procedure TForm1.TMSFMXListEditor1ItemUpdate(Sender: TObject;
  AItemIndex: Integer; var AText: string);
var
  ed: TStyledControl;
begin
  ed := TMSFMXListEditor1.Editor;
  if Assigned(ed) then
    AText := (ed as TTMSFMXEdit).Text;
end;
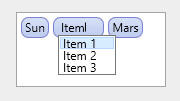
Result when typing in the editor:


 TMS Advanced Office Graphics Control Pack
TAdvPenStyleSelector: How to change the line thickness shown in the selector
The images shown in TAdvPenStyleSelector are coming from resource images. The resource images are in AdvSelectors.RES, so if you want to change these images, you''d need to change the images PENSTYLE0..PENSTYLE7 bitmaps in this resource file.

 TAdvGauge
ExtraNeedles
- ExtraNeedles: TNeedleItems
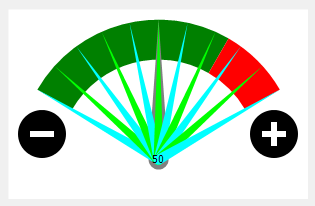
This is an extra collection to add as many needles as desired to the gauge. The collection consists of TNeedleItem objects via which the needle color, position and width can be set.
Example:
var
  it: TNeedleItem;
  I: Integer;
begin
  for I := 0 to 10 do
  begin
    it := AdvGauge1.ExtraNeedles.Add;
    it.Position := i * 10;
    if odd(i) then
      it.Color := clLime
    else
      it.Color := clAqua;
  end;
end;