Frequently Asked Component Specific Questions
Options |
|
Display all FAQ items |
Displaying items 286 to 300 of 888, page 20 of 60
<< previous next >>

 THTMLCheckList
How to make the THTMLCheckList only let one check box marked at a time
You can easily have a radiobutton-like behavior in THTMLCheckList by adding the following event handler for OnCheckClick:
procedure TForm5.HTMLCheckList1CheckClick(Sender: TObject; Index: Integer);
begin
  HTMLCheckList1.UnCheckAll;
  HTMLCheckList1.Checked[Index] := true;
end;
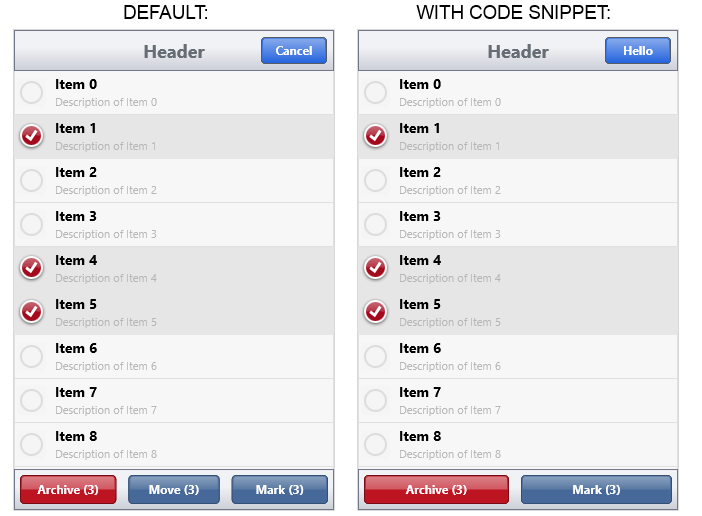
TMS FMX UI PackTTMSFMXTableView: How to change the text of the 'Edit' button depending you're in edit mode or not + how to remove the 'Move' button
Below is a small sample that demonstrates how your can change the text of the ''Edit'' button depending you''re in edit mode or not + how you can remove the ''Move'' button.
procedure TForm136.ChangeEditButton(AEditButton: TTMSFMXBarButton);
begin
  if TMSFMXTableView1.isEditMode then
    AEditButton.Text := ''Hello''
  else
    AEditButton.Text := ''World'';
end;

procedure TForm136.EditClick(Sender: TObject);
begin
  if TMSFMXTableView1.isEditMode then
    TMSFMXTableView1.CancelEditMode
  else
    TMSFMXTableView1.EditMode;

  ChangeEditButton((Sender as TTMSFMXBarButton));
end;

procedure TForm136.TMSFMXTableView1ApplyStyleLookup(Sender: TObject);
var
  b: TTMSFMXBarButton;
begin
  b := TMSFMXTableView1.GetEditButton as TTMSFMXBarButton;
  (b as TTMSFMXBarButton).OnClick := EditClick;
  (b as TTMSFMXBarButton).AllowCustomize := True;
  ChangeEditButton(b);
  TMSFMXTableView1.GetMoveButton.Visible := False;
  TMSFMXTableView1.GetMarkButton.Align := TAlignLayout.alClient;
  TMSFMXTableView1.GetArchiveButton.Align := TAlignLayout.alLeft;
  TMSFMXTableView1.GetArchiveButton.Width := (TMSFMXTableView1.Width - (TMSFMXTableView1.GetArchiveButton.Margins.Right * 5)) / 2
end;
 TMS FMX UI Pack
TTMSFMXGrid: How to access the current TRectF of a grid specific cell
You can retrieve the grid cell rectangle with XYToCell:
procedure TForm1.TMSFMXGrid1MouseMove(Sender: TObject; Shift: TShiftState; X,
  Y: Single);
var
  cl: TCell;
  obj: TControl;
  cellr: TRectF;
begin
  cl := TMSFMXGrid1.XYToCell(X, Y);
  obj := TMSFMXGrid1.GetCellObject(TMSFMXGrid1.GetDisplayCell(cl));
  if Assigned(obj) then
    cellr := RectF(obj.Position.X, obj.Position.Y, obj.Position.X + obj.Width, obj.Position.Y + obj.Height);
end;
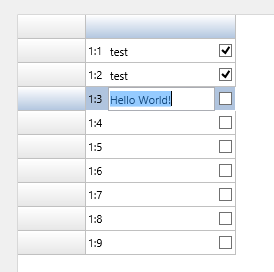
TMS FMX UI PackTTMSFMXGrid: How to combine 3 controls/functions in 1 cell
To combine for example a ReadOnly column + an editable column + a CheckBox column in 1 cell we can create a custom cell. First inherit from TTMSFMXCheckedGridCell which already has built-in support for editing and managing a checkbox. Additionally a label can be added, and with an override of the GetTextRect function it''s possible to limit the editing area.
Here you can download a sample that demonstrates this.
 TMS FMX UI Pack
TTMSFMXButton: How to set the text alignment
Many users try to set the text alignment via the TextAlign property. The TextAlign property does not apply to the text string, but to the text control. You can notice this as the property isn''t a TTextAlign property but a TAlignLayout property.
You can use the following code to left-align the text. The OnApplyStyleLookup event can be used to access the image and text object that are used inside the TTMSFMXButton:
procedure TForm1.TMSFMXButton1ApplyStyleLookup(Sender: TObject);
begin
  TMSFMXButton1.HTMLText.HorzTextAlign := TTextAlign.Leading;
end;
You can also shift the text object with the margins property (if the text object is client aligned):
procedure TForm1.TMSFMXButton1ApplyStyleLookup(Sender: TObject);
begin
  TMSFMXButton1.HTMLText.HorzTextAlign := TTextAlign.Leading;
  TMSFMXButton1.HTMLText.Margins.Left := 5;
end;
TMS FMX UI PackTTMSFMXTableView: How to customize the items to have a Bubble message list
You can easily override the item shapes with the OnItemCustomize event. Below is a small sample that demonstrates this:
procedure TForm1.TMSFMXTableView1ItemCustomize(Sender: TObject;
  AItem: TTMSFMXTableViewItem; AItemShape: TTMSFMXTableViewItemShape;
  AItemControlShape: TControl);
begin
  if Odd(AItem.Index) then
  begin
    AItemShape.Margins.Left := 50;
    AItemShape.Fill.Color := TAlphaColorRec.Lime;
  end
  else
    AItemShape.Margins.Right := 50;

  AItemShape.Margins.Top := 5;
  AItemShape.Align := TAlignLayout.Top;
  AItemShape.Corners := AllCorners;
end;
 TAdvStringGrid
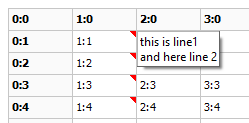
How to add multiline comments
You can add multiline comments with:
  AdvStringGrid1.SHowHint := true;
  AdvStringGrid1.AddComment(1,1,''this is line1''#13#10''and here line 2'');
The hint normally auto sizes, the max. width can be set via:
AdvStringGrid1.ControlLook.HintMaxWidth := 50;
When using xlsexport, you can also save the comment when you set:
AdvGridExcelIO.Options.ExportCellProperties = true
 TWebCopy
Download files only when newer version than local copy is available
With TWebCopy, the component to upload or download files via HTTP / FTP, it is easy to instruct the component to only start a download when a newer file version is available online. To do this, all that needs to be done is set the option WebCopyItem.CopyNewerOnly = true and set the date to check against via WebCopyItem.FileDate. In this case, we’d set this date to the local file date:
procedure TForm5.CheckAndDownloadNewDoc;
var
  wci: TWebCopyItem;
begin
  WebCopy1.Items.Clear;

  wci := WebCopy1.Items.Add;
  wci.URL := 'https://download.tmssoftware.com/download/manuals/TMS%20Spell%20Check.pdf';
  wci.CopyNewerOnly := true;
  wci.FileDate := FileAge(''c:\Doc\TMS%20Spell%20Check.pdf'');
  wci.TargetDir := ''c:\doc'';

  WebCopy1.Execute;

  if wci.NoNewVersion then
    ShowMessage(''No new version found'')
  else
    ShowMessage(''New file from ''+DateToStr(wci.NewFileDate) + '' found'');
end;
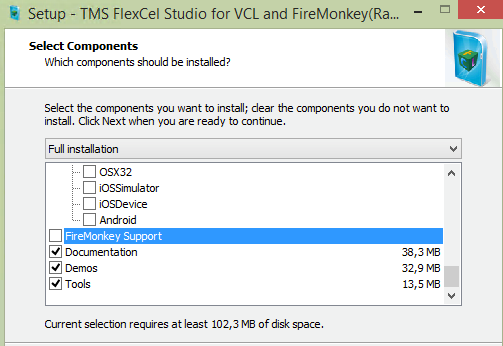
TMS FlexCel for VCL & FMXInstallation & compilation of TMS FlexCel
Due to its complexity FlexCel takes a while to compile. We are speaking about 1700 units with 700,000 lines of code, and a “mini-excel” which even includes a full PDF engine.
1) A full compilation for all platforms including debug and release configurations can take about 2 or 3 minutes. Most of the time is spent in mobile compilers like iOS and Android which are much slower than the Win32 compiler. If a full compilation takes up to 8 hours, then there is probably something wrong in the setup. (Antivirus, some unexisting library paths pointing to network locations could slow down compiling)
2) You should be compiling FlexCel just once: When you install it. Setup is similar to the VCL itself, it puts all dcus in the library path, and not the .pas files. And the result is similar, once you install it, it runs fast (recompiling the VCL would take many minutes too, again due to the complexity of it)
One way to speed it up, if you aren’t using the FireMonkey part, is to deselect it on setup:
 TMS IntraWeb Component Pack Pro
Using a detailgrid in TIWAdvWebGrid
Make sure that one column has a DetailSpan value set higher than 0. This is the column from where you want to see the detail grid, typically the first column. The DetailSpan value controls in how many columns you see the detail grid. Set DetailRowShow to dsServerOneOpen. Use the ctNode ColumnType to display a node in the cell to show/hide the TTIWAdvDetailWebGrid.
Example:
  TIWAdvWebGrid1.DetailGrid := TIWAdvDetailWebGrid1;
  TIWAdvWebGrid1.DetailRowShow := dsServerOneOpen;
  TIWAdvWebGrid1.Columns[0].ColumnType := ctNode;
  TIWAdvWebGrid1.Columns[0].DetailSpan := 3;
TMS FMX WebGMapsHow to set the map to a different location
The DefaultLatitude and DefaultLongitude needs to be set at designtime, to initialize the map the first time it is loading. When the map is loading the map will load this as the center location.
Afterwards, you can use the TTMSFMXWebGMaps1.MapPanTo(Latitude, Longitude) to set the map to a different location. This function performs a pan to a location set by latitude and longitude coordinates. This is useful to set a certain position in the center of the control canvas. Make sure to call MapPanTo after the map has finished loading. The OnDownloadFinish event is triggered when the map is ready.
Example:
procedure TForm1.TMSFMXWebGMaps1DownloadFinish(Sender: TObject);
begin
  TMSFMXWebGMaps1.MapPanTo(Latitude, Longitude);
end;
TAdvEditUsing the built-in lookup & autocompletion capabilities
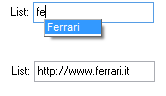
Just like in Outlook when you start typing an email address, Outlook makes a suggestion while typing on possible matching email addresses, TAdvEdit has such capability. The settings to control this lookup or autocompletion capability can be found under TAdvEdit.Lookup. The default and most simple behavior of the lookup is to add entries in the Edit.Lookup.DisplayList stringlist.
This code snippet initializes the lookup with display text and value text. When typing ''Fe'', the dropdown list will suggest ''Ferrari'' and when accepting to autocomplete, the edit control text will be set to ''http://ferrari.it'':
begin
  with AdvEdit1.Lookup do
  begin
    DisplayList.Clear;
    ValueList.Clear;
    DisplayList.Add(''BMW'');
    ValueList.Add(''http://www.bmw.de'');
    DisplayList.Add(''Mercedes'');
    ValueList.Add(''http://www.mercedes.de'');
    DisplayList.Add(''Porsche'');
    ValueList.Add(''http://www.porsche.de'');
    DisplayList.Add(''Ferrari'');
    ValueList.Add(''http://www.ferrari.it'');
    DisplayList.Add(''Audi'');
    ValueList.Add(''http://www.audi.de'');
  end;
  AdvEdit1.Lookup.Enabled := true;
end;
When Lookup.History is set to true, values entered in the edit control are automatically added to the DisplayList. This DisplayList can be persisted in the registry or in an INI file. To enable this capability, set AdvEdit.Persistence.Enable is true and specify the registry key or INI filename via AdvEdit.Persistence.Key and the registry value name or INI file section name with AdvEdit.Persistence.Section.
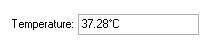
TAdvEditUsing a fixed suffix and/or prefix
It can be convenient that there is a fixed suffix or prefix hinting the user typically of the dimension of a value to enter. This can be the currency symbol for entering monetary values or a dimension like degrees Celcius °C. To have this dimension always displayed and as non editable part of the text, it can be set via Suffix and/or Prefix property.
 TAdvEdit
Using the decimal separator when '.' is pressed on the numerical keypad
Set AdvEdit.ExcelStyleDecimalSeparator = true
TWebUpdateHow to target the UserAppData directory
There are several target directory options:
{WIN} : Windows folder
{SYS} : Windows System32 folder
{PF} : Program Files folder
{TMP} : Temporary files folder
{APP} : Application folder
{DOC} : My documents folder
In case you wish to target the UserAppData directory, you can do this with a custom path converter via event OnConvertPrefix. From this event you can pass the path for a prefix you assign for this path where the path itself can be retrieved via:
uses ShlObj;
..
..
function getUserPath:string;
var pathString:array[0..1023] of char;
begin
   ShGetSpecialFolderPath(0,PChar(@pathString),CSIDL_APPDATA,false);
   result:=pathString;
end;