Effectively using the PictureContainer component
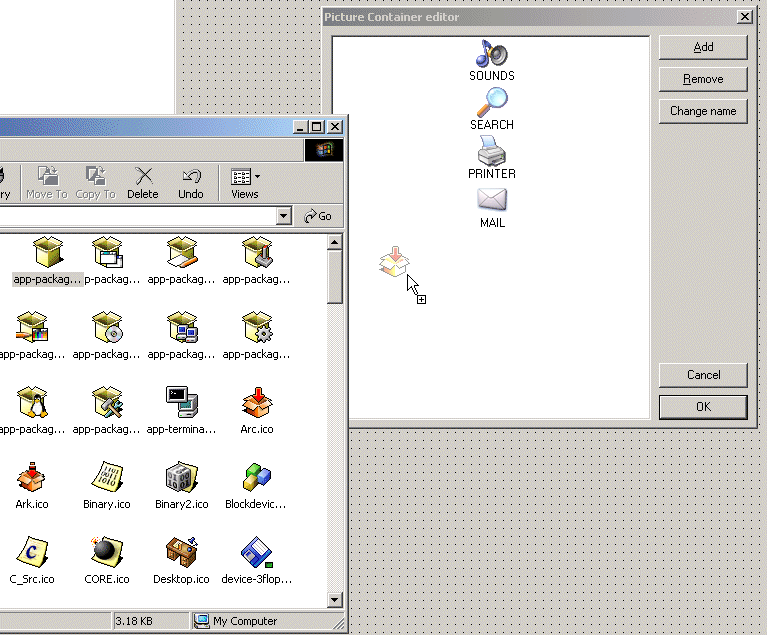
The PictureContainer makes it easy to use and embed JPEG, GIF, ICO, BMP and WMF images in your applications from the IDE without needing to resort to resource files. Note that the PictureContainer does not require any additional library or code to handle these image formats. Just drop a PictureContainer on the form and double click to start editing the pictures in the PictureContainer. The PictureContainer property editor supports drag & drop with Explorer. In this way you can just drag & drop images from Explorer to the PictureContainer instead of going through Add and browse for the files. The filename is used as picture name when the picture is dropped on the picture container. The name can be changed from the PictureContainer editor through "Change Name". This is the name you can refer to in the IMG tag from the various HTML enabled components. Suppose the images with names
SOUNDS, SEARCH, PRINTER and MAIL have been added as above, then
the images can be shown with following tags :
First image <IMG src="SOUNDS"> , second image <IMG src="PRINTER">, etc ...
assuming of course the PictureContainer is assigned to the HTML enabled control. Further the PictureContainer editor supports INS and DEL buttons to add or remove pictures from the PictureContainer. Note that GIF and ICO files support transparency by default. Multiple PictureContainer components can be used on the same form and these can be changed at runtime. When a HTML enabled control cannot find a picture with the name referenced in the PictureContainer it will display no image.
It is equally possible to add pictures to the PictureContainer at run-time. Below is a code snippet that shows how an image is loaded from file and added to the PictureContainer and subsequently used for display in a HTMListBox control :
with PictureContainer.Items.Add do
begin
  Picture.LoadFromFile('myimage.ico');
  Name := 'NEW';
end;
HTMListBox.Items.Add('This uses the new image : <IMG src="NEW">');
To remove a picture from the PictureContainer later :
with PictureContainer.Items.Items[1].Free;
To control size of the picture displayed, additional tags WIDTH and HEIGHT can be used :
New image <IMG src="NEW" width="24" height="24">
We hope this small article makes the flexibility of the PictureContainer component more clear and we hope you enjoy its usage.
×
![]()