Blog
All Blog Posts | Next Post | Previous Post

 Customizing SVG appearance
Friday, November 26, 2021
Intro
Recently we covered a blog post related to high DPI in combination with SVG in RAD Studio Alexandria. Adding SVG to your application makes you not have to worry for what the future brings in terms of look and feel. The scalable vector graphics will always be crisp independent of the screen resolution or size of the image. Today we are going a step further yet again and want to introduce a couple of QOL changes.
SVG support is available when installing one of the following 2 products.
After starting the IDE, SVG is already available. This is not only registered for our products, but also available in default VCL controls. We start by adding VCL.TMSFNCTypes or AdvTypes unit (depending on the installed product). The unit will register the SVG type at runtime. At designtime, the package already registers SVG support. In the latest version of both products, we have added a way to change the tint color, setting the overal fill, stroke and opacity as well as the ability to turn an SVG to a grayscale version.

TintColor
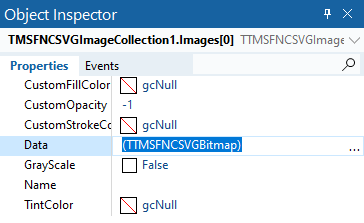
Adding an SVG image to one of your controls, directly via TPicture or via a TVirtualImageList in combination with TTMSFNCSVGImageCollection enables access to the properties. After loading an SVG via the Data property of the TTMSFNCSVGImageCollection you are able to set one of the new properties. Changing the TintColor will affect the overal appearance, the SVG engine will try to blend the TintColor with the image, creating a different appearance.
Original SVG

TintColor = gcDarkOrange

GrayScale
Enabling the property GrayScale, will transform the SVG and convert all colors to grayscale versions.

Customizing Opacity, Fill and Stroke
The CustomOpacity, CustomFillColor and CustomStrokeColor properties are focused on changing the whole appearance of the SVG. Currently, the CustomFillColor and CustomStrokeColor are designed to be applied on monochrome colors such as complete white or black SVG icons.
CustomOpacity = 0.4

In Code
Each property can be accessed when converting the TGraphic sub-property of a TPicture to TTMSFNCSVGBitmap (or TAdvSVGBitmap). The code to do this is shown below, and based on adding a TPicture on a TImage.
(Image1.Picture.Graphic as TTMSFNCSVGBitmap).SVG.GrayScale := True;
Original SVG GrayScale


The same applies to all the other properties. Below is a sample changing the opacity in combination with a custom fill color.
(Image1.Picture.Graphic as TTMSFNCSVGBitmap).SVG.CustomFillColor := gcRed;
(Image1.Picture.Graphic as TTMSFNCSVGBitmap).SVG.CustomOpacity := 0.8;
Original SVG Custom Fill/Opacity


Want to know more?
More information on SVG, the supported SVG features as well as the enhancements we made to our SVG engine are available in the following blog posts.
Pieter Scheldeman

This blog post has received 2 comments.

 2. Saturday, November 27, 2021 at 12:06:20 PM
To ensure the same code can be used in VCL,FMX,LCL and WEB Core.
Bruno Fierens
All Blog Posts | Next Post | Previous Post
Is it because of MultiPlatform, where
{$IFDEF VCL }
gcRed = clRed;
{$ELSE }
gcRed = TAplhaColors.Red;
{$ENDIF }
?
Hansen Keld