Blog
All Blog Posts | Next Post | Previous Post

 Weekend fun with Raspberry Pi 2 and TMS Cloud Pack
Sunday, June 7, 2015
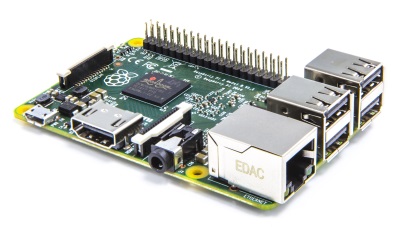
 Thinking to myself, why go through the hassle of sacrificing a desktop computer or fiddle around with VMs to test something on a Linux machine when I have here several 85mmx56mm Raspberry Pi boards laying around capable of amazing things. For my experiments, I wanted to have an ownCloud available and first thing to do was getting an ownCloud up and running on the Raspberry Pi 2, which turned out to be a piece of cake. To do this, follow these instructions:
Step 1: getting Apache up and running
If Apache is already setup on your device, skip this step, otherwise, from the command line, execute:
$ sudo apt-get install apache2
The Raspberry Pi 2 LED flashes for a short while and when completed, verify it is working by opening a browser on a machine in the network and navigate to the IP address of the Raspberry Pi 2 like http://192.168.1.100. When install was successful, you'll be greeted with an "It works!" page.
Step 2: install PHP and tools
In case you had Apache already configured with PHP 5, you can also skip this step.
To install, execute following commands:
$ sudo apt-get install php5
$ sudo apt-get install php5-gd
$ sudo apt-get install sqlite
$ sudo apt-get install php5-sqlite
$ sudo apt-get install php5-curl
After some more LED flickering, these steps will also be executed and the Apache environment with PHP 5 is ready.
Step 3: install ownCloud
To install ownCloud, start by downloading the latest distribution. At this time, this is v8.0.3 and is downloaded with:
$ sudo wget https://download.owncloud.org/community/owncloud-8.0.3.tar.bz2
Next step is to unpack the ownCloud distribution and install it under Apache.
$ sudo mv owncloud-8.0.3.tar.bz2 /var/www
$ cd /var/www
$ sudo bunzip2 owncloud-8.0.3.tar.bz2
$ sudo tar xf owncloud-8.0.3.tar
Step 4: setting up ownCloud
To finalize, the data folder for ownCloud must be created and an admin account added.
The data folder is created with following steps:
$ sudo mkdir /var/www/owncloud/data
$ sudo chown www-data:www-data /var/www/owncloud/data
$ sudo chmod 750 /var/www/owncloud/data
At this time it is more convenient to continue the setup from a browser. Either start the graphical shell on the Raspberry Pi 2 or connect from a browser on an external machine and navigate to http://localhost/owncloud or from external machine http://192.168.1.100/owncloud/
The first screen that appears is to create an admin account, so add the credentials for an admin account on this page. With this account added, owncloud is up and running and ready for use.
Step 5: Connecting from Delphi to ownCloud
Now Delphi kicks in and with a little help from the TMS Cloud Pack, let's start using ownCloud from a Delphi app.
Start your IDE, make sure TMS Cloud Pack is installed and drop the component TAdvCalDAV on the form. Configure the TAdvCalDAV component to access your ownCloud. Verify the ownCloud primary CalDAV address by opening the calendar app within ownCloud via: http://192.168.1.100/owncloud/index.php/apps/calendar/ and in the bottom left corner, click on settings where this primary address is shown. By default, this should be:
http://192.168.1.100/owncloud/remote.php/caldav/
So, now we can configure the TAdvCalDAV component to connect to ownCloud on Raspberry Pi 2:
try
  AdvCalDav1.URL := 'http://192.168.1.100/owncloud/remote.php/caldav/';
  AdvCalDav1.Username := 'tms';
  AdvCalDav1.Password := 'tmsrocks!';
  AdvCalDav1.Active := true;
except
   Exit;
end;
After a successful connect, the calendars and their events available on ownCloud can be retrieved, here by filling the info in a listview:
var
  i: integer;
  cdi: TCalDavItem;
  li: TListItem;
begin
  // get events
  for i := 0 to AdvCalDav1.Items.Count - 1 do
  begin
    cdi := AdvCalDav1.Items[i];

    if cdi.vCalendar.vEvents.Count > 0 then
    begin
      li := ListView1.Items.Add;
      li.Caption := cdi.vCalendar.vEvents[0].Summary;
      li.SubItems.Add(FormatDateTime('dd/mm/yyyy hh:nn',cdi.vCalendar.vEvents[0].DTStart));
      li.SubItems.Add(FormatDateTime('dd/mm/yyyy hh:nn',cdi.vCalendar.vEvents[0].DTEnd));
      li.SubItems.Add(cdi.vCalendar.vEvents[0].Location);
      li.SubItems.Add(cdi.vCalendar.vEvents[0].Description.Text);
      li.Data := cdi;
    end;
  end;
end;
Adding a new calendar item is equally easy:
var
  cdi: TCalDavItem;
  li: TListItem;
begin
  // set the calendar for the event
  cdi := AdvCalDav1.Items.Insert('Personal');  // add item to the "Personal" calendar
  cdi.vCalendar.vEvents.Add;
  cdi.vCalendar.vEvents[0].Summary := 'Schloss Dyck Classic Days';
  cdi.vCalendar.vEvents[0].Location := 'Jüchen, Deutschland';
  cdi.vCalendar.vEvents[0].Description.Text := 'Automobile Kulturgeschichte auf der Museums-Insel';
  cdi.vCalendar.vEvents[0].DTStart := EncodeDate(2015,7,31);
  cdi.vCalendar.vEvents[0].DTEnd := EncodeDate(2015,8;2);
  cdi.Post;
end;
or modifying an existing item
var
  cdi: TCalDavItem;
  li: TListItem;
begin
  cdi := ListView1.Selected.Data;
  cdi.vCalendar.vEvents[0].Summary := 'Schloss Dyck Classic Days 2015';
  cdi.Update;
end;
Similar to accessing the calendars of ownCloud, you can also access the contacts with the TAdvCardDAV component in a very similar way. And this rounded up my little weekend fun experiment. With so much ubiquitous computing power around and wonderful technology, aren't we living in very exciting times?
Bruno Fierens

This blog post has received 2 comments.
 2. Sunday, September 6, 2015 at 1:20:40 PM
Hello,
2. Sunday, September 6, 2015 at 1:20:40 PM
Hello,could you make a small blog/example to work with XData and an SQLite database via Rasperry?
thanks
Gernot
Baecker Gernot
All Blog Posts | Next Post | Previous Post
why in TMS Cloud Pack for Firemonkey not includes a CalDAV components ?
thanks
Antonello
Carlomagno Antonello