Blog
All Blog Posts | Next Post | Previous Post

 Attractive Scalable Images in your Diagram with Delphi, WEB Core and Lazarus
Wednesday, October 19, 2022
With TMS FNC Blox you have the ability to create high-quality diagrams and flowcharts with the help of some quick and easy selection tools.
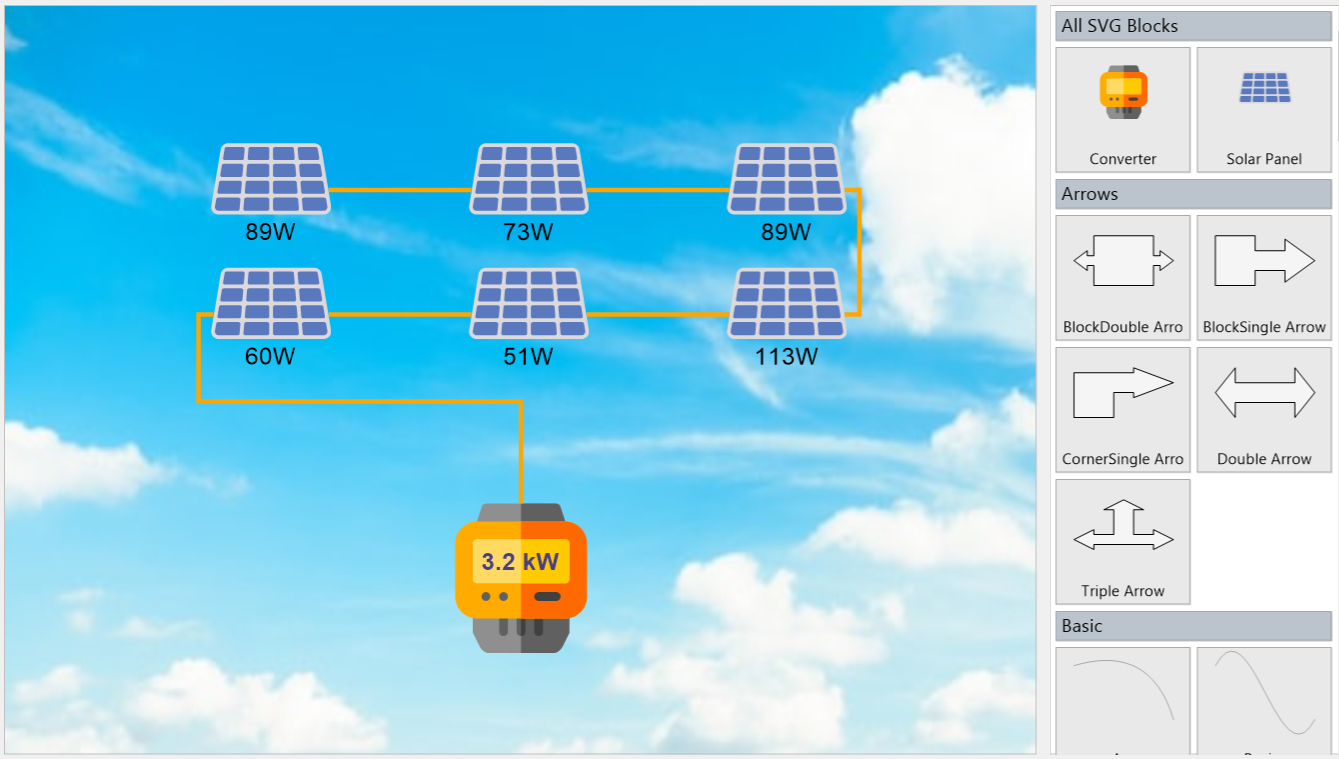
In the previous blogpost we've created our own custom blocks to use as a component in a logic scheme. In this blogpost and video we will use a vector based svg image to get the visual level of our diagram to a higher level.
October 27, Webinar: Visually create and execute workflows in Delphi apps
In this webinar, Bruno will go over the basics on how to get started with TMS FNC Blox, but will gradually advance to a more complex program where we will follow the steps of our diagram in real-time and execute actions based on the type of block.
If this sounds like an interesting feature you could use in your applications, you can register here.
Custom Blocks with SVG image
As Holger mentions in the video, the advantage to use svg images, is that you can scale the block as you want and you will not lose any quality of your image.

In the previous blogpost, we saw that we'll need to create our custom blocks first.
uses
  FMX.TMSFNCBloxControl, FMX.TMSFNCBloxCoreBlock;

type
 TSolarPanelBlock = class(TTMSFNCBloxBlock)
 public
    constructor Create; override;
    procedure GetBlockPath(APath: TTMSFNCBloxPath; ADrawer: TTMSFNCBloxBlockDrawer); override;
 end;

 TConverterBlock = class(TTMSFNCBloxBlock)
 public
    constructor Create; override;
    procedure GetBlockPath(APath: TTMSFNCBloxPath; ADrawer: TTMSFNCBloxBlockDrawer); override;
 end;
Although we don't draw the block path ourselves this time, we will need to override the method to clear the path.
procedure TConverterBlock.GetBlockPath(APath: TTMSFNCBloxPath;
  ADrawer: TTMSFNCBloxBlockDrawer);
begin
  inherited;
  APath.Reset;
end;
constructor TSolarPanelBlock.Create;
begin
  inherited;
  Restrictions := Restrictions + [crKeepRatio];
  Picture.LoadFromFile('..\..\solar-panel.svg');
  LinkPointStyle := lptNone;
  LinkPoints.Clear;
  LinkPoints.AddLink(2, (OriginalRect.Bottom - OriginalRect.Top)/2, aoLeft);
  LinkPoints.AddLink((OriginalRect.Right - OriginalRect.Left) - 2, (OriginalRect.Bottom - OriginalRect.Top) / 2, aoRight);
end;

constructor TConverterBlock.Create;
begin
  inherited;
  Width := 100;
  Height := 100;
  Restrictions := Restrictions + [crKeepRatio];
  Picture.LoadFromFile('..\..\electric-meter.svg');
  LinkPointStyle := lptNone;
  LinkPoints.Clear;
  LinkPoints.AddLink((OriginalRect.Right - OriginalRect.Left) / 2, 0, aoUp);
  LinkPoints.AddLink(0, (OriginalRect.Bottom - OriginalRect.Top) / 2, aoLeft);
  LinkPoints.AddLink(OriginalRect.Right - OriginalRect.Left, (OriginalRect.Bottom - OriginalRect.Top) / 2, aoRight);
end;
The LinkPointStyle defines how we see the linkpoints in the diagram. By default these are small crosses, but for this application we don't want to see them, so we set it to None.
To have the full source code to the demonstration application, the code for the build-up of the diagram is added as well. It is a lot of code, but we want to show the solar panels in the middle, so this needed some tweaking.
Another thing we wanted to add was that the line was one smooth line. Therefor we need the code in the for-loop to select which linkpoint to use as a source and target.
If you would use these blocks and lines a lot, you can always add more custom properties in the constructor to have less code in the creation of the diagram.
uses
  FMX.TMSFNCBloxCoreLinkPoint, FMX.TMSFNCBloxCoreLine, FMX.TMSFNCBloxCoreTypes;

procedure TSolarBloxDemoForm.FormCreate(Sender: TObject);
var
  sp, psp: TSolarPanelBlock;
  c: TConverterBlock;
  x, y, I: Integer;
  l: TTMSFNCBloxSideLine;
begin
  TMSFNCBloxControl1.BeginUpdate;

  x := Round(TMSFNCBloxControl1.Width / 4);
  y := Round(TMSFNCBloxControl1.Height / 6);

  for I := 0 to 5 do
  begin
    sp := TSolarPanelBlock.Create;

    sp.Width := 80;
    sp.Height := 80;
    sp.FontSize := 16;
    sp.Text := (Random(100) + 30).ToString + 'W';
    sp.VertAlign := vaBottom;

    sp.Top := ((I div 3) + 1) * y;
    if I < 3 then
      sp.Left := (I mod 3) * x + TMSFNCBloxControl1.Width / 5
    else
      sp.Left := (2 - I mod 3) * x + TMSFNCBloxControl1.Width / 5;

    TMSFNCBloxControl1.Blox.Add(sp);

    if (I > 0) and (psp <> nil) then
    begin
      l := TTMSFNCBloxSideLine.Create;
      l.Stroke.Color := gcOrange;
      l.Stroke.Width := 3;

      if I < 3 then
      begin
        l.SourceLinkPoint.AnchorLink := psp.LinkPoints[1];
        l.TargetLinkPoint.AnchorLink := sp.LinkPoints[0];
      end
      else if I = 3 then
      begin
         l.SourceLinkPoint.AnchorLink := psp.LinkPoints[1];
         l.TargetLinkPoint.AnchorLink := sp.LinkPoints[1];
      end
      else
      begin
        l.SourceLinkPoint.AnchorLink := psp.LinkPoints[0];
        l.TargetLinkPoint.AnchorLink := sp.LinkPoints[1];
      end;

      TMSFNCBloxControl1.Blox.Add(l);
    end;
    psp := sp;
  end;

  c := TConverterBlock.Create;
  c.Top := (4 * y);
  c.Left := (TMSFNCBloxControl1.Width - c.Width)/2;
  c.FontSize := 16;
  c.FontStyle := [xsBold];
  c.TextColor := gcDarkslateblue;
  c.Text := '3.2 kW' + #10#13 ;
  c.VertAlign := vaCenter;

  TMSFNCBloxControl1.Blox.Add(c);

  l := TTMSFNCBloxSideLine.Create;
  l.SourceLinkPoint.AnchorLink := sp.LinkPoints[0];
  l.TargetLinkPoint.AnchorLink := c.LinkPoints[0];
  l.Stroke.Color := gcOrange;
  l.Stroke.Width := 3;

  TMSFNCBloxControl1.Blox.Add(l);

  TMSFNCBloxControl1.EndUpdate;
end;
Gjalt Vanhouwaert

This blog post has received 2 comments.

 2. Monday, October 24, 2022 at 4:56:50 PM
Meanwhile, support for linear & radial gradients was added:
 https://www.tmssoftware.com/site/blog.asp?post=751
Bruno Fierens
All Blog Posts | Next Post | Previous Post
Glasier Jonathan