Frequently Asked Component Specific Questions
Options |
|
Display all FAQ items |
Displaying items 421 to 435 of 888, page 29 of 60
<< previous next >>

 TMS TableView for FireMonkey
My First Firemonkey Component
Below is a sample that is useful to understand the design of a new FireMonkey component. These three code snippets will result in your first control which has a backgroundrectangle, a button, an edit, and an additional rectangle.
This component only loads the style file as a layout, and is static. You can click on the button and type in the edit field, but the component has no properties to interact with.
fmx.MyFirstControl.pas

unit fmx.MyFirstControl;

interface

uses
  FMX.Types, Types, Classes;

  TMyFirstControl = class(TStyledControl)
  private
  public
    constructor Create(AOwner: TComponent); override;
  protected
    function GetClassName: String; virtual;
    function GetClassStyleName: String; virtual;
    function GetStyleObject: TControl; override;
    function LoadFromResource: TControl;
  end;

procedure Register;

implementation

{$R fmx.myfirstcontrol.res}

procedure Register;
begin
  RegisterComponents(‘My First FireMonkey Control’, [TMyFirstControl]);
end;

function TMyFirstControl.GetClassName: String;
begin
  Result := ClassName;
end;

constructor TMyFirstControl.Create(AOwner: TComponent); override;
begin
  inherited;
  Width := 209;
  Height := 105;
end;

function TMyFirstControl.GetClassStyleName: String;
begin
  Result := GetClassName + 'style';
  Delete(Result, 1, 1);
end;

function TMyFirstControl.GetStyleObject: TControl;
var
  obj: TControl;
begin
  obj := inherited GetStyleObject;

  if not Assigned(obj) then
  begin
    // not found in default or custom style book, so create from resource
    obj := LoadFromResource;
  end;

  Result := obj;
end;

function TMyFirstControl.LoadFromResource: TControl;
var
  S: TResourceStream;
  str: String;
begin
  Result := nil;
  // create resource class name
  str := GetClassStyleName;
  if FindRCData(HInstance, str) then
  begin
    // load from RT_RCDATA resource type
    S := TResourceStream.Create(HInstance, str, RT_RCDATA);
    try
      Result := TControl(CreateObjectFromStream(nil, S));
    finally
      S.Free;
    end;
  end;
end;

initialization
  RegisterFmxClasses([TMyFirstControl]);
end.
fmx.myfirstcontrol.style
object TRectangle
StyleName = 'MyFirstControlStyle'
Position.Point = '(184,248)'
Width = 209.000000000000000000
Height = 105.000000000000000000
Fill.Kind = bkNone
Stroke.Kind = bkNone
object TRectangle
StyleName = 'background'
Align = alClient
Width = 209.000000000000000000
Height = 105.000000000000000000
object TButton
StyleName = 'Button1'
Position.Point = '(10,20)'
Width = 80.000000000000000000
Height = 22.000000000000000000
TabOrder = 0
Text = 'Button1'
end
object TEdit
StyleName = 'Edit1'
Position.Point = '(102,20)'
Width = 100.000000000000000000
Height = 22.000000000000000000
TabOrder = 1
KeyboardType = vktDefault
Password = False
end
object TRectangle
StyleName = 'rectangleElement'
Position.Point = '(11,48)'
Width = 65.000000000000000000
Height = 49.000000000000000000
Fill.Color = xFFFF4B4B
end
end
end fmx.myfirstcontrol.rc MyFirstControlStyle RCDATA "fmx.myfirstcontrol.style"
rt := (FindStyleResource(‘rectangleElement’) as TRectangle);
rt.RotationAngle := MyRotationAngleProperty; //sample below 45°
TMS Instrumentation WorkShop for FireMonkeyCompiling / Distributing in xcode
When creating your project in Delphi, and afterwards, generate a xcode compatible project (dpr2xcode.exe) there are some additional steps to be taken before the project will compile in xcode.
In the generated iOS version you will notice an xcode folder, with an xcode project file. Before opening this project file in xcode you need to copy the correct source files from the installation directory to the directory of this your xcode project:
- All the FMX_*.pas files
- All the FMX_*.res files
- The tmsdefsios.inc file
The last step to take is to rename the tmsdefsios.inc file to tmsdefs.inc file in order to compile correctly. After opening the project in xcode, click the run button, which will automatically compile and run the project in the simulator. Of course you can select to run it on a real device as well.
TMS TableView for FireMonkeyCompiling / Distributing for iOS
When creating your project in Delphi, and afterwards, generate a xcode compatible project (dpr2xcode.exe) there are some additional steps to be taken before the project will compile in xcode.
In the generated iOS version you will notice an xcode folder, with an xcode project file. Before opening this project file in xcode you need to copy the correct source files from the installation directory to the directory of this your xcode project:
- All the FMX_*.pas files
- All the FMX_*.res files
- The tmsdefsios.inc file
The last step to take is to rename the tmsdefsios.inc file to tmsdefs.inc file in order to compile correctly. After opening the project in xcode, click the run button, which will automatically compile and run the project in the simulator. Of course you can select to run it on a real device as well.
TDBAdvGridImages that are stored in BLOB fields are displayed as '(GRAPHIC)''
Please make sure that:
1) the field's datatype is ftBlob
2) DBAdvGrid.ShowPictureFields = true
3) DBAdvGrid.Columns[columnindex].PictureField = true , for the column where the blob is to be displayed
This is also explained at page 191 of the TMS Grid Pack Developers Guide.
TMS FlexCel for VCL & FMXHow to add a new sheet to an excel file
You can call FlexCelImport.InsertEmptySheets to add new sheets.
To insert a new sheet as a last sheet, just call:
FlexCelImport.InsetEmptySheets(FlexCelImport.Sheetcount + 1, 1);
TAdvListViewSorting
When HeaderFlatStyle = true, the listview header becomes by design non clickable, hence, it will not register a click to start the sorting. When HeaderFlatStyle = false, the header can be clicked and can show a down effect when the mouse is down on the header. In this situation, it registers the mouseclick and can perform the sort.
TAdvStringGridHow to make certain columns editable
Please set goEditing = true and do this with the event OnCanEditCell:
procedure TForm4.AdvStringGrid1CanEditCell(Sender: TObject; ARow, ACol:Integer; var CanEdit: boolean);
begin
  CanEdit := ACol = 1;
end;
TAdvCardListHow to custom draw an image
You'd need to do this using the event: OnDrawCardItem:
procedure TForm4.AdvCardList1DrawCardItem(Sender: TObject; Card: TAdvCard;
  Item: TAdvCardItem; Canvas: TCanvas; Rect: TRect);
begin
end;
procedure TForm4.AdvCardList1DrawCardItem(Sender: TObject; Card: TAdvCard;
  Item: TAdvCardItem; Canvas: TCanvas; Rect: TRect);
begin
  imagelist1.Draw(rect.Left,rect.Top, item.Tag);
end;
TAdvStringGridHow to turn off the gradient and override the fixed column color
This code snippet shows how you can turn off the gradient and override the fixed column color:
procedure TForm4.AdvStringGrid1GetCellColor(Sender: TObject; ARow,
  ACol: Integer; AState: TGridDrawState; ABrush: TBrush; AFont: TFont);
begin
  if Acol = 0 then
    ABrush.Color := clRed;
end;

procedure TForm4.FormCreate(Sender: TObject);
begin
  advstringgrid1.look :=glSoft;
end;TPlannerHow to create a new PlannerItem when clicking on an empty cell
If Planner.AutoInsDel = true, the OnItemInsert event should be triggered.
When Planner.AutoInsDel = false, you need to programmatically create the item with Planner.CreateItem
This is also described in the Planner PDF developers guide.
TAdvStringGridHow to add a sheet to an existing Excel workbook using TAdvGridExcelIO.XLSExport
The 2nd parameter of the XLSExport() call is the sheetname. You can specify a new sheet name, a sheet name different from the default sheetname and it will save the data in the specified sheet.
TMS VCL WebGMapsHow to convert an address to a longitude, latitude coordinate
The TWebGMapsGeocoding component is a helper component to enable using the Google geocoding service to convert an address to a longitude, latitude coordinate. Set the address: STREET (NUMBER), (ZIPCODE) CITY, COUNTRY , and call the function TWebGMapsGeocoding.LaunchGeocoding. When the result of this call is erOK, the geocoding was successful and the longitude & latitude for the address can be read from:
TWebGMapsGeocoding.ResultLatitude
TWebGMapsGeocoding.ResultLongitude
Example:
WebGMapsGeocoding1.Address := 'Broadway 615, LOS ANGELES, USA';
if WebGMapsGeocoding1.LaunchGeocoding = erOk then
begin
   ShowMessage("Result:"+ FloatToStr(WebGMapsGeocoding1.ResultLongitude)+":"+ loatToStr(WebGMapsGeocoding1.ResultLatitude));
end;
TMS VCL WebGMapsGetting started
From the component palette, select TWebGMaps and drop it on a form. This shows an empty map. The map is only displayed when WebGMaps.Launch is called. The default center location displayed when WebGMaps.Launch is called is set by:
WebGMaps.MapOptions.DefaultLongitude
WebGMaps.MapOptions.DefaultLatitude
Markers can be added to the map by adding a new entry to the collection WebGMaps.Markers and setting the Marker's properties Longitude & Latitude.
This code snippet sets up the default view of the TWebGMaps to show the Los Angeles Theatre on Broadway at zoom level 19 with coordinates retrieved from the TWebGMapsGeocoding component:
begin
  WebGMapsGeocoding1.Address := 'Broadway 615, LOS ANGELES, USA';
  if WebGMapsGeocoding1.LaunchGeocoding = erOk then
  begin
    // center the map at the coordinate
    WebGMaps1.MapOptions.DefaultLatitude := WebGMapsGeocoding1.ResultLatitude;
    WebGMaps1.MapOptions.DefaultLongitude :=  WebGMapsGeocoding1.ResultLongitude;
    // Add a marker for the Los Angeles theatre
    WebGmaps1.Markers.Add(WebGMapsGeocoding1.ResultLatitude,
    WebGMapsGeocoding1.ResultLongitude,'Broadway theatre');
    // set zoom level
    WebGmaps1.MapOptions.ZoomMap := 19;
    // launch the display of the map
    WebGMaps1.Launch;
  end;
end;procedure TForm1.CheckBox1Click(Sender: TObject);
begin
if checkbox1.Checked then
WebGmaps1.SwitchToStreetView
else
WebGmaps1.SwitchToMap;
end;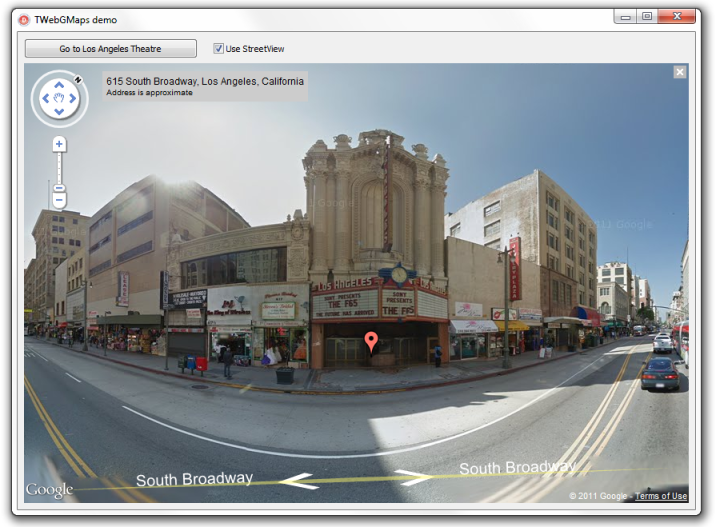
TAdvStringGridCopy a row with cell values & properties from one grid to another grid
This code snippet that can be applied to two default TAdvStringGrid instances shows how all cell values & cell properties within a rectangle can be copied from one grid to another grid via a memory stream:
procedure TForm4.FormCreate(Sender: TObject);
var
   st: TMemoryStream;
begin
   advstringgrid1.Colors[1,1] := clred;
   advstringgrid1.Colors[2,1] := clYellow;

   advstringgrid1.RandomFill(false,100);

   st := TMemoryStream.Create;
   try
     advstringgrid1.SaveRectToBinStream(Rect(0,1,advstringgrid1.ColCount - 1, 1), st);
     st.Position := 0;
    advstringgrid2.LoadAtPointFromBinStream(Point(0,1),st);
  finally
    st.Free;
  end;
end;
TMS HTML Controls PackHow to use the design-time mini HTML editor at run-time
You can easily use the mini HTML design-time editor at run-time to allow users to edit the mini-HTML controls text at run-time. To allow this, use following steps : add the HTMLPROP unit to your project and add HTMLPROP to the uses clause in the unit from where you want to invoke the mini HTML editor. Add the following code to allow for example run-time editing of the content of a HTMLabel1 component :
var
  htmledit: THTMLEditor;
begin
  htmledit := THTMLEditor.Create(Self);

  try
    htmledit.memo1.lines.Text := htmlabel1.htmltext.Text;

    htmledit.ShowModal;

    htmlabel1.htmltext.Text := htmledit.memo1.lines.Text;

  finally
    htmledit.Free;
  end;
end;