Knowledge Base Alert October, 2015


VCL

FIREMONKEY

INTRAWEB

GENERAL

TAdvRichEditor:

How to add color & font style formatted text


Adding color & font style formatted text to TAdvRichEditor can be done with setting a selection and calling AdvRichEditor.SetSelectionColor() or AdvRichEditor.SetSelectionBold(), etc.. but it can also be done by changing the AdvRichEditor.Font before adding new text.

Sample code:

begin
  AdvRichEditor1.Font.Style := [fsBold];
  AdvRichEditor1.Font.Color := clBlue;
  AdvRichEditor1.AddText('Hello world,');
  AdvRichEditor1.Font.Style := [fsItalic];
  AdvRichEditor1.Font.Color := clRed;
  AdvRichEditor1.AddText('this text is in red italic');
end;


TAdvStringGrid:

Properties LastRow & LastCol


In the latest version of TAdvStringGrid, two new public read-only properties are available to make writing typical grid operations in loops a little more convenient. To fill all columns or rows of a grid, previously, a loop like

for I := grid.FixedCols to grid.ColCount – 1 do
begin
end;

is typically needed.

With the latest version of TAdvStringGrid, this can be a little more conveniently written as:

for I := grid.FixedCols to grid.LastCol do
begin
end;

and the same applies for the read-only grid.LastRow property.

TDBAdvGrid:

Persisting column sizes & column order for a TDBAdvGrid


Assuming a user can resize & move columns around in a TDBAdvGrid and it is desirable that the last state is saved & restored when the application is restarted, this can be done in following way:
  1. Set default column order & size state after making the dataset active in the TDBAdvGrid with grid.SetColumnOrder
  2. When column states are found, restore these from INI file with grid.StringToColumnStates
  3. When the application closes, save the last state to INI file with grid.ColumnStatesToString
The full code becomes:

procedure TForm1.FormCloseQuery(Sender: TObject; var CanClose: Boolean);
var
  inif: TINIFile;
begin
  inif := TINIFile.Create('.\settings.ini');
  inif.WriteString('STATES','DBADVGRID1',DBAdvGrid1.ColumnStatesToString);
  inif.Free;
end;

procedure TForm1.FormCreate(Sender: TObject);
var
  inif: TINIFile;
  colstates: string;
begin
  adotable1.ConnectionString := 'Provider=Microsoft.Jet.OLEDB.4.0;Data Source=.\CARS.mdb;Persist Security Info=False';
  adotable1.Active := true;
  DBAdvGrid1.SetColumnOrder;
  DBAdvGrid1.Options := DBAdvGrid1.Options + [goColSizing, goColMoving];

  inif := TINIFile.Create('.\settings.ini');
  colstates := inif.ReadString('STATES','DBADVGRID1','');
  inif.Free;

  if colstates <> '' then
    DBAdvGrid1.StringToColumnStates(colstates);
end;

TAdvSmoothListBox:

Customizing the ItemAppearance


The appearance of the TAdvSmoothListBox and its items can be fully customized.

Following code:

procedure TForm1.AdvSmoothListBox1ItemBkgDraw(Sender: TObject;
  Canvas: TCanvas; itemindex: Integer; itemRect: TRect;
  var defaultdraw: Boolean);
var
  g: TGPGraphics;
begin
  defaultdraw := AdvSmoothListBox1.SelectedItemIndex <> itemindex;
  if not defaultdraw then
  begin
    g := TGPGraphics.Create(Canvas.Handle);
    g.SetSmoothingMode(SmoothingModeAntiAlias);
    AdvSmoothListBox1.ItemAppearance.FillSelected.Fill(g, MakeRect(itemrect.Left, itemrect.Top, itemrect.Width, itemrect.Height));
    g.Free;
  end;
end;

procedure TForm1.FormCreate(Sender: TObject);
var
  it: TAdvSmoothListBoxItem;
  I: Integer;
begin
  AdvSmoothListBox1.BeginUpdate;
  AdvSmoothListBox1.Fill.Color := clBlack;
  AdvSmoothListBox1.ItemAppearance.Fill.Color := clBlack;
  AdvSmoothListBox1.ItemAppearance.Fill.ColorMirror := clNone;
  AdvSmoothListBox1.ItemAppearance.Fill.BorderColor := clBlack;
  AdvSmoothListBox1.ItemAppearance.Fill.GradientType := gtSolid;
  AdvSmoothListBox1.ItemAppearance.Fill.GradientMirrorType := gtNone;
  AdvSmoothListBox1.Header.Visible := False;
  AdvSmoothListBox1.Footer.Visible := False;
  AdvSmoothListBox1.Sections.BorderColor := AdvSmoothListBox1.ItemAppearance.Fill.Color;
  AdvSmoothListBox1.ItemAppearance.FillSelected.Assign(AdvSmoothListBox1.ItemAppearance.Fill);
  AdvSmoothListBox1.ItemAppearance.FillSelected.Color := clWebOrange;
  AdvSmoothListBox1.ItemAppearance.FillSelected.Rounding := 10;
  AdvSmoothListBox1.ItemAppearance.FillSelected.RoundingType := rtBoth;
  AdvSmoothListBox1.DefaultItem.CaptionFont.Color := clWhite;
  AdvSmoothListBox1.Items.Clear;
  for I := 0 to 19 do
  begin
    it := AdvSmoothListBox1.Items.Add;
    it.Caption := 'Item ' + inttostr(I + 1);
  end;
  AdvSmoothListBox1.EndUpdate;
end;

Results in:


TMS WebGMaps:

Using latitude/longitude coordinates instead of an address


It is possible to use latitude/longitude coordinates for the Origin and Destination parameters instead of an address. There is an overload of the GetDirections method available which takes the OriginLatitude, OriginLongitude, DestinationLatitude and DestinationLongitude parameters.

Coordinates are also supported for WayPoints. There is no overload for this, but you can provide the coordinates as a string.

Example:

  WayPoints.Clear;
  WayPoints.Add('48, 5');
  WebGMaps1.GetDirections(50, 4, 47, 3, false, tmDriving, usMetric, lnDefault, false, false, WayPoints, false);

TMS FlexCel for VCL & FireMonkey:

When generating xls/xlsx files with formulas, Excel shows a message to save when you are closing the file


This message happens when you have any formula in the Excel file, and open it with different Excel versions.

The thing is: If you create a file with formulas in say Excel 2007 and then open the file in Excel 2010, Excel will recalculate all cells and show that message. Sometimes (not always) it also happens in the reverse: If you save with Excel 2010 it might ask you to save when you open in Excel 2007.

This isn’t a FlexCel issue: But in Excel you will normally not see this because in your test machine you will use the same Excel version to save and open the file. But as soon as you start delivering the file to customers, they will start seeing the message.

Now, FlexCel is only one “version": It is not Excel 2003, or 2007, or 2010. So when it creates a file, it needs to say “this file was created with Excel version …” in the file, and this is the value Excel will use to decide if it shows the message or not. If you know that say all your users are in Excel 2013, then you can tell FlexCel to say “this file was saved with Excel 2013” and Excel 2013 users won’t see the dialog. But users of a different version of Excel might.

If you are opening the file in Excel 2013 for example, you can get rid of the dialog by doing:
xls.RecalcVersion = TRecalcVersion.Excel2013;
or just do
xls.RecalcVersion = TRecalcVersion.SameAsInputFile;
to make FlexCel save the “version” used in recalculation as the same version the input file had.

TTMSFMXWebBrowser:

Fixing the FMX TWebBrowser issue on iOS 9


Linking against iOS 9 introduces the new Application Transport Security feature that enforces a secure network connection. This means that in a default RAD Studio 10 Seattle project, the default TWebBrowser but also our TTMSFMXWebBrowser, TTMSFMXWebGMaps, TTMSFMXWebOSMaps components and the TMS Cloud Pack for FireMonkey cloud services can no longer make a connection to the web. A solution for this issue is to add the following key to the Info.plist file:

<key>NSAppTransportSecurity</key>
   <dict>
      <key>NSAllowsArbitraryLoads</key>
         <true/>
   </dict>

As the Info.plist is automatically generated based on the project options, there is no option to specify a boolean key in a dictionary. To make sure the Info.plist file contains the correct keys in order to link against iOS 9 we have created an iOS9Fix command line executable and a post-build command.

1) Copy the iOS9Fix.exe to the project directory.

2) Add the following post-build command to your project options.

call "$(PROJECTDIR)iOS9Fix.exe" "$(OUTPUTPATH).info.plist"


If the above steps are executed correctly, your application should then be able to make a connection with one of the components mentioned in this blog post.

The solution with the above instructions can be downloaded at http://www.tmssoftware.net/public/iOS9Fix.zip

TTMSFMXDirectoryTreeView:

Custom painting node


This code snippet shows how to paint a directory node with a trackbar that indicades the free space:

procedure TForm1.FormCreate(Sender: TObject);
begin
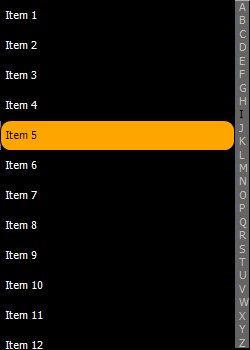
  TMSFMXDirectoryTreeView1.NodesAppearance.FixedHeight := 40;
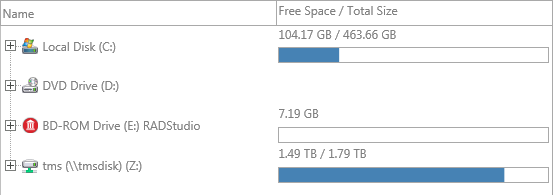
  TMSFMXDirectoryTreeView1.AddColumn(tvckFreeSpaceAndTotalSize);
  TMSFMXDirectoryTreeView1.Columns[1].VerticalTextAlign := tvtaLeading;
  TMSFMXDirectoryTreeView1.LoadDrives;
end;

procedure TForm1.TMSFMXDirectoryTreeView1AfterDrawNodeText(Sender: TObject;
  ACanvas: TCanvas; ARect: TRectF; AColumn: Integer;
  ANode: TTMSFMXTreeViewVirtualNode; AText: string);
var
  r, rs: TRectF;
  fs, fst: Int64;
  s: String;
begin
  if AColumn = 1 then
  begin
    s := TTMSFMXDirectoryTreeViewNode(ANode.Node).FileName;
    if ExtractFileDrive(s) + PathDelim = s then
    begin
      fst := DiskSize(Ord(UpperCase(s)[1]) - 64);
      fs := DiskFree(Ord(UpperCase(s)[1]) - 64);
      if (fst > -1) and (fs > -1) then
      begin
        r := ARect;
        r.Top := r.Bottom - 20;
        r.Height := 20;
        InflateRect(r, 0, -2);
        r.Width := r.Width - 2;
        r := RectF(Int(r.Left) + 0.5, Int(r.Top) + 0.5, Int(r.Right) - 0.5, Int(r.Bottom) - 0.5);
        rs := r;
        rs.Width := rs.Width * fs / fst;
        ACanvas.Fill.Kind := TBrushKind.Solid;
        ACanvas.Fill.Color := claWhite;
        ACanvas.FillRect(r, 0, 0, AllCorners, 1);
        ACanvas.Fill.Color := claSteelblue;
        ACanvas.FillRect(rs, 0, 0, AllCorners, 1);
        if TMSFMXDirectoryTreeView1.IsNodeSelected(ANode.Node) then
          ACanvas.Stroke.Color := claWhite
        else
          ACanvas.Stroke.Color := claDarkgray;

        ACanvas.DrawRect(r, 0, 0, AllCorners, 1);
      end;
    end;
  end;
end;


TTMSFMXTreeView:

How to dynamically add nodes


This code snippet shows how to dynamically add nodes to the TMSFMXTreeView:

procedure TForm1.FormCreate(Sender: TObject);
var
  n: TTMSFMXTreeViewNode;
  v: TTMSFMXTreeViewNode;
begin
  TMSFMXTreeView1.BeginUpdate;
  TMSFMXTreeView1.Nodes.Clear;
  TMSFMXTreeView1.Columns.Clear;
  TMSFMXTreeView1.Columns.Add.Text := 'Test';
  n := TMSFMXTreeView1.AddNode;
  n.Text[0] := 'Need load childs after in onBeforeExpandNode event';
 
  v := TMSFMXTreeView1.AddNode(n);
  v.DataString := 'virtual';
 
  TMSFMXTreeView1.EndUpdate;
end;
 
procedure TForm1.TMSFMXTreeView1BeforeExpandNode(Sender: TObject;
  ANode: TTMSFMXTreeViewVirtualNode; var ACanExpand: Boolean);
var
  v: TTMSFMXTreeViewNode;
  I: Integer;
begin
  if not Assigned(ANode.Node) then
    Exit;
 
  if ANode.Node.GetChildCount > 0 then
  begin
    v := ANode.Node.Nodes[0];
    if v.DataString = 'virtual' then
    begin
      TMSFMXTreeView1.RemoveNode(v);
      for I := 0 to 9 do
        TMSFMXTreeView1.AddNode(ANode.Node).Text[0] := 'Dynamically added node ' + inttostr(I);
    end;
  end;
end;


TTIWAdvWebGrid

How to add a background image


You can use the Background.PictureURL property to add a direct link to an image file. If you wish to use a relative path to link to the image file, just move the image file to a subfolder called “wwwroot” in the folder where the exe file is generated:

 TIWDBAdvWebGrid1.Background.PictureURL := 'test.png';


TTIWDBAdvWebGrid

How to display an image based on the original cell value


You can use the OnGetCellData event to display a custom value based on the original cell value. As you can't change the column type on the fly, you must add an IMG tag with a direct link to the image file.

Example:

procedure TIWForm1.TIWDBAdvWebGrid1GetCellData(Sender: TObject; RowIndex,
  ColumnIndex: Integer; var AValue: string); begin
  if AValue = 'X' then
    AValue := '<img src="/files/image.png">'
end;

Follow these steps to display image from an ImageListin the TIWAdvWebGrid:
  • Assign the ImageList to the TIWDBAdvWebGrid.Images property.
  • Set the Columns[].ColumnType to ctDataImage.
  • Set the index of the Image in the ImageList as the cell value.

TMS Hands-on training day

Nov 24th, 2015 - Kortrijk, Belgium


Want even more in-depth tips & tricks on using TMS Components, join the next upcoming TMS Training Day in Belgium on Nov 24 or get in touch with the TMS team for other options to exchange knowledge & experience with our experts.


As always, we thank all users for the numerous inputs, feedback, comments and suggestions. This is an invaluable help to steer our developments here at TMS software. We continue to look forward to all your further communications to direct our team to provide you better tools and components for your needs.

Kind regards,
TMS software team
Email: info@tmssoftware.com
Web: http://www.tmssoftware.com
Support, FAQ & Manuals: http://www.tmssoftware.com/site/support.asp


Follow latest developments at tmssoftware.com


NOTICE: If you wish to unsubscribe from the TMS software Newsletter, please click here.